一、軟件介紹
文末提供源碼和程序下載學習
? ? ?使用 X-AnyLabeling開源程序可以 導入、管理和保存數據。用戶可以通過多種方式導入圖像和視頻文件,包括快捷方式或菜單選項。此外,它還涵蓋數據刪除、圖像切換以及標簽和圖像數據的保存,以確保高效的注釋過程和安全的數據管理。
二、詳細使用
1.1 Data Import ?1.1 數據導入
After opening the GUI, users can select the corresponding task type for import from the File dropdown menu at the top of the interface or use shortcuts.
打開 GUI 后,用戶可以從界面頂部的 File 下拉菜單中選擇相應的任務類型進行導入,也可以使用快捷方式。
X-AnyLabeling currently supports three data import formats:
X-AnyLabeling 目前支持三種數據導入格式:
Image File Directory (Ctrl+U): Supports importing multiple files with multi-level directory nesting.
Image File Directory (Ctrl+U):支持多級目錄嵌套導入多個文件。
Single Image File (Ctrl+I): Supports importing various formats such as *.jpg, *.png, *.bmp, *.webp, and *.tif.
單個圖像文件 (Ctrl+I):支持導入 *.jpg、*.png、*.bmp、*.webp 和 *.tif 等各種格式。
Single Video File (Ctrl+O): Supports importing video formats such as *.mp4, *.avi, *.mov, *.mkv, *.wmv, and *.flv.
單個視頻文件 (Ctrl+O):支持導入 *.mp4、*.avi、*.mov、*.mkv、*.wmv 和 *.flv 等視頻格式。
1.2 Data Deletion ?1.2 數據刪除
X-AnyLabeling provides data deletion functionalities as follows:
X-AnyLabeling 提供如下數據刪除功能:
Delete Label File (Ctrl+Delete): Deletes the current annotation file. This operation cannot be undone, so please proceed with caution.
刪除標簽文件 (Ctrl+Delete):刪除當前注釋文件。此作無法撤消,因此請謹慎作。
Delete Image File (Ctrl+Shift+Delete): Deletes the current image file, moving it to the _delete_ folder within the current image directory.
刪除圖像文件 (Ctrl+Shift+Delete):刪除當前圖像文件,將其移動到當前圖像目錄中的 _delete_ 文件夾。
1.3 Image Switching ?1.3 圖像切換
In X-AnyLabeling, in addition to regular image switching operations, the following methods are also supported:
在 X-AnyLabeling 中,除了常規的圖片切換作外,還支持以下方法:
Shortcut ?捷徑?? ?switch_to_checked?? ?Description ?描述
Ctrl+Shift+A ?Ctrl + Shift + A 組合鍵?? ?true ?真?? ?Jump to the previous annotated image
跳轉到上一個帶注釋的圖像
Ctrl+Shift+D ?Ctrl+Shift+D 組合鍵?? ?true ?真?? ?Jump to the next annotated image
跳至下一個帶注釋的圖像
Ctrl+Shift+A ?Ctrl + Shift + A 組合鍵?? ?false ?假?? ?Jump to the previous unannotated image
跳轉到上一個未注釋的圖像
Ctrl+Shift+D ?Ctrl+Shift+D 組合鍵?? ?false ?假?? ?Jump to the next unannotated image
跳轉到下一個未注釋的圖像
You can determine the switching mode by modifying the switch_to_checked field in the user configuration file.
您可以通過修改用戶配置文件中的 switch_to_checked 字段來確定切換模式。
Additionally, you can jump to a specific image by entering the image name in the file search bar at the bottom right of the interface and pressing Enter.
此外,您可以通過在界面右下角的文件搜索欄中輸入圖像名稱并按 Enter 鍵來跳轉到特定圖像。
1.4 Saving Label Data ?1.4 保存標簽數據
X-AnyLabeling has an auto-save feature enabled by default. Upon initial startup, users can check if the Auto Save option is selected from the File dropdown menu.
X-AnyLabeling 默認啟用自動保存功能。初始啟動時,用戶可以檢查是否從 File 下拉菜單中選擇了 Auto Save 選項。
Label files are saved in the current image directory in *.json format, with the following template:
標簽文件以 *.json 格式保存在當前圖像目錄中,模板如下:
{
? "version": "${version}",
? "flags": {},
? "shapes": [
? ? {
? ? ? "label": "${label}",
? ? ? "score": null,
? ? ? "points": [...],
? ? ? "group_id": null,
? ? ? "description": null,
? ? ? "difficult": false,
? ? ? "shape_type": "${shape_type}",
? ? ? "flags": null,
? ? ? "attributes": {}
? ? }
? ],
? "imagePath": "${filename}",
? "imageData": null, ?// base64
? "imageHeight": -1,
? "imageWidth": -1
}
?? To change the label save path, select the Change Output Directory option from the File dropdown menu and set the desired save path.
?? 要更改標簽保存路徑,請選擇 ?更改輸出目錄 ?選項從 ?文件 ?下拉菜單并設置所需的保存路徑。
1.5 Saving Image Data ?1.5 保存圖像數據
If you want to save the current image data (default base64 encoded) during annotation, you can enable the Save Image Data option from the File dropdown menu.
如果要在注釋期間保存當前圖像數據(默認為 base64 編碼),則可以啟用 ?保存圖像數據 ?下拉菜單中的選項 ?文件 .
2. Editing ?2. 編輯
This section guides you on creating, editing, and managing various types of annotation objects and their label information in X-AnyLabeling. It covers everything from basic operations to advanced features, ensuring comprehensive guidance.
本節將指導您在 X-AnyLabeling 中創建、編輯和管理各種類型的標注對象及其標簽信息。它涵蓋了從基本作到高級功能的所有內容,確保全面的指導。
2.1 Creating Objects ?2.1 創建對象
In X-AnyLabeling, each distinct annotated object is referred to as a shape, with key properties such as:
在 X-AnyLabeling 中,每個不同的注釋對象都稱為一個形狀 ,其關鍵屬性如下:
Field ?田?? ?Type ?類型?? ?Description ?描述
label ?標簽?? ?String ?字符串?? ?The category label of the object.
對象的類別標簽。
score ?得分?? ?Float ?浮?? ?The confidence score of the object, typically used in AI inference. If unavailable, it is null.
對象的置信度分數,通常用于 AI 推理。如果不可用,則為 null。
points ?點?? ?Array ?數組?? ?List of vertices' coordinates, depending on the shape_type.
頂點坐標列表,具體取決于 shape_type。
group_id?? ?Integer ?整數?? ?Group ID to associate multiple objects within the same group; null if not available.
Group ID 關聯同一組中的多個對象;如果不可用, 則為 null。
description ?描述?? ?String ?字符串?? ?Description of the object; null if not available.
對象的描述;如果不可用, 則為 null。
difficult ?難?? ?Boolean ?布爾?? ?Indicates if the object is difficult to identify; true means difficult.
指示對象是否難以識別;true 表示困難。
shape_type?? ?String ?字符串?? ?The shape type, such as "rectangle", "polygon", etc.
形狀類型,如 “rectangle”、“polygon” 等。
flags ?標志?? ?Dictionary ?字典?? ?Additional flag information for extra state or attributes; null if not available.
額外狀態或屬性的其他標志信息;如果不可用, 則為 null。
attributes ?屬性?? ?Dictionary ?字典?? ?Object's attribute information; an empty dictionary {} if not available.
對象的屬性信息;如果不可用,則為空字典 {}。
kie_linking?? ?List ?列表?? ?Connection information between objects, e.g., [[1,2],[3,4]]; an empty list [] if not available.
對象之間的連接信息,例如 [[1,2],[3,4]];如果不可用,則為空列表 []。
For more details on additional fields, refer to shape.py.
有關其他字段的更多詳細信息,請參閱 shape.py。
X-AnyLabeling supports creating the following types of shape objects:
X-AnyLabeling 支持創建以下類型的形狀對象:
Rectangle (R): Start drawing by left-clicking, move the cursor, and click again to finish the rectangle.
矩形 (R):通過左鍵單擊開始繪制,移動光標,然后再次單擊以完成矩形。
Rotation (O): Start drawing by left-clicking, move the cursor, and click again to finish the rotated box.
旋轉 (O):通過左鍵單擊開始繪制,移動光標,然后再次單擊以完成旋轉的框。
Polygon (P): Start drawing by left-clicking along the object's edge, adding segmentation points. Click on the starting point to finish. A minimum of 3 points is required.
多邊形 (P):通過沿對象的邊緣左鍵單擊開始繪制,并添加分段點。單擊起點以完成。至少需要 3 分。
Point: Left-click to create a key point.
點 :左鍵單擊可創建關鍵點。
Line: Start drawing by left-clicking, move the cursor, and click again to finish the line segment.
線條 :通過左鍵單擊開始繪制,移動光標,然后再次單擊以完成線段。
Line Strip: Start drawing by left-clicking, move the cursor, click to add line segments, and double-click to finish.
線帶 :通過左鍵單擊開始繪制,移動光標,單擊以添加線段,然后雙擊以完成。
Circle: Start drawing by left-clicking, move the cursor to define the radius, and click again to finish.
圓 :通過左鍵單擊開始繪制,移動光標以定義半徑,然后再次單擊以完成。
Users can operate through the corresponding options in the left menu, right-click, or use shortcuts.
用戶可以通過左側菜單中的相應選項進行作,右鍵單擊或使用快捷方式。
2.2 Editing Objects ?2.2 編輯對象
X-AnyLabeling has two modes: Drawing Mode and Editing Mode.
X-AnyLabeling 有兩種模式:Drawing Mode 和 Editing Mode。
Drawing Mode: Users can create multiple objects continuously.
繪圖模式 :用戶可以連續創建多個對象。
Editing Mode: Users can edit objects (Ctrl+E), undo (Ctrl+Z), copy (Ctrl+C), paste (Ctrl+V), delete (Delete), move, scale, rotate, etc.
編輯模式 :用戶可以編輯對象 (Ctrl+E)、撤消 (Ctrl+Z)、復制 (Ctrl+C)、粘貼 (Ctrl+V)、刪除 (Delete)、移動、縮放、旋轉等。
Users can quickly switch between drawing and editing modes using the Ctrl+J shortcut or the corresponding options mentioned in section 2.1.
用戶可以使用 Ctrl+J 快捷鍵或第 2.1 節中提到的相應選項在繪圖和編輯模式之間快速切換。
Specific operations include:
具體作包括:
For rectangular objects, besides resizing by corner points, users can select multiple objects and merge them into a bounding rectangle by right-clicking and selecting "Merge Selected Objects."
對于矩形對象,除了按角點調整大小外,用戶還可以選擇多個對象,并通過右鍵單擊并選擇“合并所選對象”來將它們合并為一個邊界矩形。
For polygon objects, in editing mode, users can drag on an edge to add a new vertex or remove a selected vertex by holding the Shift key and left-clicking.
對于多邊形對象,在編輯模式下,用戶可以通過按住 Shift 鍵并左鍵單擊來拖動邊緣以添加新頂點或刪除所選頂點。
For rotation box objects, users can control the rotation angle and direction by selecting the target and using Z, X, C, V. Real-time rotation angles can also be displayed.
對于旋轉框對象,用戶可以通過選擇目標并使用 Z、X、C、V 來控制旋轉角度和方向。還可以顯示實時旋轉角度。
2.3 Editing Labels ?2.3 編輯標簽
When creating or editing an object, a label editing box pops up for editing the object's label information.
在創建或編輯對象時,會彈出一個標簽編輯框,用于編輯對象的標簽信息。

Field ?田?? ?Description ?描述
Object Label ?對象標簽?? ?Enter the object's category label, supporting fuzzy search.
輸入對象的類別標簽,支持模糊搜索。
Group ID ?組 ID?? ?For specific tasks like keypoint detection and multi-object tracking.
用于關鍵點檢測和多對象跟蹤等特定任務。
Difficult Label ?困難標簽?? ?Indicates if the object is difficult to recognize.
指示對象是否難以識別。
Label List ?標簽列表?? ?Shows the list of added labels, sorted alphabetically by default.
顯示添加的標簽列表,默認情況下按字母順序排序。
Label Description ?標簽描述?? ?Additional flag information for extra states or attributes, `null` if not available.
額外狀態或屬性的其他標志信息,如果不可用,則為 'null'。
Label Linking ?標簽鏈接?? ?For linking fields in tasks like key information extraction and relationship extraction.
用于鏈接關鍵信息提取和關系提取等任務中的字段。
2.4 Editing Images ?2.4 編輯圖像
Currently, X-AnyLabeling supports adding a Caption description to the current image. To do this, enter editing mode, click on the blank area of the image, and fill in the image description in the Description area on the right.
目前 X-AnyLabeling 支持為當前圖片添加 Caption 描述。為此,請進入編輯模式,單擊圖像的空白區域,然后在右側的 Description 區域填寫圖像描述。
3. View ?3. 視圖
This section demonstrates how to optimize and customize the display of images and annotation objects in X-AnyLabeling, including visual adjustments of the canvas and images, as well as object information visualization settings, ensuring an efficient and intuitive annotation workflow.
本節演示了如何在 X-AnyLabeling 中優化和自定義圖像和注釋對象的顯示,包括畫布和圖像的視覺調整,以及對象信息可視化設置,確保高效、直觀的注釋工作流程。
3.1 Canvas Visualization ?3.1 畫布可視化
X-AnyLabeling currently supports the following canvas operations:
X-AnyLabeling 目前支持以下 canvas 作:
Zoom In (Ctrl++)
放大 (Ctrl++)
Zoom Out (Ctrl+-)
縮小 (Ctrl+-)
Reset (Ctrl+0) ?重置 (Ctrl+0)
Besides setting the zoom ratio in the left window and using shortcuts, users can also zoom in on specific areas by holding the Ctrl key and using the mouse scroll wheel for precise annotation and small object labeling. To apply this change globally, ensure to select the Keep Previous Zoom Ratio option from the View dropdown menu.
除了在左側窗口中設置縮放比例和使用快捷方式外,用戶還可以通過按住 Ctrl 鍵和使用鼠標滾輪來放大特定區域,以進行精確注釋和小對象標記。要全局應用此更改,請確保從 View 下拉菜單中選擇 Keep Previous Zoom Ratio 選項。
3.2 Image Visualization ?3.2 圖像可視化
X-AnyLabeling supports color adjustment for the current image. Operations include:
X-AnyLabeling 支持對當前圖片進行顏色調整。作包括:
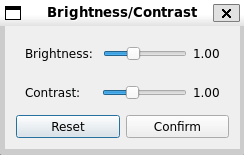
Select Brightness Contrast from the View dropdown menu at the top of the interface to adjust the brightness and contrast for better visual effects.
選擇 ?亮度對比度 ?來自 ?查看 ?界面頂部的下拉菜單來調整亮度和對比度以獲得更好的視覺效果。
To apply this change globally, select Keep Current Brightness and Keep Current Contrast from the View dropdown menu.
要全局應用此更改,請從 View 下拉菜單中選擇 Keep Current Brightness 和 Keep Current Contrast 。
Additionally, as the cursor moves, the information bar at the bottom of the GUI displays the current image's filename and annotation progress in real time.
此外,當光標移動時,GUI 底部的信息欄會實時顯示當前圖像的文件名和注釋進度。
3.3 Shape Visualization ?3.3 形狀可視化
Shape visualization features display text descriptions of labeled shapes (Ctrl+T), label names (Ctrl+L), group IDs, rotation angles, prediction scores, and more.
形狀可視化功能顯示標記形狀的文本描述 (Ctrl+T)、標簽名稱 (Ctrl+L)、組 ID、旋轉角度、預測分數等。
Configure these display options using the indicated keyboard shortcuts or by selecting them in the View dropdown menu at the top.
使用指示的鍵盤快捷鍵或在頂部的 View 下拉菜單中選擇它們來配置這些顯示選項。
Hovering your cursor over a shape will dynamically display its width and height in the GUI's bottom information bar.
將光標懸停在形狀上將在 GUI 的底部信息欄中動態顯示其寬度和高度。
3.4 Crosshair ?3.4 準星
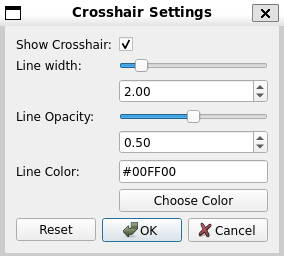
對于十字準線,用戶可以通過選擇 ?設置十字準線 ?界面頂部的下拉菜單中的選項。
Moreover, as the cursor moves, the information bar at the bottom of the GUI displays real-time position coordinates.
此外,當光標移動時,GUI 底部的信息欄會顯示實時位置坐標。
4. Annotation Import and Export
4. 注釋導入和導出
At present, X-AnyLabeling provides functionalities for importing and exporting a variety of mainstream label file formats. Below is a brief guide on how to use these features.
目前 X-AnyLabeling 提供了多種主流標簽文件格式的導入和導出功能。以下是有關如何使用這些功能的簡要指南。
4.1 YOLO Annotation ?4.1 YOLO 注釋
The latest version of X-AnyLabeling supports one-click import/export for YOLOv5/v8 label files (*.txt) for object detection, instance segmentation, rotated bounding box detection, and keypoint detection tasks.
最新版本的 X-AnyLabeling 支持一鍵導入/導出 YOLOv5/v8 標簽文件 (*.txt),用于對象檢測、實例分割、旋轉邊界框檢測和關鍵點檢測任務。
Before importing/exporting YOLO label files, you need to prepare a label configuration file:
在導入/導出 YOLO 標簽文件之前,您需要準備一個標簽配置文件:
For YOLO object detection, instance segmentation, and rotated bounding box detection tasks, refer to classes.txt. Each line represents a class, with numbers incrementing from 0.
有關 YOLO 對象檢測、實例分割和旋轉邊界框檢測任務,請參閱 classes.txt。每行代表一個類,數字從 0 開始遞增。
For YOLO keypoint detection tasks, refer to yolov8_pose.yaml. For the has_visible parameter, please refer to the official definition.
YOLO 關鍵點檢測任務請參考 yolov8_pose.yaml。has_visible 參數請參考官方定義 。
To export in YOLO-Pose format, you need to assign a group_id to each set (bounding box and its keypoints) during annotation so that X-AnyLabeling can understand their relationships during export.
要以 YOLO-Pose 格式導出,您需要在注釋過程中為每組(邊界框及其關鍵點)分配一個 group_id,以便 X-AnyLabeling 在導出過程中可以理解它們之間的關系。
Import Task: ?導入任務 :
Click the Upload button in the top menu bar.
點擊 ?上傳 ?頂部菜單欄中的按鈕。
Select the corresponding task.
選擇相應的任務。
Upload the prepared configuration file.
上傳準備好的配置文件。
Choose the directory where the label files are located and click OK.
選擇標簽文件所在的目錄,然后單擊 OK。
Export Task: ?導出任務 :
Click the Export button in the top menu bar.
點擊 ?出口 ?頂部菜單欄中的按鈕。
Upload the prepared configuration file.
上傳準備好的配置文件。
Check the appropriate options as needed and click OK.
根據需要檢查相應的選項,然后單擊 OK。
The export path defaults to the labels folder in the same directory as the current image directory.
導出路徑默認為當前鏡像目錄下同目錄下的 labels 文件夾。
For a sample YOLO label file, refer to demo.txt.
有關 YOLO 標簽文件示例,請參閱 demo.txt。
4.2 VOC Annotation ?4.2 VOC 注釋
The latest version of X-AnyLabeling supports one-click import/export for Pascal-VOC label files (*.xml) for detection and segmentation tasks.
最新版本的 X-AnyLabeling 支持一鍵導入/導出 Pascal-VOC 標簽文件 (*.xml),用于檢測和分割任務。
Import Task: ?導入任務 :
Click the Upload button in the top menu bar.
點擊 ?上傳 ?頂部菜單欄中的按鈕。
Select the corresponding task.
選擇相應的任務。
Choose the directory where the label files are located and click OK.
選擇標簽文件所在的目錄,然后單擊 OK。
Export Task: ?導出任務 :
Click the Export button in the top menu bar.
點擊 ?出口 ?頂部菜單欄中的按鈕。
Check the appropriate options as needed and click OK.
根據需要檢查相應的選項,然后單擊 OK。
The export path defaults to the Annotations folder in the same directory as the current image directory.
導出路徑默認為當前鏡像目錄下同目錄下的 Annotations 文件夾。
For a sample VOC label file, refer to demo.xml.
有關 VOC 標簽文件示例,請參閱 demo.xml。
4.3 COCO Annotation ?4.3 COCO 注解
The latest version of X-AnyLabeling supports one-click import/export for COCO label files (*.json) related to object detection, instance segmentation, and keypoint detection tasks.
最新版本的 X-AnyLabeling 支持一鍵導入/導出與對象檢測、實例分割和關鍵點檢測任務相關的 COCO 標簽文件 (*.json)。
Before importing or exporting COCO label files, ensure you have a label configuration file prepared. For object detection and instance segmentation tasks, refer to classes.txt, and for keypoint detection tasks, refer to yolov8_pose.yaml.
在導入或導出 COCO 標簽文件之前,請確保您已準備好標簽配置文件。對象檢測和實例分割任務請參考 classes.txt,關鍵點檢測任務請參考 yolov8_pose.yaml。
Import Task: ?導入任務 :
Click the Upload button in the top menu bar.
點擊 ?上傳 ?頂部菜單欄中的按鈕。
Select the corresponding task.
選擇相應的任務。
Upload the prepared configuration file.
上傳準備好的配置文件。
Choose the directory where the label files are located and click OK.
選擇標簽文件所在的目錄,然后單擊 OK。
Export Task: ?導出任務 :
Click the Export button in the top menu bar.
點擊 ?出口 ?頂部菜單欄中的按鈕。
Select the corresponding task.
選擇相應的任務。
Upload the prepared configuration file.
上傳準備好的配置文件。
Click OK. ?單擊 OK(確定)。
The export path defaults to the annotations folder in the same directory as the current image directory.
導出路徑默認為與當前鏡像目錄位于同一目錄下的 annotations 文件夾。
For a sample COCO label file, refer to instances_default.json.
有關 COCO 標簽文件示例,請參閱 instances_default.json。
4.4 DOTA Annotation ?4.4 DOTA 注解
The latest version of X-AnyLabeling supports one-click import/export for DOTA label files (*.txt). The label format is defined as:
最新版本的 X-AnyLabeling 支持一鍵導入/導出 DOTA 標簽文件 (*.txt)。標簽格式定義為:
x1 y1 x2 y2 x3 y3 x4 y4 class_name difficult
x1 y1 x2 y2 x3 y3 x4 y4 class_name 困難
Import Task: ?導入任務 :
Click the Upload button in the top menu bar.
點擊 ?上傳 ?頂部菜單欄中的按鈕。
Select the corresponding task.
選擇相應的任務。
Choose the directory where the label files are located and click OK.
選擇標簽文件所在的目錄,然后單擊 OK。
Export Task: ?導出任務 :
Click the Export button in the top menu bar.
點擊 ?出口 ?頂部菜單欄中的按鈕。
Click OK. ?單擊 OK(確定)。
The export path defaults to the labelTxt folder in the same directory as the current image directory.
導出路徑默認為當前鏡像目錄下同目錄下的 labelTxt 文件夾。
For a sample DOTA label file, refer to demo_obb.txt.
有關 DOTA 標簽文件示例,請參閱 demo_obb.txt。
4.5 MASK Annotation ?4.5 MASK 注釋
The latest version of X-AnyLabeling supports one-click import/export for semantic segmentation mask label files (*.png).
最新版本的 X-AnyLabeling 支持一鍵導入/導出語義分割掩碼標簽文件 (*.png)。
Before importing/exporting mask label files, prepare the configuration file as follows:
在導入/導出蒙版標簽文件之前,請準備如下配置文件:
For color images, refer to mask_color_map.json.
有關彩色圖像,請參閱 mask_color_map.json。
For grayscale images, refer to mask_grayscale_map.json.
對于灰度圖像,請參閱 mask_grayscale_map.json。
Import Task: ?導入任務 :
Click the Upload button in the top menu bar.
點擊 ?上傳 ?頂部菜單欄中的按鈕。
Select the corresponding task.
選擇相應的任務。
Upload the prepared configuration file.
上傳準備好的配置文件。
Choose the directory where the label files are located and click OK.
選擇標簽文件所在的目錄,然后單擊 OK。
Export Task: ?導出任務 :
Click the Export button in the top menu bar.
點擊 ?出口 ?頂部菜單欄中的按鈕。
Upload the prepared configuration file.
上傳準備好的配置文件。
Click OK. ?單擊 OK(確定)。
The export path defaults to the mask folder in the same directory as the current image directory.
導出路徑默認為與當前 image 目錄位于同一目錄下的 mask 文件夾。
4.6 MOT Annotation ?4.6 AGAINST 注釋
The latest version of X-AnyLabeling supports one-click import/export for multi-object tracking label files.
最新版本的 X-AnyLabeling 支持一鍵導入/導出多對象跟蹤標簽文件。
Before importing/exporting label files, prepare a label configuration file, referring to classes.txt, where each line represents a class, with numbers incrementing from 0.
在導入/導出標簽文件之前,請參考 classes.txt 準備一個標簽配置文件,其中每行代表一個類,數字從 0 開始遞增。
Export Task: ?導出任務 :
Click the Export button in the top menu bar.
點擊 ?出口 ?頂部菜單欄中的按鈕。
Upload the prepared configuration file.
上傳準備好的配置文件。
Choose the save path and click OK.
選擇保存路徑,然后單擊 OK。
Import Task: ?導入任務 :
Click the Upload button in the top menu bar.
點擊 ?上傳 ?頂部菜單欄中的按鈕。
Select the corresponding task.
選擇相應的任務。
Upload the prepared configuration file.
上傳準備好的配置文件。
Choose the directory containing the label file (gt.txt) and click OK.
選擇包含標簽文件的目錄 (gt.txt),然后單擊 OK。
For sample label files, refer to the MOT directory, which includes three subfiles: seqinfo.ini, det.txt, and gt.txt.
有關示例標簽文件,請參閱 MOT 目錄,其中包括三個子文件:seqinfo.ini、det.txt 和 gt.txt。
seqinfo.ini
The seqinfo.ini file contains sequence information, describing metadata for the dataset. The file includes:
seqinfo.ini 文件包含序列信息,用于描述數據集的元數據。該文件包括:
[Sequence]
name = MOT ? ? ? ? ? ?# Sequence name
imdir = mot_label ? ? # Image directory
framerate = 30 ? ? ? ?# Frame rate
seqlength = 249 ? ? ? # Sequence length (number of frames)
imwidth = 1280 ? ? ? ?# Image width
imheight = 720 ? ? ? ?# Image height
imext = .jpg ? ? ? ? ?# Image file extension
det.txt
The det.txt file contains detection results, with each line representing a detection box. The file includes:
det.txt 文件包含檢測結果,每行代表一個檢測框。該文件包括:
Frame number, Track ID, Top-left x-coordinate, Top-left y-coordinate, Width, Height, Confidence, <x>, <y>, <z>
The last three fields are for the MOT3D task and are set to -1 by default.
最后三個字段用于 MOT3D 任務,默認情況下設置為 -1。
gt.txt
The gt.txt file contains tracking annotation information, with each line representing an annotation box. The file includes:
gt.txt 文件包含跟蹤注釋信息,每行代表一個注釋框。該文件包括:
Frame number, Track ID, Top-left x-coordinate, Top-left y-coordinate, Width, Height, Validity flag, Class ID, Visibility ratio
The validity flag indicates whether the current trajectory is valid, with 0 for invalid data (ignore) and 1 for valid data (activate). Users can set this using the useDifficult flag in the label manager, where ?? indicates an invalid trajectory.
有效性標志指示當前軌跡是否有效, 其中 0 表示無效數據 (ignore),1 表示有效數據 (activate)。用戶可以使用標簽管理器中的 useDifficult 標志進行設置,其中??表示無效的軌跡。
Additionally, for the MOTS dataset format, the v2.4.0+ version offers corresponding export settings. The specific steps for implementation are as follows:
此外,對于 MOTS 數據集格式,v2.4.0+ 版本提供了相應的導出設置。具體實施步驟如下:
Click on the Export - Export MOTS Annotations button in the top menu bar.
單擊頂部菜單欄中的 Export - Export MOTS Annotations 按鈕。
Upload the prepared configuration file.
上傳準備好的配置文件。
Select the save path and click 'OK' to proceed.
選擇保存路徑,然后單擊“確定”繼續。
It is important to note that the default exported mots labels are not in the final official dataset format. Here, we provide the corresponding conversion code for reference:
請務必注意,默認導出的 mots 標簽不是最終的官方數據集格式。這里,我們提供相應的轉換碼供參考:
python3 tools/label_converter.py --task mots --mode custom_to_gt --src_path /path/to/your/custom_gt.txt
Note
? 注意
Before executing the conversion, you need to install the pycocotools library first.
在執行轉換之前,您需要先安裝 pycocotools 庫。
4.7 PPOCR Annotation ?4.7 PPOCR 注釋
The latest version of X-AnyLabeling (v2.4.0+) supports one-click import/export for the following two PPOCR tasks:
最新版本的 X-AnyLabeling (v2.4.0+) 支持一鍵導入/導出以下兩個 PPOCR 任務:
Text Detection and Recognition: Locates text areas in the input image and recognizes the text content.
文本檢測和識別:在輸入圖像中定位文本區域并識別文本內容。
Key Information Extraction: Extracts key information from images, including semantic entity recognition and relation extraction.
關鍵信息提取:從圖像中提取關鍵信息,包括語義實體識別和關系提取。
Import Task: ?導入任務 :
Click the Upload button in the top menu bar.
點擊 ?上傳 ?頂部菜單欄中的按鈕。
Select the corresponding task.
選擇相應的任務。
Choose the appropriate label file and click OK to upload.
選擇適當的標簽文件,然后單擊 OK 上傳。
Export Task: ?導出任務 :
Click the Export button in the top menu bar.
點擊 ?出口 ?頂部菜單欄中的按鈕。
Click OK. ?單擊 OK(確定)。
For the Text Detection and Recognition task, the export path defaults to the ppocr-rec folder in the same directory as the current image directory, which contains:
對于 Text Detection and Recognition 任務,導出路徑默認為與當前圖像目錄位于同一目錄中的 ppocr-rec 文件夾,其中包含:
Label.txt: Annotation results
Label.txt:注釋結果
rec_gt.txt: Recognition results
rec_gt.txt:識別結果
crop_img: Images corresponding to the recognition results for training
crop_img:用于訓練的識別結果對應的圖像
For the Key Information Extraction task, the export path defaults to the ppocr-kie folder in the same directory as the current image directory, which contains:
對于 Key Information Extraction 任務,導出路徑默認為與當前圖像目錄位于同一目錄下的 ppocr-kie 文件夾,其中包含:
class_list.txt: List of label classes
class_list.txt:標簽分類列表
ppocr_kie.json: KIE annotation results
ppocr_kie.json:KIE 注釋結果
For sample label files, refer to ppocr-rec and ppocr-kie.
有關示例標簽文件,請參閱 ppocr-rec 和 ppocr-kie。
4.8 ODVG Annotation ?4.8 ODVG 注釋
The latest version of X-AnyLabeling supports one-click import/export for Grounding task-related label files, specifically ODVG annotations.
最新版本的 X-AnyLabeling 支持一鍵導入/導出 Grounding 任務相關的標簽文件,特別是 ODVG 注釋。
Before importing/exporting ODVG label files, you need to prepare a label configuration file. For reference, see classes.txt, where each line represents a category, with the numbering incrementing from top to bottom.
在導入/導出 ODVG 標簽文件之前,您需要準備一個標簽配置文件。有關參考,請參閱 classes.txt,其中每行表示一個類別,編號從上到下遞增。
Import Task: ?導入任務 :
Click the Upload button in the top menu bar.
點擊 ?上傳 ?頂部菜單欄中的按鈕。
Select the corresponding task.
選擇相應的任務。
Choose the directory where the label files are located and click OK.
選擇標簽文件所在的目錄,然后單擊 OK。
Export Task: ?導出任務 :
Click the Export button in the top menu bar.
點擊 ?出口 ?頂部菜單欄中的按鈕。
Select the corresponding task.
選擇相應的任務。
Upload the prepared configuration file.
上傳準備好的配置文件。
Choose the save path and click OK.
選擇保存路徑,然后單擊 OK。
For the style of ODVG label files, refer to ODVG.
有關 ODVG 標簽文件的樣式,請參閱 ODVG。
5. Toolbar ?5. 工具欄
5.1 Data Statistics ?5.1 數據統計
X-AnyLabeling includes a data statistics feature, allowing users to easily access an overview of the current task's data. By selecting Tools -> Overview in the top menu bar, users can view the current data status. It supports the following features:
X-AnyLabeling 包括數據統計功能,允許用戶輕松訪問當前任務數據的概覽。通過選擇頂部菜單欄中的 工具 -> 概覽 ,用戶可以查看當前數據狀態。它支持以下功能:
Data Export Functionality
數據導出功能
Export statistical reports in CSV format
以 CSV 格式導出統計報告
Automatically generate a zip file containing label information, shape statistics and class list
自動生成包含標簽信息、形狀統計和類列表的 zip 文件
Export files include: ? 導出文件包括:
label_infos.csv: Label count statistics
label_infos.csv:標簽計數統計信息
shape_infos.csv: Annotation shape statistics
shape_infos.csv:注釋形狀統計信息
classes.txt: List of all classes
classes.txt:所有類的列表
Flexible Statistics Range
靈活的統計范圍
Support selecting specific range of images for statistics
支持選擇特定范圍的圖片進行統計
View statistics for single or multiple images
查看單個或多個圖像的統計信息
Real-time statistics updates
實時統計數據更新
Multi-dimensional Data Analysis
多維度數據分析
By label category: Shows annotation count for each class
按標簽類別:顯示每個類的注釋計數
By shape type: Including polygon, rectangle, rotated box, point, line, circle etc.
按形狀類型:包括多邊形、矩形、旋轉框、點、線、圓等。
Overall data overview: Shows dataset distribution
整體數據概覽:顯示數據集分布
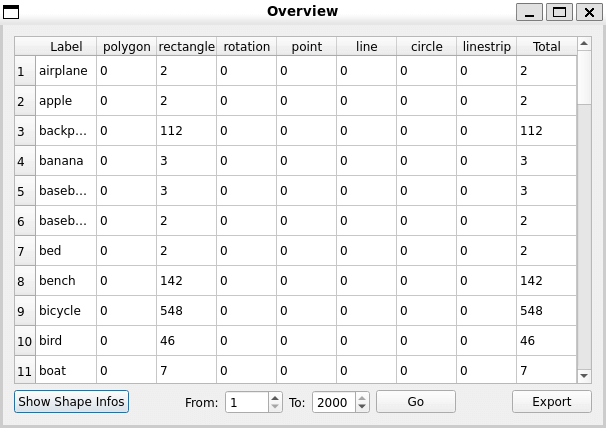
Usage Instructions: ?使用說明:
Click "Tools" -> "Overview" in the top menu bar
單擊頂部菜單欄中的 “Tools” -> “Overview”
View data distribution in the statistics window
在統計信息窗口中查看數據分布
Optionally select specific image range for statistics
(可選)選擇特定的圖像范圍進行統計
Click "Export" button to save statistics as zip file
單擊“導出”按鈕將統計信息保存為 zip 文件
5.2 Save Sub-Images ?5.2 保存子圖片
To use the save sub-images feature, follow these steps:
要使用保存子圖像功能,請執行以下步驟:
Prepare a custom class file. For an example, refer to classes.txt.
準備自定義類文件。有關示例,請參閱 classes.txt。
Click on the Tools -> Save Sub-Images option in the top menu bar, and upload the corresponding custom class file. A sub-image folder named x-anylabeling-crops will be generated in the current directory, containing the targets categorized by class name.
單擊頂部菜單欄中的 Tools -> Save Sub-Images 選項,然后上傳相應的自定義類文件。將在當前目錄中生成一個名為 x-anylabeling-crops 的子圖像文件夾,其中包含按類名分類的目標。
5.3 Object Manager ?5.3 對象管理器
X-AnyLabeling offers global management of label objects. Users can perform the following operations:
X-AnyLabeling 提供標簽對象的全局管理。用戶可以執行以下作:
Delete Labels: Remove unnecessary labels.
刪除標簽 :刪除不必要的標簽。
Rename Labels: Update label names to align with new classification standards.
重命名標簽 :更新標簽名稱以符合新的分類標準。
Change Label Colors: Adjust label colors to improve distinguishability.
更改標簽顏色 :調整標簽顏色以提高可區分性。
These actions can be accessed through the Tools -> Object Manager option in the top menu bar, opening the label management window.
可以通過頂部菜單欄中的 Tools -> Object Manager 選項訪問這些作,打開標簽管理窗口。
Also, to quickly select all annotation shapes on the canvas, follow these steps:
此外,要快速選擇畫布上的所有批注形狀,請執行以下步驟:
Switch to Edit Mode ?切換到編輯模式
Click the corresponding icon in the left toolbar (or press Ctrl+E) to enter edit mode
單擊左側工具欄中的相應圖標(或按 Ctrl+E)進入編輯模式
Activate Label List ?激活標簽列表
In the right shape label panel, left-click on any target label
在右側形狀標簽面板中,左鍵單擊任何目標標簽
Execute Select All ?執行全選
While holding down the Shift key:
按住 Shift 鍵時:
First press Home to select all objects above the current label
首先按 Home 鍵可選擇當前標簽上方的所有對象
Then press End to select all objects below the current label
然后按 End 鍵選擇當前標簽下的所有對象
5.4 Shape Type Conversion
5.4 形狀類型轉換
X-AnyLabeling provides a shape type conversion feature, allowing users to change shape types through the Tools option in the top menu bar. The supported conversions include:
X-AnyLabeling 提供了形狀類型轉換功能,允許用戶通過頂部菜單欄中的 Tools 選項更改形狀類型。支持的轉換包括:
Rectangular Box to Rotated Box: Convert rectangular box labels to rotated box labels.
矩形框到旋轉框 :將矩形框標簽轉換為旋轉框標簽。
Rotated Box to Rectangular Box: Convert rotated box labels to rectangular box labels.
旋轉框到矩形框 :將旋轉的框標簽轉換為矩形框標簽。
Polygon to Bounding Box: Convert polygon labels to bounding box labels.
多邊形到邊界框 :將多邊形標簽轉換為邊界框標簽。
Note: The Rotated Box to Rectangular Box and Polygon to Bounding Box conversions use the maximum bounding rectangle by default, which may result in the loss of some label information, such as rotation angle. These actions are irreversible, so use them with caution.
注: 默認情況下, Rotated Box to Rectangular Box 和 Polygon to Bounding Box 轉換使用最大邊界矩形,這可能會導致某些標簽信息丟失,例如旋轉角度。這些作是不可逆的 ,因此請謹慎使用。
5.5 Saving Masked Images ?5.5 保存蒙版圖像
To implement the masked image saving feature, follow the steps below:
要實現蒙版圖像保存功能,請執行以下步驟:
For areas that require masking, they can be identified using rectangle, rotation, or polygon objects, with the label name set to __mask__;
對于需要掩膜的區域,可以使用矩形 、 旋轉或多邊形對象進行標識,并將標簽名稱設置為 __mask__;
Click on the Tools -> Save Masked Image option in the top menu bar to set the fill color block. The default value is (114, 114, 114). The resulting images are saved by default in the x-anylabeling-mask-image folder.
單擊頂部菜單欄中的 Tools -> Save Masked Image 選項以設置填充顏色塊。默認值為 (114, 114, 114)。默認情況下,生成的圖像保存在 x-anylabeling-mask-image 文件夾中。
三、軟件下載
夸克網盤分享
本文信息來源于GitHub作者地址:https://github.com/CVHub520/X-AnyLabeling


)


)


:python操控autoit解決csf視頻批量轉換(有點難,AI都不會))

、持續時間(duration)和鏈接(linkage))


項目)

