非機動車及駕駛人佩戴安全帽檢測任務的意義主要包括以下幾點:
保障行車安全:非機動車包括自行車、電動車等,佩戴安全帽能夠有效保護騎車人頭部,減少因交通事故造成的頭部傷害風險,提高行車安全系數。
符合交通法規:許多國家和地區的交通法規要求騎車人員在騎行時佩戴安全帽,因此進行安全帽檢測任務可以確保遵守相關法規,避免因未佩戴安全帽而受到處罰。
促進交通安全宣傳:通過開展安全帽檢測任務,可以增強公眾對交通安全的認識和重視程度,提升騎車人員自我保護意識,倡導大眾積極參與交通安全宣傳活動。
減少交通事故傷亡:頭部是人體最脆弱的部位之一,遭受外傷后很容易導致嚴重后果。通過佩戴安全帽,可以有效降低頭部受傷的風險,減少交通事故造成的傷亡人數。
????????非機動車及駕駛人佩戴安全帽檢測任務的意義在于提高行車安全性、符合法規要求、促進交通安全宣傳和減少交通事故傷亡。
????????本文以YOLOv8為基礎(可以換成YOLOv11/YOLOv12),設計研究了基于YOLOv8的非機動車及駕駛人是否佩戴安全帽檢測識別任務,包含完整數據介紹、訓練過程和測試結果全流程。
目錄
🌷🌷1.數據集介紹
👍👍2.識別檢測實現效果
🍎🍎3.YOLOv8識別非機動車及安全帽算法步驟
🍋3.1數據準備
🍋3.2模型選擇
🍋3.3加載預訓練模型
🍋3.4輸入數據組織
🍭🍭4.目標檢測訓練代碼
🏆🏆5.目標檢測推理代碼
整理不易,歡迎一鍵三連!!!送你們一條美麗的--分割線--
🌷🌷1.數據集介紹
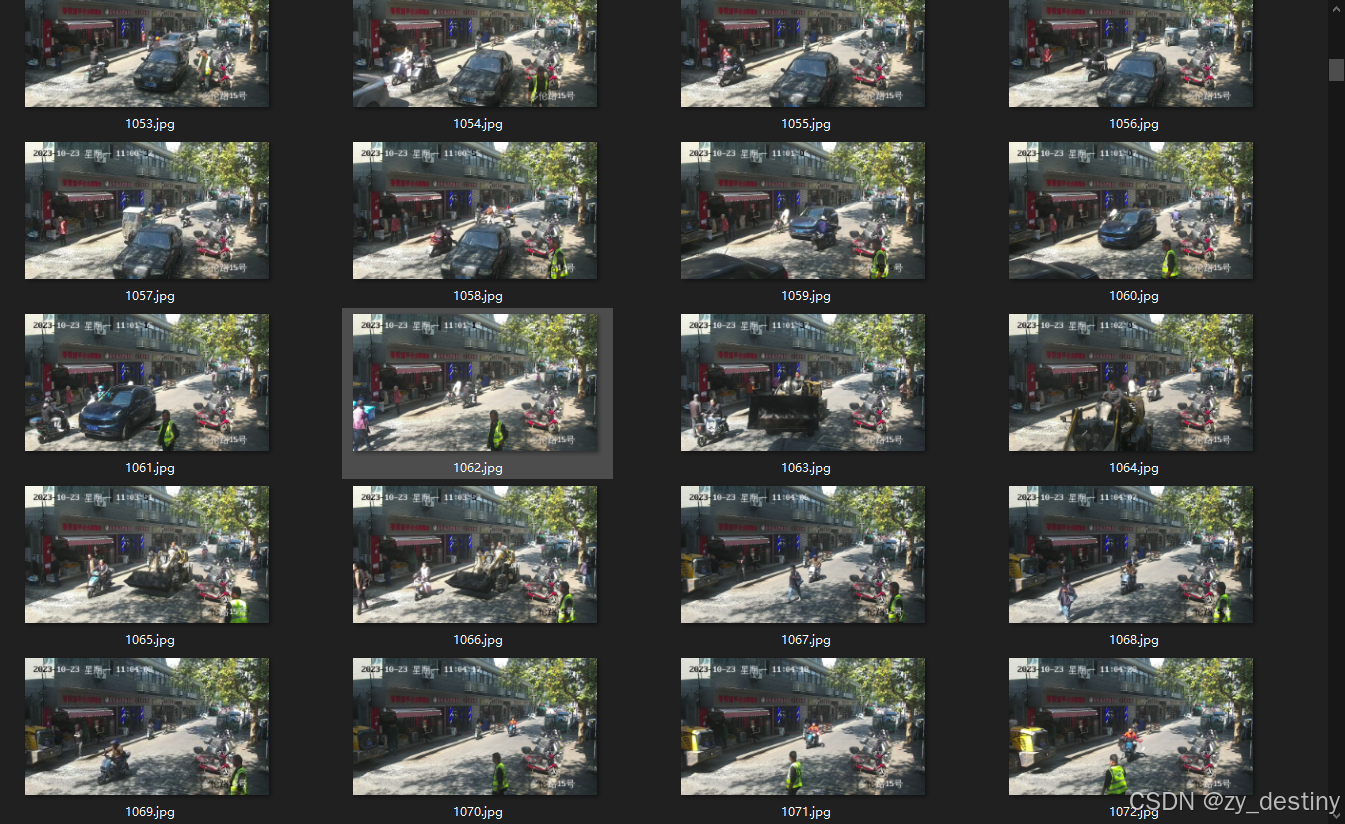
? ? ? ? 非機動車及駕駛人是否佩戴安全帽數據集為攝像頭視角拍攝到的實際影像,主要包含4類數據:
0:安全帽1:?駕駛人未戴安全帽2:駕駛人戴安全帽3:非機動車????????部分影像展示如下:
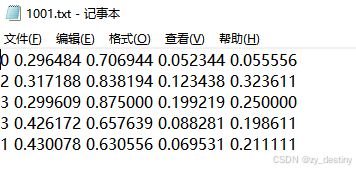
?label為txt格式的yolo目標檢測格式,示例txt文件內容為:
訓練驗證比例可以自行調整,這里不贅述。
👍👍2.識別檢測實現效果
🍎🍎3.YOLOv8識別非機動車及安全帽算法步驟
????????通過目標檢測方法進行非機動車及安全帽識別的方法不限,本文以YOLOv8為例進行說明。
🍋3.1數據準備
數據組織:
----非機動車_dataset
? ? ? ?----images
? ? ? ? ? ? ? ? ----train
? ? ? ? ? ? ? ? ----val
? ? ? ? ----labels
? ? ? ? ? ? ? ? ----train
? ? ? ? ? ? ? ? ----val
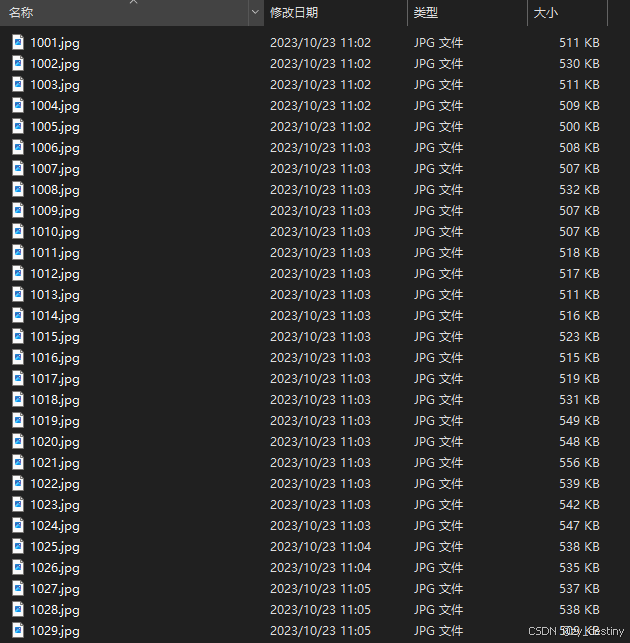
?image/train文件夾下內容如下:
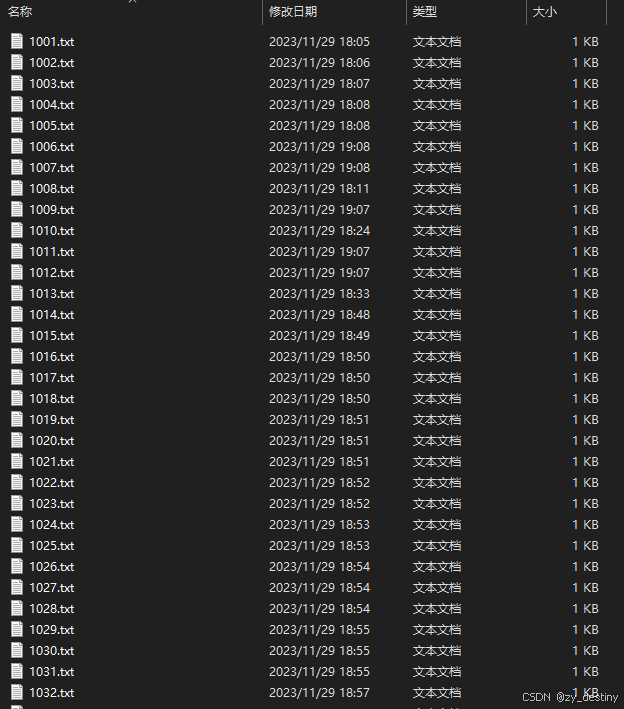
????????labels/train文件夾下內容如下:
模型訓練label部分采用的是YOLO格式的txt文件,所以如果自己的數據集是xml格式或者json格式需要進行轉換哦,轉換可移步這里。
? ? ? ? 具體txt格式內容如1.數據集介紹中所示。
🍋3.2模型選擇
? ? ? ? 以YOLOv8為例,模型選擇代碼如下:
from ultralytics import YOLO# Load a model
model = YOLO('yolov8n.yaml') ?# build a new model from YAML
model = YOLO('yolov8n.pt') ?# load a pretrained model (recommended for training)
model = YOLO('yolov8n.yaml').load('yolov8n.pt') ?# build from YAML and transfer weights
? ? ? ? 其中yolov8n.yaml為./ultralytics/cfg/models/v8yolov8n.yaml,可根據自己的數據進行模型調整,打開yolov8n.yaml顯示內容如下:
# Ultralytics YOLO 🚀, AGPL-3.0 license
# YOLOv8 object detection model with P3-P5 outputs. For Usage examples see https://docs.ultralytics.com/tasks/detect# Parameters
nc: 4 # number of classes
scales: # model compound scaling constants, i.e. 'model=yolov8n.yaml' will call yolov8.yaml with scale 'n'# [depth, width, max_channels]n: [0.33, 0.25, 1024] # YOLOv8n summary: 225 layers,  3157200 parameters,  3157184 gradients,   8.9 GFLOPss: [0.33, 0.50, 1024] # YOLOv8s summary: 225 layers, 11166560 parameters, 11166544 gradients,  28.8 GFLOPsm: [0.67, 0.75, 768] # YOLOv8m summary: 295 layers, 25902640 parameters, 25902624 gradients,  79.3 GFLOPsl: [1.00, 1.00, 512] # YOLOv8l summary: 365 layers, 43691520 parameters, 43691504 gradients, 165.7 GFLOPsx: [1.00, 1.25, 512] # YOLOv8x summary: 365 layers, 68229648 parameters, 68229632 gradients, 258.5 GFLOPs# YOLOv8.0n backbone
backbone:# [from, repeats, module, args]- [-1, 1, Conv, [64, 3, 2]] # 0-P1/2- [-1, 1, Conv, [128, 3, 2]] # 1-P2/4- [-1, 3, C2f, [128, True]]- [-1, 1, Conv, [256, 3, 2]] # 3-P3/8- [-1, 6, C2f, [256, True]]- [-1, 1, Conv, [512, 3, 2]] # 5-P4/16- [-1, 6, C2f, [512, True]]- [-1, 1, Conv, [1024, 3, 2]] # 7-P5/32- [-1, 3, C2f, [1024, True]]- [-1, 1, SPPF, [1024, 5]] # 9# YOLOv8.0n head
head:- [-1, 1, nn.Upsample, [None, 2, "nearest"]]- [[-1, 6], 1, Concat, [1]] # cat backbone P4- [-1, 3, C2f, [512]] # 12- [-1, 1, nn.Upsample, [None, 2, "nearest"]]- [[-1, 4], 1, Concat, [1]] # cat backbone P3- [-1, 3, C2f, [256]] # 15 (P3/8-small)- [-1, 1, Conv, [256, 3, 2]]- [[-1, 12], 1, Concat, [1]] # cat head P4- [-1, 3, C2f, [512]] # 18 (P4/16-medium)- [-1, 1, Conv, [512, 3, 2]]- [[-1, 9], 1, Concat, [1]] # cat head P5- [-1, 3, C2f, [1024]] # 21 (P5/32-large)- [[15, 18, 21], 1, Detect, [nc]] # Detect(P3, P4, P5)
打印的網絡結構如下:
from  n    params  module                                       arguments                     0                  -1  1       464  ultralytics.nn.modules.conv.Conv             [3, 16, 3, 2]                 1                  -1  1      4672  ultralytics.nn.modules.conv.Conv             [16, 32, 3, 2]                2                  -1  1      7360  ultralytics.nn.modules.block.C2f             [32, 32, 1, True]             3                  -1  1     18560  ultralytics.nn.modules.conv.Conv             [32, 64, 3, 2]                4                  -1  2     49664  ultralytics.nn.modules.block.C2f             [64, 64, 2, True]             5                  -1  1     73984  ultralytics.nn.modules.conv.Conv             [64, 128, 3, 2]               6                  -1  2    197632  ultralytics.nn.modules.block.C2f             [128, 128, 2, True]           7                  -1  1    295424  ultralytics.nn.modules.conv.Conv             [128, 256, 3, 2]              8                  -1  1    460288  ultralytics.nn.modules.block.C2f             [256, 256, 1, True]           9                  -1  1    164608  ultralytics.nn.modules.block.SPPF            [256, 256, 5]                 10                  -1  1         0  torch.nn.modules.upsampling.Upsample         [None, 2, 'nearest']          11             [-1, 6]  1         0  ultralytics.nn.modules.conv.Concat           [1]                           12                  -1  1    148224  ultralytics.nn.modules.block.C2f             [384, 128, 1]                 13                  -1  1         0  torch.nn.modules.upsampling.Upsample         [None, 2, 'nearest']          14             [-1, 4]  1         0  ultralytics.nn.modules.conv.Concat           [1]                           15                  -1  1     37248  ultralytics.nn.modules.block.C2f             [192, 64, 1]                  16                  -1  1     36992  ultralytics.nn.modules.conv.Conv             [64, 64, 3, 2]                17            [-1, 12]  1         0  ultralytics.nn.modules.conv.Concat           [1]                           18                  -1  1    123648  ultralytics.nn.modules.block.C2f             [192, 128, 1]                 19                  -1  1    147712  ultralytics.nn.modules.conv.Conv             [128, 128, 3, 2]              20             [-1, 9]  1         0  ultralytics.nn.modules.conv.Concat           [1]                           21                  -1  1    493056  ultralytics.nn.modules.block.C2f             [384, 256, 1]                 22        [15, 18, 21]  1    752092  ultralytics.nn.modules.head.Detect           [4, [64, 128, 256]]
YOLOv8n summary: 225 layers, 3011628 parameters, 3011612 gradients, 8.2 GFLOPs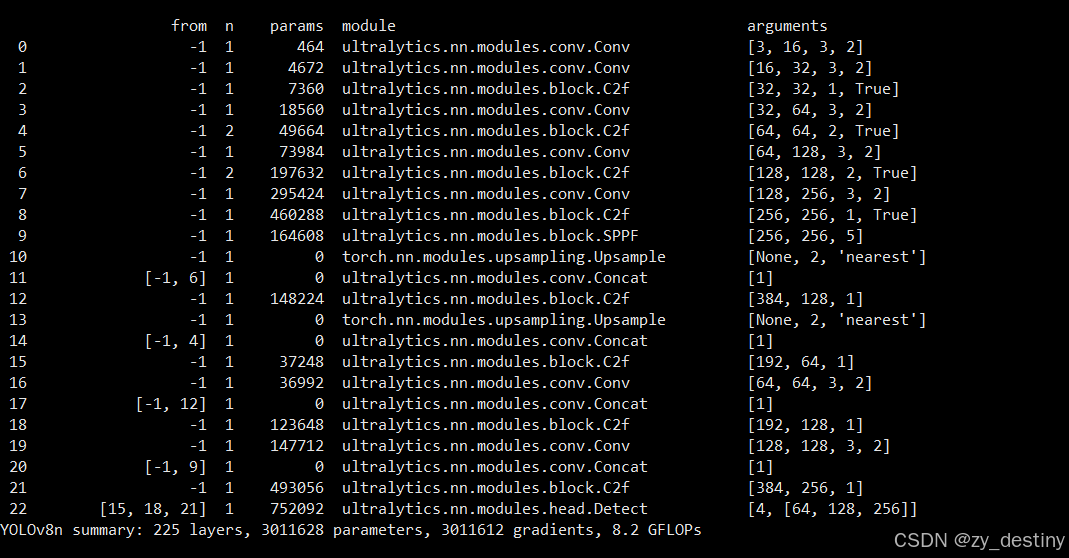
? ? ? ? 主要需要修改的地方為nc,也就是num_class,此處數據集類別為4類,所以nc=4。
? ? ? ? 如果其他的模型參數不變的話,就默認保持原版yolov12,需要改造模型結構的大佬請繞行。
🍋3.3加載預訓練模型
? ? ? ? 加載預訓練模型yolov8n.pt,可以在第一次運行時自動下載,如果受到下載速度限制,也可以自行下載好(下載鏈接),放在對應目錄下即可。
🍋3.4輸入數據組織
? ? ? ? yolov8還是以yolo格式的數據為例,./ultralytics/cfg/datasets/data.yaml的內容示例如下:
# Train/val/test sets as 1) dir: path/to/imgs, 2) file: path/to/imgs.txt, or 3) list: [path/to/imgs1, path/to/imgs2, ..]
path: ../datasets/coco8 ?# dataset root dir
train: images/train ?# train images (relative to 'path') 4 images
val: images/val ?# val images (relative to 'path') 4 images
test: ?# test images (optional)# Classes (80 COCO classes)
names:0: person1: bicycle2: car# ...77: teddy bear78: hair drier79: toothbrush
? ? ? ? 這個是官方的標準coco數據集,需要換成自己的數據集格式,此處建議根據自己的數據集設置新建一個feijidongche_detect_coco128.yaml文件,放在./ultralytics/cfg/datasets/目錄下,最后數據集設置就可以直接用自己的feijidongche_detect_coco128.yaml文件了。以我的feijidongche_detect_coco128.yaml文件為例:
path: /home/datasets/feijidongche# dataset root dir
train: images/train ?# train images (relative to 'path') 4 images
val: images/val ?# val images (relative to 'path') 4 images
test: images/test # test images (optional)names:0: helmet      1: per-no-hel 2: per-w-hel 3:Non-motorized-vehicle
🍭🍭4.目標檢測訓練代碼
準備好數據和模型之后,就可以開始訓練了,train.py的內容顯示為:
from ultralytics import YOLO# Load a model
#model = YOLO('yolov12n.yaml') ?# build a new model from YAML
#model = YOLO('yolov12n.pt') ?# load a pretrained model (recommended for training)
model = YOLO('yolov12n.yaml').load('yolov12n.pt') ?# build from YAML and transfer weights# Train the model
results = model.train(data='yinliao_detect_coco128.yaml', epochs=200, imgsz=640)
? ? ? ? 通常我會選擇在基礎YOLO模型上進行transfer微調,不會從頭開始訓練,如果想自己從頭開始,可以自行選擇第一種方式。這里建議選擇第三種。
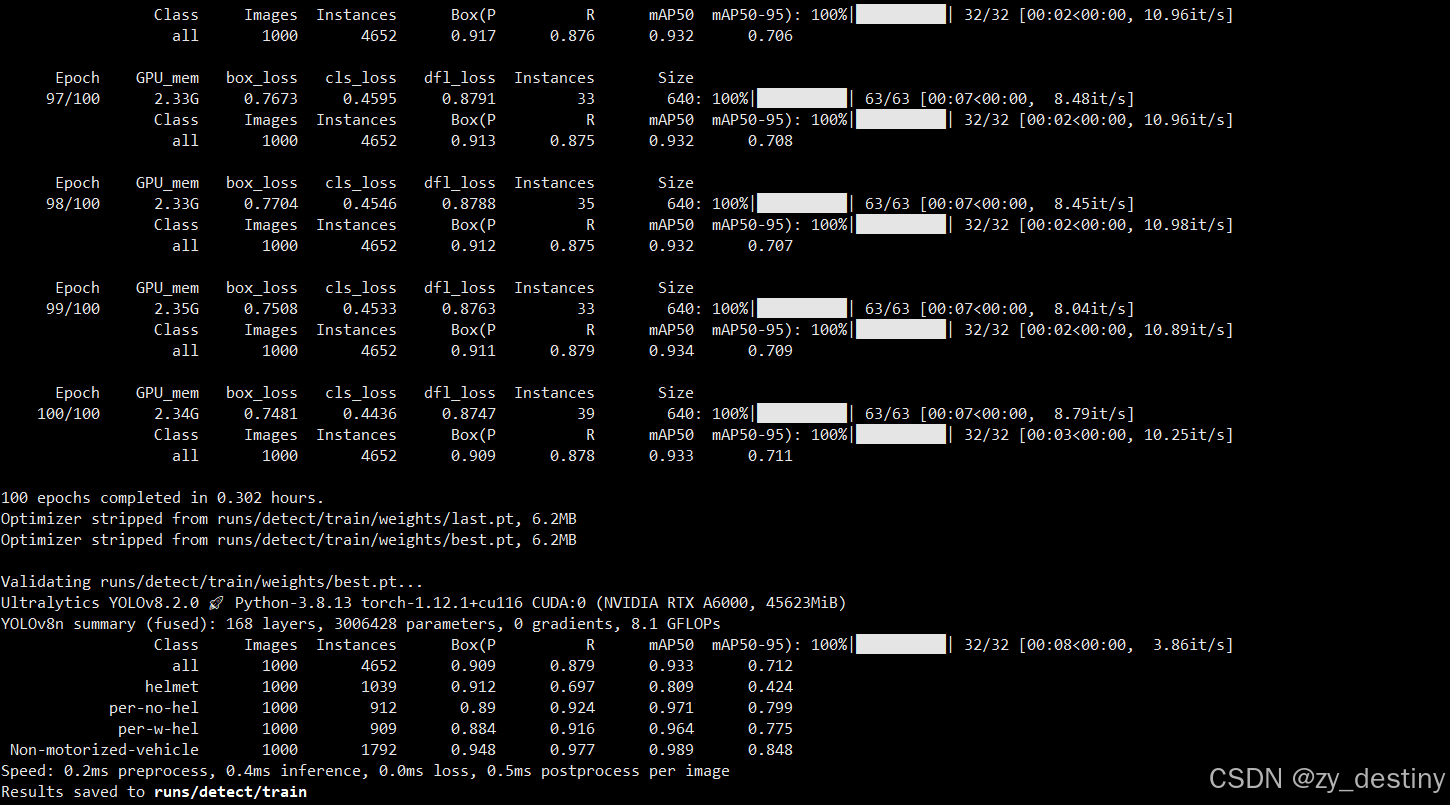
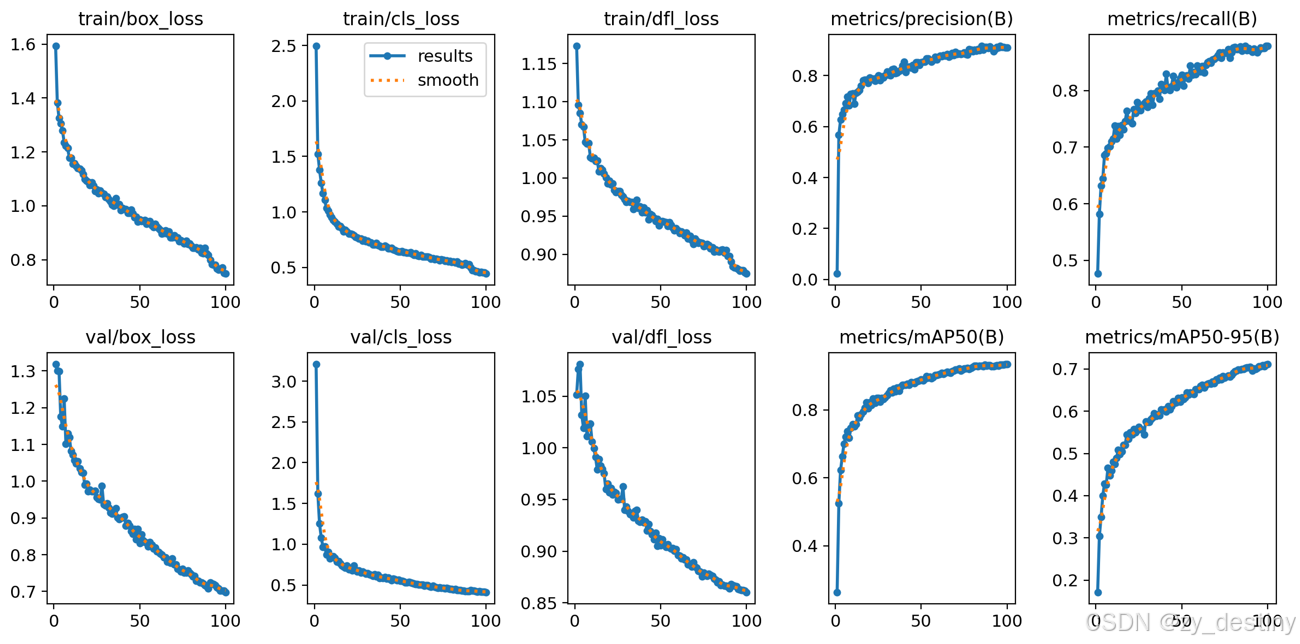
?4.1訓練過程
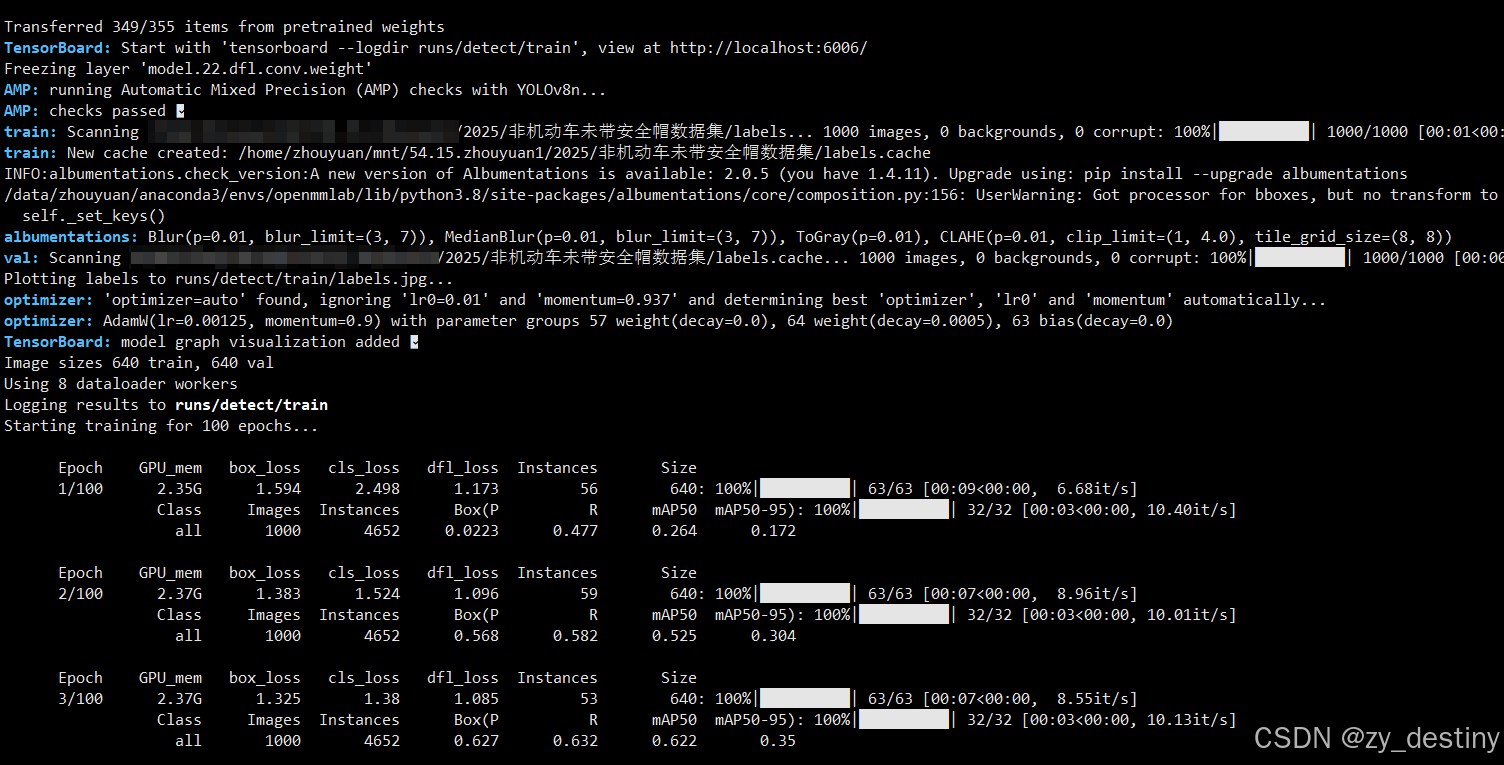
? ? ? ? 開始訓練之后就會開始打印log文件了。如下圖所示:
?
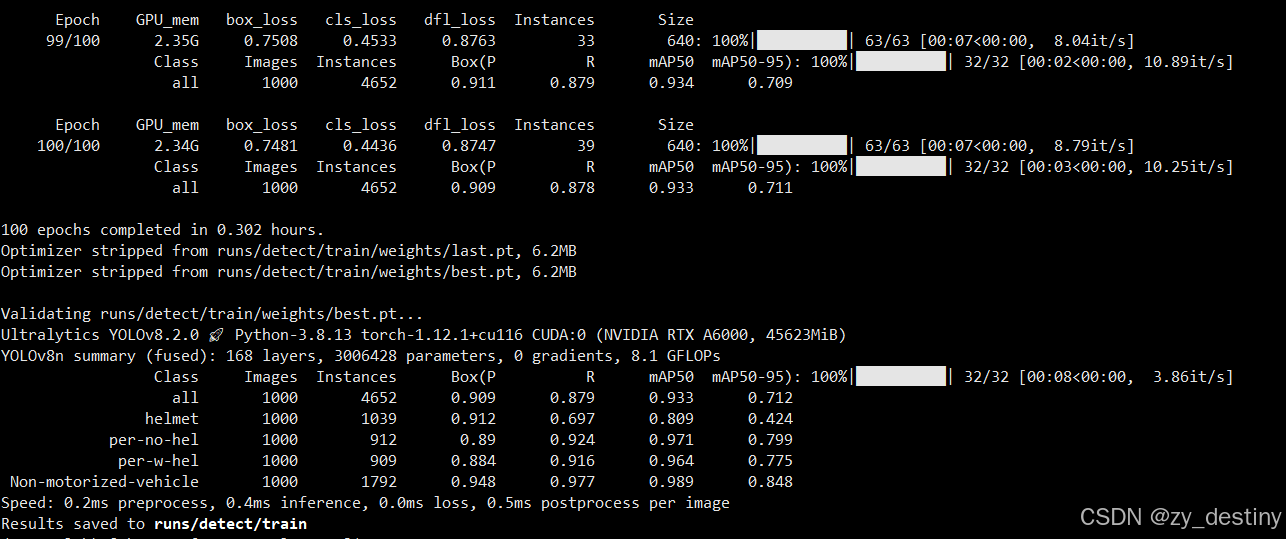
?訓練完成后會在/run/detect/目錄下生成train或者train+數字的文件夾,存放你的訓練結果。
訓練完成后的結果如下:
????????其中weights文件夾內會包含2個模型,一個best.pth,一個last.pth。

????????至此就可以使用best.pth進行推理檢測非機動車及佩戴安全帽了。
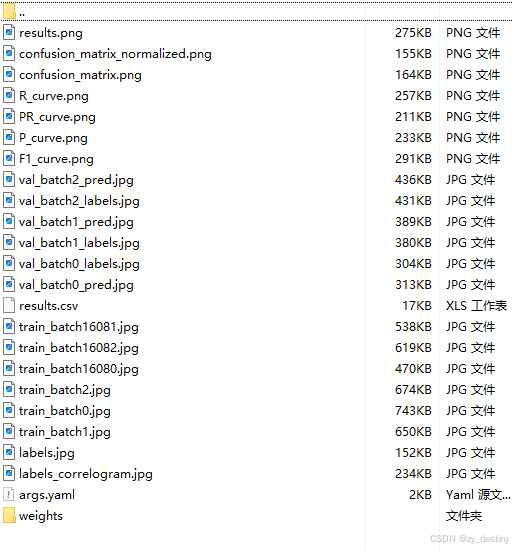
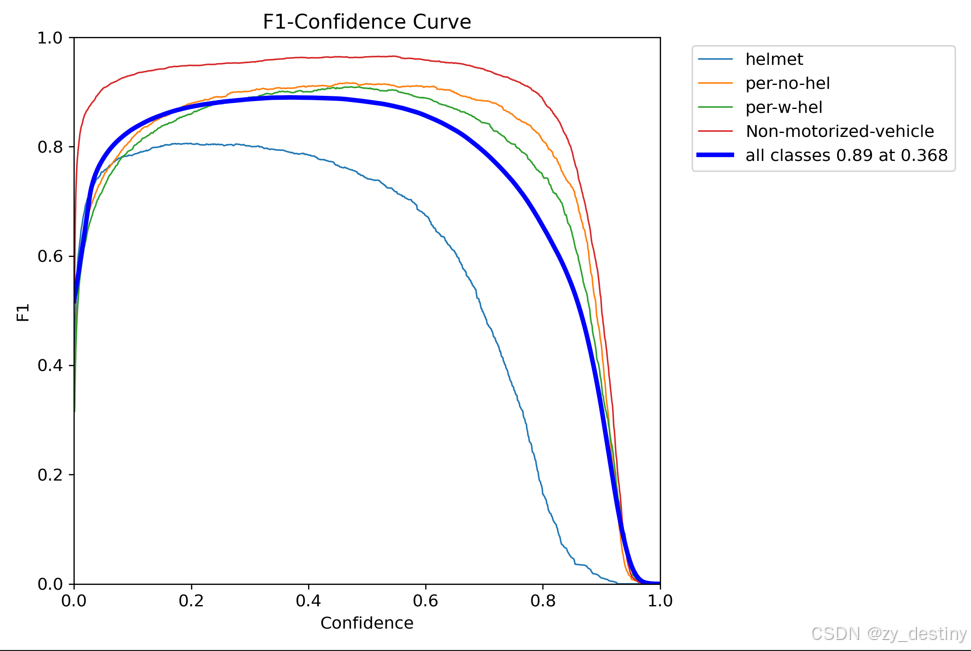
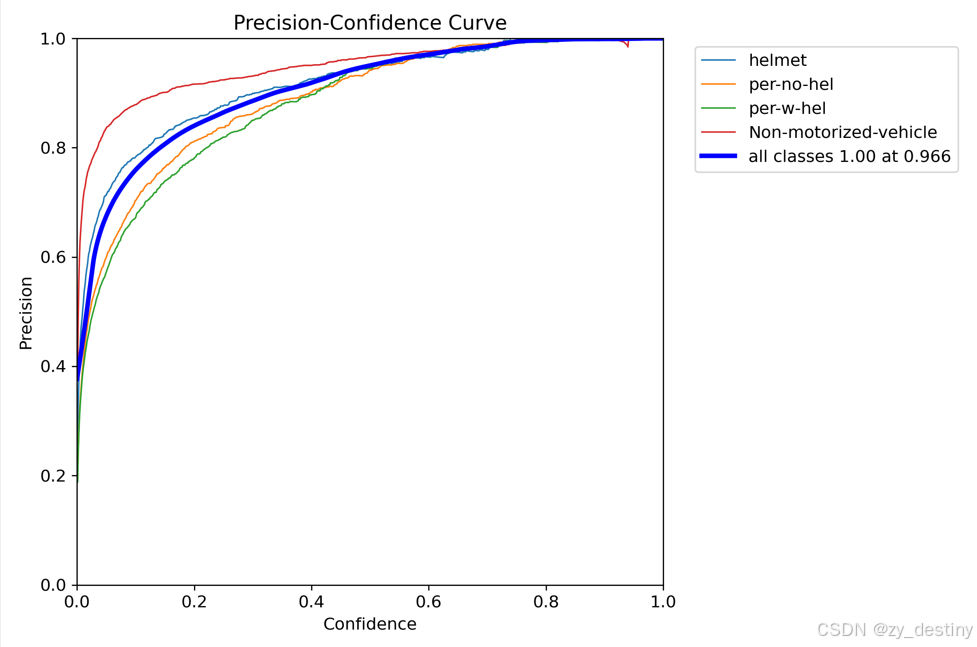
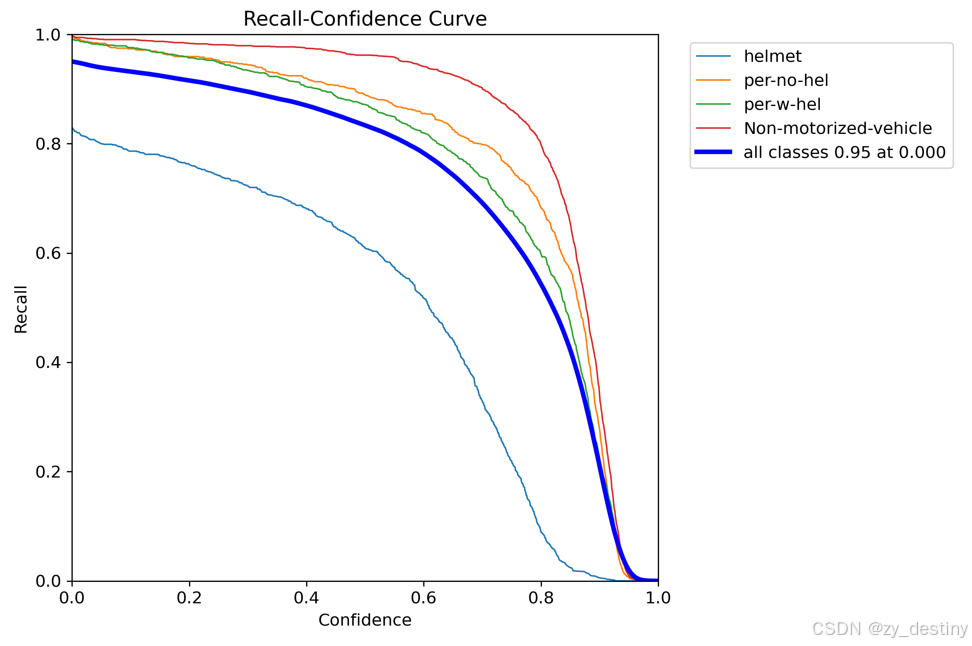
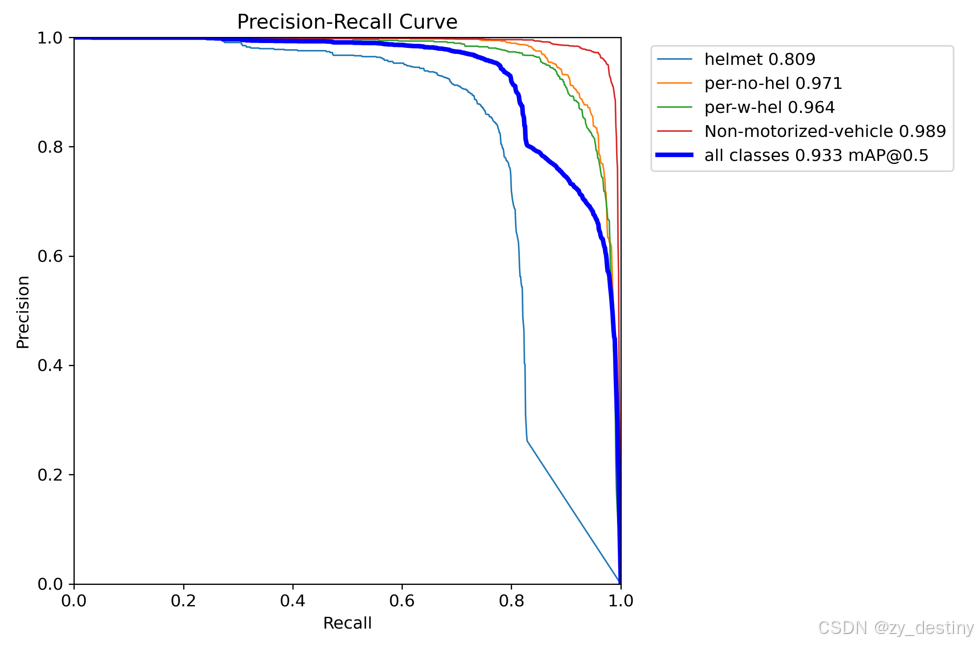
訓練精度展示:
?
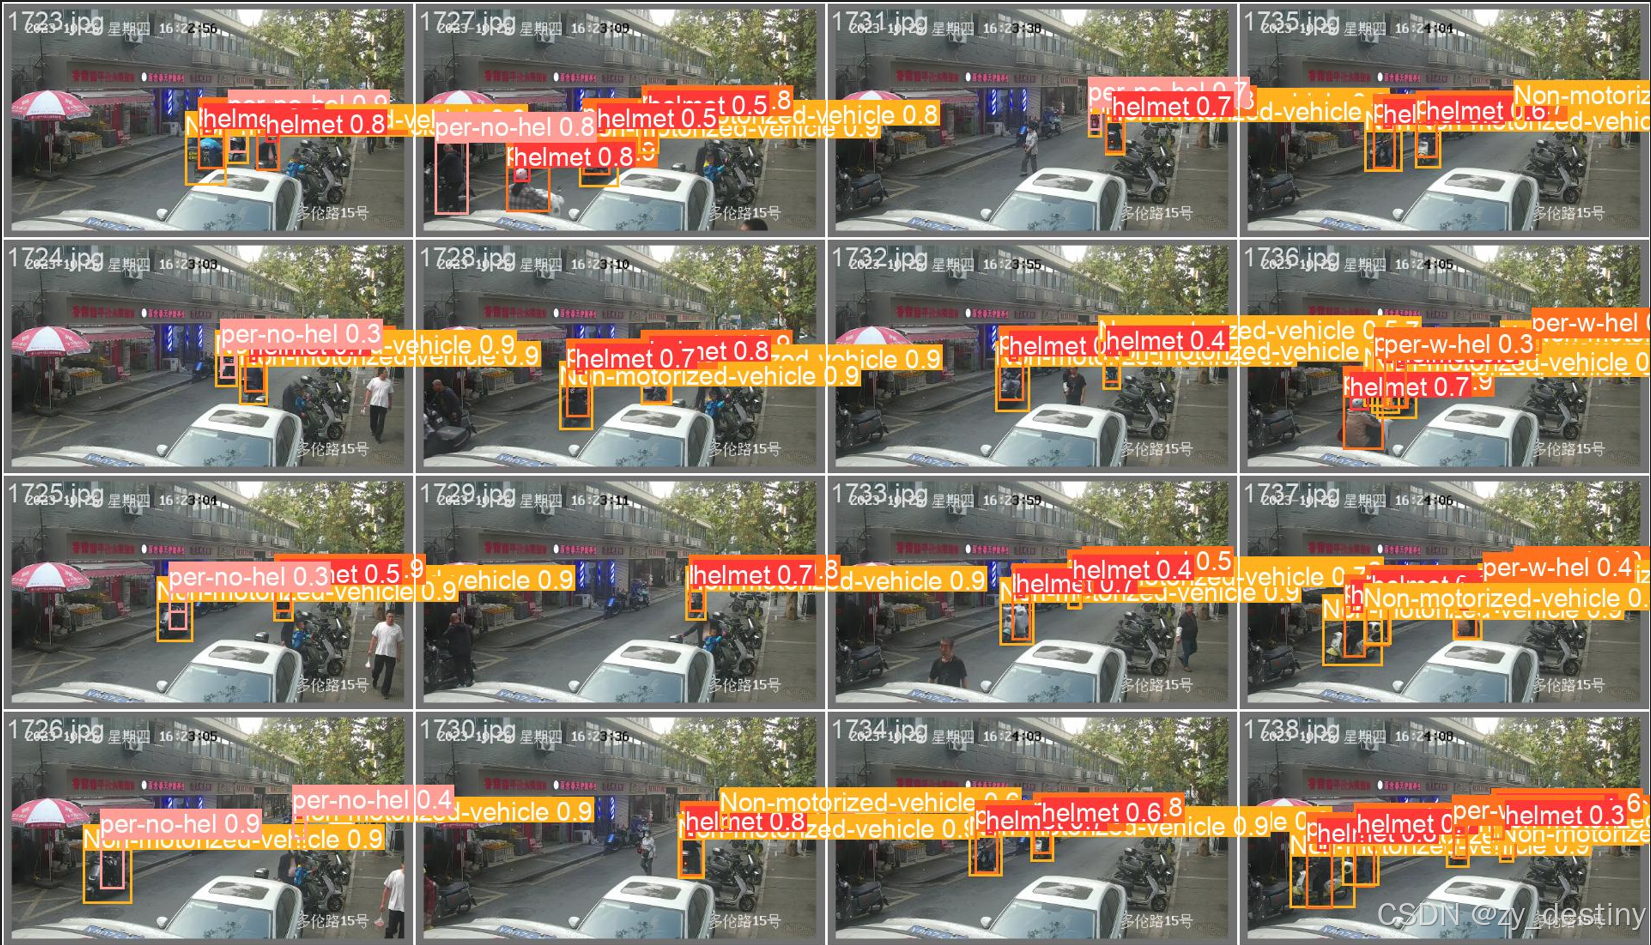
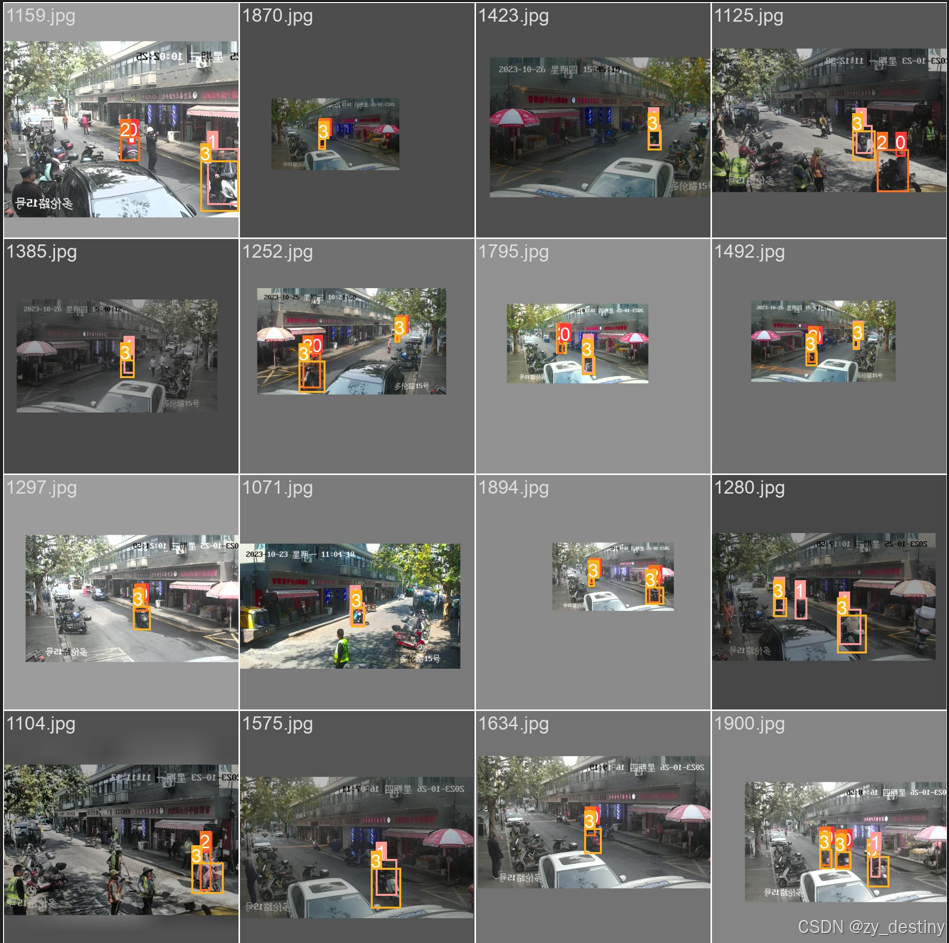
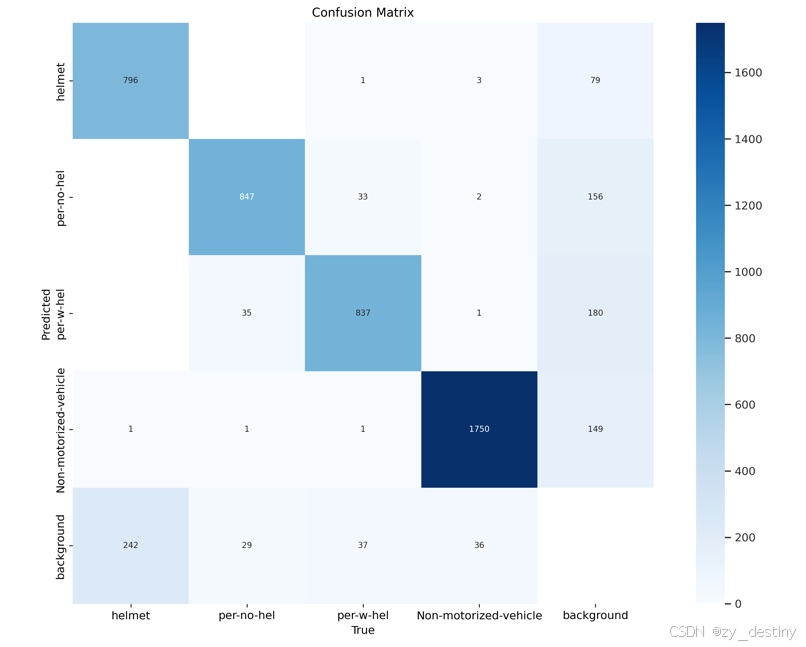
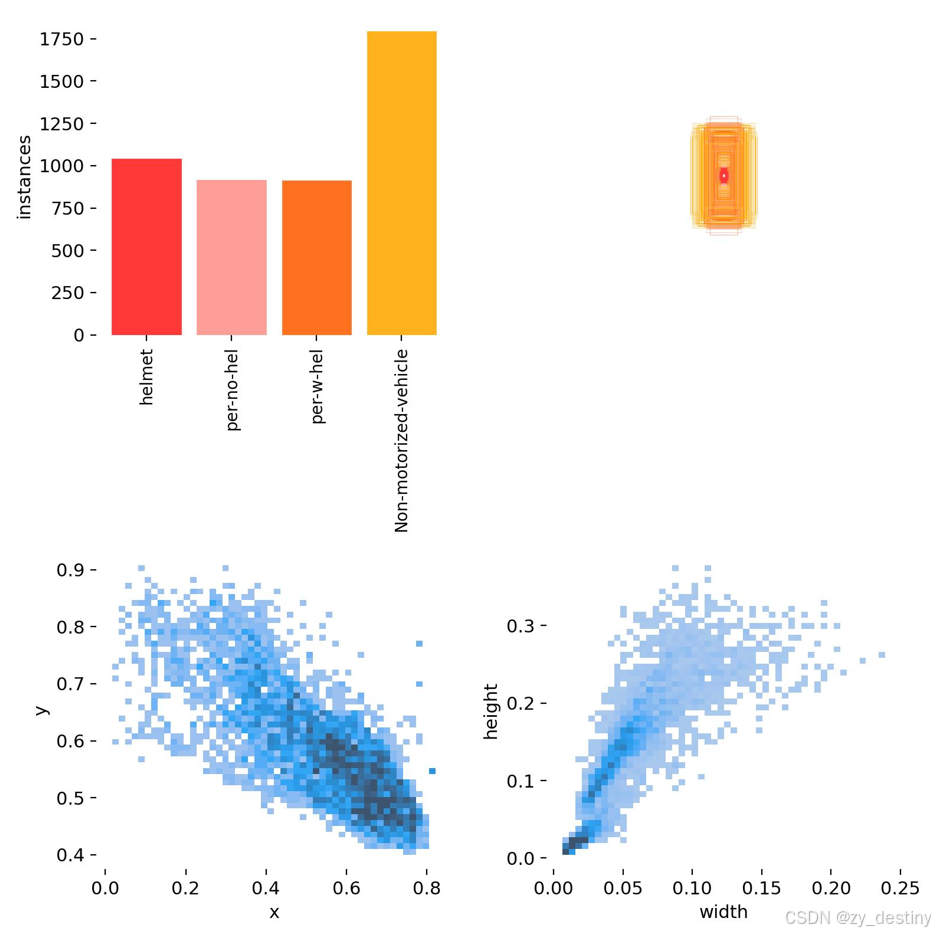
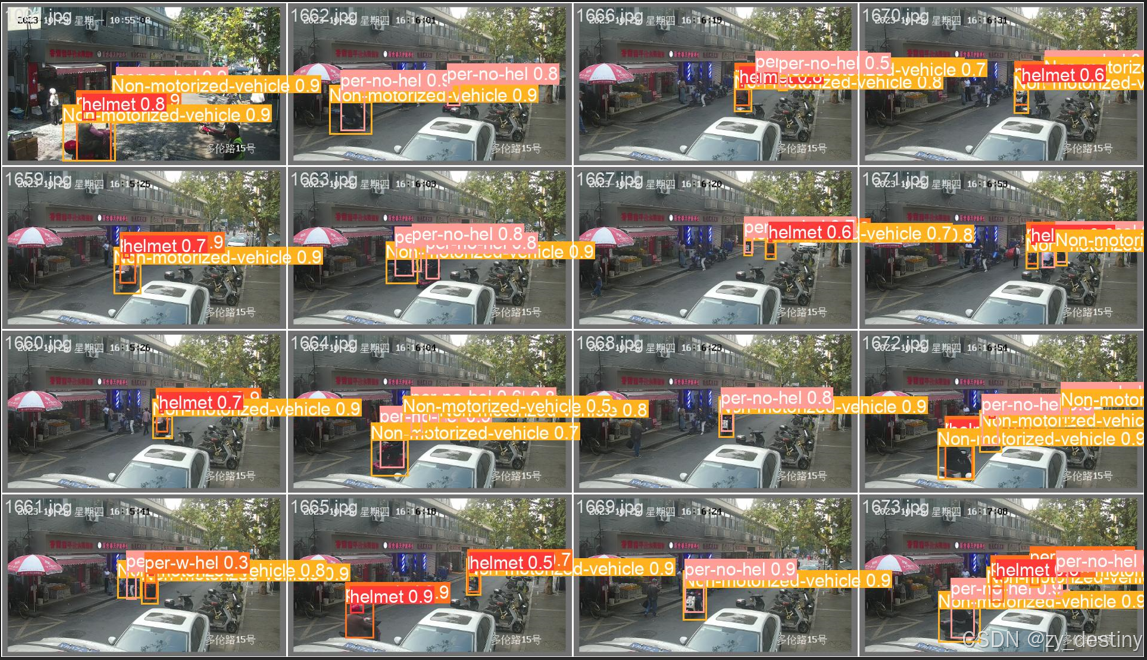
可視化效果:
🏆🏆5.目標檢測推理代碼
批量推理python代碼如下:
from ultralytics import YOLO
from PIL import Image
import cv2
import osmodel = YOLO('/yolov8/runs/detect/train/weights/best.pt') ?# load a custom model
path = '/home/dataset/feijidongche/images/test/' ?#test_image_path_dir
img_list = os.listdir(path)
for img_path in img_list:
### ?=============detect=====================im1 = Image.open(os.path.join(path,img_path))results = model.predict(source=im1, save=True,save_txt=True)
若需要完整數據集和源代碼可以私信。
整理不易,歡迎一鍵三連!!!
送你們一條美麗的--分割線--
🌷🌷🍀🍀🌾🌾🍓🍓🍂🍂🙋🙋🐸🐸🙋🙋💖💖🍌🍌🔔🔔🍉🍉🍭🍭🍋🍋🍇🍇🏆🏆📸📸????🍎🍎👍👍🌷🌷

——修改emacs的一些默認行為)

)


——循環與條件任務)


![[raspberrypi 0w and respeaker 2mic]實時音頻波形](http://pic.xiahunao.cn/[raspberrypi 0w and respeaker 2mic]實時音頻波形)

問題)