一.棧
1.棧的定義
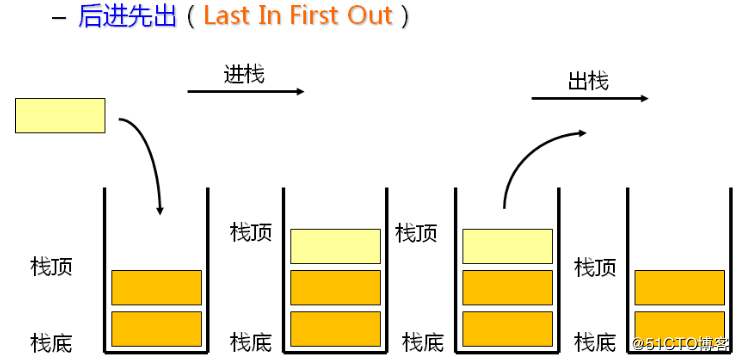
棧是一種特殊的線性表,其只允許在固定的一端進行插入和刪除元素操作。進行數據插入和刪除操作的一端稱為棧頂,另一端稱為棧底。棧中的數據元素遵守后進先出LIFO(Last In First Out)的原則。其結構可以參考羽毛球筒
在現實中我們通常用棧解決對稱性問題,如經典的括號匹配問題。
?2.棧的實現
由上結構圖可看出,我們用一個指針bottom指向棧底元素,一個指針top指向棧頂元素的下一個位置。實現棧可以用數組。
typedef int STDataType;
typedef struct Stack {STDataType *a;//一個動態創建的數組int top;//棧頂數據的下個位置,也是當前棧內元素個數int capacity;//當前棧的最大數據容量
} ST;
為了實現棧的增刪改查等功能,我們可以定義若干接口
//初始化
void StackInit(ST *pst);
//銷毀
void StackDestroy(ST *pst);
//入棧
void StackPush(ST *pst, STDataType x);
//出棧
void StackPop(ST *pst);
//獲取棧頂元素
STDataType StackTop(ST* pst);
//獲取棧是否為空
bool StackEmpty(ST* pst);
//獲取棧中元素的個數
int StackSize(ST *pst);
現在對這些接口實現。
#include "Stack.h"
//注意top的指向會影響到他的初始值
//初始化
void StackInit(ST* pst) {assert(pst != NULL);pst->a= NULL;//top指向棧頂元素的下一個空間,即表示當前棧內沒有元素pst->top = 0;pst->capacity = 0;
}
//銷毀
void StackDestroy(ST* pst) {assert(pst != NULL);free(pst->a);pst->top=pst->capacity=0;
}
//入棧
//先判斷當前空間是否足夠,不夠就動態開辟
//將入棧元素的值x賦予top,更新top位置
void StackPush(ST* pst, STDataType x) {assert(pst != NULL);if (pst->top == pst->capacity) {int newcapacity = pst->capacity == 0 ? 4 : pst->capacity * 2;STDataType* tmp = (STDataType*)realloc(pst->a, newcapacity * sizeof(STDataType));if (tmp == NULL) {perror("realloc fail");return;}}pst->a[pst->top] = x;pst->top++;
}//出棧
//從棧頂出元素,直接令top--
void StackPop(ST* pst){assert(pst != NULL);pst->top--;
}
//獲取棧頂元素
//top為棧頂元素下個位置,返回top-1處值即可
STDataType StackTop(ST* pst) {assert(pst);assert(pst->top != 0);return pst->a[pst->top - 1];
}
//獲取棧是否為空
bool StackEmpty(ST* pst) {assert(pst != NULL);return pst->top == 0;
}
//獲取棧中元素的個數
int StackSize(ST* pst) {assert(pst != NULL);return pst->top;
}
二.隊列
1.隊列的定義
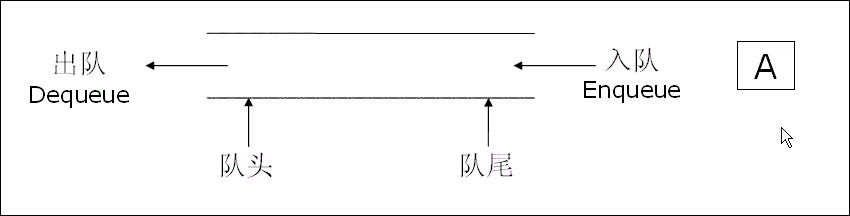
隊列也是一種特殊的線性表,其只允許在一端進行插入數據操作,在另一端進行刪除數據操作的特殊線性表,隊列具有先進先出FIFO(First In First Out) 入隊列:進行插入操作的一端稱為隊尾 出隊列:進行刪除操作的一端稱為隊頭
在實際應用中我們常用隊列解決公平性問題。如排隊取號,以及并發編程中鎖的競爭分配問題。?
隊列由于其隊尾插入,隊頭刪除的特性,若使用數組實現會比較困難:無論是插入還是刪除,都需要考慮空間大小和數據移動的問題,因此在這里我僅展示用鏈表實現。因此隊列的功能我們僅對鏈表進行尾插頭刪即可
聲明隊列節點結構
typedef int QDataType;typedef struct QueueNode
{struct QueueNode* next;QDataType val;
}QNode;
?為了避免次次尋找隊頭隊尾,直接定義另一個結構存儲頭尾指針
typedef struct Queue
{QNode* phead;//隊頭QNode* ptail;//隊尾int size;//隊列數據數量
}Queue;
要實現的接口
void QueueInit(Queue* pq);
void QueueDestroy(Queue* pq);// 隊尾插入
void QueuePush(Queue* pq, QDataType x);
// 隊頭刪除
void QueuePop(Queue* pq);// 取隊頭和隊尾的數據
QDataType QueueFront(Queue* pq);
QDataType QueueBack(Queue* pq);int QueueSize(Queue* pq);
bool QueueEmpty(Queue* pq);
?實現
#include"Queue.h"void QueueInit(Queue* pq)
{assert(pq);pq->phead = NULL;pq->ptail = NULL;pq->size = 0;
}void QueueDestroy(Queue* pq)
{assert(pq);QNode* cur = pq->phead;while (cur){QNode* next = cur->next;free(cur);cur = next;}pq->phead = pq->ptail = NULL;pq->size = 0;
}// 隊尾插入
//申請節點,插入節點后更新size
void QueuePush(Queue* pq, QDataType x)
{assert(pq);QNode* newnode = (QNode*)malloc(sizeof(QNode));if (newnode == NULL){perror("malloc fail");return;}newnode->next = NULL;newnode->val = x;if (pq->ptail == NULL)//若此時隊列沒有節點{pq->phead = pq->ptail = newnode;}else{pq->ptail->next = newnode;pq->ptail = newnode;}pq->size++;
}// 隊頭刪除
//存頭節點下個位置的節點
//釋放頭節點位置節點
//更新頭節點和size
void QueuePop(Queue* pq)
{assert(pq);assert(pq->size != 0);/*QNode* next = pq->phead->next;free(pq->phead);pq->phead = next;if (pq->phead == NULL)pq->ptail = NULL;*/// 一個節點if (pq->phead->next == NULL){free(pq->phead);pq->phead = pq->ptail = NULL;}else // 多個節點{QNode* next = pq->phead->next;free(pq->phead);pq->phead = next;}pq->size--;
}
//輸出隊頭數據
QDataType QueueFront(Queue* pq)
{assert(pq);assert(pq->phead);return pq->phead->val;
}//輸出隊尾數據
QDataType QueueBack(Queue* pq)
{assert(pq);assert(pq->ptail);return pq->ptail->val;
}//求當前隊列的數據個數
int QueueSize(Queue* pq)
{assert(pq);return pq->size;
}//當前隊列數據個數0則為空
bool QueueEmpty(Queue* pq)
{assert(pq);return pq->size == 0;
}
?
三.棧和隊列的簡單應用
1.用雙棧實現隊列
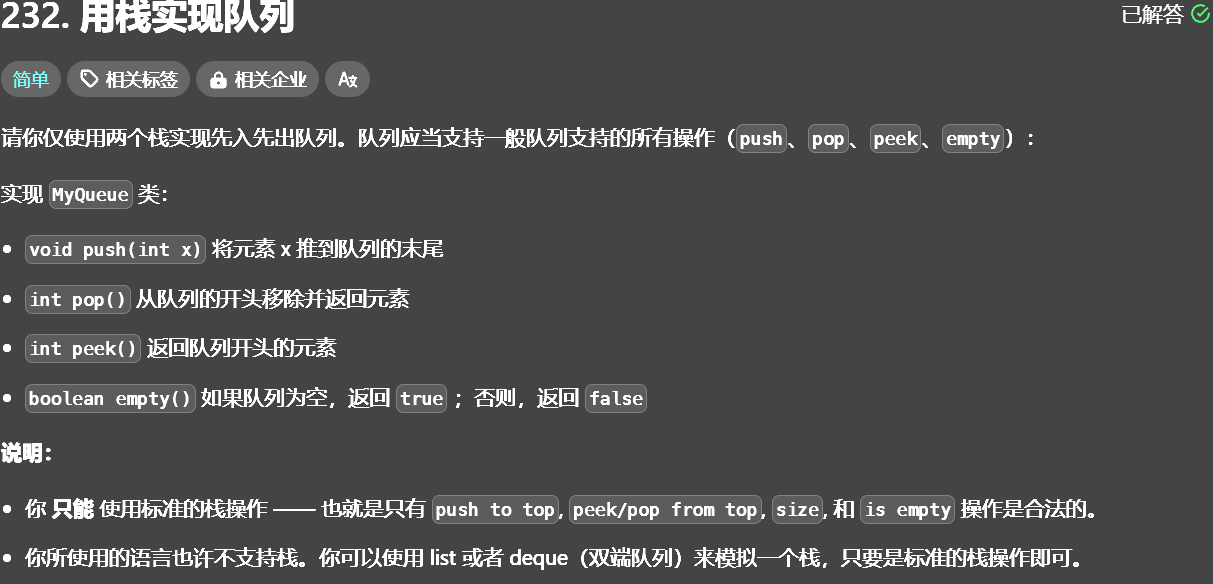
該問題的核心是:如何用后進先出的結構,實現一個先進先出的結構。這個核心會同時影響到插入和刪除的設計邏輯。
不妨先大致分析一下出隊的邏輯
 ?
?
我們向Stack1中插入數據[1,2,3]。若要進行出隊,應該出最先入隊的1
然而在Stack1中,1顯然位于棧底,想要將其最先出隊,不難觀察出:
我們只要將Stack1中數據以此出棧到Stack2中即可。
 ?此時將Stack2的棧頂出棧,就完成了出隊的操作。
typedef struct{int*a;int top;int capacity;
}Stack;void stackInit(Stack*pst){assert(pst!=NULL);pst->top=pst->capacity=0;pst->a=NULL;
}void stackPush(Stack*pst,int x){assert(pst!=NULL);if(pst->top==pst->capacity){int newcapacity=pst->capacity==0?4:pst->capacity*2;int *tmp=(int*)realloc(pst->a,newcapacity*sizeof(int));pst->a=tmp;pst->capacity=newcapacity;}pst->a[pst->top]=x;pst->top++;
}void stackPop(Stack*pst){assert(pst!=NULL);pst->top--;}int stackTop(Stack*pst){return pst->a[pst->top-1];
}bool stackEmpty(Stack*pst){return pst->top==0;
}void stackFree(Stack*pst){free(pst->a);pst->a=NULL;
}
//至此都是棧的結構和接口,因為C語言庫沒有內置棧。。//可以看到這里的隊列由雙棧實現
typedef struct {Stack stack1;Stack stack2;
} MyQueue;//建隊,即將隊中的兩個棧初始化即可
MyQueue* myQueueCreate() {MyQueue*obj=(MyQueue*)malloc(sizeof(MyQueue));stackInit(&(obj->stack1));stackInit(&(obj->stack2));return obj;
}int myQueuePop(MyQueue* obj){// 當stack2為空時,轉移所有元素if(stackEmpty(&obj->stack2)){while(!stackEmpty(&obj->stack1)){int tmp = stackTop(&obj->stack1);stackPush(&obj->stack2, tmp);stackPop(&obj->stack1);}}int x = stackTop(&obj->stack2);stackPop(&obj->stack2);return x;
}
void myQueuePush(MyQueue* obj, int x){stackPush(&obj->stack1,x);
}
int myQueuePeek(MyQueue* obj) {if (stackEmpty(&obj->stack2)) {// 循環轉移所有元素while (!stackEmpty(&obj->stack1)) {int tmp = stackTop(&obj->stack1);stackPush(&obj->stack2, tmp);stackPop(&obj->stack1);}}return stackTop(&obj->stack2); // 正確返回隊首元素
}bool myQueueEmpty(MyQueue* obj) {return stackEmpty(&obj->stack1)&&stackEmpty(&obj->stack2);
}void myQueueFree(MyQueue* obj) {stackFree(&obj->stack1);stackFree(&obj->stack2);
}
這段代碼就是上面提到要實現出隊時,將棧滿的元素一個個入棧到棧空的棧中
a.取stack1棧頂元素值
b.將stack1棧頂元素入空棧stack2
c.將當前stack1棧頂元素出棧,更新新的棧頂元素
由此直至stack1變為空棧,stack2棧滿,stack1的棧底為stack2的棧頂。
while(!stackEmpty(&obj->stack1)){int tmp = stackTop(&obj->stack1);stackPush(&obj->stack2, tmp);stackPop(&obj->stack1);}?
然而上述代碼存在一定的問題。?
int myQueuePop(MyQueue* obj){// 當stack2為空時,轉移所有元素if(stackEmpty(&obj->stack2)){while(!stackEmpty(&obj->stack1)){int tmp = stackTop(&obj->stack1);stackPush(&obj->stack2, tmp);stackPop(&obj->stack1);}}int x = stackTop(&obj->stack2);stackPop(&obj->stack2);return x;
}
void myQueuePush(MyQueue* obj, int x){stackPush(&obj->stack1,x);
}
int myQueuePeek(MyQueue* obj) {if (stackEmpty(&obj->stack2)) {// 循環轉移所有元素while (!stackEmpty(&obj->stack1)) {int tmp = stackTop(&obj->stack1);stackPush(&obj->stack2, tmp);stackPop(&obj->stack1);}}return stackTop(&obj->stack2); // 正確返回隊首元素
}
在進行轉移元素的操作時,我們默認向空棧中轉移。在初次創建棧時空棧即為Stack2(因為上述接口中首先向Stack1插入元素),但若測試用例中對同一個myQueue進行出隊時,此時的空棧又變成了Stack1。這里建議使用if-else判斷空棧或者用假設法判定空棧,否則可能無法通過某些測試用例。
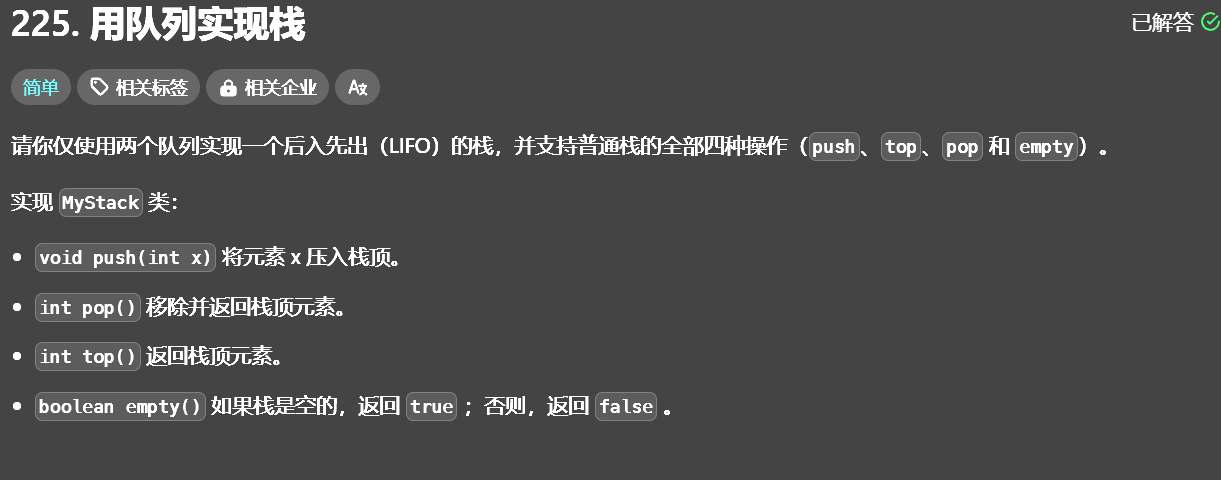
2.用兩個隊列實現棧
 ?
?
這題的思想其實與第一個完全一致。在這里直接放出代碼,并解決以上提到的問題?
#define LEN 20
typedef struct queue {int *data;int head;int rear;int size;
} Queue;typedef struct {Queue *queue1, *queue2;
} MyStack;Queue *initQueue(int k) {Queue *obj = (Queue *)malloc(sizeof(Queue));obj->data = (int *)malloc(k * sizeof(int));obj->head = -1;obj->rear = -1;obj->size = k;return obj;
}void enQueue(Queue *obj, int e) {if (obj->head == -1) {obj->head = 0;}obj->rear = (obj->rear + 1) % obj->size;obj->data[obj->rear] = e;
}int deQueue(Queue *obj) {int a = obj->data[obj->head];if (obj->head == obj->rear) {obj->rear = -1;obj->head = -1;return a;}obj->head = (obj->head + 1) % obj->size;return a;
}int isEmpty(Queue *obj) {return obj->head == -1;
}MyStack *myStackCreate() {MyStack *obj = (MyStack *)malloc(sizeof(MyStack));obj->queue1 = initQueue(LEN);obj->queue2 = initQueue(LEN);return obj;
}void myStackPush(MyStack *obj, int x) {if (isEmpty(obj->queue1)) {enQueue(obj->queue2, x);} else {enQueue(obj->queue1, x);}
}int myStackPop(MyStack *obj) {if (isEmpty(obj->queue1)) {while (obj->queue2->head != obj->queue2->rear) {enQueue(obj->queue1, deQueue(obj->queue2));}return deQueue(obj->queue2);}while (obj->queue1->head != obj->queue1->rear) {enQueue(obj->queue2, deQueue(obj->queue1));}return deQueue(obj->queue1);
}int myStackTop(MyStack *obj) {if (isEmpty(obj->queue1)) {return obj->queue2->data[obj->queue2->rear];}return obj->queue1->data[obj->queue1->rear];
}bool myStackEmpty(MyStack *obj) {if (obj->queue1->head == -1 && obj->queue2->head == -1) {return true;}return false;
}void myStackFree(MyStack *obj) {free(obj->queue1->data);obj->queue1->data = NULL;free(obj->queue1);obj->queue1 = NULL;free(obj->queue2->data);obj->queue2->data = NULL;free(obj->queue2);obj->queue2 = NULL;free(obj);obj = NULL;
}
3.設計循環隊列
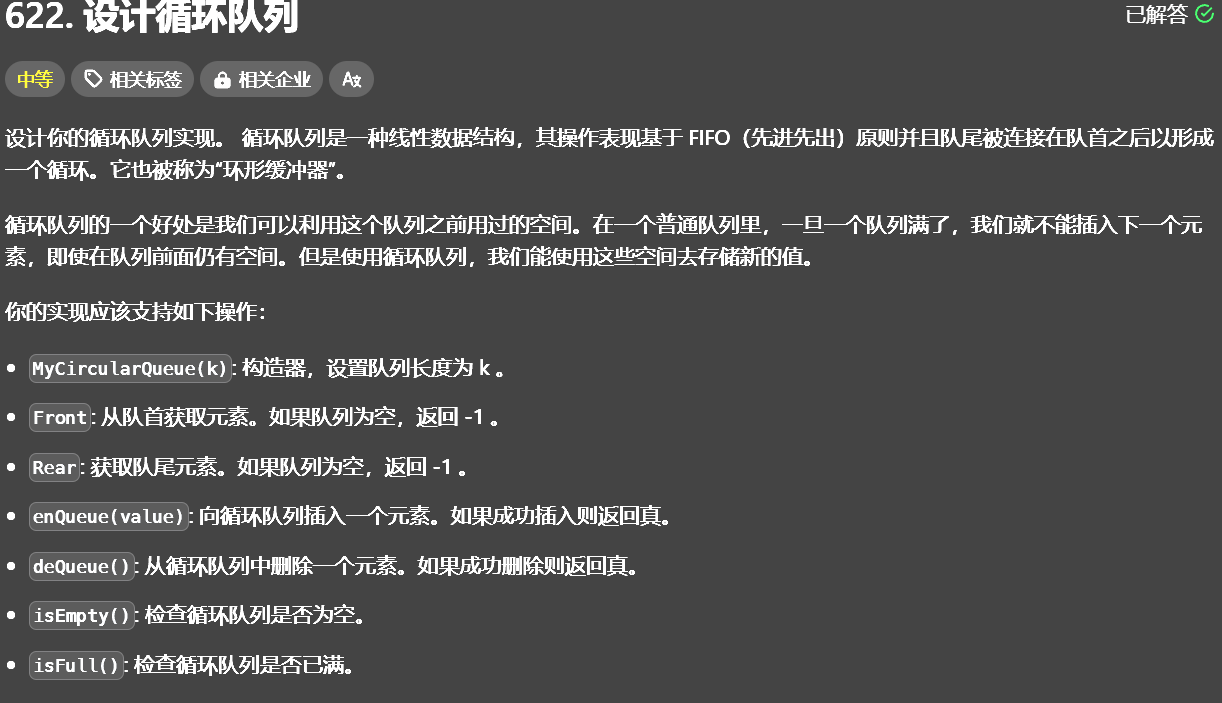
循環隊列我們可以理解為一個座位有限的圖書館,當座位滿時就不能再坐人,但是一旦有人離開,就可以再來一個人坐在那個空位。
我們可以直接用筆畫一畫這個結構,在這里rear為隊尾元素的下一個位置。假設這是一個可以存放五個數據的循環隊列。先對這個隊列進行入隊。
 ?
?
接著開始出隊?(注意隊列從隊尾入隊,隊頭出隊)

其實從剛剛插入的圖我們就能發現一個比較大的問題,當棧空和棧滿時的front指針和rear指針指向的都是同一個位置。。。他有一個專門的稱為,叫假溢出
為了解決假溢出,可以對要存儲k個數據的循環隊列,初始化k+1個空間。
若此時的k為4,開辟k+1個元素。此時的隊空隊滿如下:

直接來做這道題?
typedef struct {int front;//指向隊頭int rear;//指向隊尾的下一個元素int capacity;//空間容量int *elements;//用數組實現循環隊列
} MyCircularQueue;//建立存k個數據的循環隊列,這里開辟的空間為k+1
MyCircularQueue* myCircularQueueCreate(int k) {MyCircularQueue *obj = (MyCircularQueue *)malloc(sizeof(MyCircularQueue));obj->capacity = k + 1;obj->rear = obj->front = 0;obj->elements = (int *)malloc(sizeof(int) * obj->capacity);return obj;
}//入隊,成功return true
//若此時隊滿,直接return false
//這時判斷隊滿的條件是rear的下一個元素為隊頭
//注意這里的取模操作,是為了消除rear+1大于capacity,并且也是讓rear和front循環起來的基本操作
//更新rear位置
bool myCircularQueueEnQueue(MyCircularQueue* obj, int value) {if ((obj->rear + 1) % obj->capacity == obj->front) {return false;}obj->elements[obj->rear] = value;obj->rear = (obj->rear + 1) % obj->capacity;return true;
}//出隊,成功return true
//若此時隊空,直接return false
//更新front位置
bool myCircularQueueDeQueue(MyCircularQueue* obj) {if (obj->rear == obj->front) {return false;}obj->front = (obj->front + 1) % obj->capacity;return true;
}//求隊頭元素
//若隊空,return
//返回front處值
int myCircularQueueFront(MyCircularQueue* obj) {if (obj->rear == obj->front) {return -1;}return obj->elements[obj->front];
}//求隊尾元素
//若隊空,return
//rear為隊尾元素的下一個,因此返回rear-1處位置即可
//但此時rear恰好為0,為讓其正確指向隊尾元素,-1加上capacity再模capacity
int myCircularQueueRear(MyCircularQueue* obj) {if (obj->rear == obj->front) {return -1;}return obj->elements[(obj->rear - 1 + obj->capacity) % obj->capacity];
}bool myCircularQueueIsEmpty(MyCircularQueue* obj) {return obj->rear == obj->front;
}bool myCircularQueueIsFull(MyCircularQueue* obj) {return (obj->rear + 1) % obj->capacity == obj->front;
}void myCircularQueueFree(MyCircularQueue* obj) {free(obj->elements);free(obj);
}


)

)


實現步驟及示例)


![【補題】P10424 [藍橋杯 2024 省 B] 好數(數位dp)](http://pic.xiahunao.cn/【補題】P10424 [藍橋杯 2024 省 B] 好數(數位dp))


 Restful API接口調用)

