系列文章目錄
文章目錄
- 前言
- 一、QML基礎語法
- 二、屬性
- 三、腳本
- 四、核心元素類型
- 4.1 元素可以分為視覺元素和非視覺元素。
- 4.2 Item
- 4.2.1 幾何屬性(Geometry):
- 4.2.2 布局處理:
- 4.2.3 鍵處理:
- 4.2.4 變換
- 4.2.5 視覺
- 4.2.6 狀態定義
- 4.3 Rectangle
- 4.3.1 顏色
- 4.4 Text
- 4.5 Image
- 4.6 MouseArea
- 五、實例演示
- 總結
前言
- QML是一種用于描述對象如何相互關聯的聲明式語言。
- QtQuick是一個基于QML的框架。
一、QML基礎語法
- import語句導入一個模塊。qt6 可以不寫版本號,自動加載最高版本的模塊。
- 對于單行注釋,可以使用//,對于多行注釋,可以通過/**/進行注釋。就像在C/C++和JavaScript中一樣
- 每個QML文件都需要有一個唯一的根元素,就像HTML一樣
- 元素聲明形式為:type{ }
- 元素可以有屬性,形式為:name:value
- QML文檔中的任意元素可以通過使用其id(不帶引號的標識符)進行訪問
- 元素可以嵌套,這意味著父元素可以有千元去子元素可以使用parent關鍵字訪問父元素
二、屬性
- 屬性是一個簡單的鍵值對,例如:width:100; text: ‘Greetings’ ; color: ‘#FF0000’
- 屬性具有類型,并且可以具有初始值。
- id是用于引用QML文件(在QML中稱為"document”)中的元素。id在文檔中必須是唯一的,不能重置為其他值。(類似于C++的引用。)
- 屬性可以設置值,具體取決于其類型。如果沒有為屬性指定值,將使用默認初始值。
- 屬性可以依賴于一個或多個其他屬性。這稱為綁定。
- 可以使用property限定符向元素添加新屬性,后跟類型、名稱和可選的初始值( property<類型><名稱>:<值>) 。
- 聲明屬性的另一種重要方式是使用別名關鍵字(property alias≤名稱>:<引用>)。
- 基于int的值將自動轉換為字符串類型。每次times屬性更改時都會更新文本。
- 編寫grouped property的另一種方法是font{family:“Ubuntu”; pixelSize:24}。
- 快速切換焦點。
- 可以為屬性提供處理程序。屬性更改后被調用。
三、腳本
- QML和JavaScript(也稱為ECMAScript)是好朋友。
- 也可以使用箭頭函數((text)=> {})。
- 當用戶按下了鍵盤上的空格鍵,調用JavaScript函數increment() 。
- 以函數name(){ …}的形式定義JavaScript函數,它增加了計數器。每次SpacePress遞增時,綁定屬性也將更新。
四、核心元素類型
4.1 元素可以分為視覺元素和非視覺元素。
- 視覺元素(如Rectangle)具有幾何形狀。
- 非視覺元素(Timer)提供一般功能,通常用于控制視覺元素。
4.2 Item
ltem是所有視覺元素的基礎元素,因此所有其他視覺元素都從ltem繼承。 它本身
并不繪制任何東西,但定義了所有視覺元素的共同屬性:
4.2.1 幾何屬性(Geometry):
- x、y: 用于定義元素展開的左上角位置
- z: 用于定義堆疊順序
- width、height: 用于表示范圍
4.2.2 布局處理:
- anchors:(左、右、上、下、垂直和水平中心)相對于其他元素進行定位。
- 可選項margins
4.2.3 鍵處理:
- Key和KeyNavigation屬性用于控制鍵處理
- focus屬性啟用鍵處理
4.2.4 變換
- scale和rotate變換以及x、y、z變換的通用transform屬性列表,以及transformOrigin。
4.2.5 視覺
- opacity用于控制透明度,visible用于顯示/隱藏元素,clip用于限制對元素邊界的繪制操作,smooth用于增強渲染質量。
4.2.6 狀態定義
- states用于動畫化狀態更改。
- 包含所有支持的狀態列表,當前state屬性和transitions 列表屬性,
4.3 Rectangle
Rectangle擴展了Item,為其添加填充顏色。此外,還支持border.color和border.width。要創建圓角矩形,可以使用radius屬性。
4.3.1 顏色
- gradient用于填充漸變顏色
- position標記y軸上的位置(o=頂部,1=底部)
4.4 Text
- 要顯示文本,可以使用Text元素。它最顯著的屬性是字符串類型的text屬性。元素根據給定的文本和使用的字體(例如font.family、font.pixelSize等)計算其初始寬度和高度。要更改文本的顏色,只需使用color屬性。
- 可以使用horizontalAlignment和verticalAlignment屬性對齊文本。使用style和styleColor允許以輪廓、凸起和凹陷模式渲染文本。
- elide屬性允許將省略符位置設置為文本的左側、右側或中間。
- 例如:A very … long text
- 如果不希望省略符模式的"…"出現,但仍希望看到全文,可以使用wrapMode屬性包裝文本(僅在顯式的設置了寬度時有效)
4.5 Image
lmage元素能夠以各種格式(例如PNG、JPG、GIF、BMP、WEBP)顯示圖像。有關支持的圖像格式的完整列表,請參閱Qt文檔。除了提供圖像URL的source屬性外,它還包含一個控制大小調整行為的fillMode。
| 值 | 說明 |
|---|---|
| lmage.Stretch | 默認值。縮放圖像以適合項目 |
| Image.PreserveAspectFit | 圖像均勻縮放以適應而不裁剪 |
| Image.PreserveAspectCrop | 圖像均勻縮放以填充,必要時進行裁剪 |
| Image.Tile | 水平和垂直復制圖像 |
| lmage.TileVertically | 圖像水平拉伸并垂直平鋪 |
| lmage.TileHorizontally | 圖像被垂直拉伸并水平平鋪Image.Pad:圖像未轉換 |
- 使用PreserveApectCrop的圖像元素還應啟用clip,以避免在圖像邊界之外渲染圖像數據。
- 可以在C++中使用QQuicklmageProviger創建自己的圖像提供程序。動態創建圖像,并利用線程加載圖像。
4.6 MouseArea
MouseArea這是一個矩形的不可見項,可以在其中捕獲鼠標事件。
五、實例演示
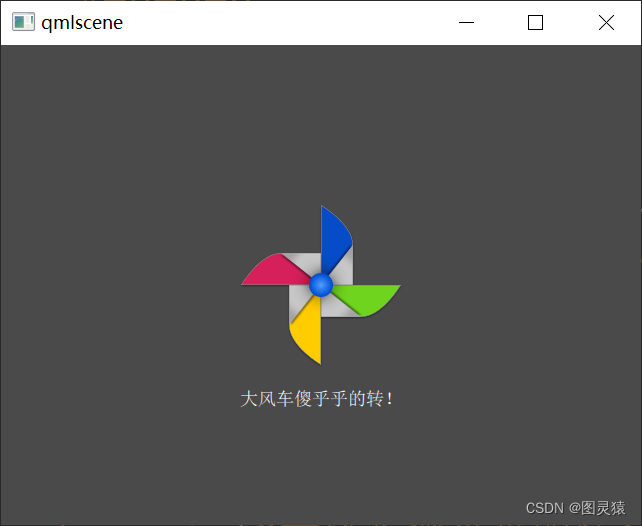
示例1:
import QtQuick 2.12
import QtQuick.Window 2.12Rectangle {id: rootwidth: 640; height: 480color: "#4A4A4A"Image {id: imagex: (/*root.*/parent.width - width) / 2;y: (root.height - height) / 2source: "../00_chapter1-pinwheel/images/pinwheel.png"}Text {
//        id: nametext: qsTr("大風車傻乎乎的轉!")/*x: (root.width - width) / 2;*/y: image.y + image.height + 20horizontalAlignment: Text.AlignHCenterwidth: root.widthcolor: 'white'}
}
運行結果:
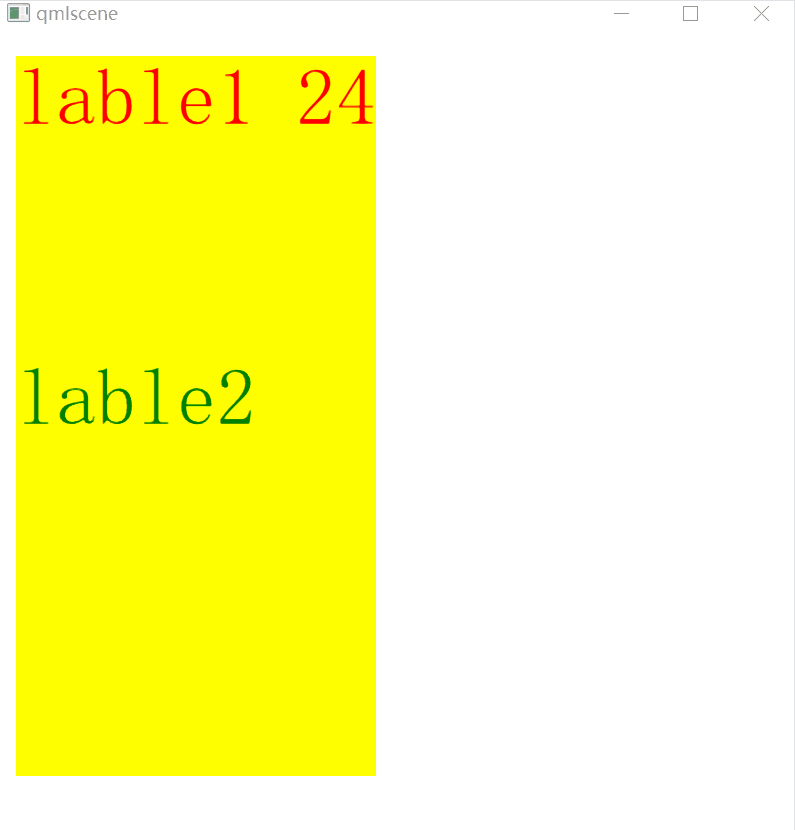
示例2:
import QtQuick 2.9
import QtQuick.Window 2.3Rectangle{id: rootwidth: 800;height: 800Text {// (1) identifierid: lable1// (2) set x- and y-positonx: 20;y: 20// (3) bind height to 2 * widthheight: 2 * widthRectangle {anchors.fill: parentcolor: 'yellow'z: parent.z - 1}// (4) custom propertyproperty int times: 24// (5) property aliasproperty alias anotherTimes: lable1.times// (6) set text appended by valuetext: "lable1 " + anotherTimes// (7) font is a grouped properttfont.family: "Ubuntu"font.pixelSize: 80
//        font {family: "Ubuntu";pixelSize: 24}// (8) KeyNavigation is an attached propertyKeyNavigation.tab: lable2// (9) signal handler for property changesonHeightChanged: console.log('height:',height)// (10) focus is need to receive key eventsfocus: true// (11) change color based on focus valuecolor: focus ? "green":"red"}Text {id: lable2x: lable1.x;y: lable1.y +300font{pixelSize: 80}text: qsTr("lable2")focus: !lable1.focusKeyNavigation.tab: lable1color: focus ? "green":"red"}
}
運行結果:
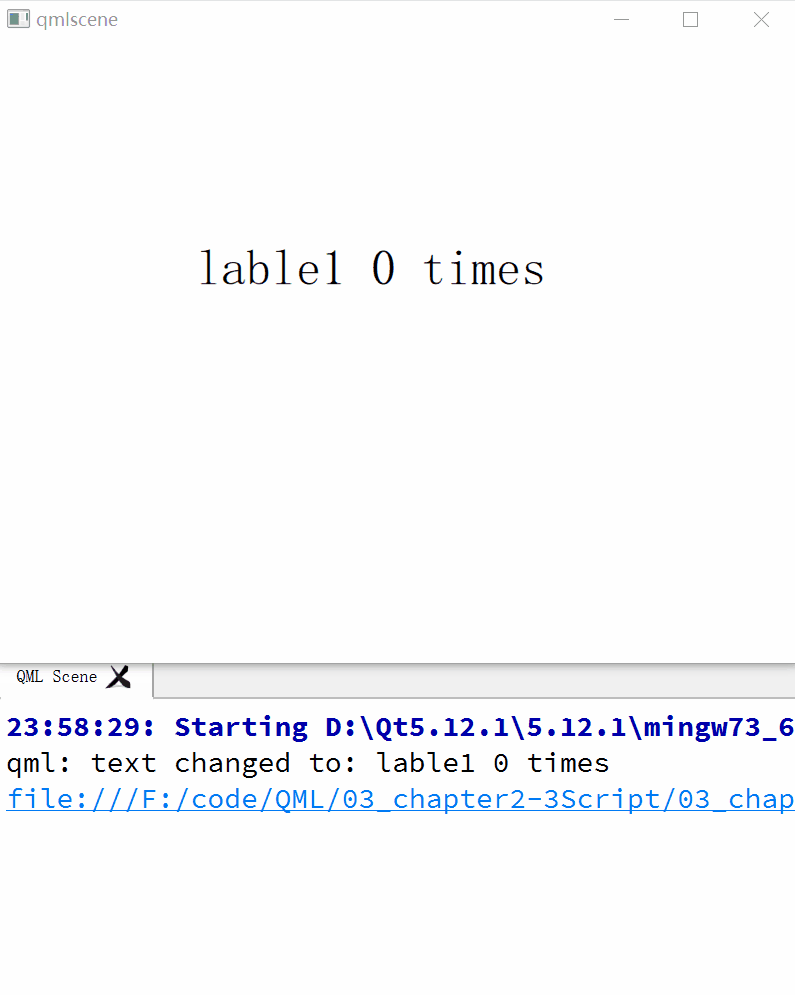
示例3:
import QtQuick 2.9
import QtQuick.Window 2.3Rectangle{id: rootwidth: 800;height: 800Text {id: lable1color: whitex: 200;y: 200property int spacePresses: 0text: "lable1 " + spacePresses + " times"font.family: "Ubuntu"font.pixelSize: 50onTextChanged: function(text){ console.log("text changed to:",text)}
//        onTextChanged: (text) =>{console.log("text changed to:",text)}focus: trueKeys.onSpacePressed: {increment()}Keys.onEscapePressed: {lable1.text = ''}function increment(){spacePresses += 1}KeyNavigation.tab: lable1}
}
運行結果:
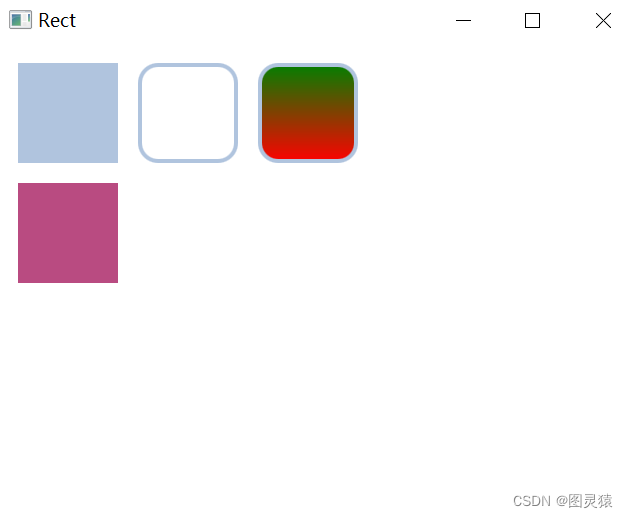
示例4:
import QtQuick 2.9
import QtQuick.Window 2.3Window {visible: truewidth: 640height: 480title: qsTr("Rect")Rectangle {id: rect1x: 20;y: 20width: 100; height: 100color: 'lightsteelblue'}Rectangle {id: rect2x: 140;y: 20width: 100; height: 100border.color: 'lightsteelblue'border.width: 4radius: 20}Rectangle {id: rect3x: 260;y: 20width: 100; height: 100gradient: Gradient {
//            GradientStop {position: 0.0;color: 'lightsteelblue'}
//            GradientStop {position: 1.0;color: 'slategray'}GradientStop {position: 0.0;color: 'green'}GradientStop {position: 1.0;color: 'red'}}border.color: 'lightsteelblue'border.width: 4radius: 20}Rectangle {id: rect4x: 20;y: 140width: 100; height: 100//可以使用JavaScript創建隨機顏色color: Qt.rgba(Math.random(),Math.random(),Math.random(),1)}
}
運行結果:
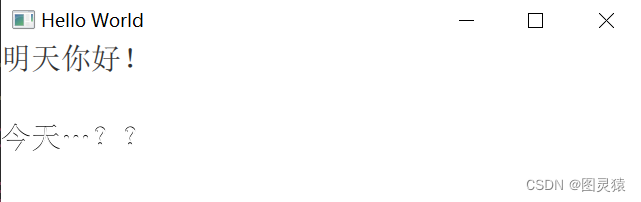
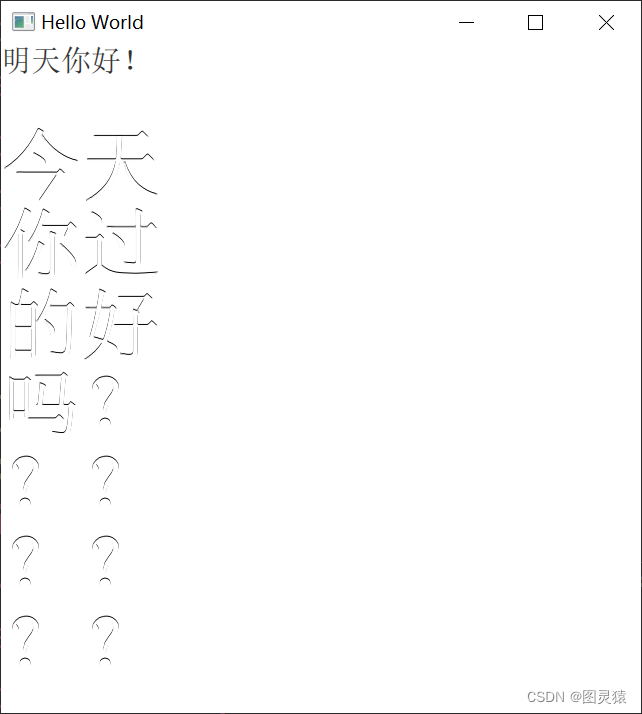
示例5:
Window {visible: truewidth: 640height: 780title: qsTr("Hello World")Text {id: text1text: "明天你好!"color: "#303030"font.family: "Ubuntu"font.pixelSize: 30}Text {y: text1.height+50width: 180elide: Text.ElideMiddle //文字縮略顯示屬性設置text: "今天你過的好嗎???????????"font.family: "Ubuntu"font.pixelSize: 80style: Text.SunkenstyleColor: '#000000'color: 'white'
//        wrapMode: Text.WordWrap //文字超過設置寬度換行(符號不屬于文字范疇)wrapMode: Text.WrapAtWordBoundaryOrAnywhere //符號也會換行}
}
運行結果:
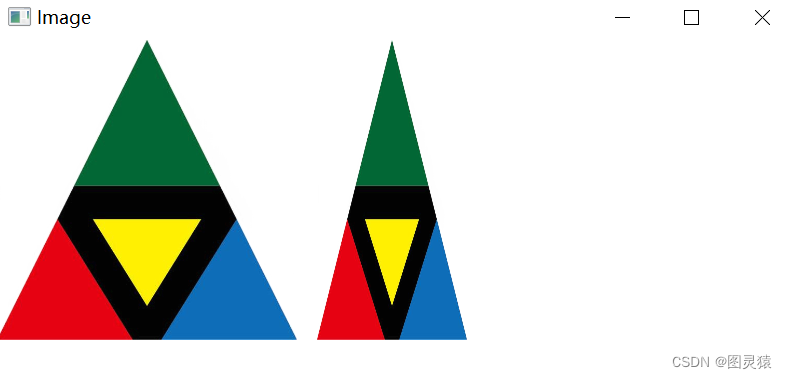
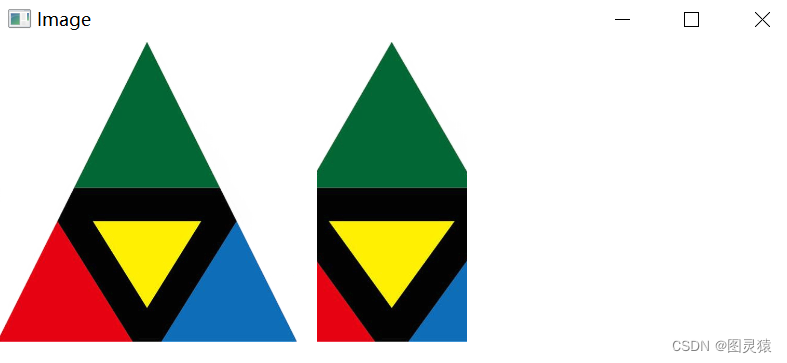
示例6:
import QtQuick 2.9
import QtQuick.Window 2.3Window {visible: truewidth: 800height: 600title: qsTr("Image")Image {id: image1width: 300; height: 300source: "./image/triangle.png"}Image {
//        id: image1x: image1.x + image1.width + 20width: image1.width / 2; height: 300source: "./image/triangle.png"
//        fillMode: Image.Stretch             //默認值。縮放圖像以適合項目
//        fillMode: Image.PreserveAspectCrop  //圖像均勻縮放以填充,必要時進行裁剪
//        clip: truefillMode: Image.PreserveAspectFit     //圖像均勻縮放以適應而不裁剪(長寬哪個小,以哪個為基準)}
}
運行結果:

示例7:
import QtQuick 2.9
import QtQuick.Window 2.3Window {visible: truewidth: 800height: 700title: qsTr("MouseArea")Rectangle {id: rect1x: 10;y: 10width: 280;height: 280color: "lightsteelblue"MouseArea{width: parent.width; height: parent.heightonClicked: rect2.visible = !rect2.visible}}Rectangle {id: rect2x: 300;y: 10width: 280;height: 280border.color: "lightsteelblue"border.width: 5}
}
運行結果:


)


)

)