任務描述
任務名稱:
實現基本的登錄功能
知識點:
了解前端Vue項目的基本執行過程
重? 點:
構建項目的基本登陸功能
內? 容:
通過實現項目的基本登錄功能,來了解前端Vue項目的基本執行過程,并完成基礎環境的準備,包括:工具類、靜態資源文件等。
任務指導
通過實現項目的基本登錄功能,來了解前端Vue項目的基本執行過程,并完成基礎環境的準備,包括:工具類、靜態資源文件等:
1、掌握各工具類的作用
2、完成登錄的前端設計
3、完成登錄的后端設計
4、最終掌握前端Vue項目的開發流程,以及各個文件的功能和作用
任務實現
在上一個階段任務創建的前端基礎框架的基礎上,進行本階段任務的開發。
一、登錄功能的前端處理過程
1、導入項目所需的圖片和CSS等靜態文件
- 參考代碼存放client節點的/opt/code目錄下
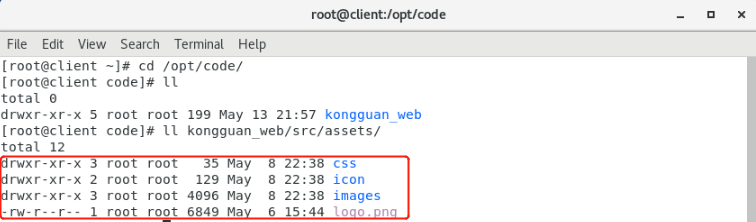
- 執行如下命令:
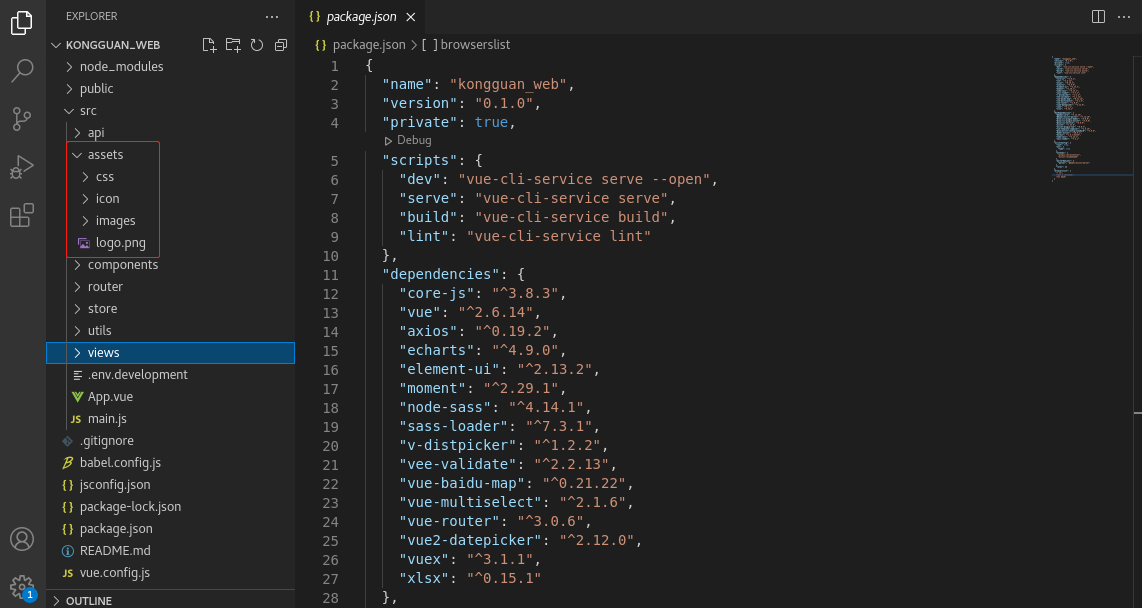
[root@client ~]# cp -r /opt/code/kongguan_web/src/assets/* /root/kongguan_web/src/assets/- 將參考代碼中的css、icon、images等文件夾或文件直接拷貝到當前創建的新項目的src/assets/目錄中
2、完成項目中使用的工具類的編寫(此處的代碼可由學生獨立完成,也可以由老師提供,直接導入到項目中)
- 編寫或直接導入工具類文件,所有的工具類都放在src/utils目錄下
| src/utils/message.js | 消息彈窗管理 |
| src/utils/request.js | 用于請求的身份驗證 |
- 在src/utils/message.js中,定義了消息彈窗管理,代碼如下:
import { Message } from "element-ui";
let messageInstance = null;
let mainMessage = function DoneMessage(options) {//如果彈窗已存在先關閉if (messageInstance) {messageInstance.close();}messageInstance = Message(options);
}
let arr = ['success', 'warning', 'info', 'error'];
arr.forEach(function (type) {mainMessage[type] = function (options) {if (typeof options === 'string') {options = {message: options};}options.type = type;return mainMessage(options);};
});
export const message = mainMessage;- 在src/utils/request.js中,定義了攔截器,用于攔截“請求”和“響應”,進行身份驗證,代碼如下:
import Vue from 'vue'
import axios from 'axios'Vue.prototype.$ajax = Vue.ajax = axiosaxios.defaults.baseURL = process.env.NODE_ENV !== 'production' ? "" : (process.env.VUE_APP_BASE_API)axios.interceptors.request.use(config => {if (localStorage.getItem('Authorization')) {config.headers.common['Authorization'] = localStorage.getItem('Authorization');} else {}return config;
}, err => {return Promise.reject(err);
})
axios.interceptors.response.use(function (response) {// console.log(response);// console.log(response.headers.Authorization);// 對響應數據做點什么return response.data;
}, function (error) {if (JSON.stringify(error).indexOf('401') !== -1) { // token失效localStorage.removeItem('Authorization')Vue.prototype.$message.error("token過期")Vue.prototype.$router.push({path: '/login',})} else if (JSON.stringify(error).indexOf('403') !== -1) {localStorage.removeItem('Authorization')Vue.prototype.$message.error("token無效")Vue.prototype.$router.push({path: '/login',})}// 對響應錯誤做點什么return Promise.reject(error);
});export default axios;
3、編寫 src/api/login/login.js文件,向服務端發送請求,實現登錄
- 定義login方法,使用POST請求向服務端發送表單數據data,服務端返回的數據包括:登錄狀態、身份token、權限等信息。
import request from '../../utils/request'const baseUrl="/api"/*** 用戶登錄*/
export function login(data){return request({url:baseUrl+"/login",method:"post",data:data})
}
4、編寫src/store/index.js,用于Token的存儲
- src/store/index.js文件,用于存儲token,修改token,并將token存入localStorage
import Vue from 'vue'
import Vuex from 'vuex'Vue.use(Vuex)
export default new Vuex.Store({state: {// 存儲tokenAuthorization: localStorage.getItem('Authorization') ? localStorage.getItem('Authorization') : '',},mutations: {// 修改token,并將token存入localStoragechangeLogin (state, user) {state.Authorization = user.Authorization;localStorage.setItem('Authorization', user.Authorization);console.log(state.Authorization);}}
})
5、創建登錄的Vue視圖組件Login.vue
- 登錄頁面設計:在src/views目錄下創建Login目錄,然后在Login目錄下,創建Login.vue 登錄頁面
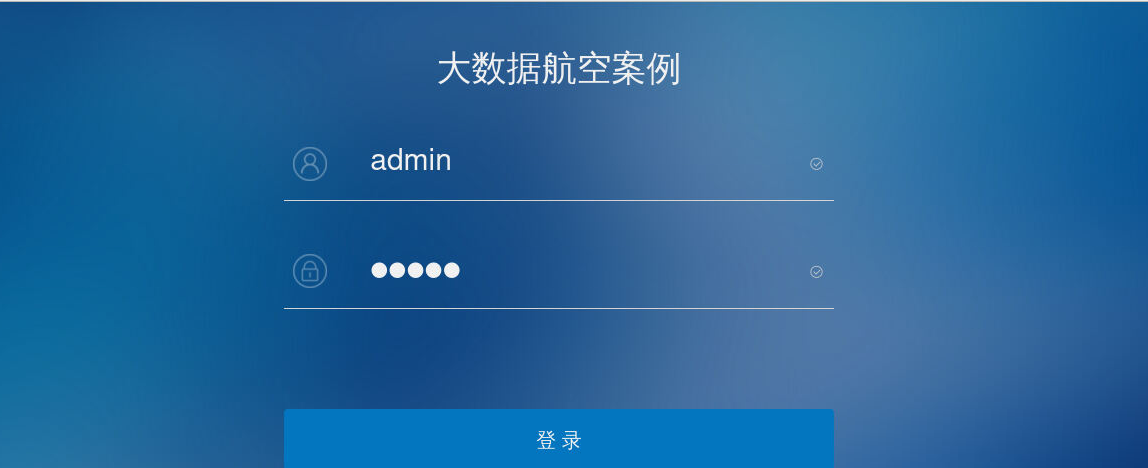
<template><div class="login"><div class="top_logo"></div><!-- 登錄框區域 --><div class="form_box"><div style="color: #f0f0f0;">大數據航空案例</div><el-form style="margin-top: 60px" :model="loginForm" status-icon :rules="rules" ref="loginForm"><el-row type="flex" justify="left" :gutter="20"><el-col :span="3" align="center"><img src="../../assets/images/user-icon.png" style="margin-top: 3px"/></el-col><el-col :span="21" align="center"><el-form-item prop="account"><el-input  class="el-input__inner1" v-model="loginForm.account" placeholder="請輸入用戶名" maxlength="20"></el-input></el-form-item></el-col></el-row><el-row type="flex"><div class="tableTitle"/></el-row><el-row type="flex" justify="left" style="margin-top: 50px" :gutter="20"><el-col :span="3" align="center"><img src="../../assets/images/pwd-icon.png" style="margin-top: 3px"/></el-col><el-col :span="21"><el-form-item prop="password"><el-input type="password" v-model="loginForm.password" placeholder="請輸入密碼" maxlength="16"></el-input></el-form-item></el-col></el-row><el-row type="flex"><div class="tableTitle"/></el-row><el-form-item align="center" style="margin-top: 100px"><el-button class="el-button1" type="primary;" @click="submitForm('loginForm')">登 錄</el-button></el-form-item></el-form></div><!-- 底部區域 --></div>
</template>
... 接下頁...- 初始化表單數據,并定義表單驗證規則,例如:如果用戶名輸入框為空,則提示“請輸入登陸賬號”
 ... 接上頁...<script>import {mapMutations} from 'vuex';import {login} from "@/api/login/login";export default {data() {return {loginForm: {account: "",password: "",},otherQuery: {},rules: {account: [{required: true, message: "請輸入登陸賬號", trigger: "blur"}],password: [{required: true, message: "請輸入登陸密碼", trigger: "blur"}]}};},
... 接下頁...- 處理請求的重定向地址,獲取請求的地址,登錄后,直接跳轉到請求的地址
其中getOtherQuery(query)方法是在下面的代碼中定義的方法,返回上一次請求的地址,登錄成功后,直接跳轉到該地址。
... 接上頁...watch: {$route: {handler: function (route) {const query = route.queryif (query) {this.redirect = query.redirectthis.otherQuery = this.getOtherQuery(query)}},immediate: true}},
... 接下頁...- 提交表單的過程如下:
調用src/api/Login/Login.js中的login方法,向服務端發送請求,登錄成功后將用戶token和權限保存到本地vuex中,然后跳轉到上一次請求的地址。
... 接上頁...//methods: {...mapMutations(['changeLogin']),submitForm(formName) {this.$refs[formName].validate(valid => {if (valid) {login(this.loginForm).then(data => {if (data.successful) {console.log("登錄成功");// 將用戶token保存到vuex中// this.changeLogin({Authorization: data.result.token});//localStorage.setItem('account', data.result.name)if (data.resultValue.Authorization != null) {localStorage.setItem('Authorization', data.resultValue.Authorization);}if (data.resultValue.userAuth != null) {localStorage.setItem('userAuth', data.resultValue.userAuth);}this.$router.push({path: this.redirect || '/', query: this.otherQuery});console.log("跳轉");} else {console.log("登錄失敗");this.$message.error("登錄失敗");}});} else {return false;}});},//獲取請求的地址,登錄后,直接跳轉到請求的地址getOtherQuery(query) {return Object.keys(query).reduce((acc, cur) => {if (cur !== 'redirect') {acc[cur] = query[cur]}return acc}, {})}}};
</script>
... 接下頁...- 頁面樣式如下
... 接上頁...
<style scoped>.login {background: url('../../assets/images/loginBg.png') no-repeat;background-size: cover;height: 100%;}.top_logo {height: 130px;}.form_box {text-align: center;width: 550px;margin: 0 auto;}.login-footer {width: 100%;text-align: center;color: #ffffff;position:fixed;bottom:0;margin-bottom: 64px;size: 23px;padding-top: 100px;}.el-button1{background: #0376bf;border-color: #0376bf;width: 100%;color: #f0f0f0;height: 62px;}.tableTitle {margin: 0 auto;margin-top: 10px;width: 550px;height: 1px;background-color: #d4d4d4;}
</style>
<style>.el-form-item {margin-bottom: 1px;}.el-form-item__error{margin-left: 15px;margin-top: 20px;}.el-input__inner {background: transparent;border: 0;color: #f0f0f0;}
</style>
6、創建登錄成功后的主頁面的Vue視圖組件src/views/Home/Index.vue
- 由于當前任務是實現登錄功能,所以登錄成功后的src/views/Home/Index.vue頁面只顯示簡單的內容即可,詳細展示會在后續任務中完成。
<template><div style="color: #000000;">大數據航空案例</div>
</template><script>export default{}
</script><style>
</style>
7、為了實現頁面風格的統一,所以這里還需要創建一個src/views/Layout/Layout.vue和一個src/views/Layout/Header.vue 布局視圖組件
除登錄頁面外,其他顯示的頁面都嵌套在一個Layout.vue內,且都顯示同一個頭部內容Header.vue。由于這是在后續任務中完成的工作,所以這里只顯示簡單的內容即可。
- src/views/Layout/Layout.vue
<template><div class="main"><Header></Header><div class="common-right"><router-view/></div></div>
</template><script>export default{}
</script><style>
</style>- src/views/Layout/Header.vue
<template><div style="color: red;">大數據航空案例</div>
</template><script>export default{}
</script><style>
</style>
8、編寫src/router/index.js路由文件,當我們訪問任何頁面時,如果沒有身份認證信息,則會跳轉到Login.vue
- 通過vue-router重寫路由的push方法,解決相同路徑跳轉報錯的問題
import Vue from 'vue'
import Router from 'vue-router'const originalPush = Router.prototype.push;
Router.prototype.push = function push(location) {return originalPush.call(this, location).catch(err => err)
}
... 接下文 ...- 設置基本路由規則
... 接上文 ...
Vue.use(Router)
/* Layout */
import Layout from '@/views/Layout/Layout'
const router =  new Router({base: process.env.BASE_URL,mode: 'history',routes: [{path: "/login",component: resolve => require(['@/views/Login/Login'], resolve),hidden: true,meta: {auth: true}},{path: '/',component: Layout, redirect: '/home',children: [{path: 'home',component: resolve => require(['@/views/Home/Index'], resolve),name: 'home',meta: { title: 'home' }}]},]
})
... 接下文 ...- 導航守衛:使用router.beforeEach注冊一個全局前置守衛,用于獲取Token來判斷用戶是否登陸,如果沒有登錄,則跳轉到/Login.vue頁面
... 接上文 ...
router.beforeEach((to, from, next) => {if (to.path === '/login') {next();} else {let token = localStorage.getItem('Authorization');if (token === null || token === '') {next('/login');} else {next();}}
});
export default router
9、編寫src/main.js文件,該文件是應用系統入口、主方法
- 在src/main.js中導入 ?src/store/index 等文件,有些組件,如ECharts報表組件,在當前任務中沒有使用,可以先導入暫不使用
import Vue from 'vue'
import App from './App'
import router from './router'
import store from './store/index'
import './assets/css/basic.css'
import ElementUI from 'element-ui';
import 'element-ui/lib/theme-chalk/index.css';
import './assets/icon/iconfont.css';
import * as echarts from 'echarts';
import axios from 'axios';
import moment from 'moment';
import { message } from './utils/message'
... 略,接下文 ...- 定義全局屬性,以便可以在項目的任意位置使用
... 略,接上文 ...
Vue.prototype.$echarts = echarts;
Vue.prototype.$axios = axios;
Vue.config.productionTip = false
Vue.use(ElementUI);
Vue.prototype.$message = message;
Vue.prototype.$moment = moment;new Vue({router,store,render:h =>h(App)
}).$mount('#app')
... 略,接下文 ...- 定義全局響應(response)攔截器和請求(request)攔截器
... 略,接上文 ...
//定義一個響應攔截器
axios.interceptors.response.use(function (config) {let status = config.code;//401,未登錄,跳轉到登錄頁if (status == 401) {console.log(401);router.push("/login");}//403,無權限,跳轉到登錄頁if (status == 403) {console.log(403);router.push("/login");}return config
})// request攔截器
axios.interceptors.request.use(config => {// 如果想請求可以重復發起,給在請求參數中加allowedRepeat:true  (后續會刪除,不會發送給服務端)if (!config.data || !config.data.allowedRepeat) { // 如果不允許重復請求,開啟攔截// todo: 1. 設置攔截 防止重復請求// 攔截重復請求(即當前正在進行的相同請求)const requestData = getRequestIdentify(config)removePending(requestData, true)// 使用 cancel token 取消請求 參考:http://www.axios-js.com/zh-cn/docs/#%E6%8B%A6%E6%88%AA%E5%99%A8config.cancelToken = new CancelToken((c) => {pending[requestData] = c})} else { // 允許重復請求,不進行攔截delete config.data.allowedRepeat // 把自定義的請求參數給刪掉,不發送給服務端}return config
}, error => {// Do something with request errorconsole.log(error) // for debugPromise.reject(error)
})
... 略,接下文 ...- 攔截重復請求
... 略,接上文 ...
// 攔截重復請求
let pending = {}
const CancelToken = axios.CancelToken
// 請求標識;完成請求后也需要執行刪除記錄,所以添加此參數避免執行無用操作
const removePending = (key, isRequest = false) => {if (pending[key] && isRequest) {pending[key]('取消重復請求')}delete pending[key]
}
/*** 由于我們請求用了代理 直接代理到測試服務器 因此請求響應攔截器的config.url是一致的,不需要標識值區分* 如果請求攔截器和響應攔截器的config.url不一致,就需要一個標識值用來區分判斷*/
const getRequestIdentify = (config) => {const url = config.url// 返回url及請求參數 post方法請求參數為config.data  get方法請求參數為config.paramsif (config.method === 'post') {return encodeURIComponent(config.url + JSON.stringify(config.data))}return encodeURIComponent(url + JSON.stringify(config.params))
}
10、配置環境變量,在項目根目錄下創建 .env.development 文件,內容如下:
NODE_ENV='development'
VUE_APP_TITLE = 'development'
#測試環境,使用此配置文件
#請求前綴
VUE_APP_BASE_API = 'http://localhost:8848/api'
11、修改vue.config.js文件,覆蓋文件內容,配置服務器端的IP和訪問端口等,文件的完整內容如下:
module.exports = {runtimeCompiler: true,lintOnSave: process.env.NODE_ENV !== 'production',lintOnSave: false,productionSourceMap:false,chainWebpack(config) {config.plugins.delete('prefetch')  },pwa: {iconPaths: {}},devServer: {host: "0.0.0.0",port: 8089,proxy: {'/api': {target: process.env.VUE_APP_BASE_API,pathRewrite:{"^/api":"/"},changeOrigin: true,ws: false},}}
}
12、運行測試前端Vue程序
- 進入命令行模式,在項目根目錄下執行npm run dev命令運行項目(注意:npm默認使用國外鏡像,可能會出現連接失敗的問題,如出現連接失敗可將npm命令切換成cnpm命令)
[root@client KongGuan-Web]# npm run dev- 打開瀏覽器,可以查看到登錄頁面
二、登錄功能的后端處理過程
1、在后端BigData-KongGuan項目的pom.xml文件中引入 spring-boot-starter-security 包和Redis相關包
- 當前項目使用SpringBoot的WebSecurityConfig安全組件,并使用Redis保存用戶token和權限,并為Redis設置過期時間,在前面搭建后端基礎框架的任務中,已經在pom.xml文件引入了相關依賴包,打開pom.xml文件可以查看到以下內容。
<!-- Spring Boot Security --><dependency><groupId>org.springframework.boot</groupId><artifactId>spring-boot-starter-security</artifactId></dependency><!-- spring-redis --><dependency><groupId>org.springframework.boot</groupId><artifactId>spring-boot-starter-data-redis</artifactId><exclusions><exclusion><groupId>io.lettuce</groupId><artifactId>lettuce-core</artifactId></exclusion></exclusions></dependency><dependency><groupId>redis.clients</groupId><artifactId>jedis</artifactId></dependency>2、編寫com/qrsoft/config/WebSecurityConfig.java類,使用SpringBoot的WebSecurity安全組件
- 使用自定義身份驗證組件TokenAuthenticationProvider
// ... ...// ... 略 ...@Autowiredprivate TokenAuthenticationProvider tokenAuthenticationProvider;@Overrideprotected void configure(AuthenticationManagerBuilder auth) {// 使用自定義身份驗證組件auth.authenticationProvider(tokenAuthenticationProvider);}// ... 略 ...// ... ...- 在類中添加攔截器,攔截請求,如果非/api/login請求,則執行TokenLoginFilter過濾器進行登錄驗證,執行TokenAuthenticationFilter進行身份驗證。
@Override
protected void configure(HttpSecurity http) throws Exception {/// ... ...// ... 略 ...// 添加攔截器http.addFilterBefore(new TokenLoginFilter("/api/login", authenticationManager(), redisTemplate), UsernamePasswordAuthenticationFilter.class).addFilterBefore(new TokenAuthenticationFilter(userMapper, redisTemplate), UsernamePasswordAuthenticationFilter.class);// ... 略 ...// ... ...
}- com/qrsoft/config/WebSecurityConfig.java類的完整代碼如下:
package com.qrsoft.config;import com.google.gson.Gson;
import com.qrsoft.common.WrappedResult;
import com.qrsoft.filter.TokenAuthenticationFilter;
import com.qrsoft.filter.TokenAuthenticationProvider;
import com.qrsoft.filter.TokenLoginFilter;
import com.qrsoft.mapper.SysUserMapper;
import org.springframework.beans.factory.annotation.Autowired;
import org.springframework.context.annotation.Configuration;
import org.springframework.data.redis.core.StringRedisTemplate;
import org.springframework.security.config.annotation.authentication.builders.AuthenticationManagerBuilder;
import org.springframework.security.config.annotation.method.configuration.EnableGlobalMethodSecurity;
import org.springframework.security.config.annotation.web.builders.HttpSecurity;
import org.springframework.security.config.annotation.web.builders.WebSecurity;
import org.springframework.security.config.annotation.web.configuration.EnableWebSecurity;
import org.springframework.security.config.annotation.web.configuration.WebSecurityConfigurerAdapter;
import org.springframework.security.config.http.SessionCreationPolicy;
import org.springframework.security.web.authentication.UsernamePasswordAuthenticationFilter;import javax.servlet.http.HttpServletResponse;@Configuration
@EnableWebSecurity
@EnableGlobalMethodSecurity(prePostEnabled = true)
public class WebSecurityConfig extends WebSecurityConfigurerAdapter {@Autowiredprivate SysUserMapper userMapper;@Autowiredprivate StringRedisTemplate redisTemplate;@Autowiredprivate TokenAuthenticationProvider tokenAuthenticationProvider;@Overrideprotected void configure(AuthenticationManagerBuilder auth) {// 使用自定義身份驗證組件auth.authenticationProvider(tokenAuthenticationProvider);}@Overrideprotected void configure(HttpSecurity http) throws Exception {// 配置 CSRF 關閉,允許跨域訪問http.csrf().disable();// 開啟Spring Security cors支持,允許跨域訪問http.cors();// 關閉 Sessionhttp.sessionManagement().sessionCreationPolicy(SessionCreationPolicy.STATELESS);// 允許 登錄接口 的無授權訪問,其他需要授權訪問http.authorizeRequests().antMatchers("/*").permitAll().anyRequest().authenticated();// 禁用緩存http.headers().cacheControl();// 添加攔截器http.addFilterBefore(new TokenLoginFilter("/api/login", authenticationManager(), redisTemplate), UsernamePasswordAuthenticationFilter.class).addFilterBefore(new TokenAuthenticationFilter(userMapper, redisTemplate), UsernamePasswordAuthenticationFilter.class);// 指定錯誤未授權訪問的處理類http.exceptionHandling().accessDeniedHandler((request, response, accessDeniedException) -> {response.setContentType("application/json");response.setCharacterEncoding("UTF-8");response.setStatus(HttpServletResponse.SC_FORBIDDEN);response.getWriter().print(new Gson().toJson(WrappedResult.failedWrappedResult(accessDeniedException.getMessage(), "403")));});}@Overridepublic void configure(WebSecurity web) {web.ignoring().antMatchers("/doc.html/**", "/swagger-ui.html/**", "/v2/**", "/swagger-resources/**", "/webjars/**", "/minio/**");}
}3、編寫com/qrsoft/filter下面的類,TokenLoginFilter是登錄過濾器,除此之外,還會用到TokenAuthenticationFilter身份認證過濾器和TokenAuthenticationProvider用來處理認證實體。
- 登錄過程包括4個部分(按①②③④的順序執行),其中com/qrsoft/filter/TokenLoginFilter.java類是登錄的核心過濾器,包括①④兩個部分:
package com.qrsoft.filter;import com.alibaba.fastjson.JSONObject;
import com.baomidou.mybatisplus.core.toolkit.StringUtils;
import com.google.gson.Gson;
import com.qrsoft.common.TokenVO;
import com.qrsoft.common.WrappedResult;
import com.qrsoft.entity.SysUser;
import com.qrsoft.util.TokenUtil;
import org.springframework.data.redis.core.BoundSetOperations;
import org.springframework.data.redis.core.StringRedisTemplate;
import org.springframework.security.authentication.AuthenticationManager;
import org.springframework.security.authentication.BadCredentialsException;
import org.springframework.security.authentication.UsernamePasswordAuthenticationToken;
import org.springframework.security.core.Authentication;
import org.springframework.security.core.AuthenticationException;
import org.springframework.security.core.GrantedAuthority;
import org.springframework.security.web.authentication.AbstractAuthenticationProcessingFilter;
import org.springframework.security.web.util.matcher.AntPathRequestMatcher;import javax.servlet.FilterChain;
import javax.servlet.http.HttpServletRequest;
import javax.servlet.http.HttpServletResponse;
import java.io.BufferedReader;
import java.io.IOException;
import java.io.InputStreamReader;
import java.nio.charset.StandardCharsets;
import java.util.Collection;
import java.util.HashMap;
import java.util.List;
import java.util.Map;
import java.util.stream.Collectors;public class TokenLoginFilter extends AbstractAuthenticationProcessingFilter {private final StringRedisTemplate redisTemplate;public TokenLoginFilter(String url, AuthenticationManager authManager, StringRedisTemplate redisTemplate) {super(new AntPathRequestMatcher(url));setAuthenticationManager(authManager);this.redisTemplate = redisTemplate;}/*** 嘗試認證(從request中取用戶名和密碼,生成認證實體)*/@Overridepublic Authentication attemptAuthentication(HttpServletRequest request, HttpServletResponse response) throws AuthenticationException, IOException {return null;//① ...}/*** 認證成功返回統一格式的JSON*/@Overrideprotected void successfulAuthentication(HttpServletRequest request, HttpServletResponse response, FilterChainchain, Authentication auth) throws IOException {//④...}/*** 認證失敗返回統一格式的JSON*/@Overrideprotected void unsuccessfulAuthentication(HttpServletRequest request, HttpServletResponseresponse, AuthenticationException failed) throws IOException {//④ ...}
}- com/qrsoft/filter/TokenAuthenticationProvider.java類是用來處理認證實體,包括②③兩個部分
package com.qrsoft.filter;import com.baomidou.mybatisplus.core.toolkit.StringUtils;
import com.qrsoft.entity.SysAuth;
import com.qrsoft.entity.SysUser;
import com.qrsoft.mapper.SysAuthMapper;
import com.qrsoft.mapper.SysUserMapper;
import org.springframework.beans.factory.annotation.Autowired;
import org.springframework.security.authentication.AuthenticationProvider;
import org.springframework.security.authentication.BadCredentialsException;
import org.springframework.security.authentication.UsernamePasswordAuthenticationToken;
import org.springframework.security.core.Authentication;
import org.springframework.security.core.AuthenticationException;
import org.springframework.security.core.GrantedAuthority;
import org.springframework.security.core.authority.AuthorityUtils;
import org.springframework.security.core.userdetails.UsernameNotFoundException;
import org.springframework.security.crypto.bcrypt.BCryptPasswordEncoder;
import org.springframework.security.crypto.password.PasswordEncoder;
import org.springframework.stereotype.Component;import java.util.List;
import java.util.Set;
import java.util.stream.Collectors;@Component
public class TokenAuthenticationProvider implements AuthenticationProvider {private final PasswordEncoder passwordEncoder = new BCryptPasswordEncoder();@Autowiredprivate SysUserMapper userMapper;@Autowiredprivate SysAuthMapper authMapper;/*** 身份認證*/@Overridepublic Authentication authenticate(Authentication authentication) throws AuthenticationException {return null;//③ ... }@Overridepublic boolean supports(Class<?> authentication) {return false;//② ... }/*** 獲取用戶權限*/private List<GrantedAuthority> getGrantedAuthorities(SysUser sysUser) {List<SysAuth> authList = authMapper.getAuthByUserId(sysUser.getId());//先過濾,在轉換Set<String> perms = authList.stream().map(SysAuth::getAuthCode).filter(StringUtils::isNotBlank).collect(Collectors.toSet());return AuthorityUtils.createAuthorityList(perms.toArray(new String[0]));}
}- 在TokenLoginFilter類中的 ① 部分的代碼如下(請在TokenLoginFilter類中的相應位置替換為如下代碼):
/*** 嘗試認證(從request中取用戶名和密碼,生成認證實體)*/@Overridepublic Authentication attemptAuthentication(HttpServletRequest request, HttpServletResponse response) throws AuthenticationException, IOException { //①String account = request.getParameter("account");String password = request.getParameter("password");if (StringUtils.isBlank(account) && StringUtils.isBlank(password)) {InputStreamReader streamReader = new InputStreamReader(request.getInputStream(), StandardCharsets.UTF_8);BufferedReader reader = new BufferedReader(streamReader);StringBuilder builder = new StringBuilder();String inputStr;while ((inputStr = reader.readLine()) != null)builder.append(inputStr);JSONObject jsonObject = JSONObject.parseObject(builder.toString());account = jsonObject.getString("account");password = jsonObject.getString("password");streamReader.close();reader.close();}if (account.contains(" ")) throw new BadCredentialsException("用戶名或密碼錯誤");// 返回一個驗證令牌return getAuthenticationManager().authenticate(new UsernamePasswordAuthenticationToken(account, password));}- 在TokenAuthenticationProvider類中的 ② 部分的代碼如下(請在TokenAuthenticationProvider類中的相應位置替換為如下代碼):
@Overridepublic boolean supports(Class<?> authentication) {//②return authentication.equals(UsernamePasswordAuthenticationToken.class);}- 在TokenAuthenticationProvider類中的 ③ 部分代碼如下(請在TokenAuthenticationProvider類中的相應位置替換為如下代碼):
/*** 身份認證*/@Overridepublic Authentication authenticate(Authentication authentication) throws AuthenticationException {//③if (authentication.getPrincipal() == null || authentication.getCredentials() == null)throw new BadCredentialsException("用戶名或密碼錯誤");// 獲取認證的用戶名 & 密碼String account = authentication.getPrincipal().toString();String password = authentication.getCredentials().toString();SysUser sysUser = userMapper.getByAccount(account);if (sysUser != null) {// 密碼不匹配直接拋出異常if (!passwordEncoder.matches(password, sysUser.getPassword()))throw new BadCredentialsException("用戶名或密碼錯誤");// 獲取用戶權限List<GrantedAuthority> authorities = getGrantedAuthorities(sysUser);UsernamePasswordAuthenticationToken token = new UsernamePasswordAuthenticationToken(sysUser.getAccount(), sysUser.getPassword(), authorities);token.setDetails(sysUser);return token;} else {throw new UsernameNotFoundException("用戶不存在或已刪除");}}- 在TokenLoginFilter類中的 ④ 部分的代碼如下(請在TokenLoginFilter類中的相應位置替換為如下代碼):
/**
* 認證成功返回統一格式的JSON
*/
@Override
protected void successfulAuthentication(HttpServletRequest request, HttpServletResponse response, FilterChain chain, Authentication auth) throws IOException {//④response.setContentType("application/json");response.setStatus(HttpServletResponse.SC_OK);response.setCharacterEncoding("UTF-8");String token;//生成tokentry {Map<String, Object> payload = new HashMap<>();payload.put("account", auth.getName());token = TokenUtil.genToken(payload);} catch (Exception e) {response.getWriter().print(new Gson().toJson("Token生成失敗"));return;}if (auth.getDetails() instanceof SysUser) {SysUser sysUser = (SysUser) auth.getDetails();TokenVO tokenVO = new TokenVO();tokenVO.setAccount(auth.getName());Collection<? extends GrantedAuthority> authorities = auth.getAuthorities();List<String> authorityList = authorities.stream().map(GrantedAuthority::getAuthority).collect(Collectors.toList());tokenVO.setName(sysUser.getName());tokenVO.setId(sysUser.getId().toString());tokenVO.setType(sysUser.getType());Boolean userboo = redisTemplate.hasKey(sysUser.getId().toString());if (userboo != null && userboo) {String tok = redisTemplate.boundValueOps(sysUser.getId().toString()).get();if (tok != null) {Boolean tokboo = redisTemplate.hasKey(tok);if (tokboo != null && tokboo) {redisTemplate.delete(tok);}}redisTemplate.delete(sysUser.getId().toString());}//存儲用戶對應tokenredisTemplate.boundValueOps(sysUser.getId().toString()).set(token);//存儲token對應權限BoundSetOperations<String, String> setOperations = redisTemplate.boundSetOps(token);setOperations.add(authorityList.toArray(new String[]{}));response.setHeader("Authorization", token);response.setHeader("userAuth",authorityList.toString());tokenVO.setAuthorization(token);tokenVO.setUserAuth(authorityList.toString());response.getWriter().print(new Gson().toJson(WrappedResult.successWrapedResult(tokenVO)));} else {response.setContentType("application/json");response.setStatus(HttpServletResponse.SC_OK);response.setCharacterEncoding("UTF-8");response.getWriter().print(new Gson().toJson(WrappedResult.failedWrappedResult("登錄失敗")));}
}
/**
* 認證失敗返回統一格式的JSON
*/
@Override
protected void unsuccessfulAuthentication(HttpServletRequest request, HttpServletResponse response, AuthenticationException failed) throws IOException {//④response.setContentType("application/json");response.setStatus(HttpServletResponse.SC_OK);response.setCharacterEncoding("UTF-8");response.getWriter().print(new Gson().toJson(WrappedResult.failedWrappedResult(failed.getMessage())));
}- com/qrsoft/filter/TokenAuthenticationFilter.java類是用于身份認證的過濾器,其完整代碼如下:
package com.qrsoft.filter;import com.baomidou.mybatisplus.core.toolkit.StringUtils;
import com.google.gson.Gson;
import com.qrsoft.common.R;
import com.qrsoft.common.WrappedResult;
import com.qrsoft.entity.SysUser;
import com.qrsoft.mapper.SysUserMapper;
import com.qrsoft.util.TokenUtil;
import org.apache.commons.collections.MapUtils;
import org.springframework.data.redis.core.StringRedisTemplate;
import org.springframework.security.authentication.UsernamePasswordAuthenticationToken;
import org.springframework.security.core.authority.AuthorityUtils;
import org.springframework.security.core.context.SecurityContextHolder;
import org.springframework.web.filter.GenericFilterBean;import javax.servlet.FilterChain;
import javax.servlet.ServletException;
import javax.servlet.ServletRequest;
import javax.servlet.ServletResponse;
import javax.servlet.http.HttpServletRequest;
import javax.servlet.http.HttpServletResponse;
import java.io.IOException;
import java.util.Set;/*** 身份認證過濾器*/
public class TokenAuthenticationFilter extends GenericFilterBean {private final SysUserMapper userMapper;private final StringRedisTemplate redisTemplate;public TokenAuthenticationFilter(SysUserMapper sysUserDao, StringRedisTemplate redisTemplate) {this.userMapper = sysUserDao;this.redisTemplate = redisTemplate;}@Overridepublic void doFilter(ServletRequest request, ServletResponse response, FilterChain filterChain) throws IOException, ServletException {System.out.println("權限信息打印");// 從Http頭中取tokenString token = ((HttpServletRequest) request).getHeader("Authorization");if (token != null) {// 校驗token,并獲取token中存儲的用戶名R r = TokenUtil.valid(token);// 驗證redis是否存在tokenBoolean tokenBoo = redisTemplate.hasKey(token);if (tokenBoo != null && tokenBoo && r.isSuccess()) {// 從token檢驗結果獲取用戶名String account = MapUtils.getString(r.getPayloadMap(), "account", StringUtils.EMPTY);// 根據token獲取redis中權限setSet<String> authoritySet = redisTemplate.boundSetOps(token).members();SysUser sysUser = userMapper.getByAccount(account);UsernamePasswordAuthenticationToken authentication = new UsernamePasswordAuthenticationToken(sysUser.getAccount(), sysUser.getPassword(), AuthorityUtils.createAuthorityList(authoritySet.toArray(new String[]{})));authentication.setDetails(sysUser);SecurityContextHolder.getContext().setAuthentication(authentication);filterChain.doFilter(request, response);} else {//token驗證不通過writeResponse((HttpServletResponse) response, "Token失效");}} else {// token不存在放回401(未登錄)writeResponse((HttpServletResponse) response, "未登錄");}}private void writeResponse(HttpServletResponse response, String str) throws IOException {response.setContentType("application/json");response.setCharacterEncoding("UTF-8");response.setStatus(HttpServletResponse.SC_UNAUTHORIZED);response.getWriter().print(new Gson().toJson(WrappedResult.failedWrappedResult(str, String.valueOf(HttpServletResponse.SC_UNAUTHORIZED))));}
}
4、由于com.qrsoft.entity、com.qrsoft.mapper、com.qrsoft.common、com.qrsoft.util包下的幫助類不是當前項目的重點,所以請參考相應的源代碼,自行完成或直接拷貝這些通用類即可。主要使用到以下的類:
| 類/接口 | 功能 |
|---|---|
| com.qrsoft.mapper.SysUserMapper | 用戶基礎信息表對應的數據訪問類 |
| com.qrsoft.mapper.SysAuthMapper | 權限表對應的數據訪問類 |
| com.qrsoft.common.R | 通用類,定義了返回結果 |
| com.qrsoft.common.WrappedResult | 通用類,定義了返回結果的接口規范 |
| com.qrsoft.common.TokenVO | 通用類,定義了Token的內容 |
| com.qrsoft.common.AuthAndMenu | 通用類,定義了權限和菜單 |
| com.qrsoft.entity.SysUser | 用戶基礎信息表對應的數據實體類 |
| com.qrsoft.entity.SysAuth | 權限表對應的數據實體類 |
| com.qrsoft.util.TokenUtil | Token工具類,用于生成Token、驗證Token有效性等 |
| com.qrsoft.config.MybatisPlusConfig | MybatisPlus的配置類 |
- com.qrsoft.mapper.SysUserMapper類:用戶基礎信息表對應的數據訪問類
package com.qrsoft.mapper;import com.qrsoft.entity.SysUser;
import org.apache.ibatis.annotations.Mapper;
import org.apache.ibatis.annotations.Select;
import org.springframework.stereotype.Repository;@Repository
@Mapper
public interface SysUserMapper {@Select("select id,account,password,name,is_enable,type,user_type_id " +"from sys_user where account = #{account} and is_del = 0")SysUser getByAccount(String account);
}- com.qrsoft.mapper.SysAuthMapper類:權限表對應的數據訪問類
package com.qrsoft.mapper;import com.baomidou.mybatisplus.core.mapper.BaseMapper;
import com.qrsoft.entity.SysAuth;
import org.apache.ibatis.annotations.Delete;
import org.apache.ibatis.annotations.Mapper;
import org.apache.ibatis.annotations.Select;
import org.apache.ibatis.annotations.Update;
import org.springframework.stereotype.Repository;import java.util.List;@Repository
@Mapper
public interface SysAuthMapper extends BaseMapper<SysAuth> {/*** 根據用戶id獲取按鈕權限*/@Select("select sa.id,sa.auth_name,sa.auth_code,sa.parent_id from sys_auth sa left join role_auth ra on sa.id = ra.auth_id where " +"sa.is_del = 0 and sa.type = 0 and ra.role_id in " +"(select sr.id from sys_role sr join user_role ur on sr.id = ur.role_id where sr.is_del = 0 and sr.is_enable = 0 and ur.user_id = #{userId})" +" order by sa.parent_id")List<SysAuth> getAuthByUserId(Integer userId);/*** 根據用戶id獲取菜單權限*/@Select("select sa.id,sa.auth_name,sa.auth_code,sa.parent_id,sa.menu_url,sa.menu_icon,sa.menu_order from sys_auth sa left join role_auth ra on sa.id = ra.auth_id where " +"sa.is_del = 0 and sa.type = 1 and ra.role_id in " +"(select sr.id from sys_role sr join user_role ur on sr.id = ur.role_id where sr.is_del = 0 and sr.is_enable = 0 and ur.user_id = #{userId})" +" group by sa.id order by sa.menu_order")List<SysAuth> getMenuByUserId(Integer userId);/*** 根據權限id獲取權限詳情*/@Select("select id,auth_name,auth_code,type,menu_url,parent_id,menu_icon,menu_order from sys_auth where id = #{id} and is_del=0")SysAuth getOneAuth(Integer id);/*** 根據權限標識統計權限數量*/@Select("select count(1) from sys_auth where auth_code = #{authCode} and is_del=0")Integer countAuthCode(String authCode);/*** 權限取消全部角色*/@Delete("delete from role_auth where auth_id = #{authId}")void deleteRole(Integer authId);/*** 刪除權限*/@Update("update sys_auth set is_del = 1 where id = #{id} and is_del = 0")Boolean delAuth(Integer id);@Select("select DISTINCT sa.id,sa.auth_name,sa.auth_code,sa.parent_id,sa.type,sa.menu_icon,sa.menu_order from sys_auth sa left join role_auth ra on sa.id = ra.auth_id where " +"sa.is_del = 0 and ra.role_id = #{roleId} order by sa.parent_id")List<SysAuth> getAuthByRole(Integer roleId);/*** 根據角色獲取權限id*/@Select("select auth_id from role_auth where role_id in (${roleId})")List<Integer> getIdByRole(String roleId);
}- com.qrsoft.common.R類:通用類,定義了返回結果
package com.qrsoft.common;import java.util.HashMap;
import java.util.Map;public class R {private final boolean success;private final String msg;private final Map<String, Object> payloadMap;private R(boolean success, String msg, Map<String, Object> payloadMap) {this.success = success;this.msg = msg;this.payloadMap = payloadMap;}public static R ok(Map<String, Object> payloadMap) {return new R(true, "", payloadMap);}public static R error(String msg) {return new R(false, msg, new HashMap<>());}public boolean isSuccess() {return success;}public Map<String, Object> getPayloadMap() {return payloadMap;}@Overridepublic String toString() {return "R{" +"success=" + success +", msg='" + msg + '\'' +", payloadMap=" + payloadMap +'}';}
}- com.qrsoft.common.WrappedResult類:通用類,定義了返回結果的接口規范
package com.qrsoft.common;import io.swagger.annotations.ApiModelProperty;
import org.springframework.security.access.AccessDeniedException;
import java.io.Serializable;public class WrappedResult<T> implements Serializable {private static final long serialVersionUID = 1L;private static final String ERROR = "error";private static final String SUCCESS = "success";/*** 接口狀態*/@ApiModelProperty("接口狀態,true成功,false失敗")private final boolean successful;/*** 接口返回數據*/@ApiModelProperty("接口成功返回數據主體")private final T resultValue;/*** 接口錯誤信息*/@ApiModelProperty("接口錯誤信息")private final String resultHint;/*** 接口返回狀態* 失敗:401,403,error* 成功:success*/@ApiModelProperty("接口返回狀態,成功:success,失敗:401,403,error")private final String type;private WrappedResult(boolean isSuccess, T data, String resultHint, String type) {this.successful = isSuccess;this.resultValue = data;this.resultHint = resultHint;this.type = type;}public static <T> WrappedResult<T> successWrapedResult(T data) {return new WrappedResult<>(true, data, "", SUCCESS);}public static <T> WrappedResult<T> failedWrappedResult(String exMessage) {return new WrappedResult<>(false, null, exMessage, ERROR);}public static WrappedResult<Boolean> failedWrappedResult(Exception e, Boolean data) {if ("java.lang.RuntimeException".equals(e.getClass().getName())) {return new WrappedResult<>(false, data, e.getMessage(), ERROR);} else if ("org.springframework.security.access.AccessDeniedException".equals(e.getClass().getName())) {throw new AccessDeniedException(e.getMessage());} else {return new WrappedResult<>(false, data, "操作失敗", ERROR);}}public static <T> WrappedResult<T> failedWrappedResult(Exception e) {if ("java.lang.RuntimeException".equals(e.getClass().getName())) {return new WrappedResult<>(false, null, e.getMessage(), ERROR);} else if ("org.springframework.security.access.AccessDeniedException".equals(e.getClass().getName())) {throw new AccessDeniedException(e.getMessage());} else {return new WrappedResult<>(false, null, "操作失敗", ERROR);}}public static <T> WrappedResult<T> failedWrappedResult(Exception e, String exMessage) {if ("java.lang.RuntimeException".equals(e.getClass().getName())) {return new WrappedResult<>(false, null, e.getMessage(), ERROR);} else if ("org.springframework.security.access.AccessDeniedException".equals(e.getClass().getName())) {throw new AccessDeniedException(e.getMessage());} else {return new WrappedResult<>(false, null, exMessage, ERROR);}}public static <T> WrappedResult<T> failedWrappedResult(String exMessage, String type) {return new WrappedResult<>(false, null, exMessage, type);}public boolean isSuccessful() {return this.successful;}public T getResultValue() {return this.resultValue;}public String getType() {return this.type;}public String getResultHint() {return resultHint;}
}- com.qrsoft.common.TokenVO類:通用類,定義了Token的內容
package com.qrsoft.common;import lombok.Data;import java.io.Serializable;
import java.util.List;@Data
public class TokenVO implements Serializable {private static final long serialVersionUID = -5501706435587205188L;/*** token*/private String token;/*** 用戶ID*/private String id;/*** 姓名*/private String name;/*** 用戶名*/private String account;/*** 用戶類型*/private Integer type;/*** 按鈕權限列表*/private List<AuthAndMenu> authList;/*** 菜單權限列表*/private List<AuthAndMenu> menuList;private String Authorization;private String userAuth;
}- com.qrsoft.common.AuthAndMenu類: 通用類,定義了權限和菜單
package com.qrsoft.common;import com.qrsoft.entity.SysAuth;
import lombok.Data;import java.util.List;@Data
public class AuthAndMenu {/*** id*/private Integer id;/*** 權限名稱*/private String authName;/*** 權限編碼*/private String authCode;/*** 權限類型(0:按鈕;1,菜單)*/private Integer type;/*** 菜單Url*/private String menuUrl;/*** 菜單Icon*/private String menuIcon;/*** 菜單order*/private Integer menuOrder;/***  子菜單*/private List<AuthAndMenu> childs;/*** 父級id*/private Integer parentId;public static AuthAndMenu authTOAuth(SysAuth auth) {AuthAndMenu output = new AuthAndMenu();output.setId(auth.getId());output.setAuthName(auth.getAuthName());output.setAuthCode(auth.getAuthCode());output.setType(0);output.setParentId(auth.getParentId());output.setMenuUrl(auth.getMenuUrl());output.setMenuIcon(auth.getMenuIcon());output.setMenuOrder(auth.getMenuOrder());return output;}public static AuthAndMenu authTOMenu(SysAuth auth) {AuthAndMenu output = new AuthAndMenu();output.setId(auth.getId());output.setAuthName(auth.getAuthName());output.setType(1);output.setParentId(auth.getParentId());output.setMenuUrl(auth.getMenuUrl());output.setMenuIcon(auth.getMenuIcon());output.setMenuOrder(auth.getMenuOrder());return output;}
}- com.qrsoft.entity.SysUser類:用戶基礎信息表對應的數據實體類
package com.qrsoft.entity;import com.baomidou.mybatisplus.annotation.IdType;
import com.baomidou.mybatisplus.annotation.TableField;
import com.baomidou.mybatisplus.annotation.TableId;
import com.baomidou.mybatisplus.annotation.TableName;
import lombok.Data;import java.io.Serializable;
import java.util.Date;/*** 用戶基礎*/
@Data
@TableName("sys_user")
public class SysUser implements Serializable {private static final long serialVersionUID = 1L;/*** 主鍵id*/@TableId(value = "id", type = IdType.AUTO)private Integer id;/*** 用戶賬號*/@TableField("account")private String account;/*** 用戶密碼*/@TableField("password")private String password;/*** 用戶姓名*/@TableField("name")private String name;/*** 聯系方式*/@TableField("contact")private String contact;/*** 用戶類型(0:質檢員(管理員);1:司機;2:客戶)*/@TableField("type")private Integer type = 0;/*** 司機id/客戶id*/@TableField("user_type_id")private Integer userTypeId;/*** 是否啟用(啟用:0,未啟用:1)*/@TableField("is_enable")private Integer isEnable = 0;/*** 是否刪除(正常:0,刪除:1)*/@TableField("is_del")private Integer isDel = 0;/*** 創建人*/@TableField(value = "create_user", select = false)private Integer createUser;/*** 創建時間*/@TableField(value = "create_time", select = false)private Date createTime;
}- com.qrsoft.entity.SysAuth類:權限表對應的數據實體類
package com.qrsoft.entity;import com.baomidou.mybatisplus.annotation.IdType;
import com.baomidou.mybatisplus.annotation.TableField;
import com.baomidou.mybatisplus.annotation.TableId;
import com.baomidou.mybatisplus.annotation.TableName;
import lombok.Data;import java.io.Serializable;
import java.util.Date;/*** 權限表*/
@Data
@TableName("sys_auth")
public class SysAuth implements Serializable {private static final long serialVersionUID = 1L;/*** 主鍵id*/@TableId(value = "id", type = IdType.AUTO)private Integer id;/*** 權限名稱*/@TableField("auth_name")private String authName;/*** 權限編碼*/@TableField("auth_code")private String authCode;/*** 權限類型(0:按鈕;1,菜單)*/@TableField("type")private Integer type = 0;/*** 菜單Url*/@TableField("menu_url")private String menuUrl;/*** 父級id*/@TableField("parent_id")private Integer parentId;/*** 菜單圖標*/@TableField("menu_icon")private String menuIcon;/*** 菜單順序*/@TableField("menu_order")private Integer menuOrder;/*** 刪除狀態,0正常,1刪除*/@TableField("is_del")private Integer isDel = 0;/*** 創建人*/@TableField(value = "create_user", select = false)private Integer createUser;/*** 創建時間*/@TableField(value = "create_time", select = false)private Date createTime;
}- com.qrsoft.util.TokenUtil類:Token工具類,用于生成Token、驗證Token有效性等
package com.qrsoft.util;import com.qrsoft.common.R;
import io.jsonwebtoken.JwtBuilder;
import io.jsonwebtoken.JwtParser;
import io.jsonwebtoken.Jwts;
import io.jsonwebtoken.security.Keys;import java.util.Calendar;
import java.util.Map;/*** token工具類*/
public class TokenUtil {private TokenUtil() {}/*** 密鑰(至少32字節,后續可根據需求換成RSA加密)*/private static final byte[] SECRET = "sarnath-sarnath-sarnath-sarnath.".getBytes();/*** token失效時間(分)*/public static final int EXP_TIME = 24 * 60;/*** 生成token*/public static String genToken(Map<String, Object> payloadMap) {// JwtBuilder的base64UrlEncoder默認Encoders.BASE64URLJwtBuilder jwtBuilder = Jwts.builder();// 設置載荷jwtBuilder.setClaims(payloadMap);// 設置失效時間Calendar calendar = Calendar.getInstance();calendar.add(Calendar.MINUTE, EXP_TIME);jwtBuilder.setExpiration(calendar.getTime());// 設置簽名jwtBuilder.signWith(Keys.hmacShaKeyFor(SECRET));return jwtBuilder.compact();}/*** 驗證token有效性*/public static R valid(String token) {try {JwtParser jwtParser = Jwts.parser();// 設置時鐘偏移jwtParser.setAllowedClockSkewSeconds(3 * 60);// 設置簽名jwtParser.setSigningKey(SECRET);Map<String, Object> payload = jwtParser.parseClaimsJws(token).getBody();return R.ok(payload);} catch (Exception e) {return R.error(e.getMessage());}}
}- com.qrsoft.config.MyBatisPlusConfig類:MyBatisPlus的配置類
package com.qrsoft.config;import com.baomidou.mybatisplus.extension.plugins.PaginationInterceptor;
import com.baomidou.mybatisplus.extension.plugins.pagination.optimize.JsqlParserCountOptimize;
import org.springframework.context.annotation.Bean;
import org.springframework.context.annotation.Configuration;@Configuration
public class MyBatisPlusConfig {@Beanpublic PaginationInterceptor paginationInterceptor() {PaginationInterceptor paginationInterceptor = new PaginationInterceptor();paginationInterceptor.setCountSqlParser(new JsqlParserCountOptimize(true));return paginationInterceptor;}
}
5、因為需要訪問MySQL數據庫,所以在resources目錄下打開application.yml文件(在前面步驟中已經創建),并填寫如下配置:
server:port: 8848
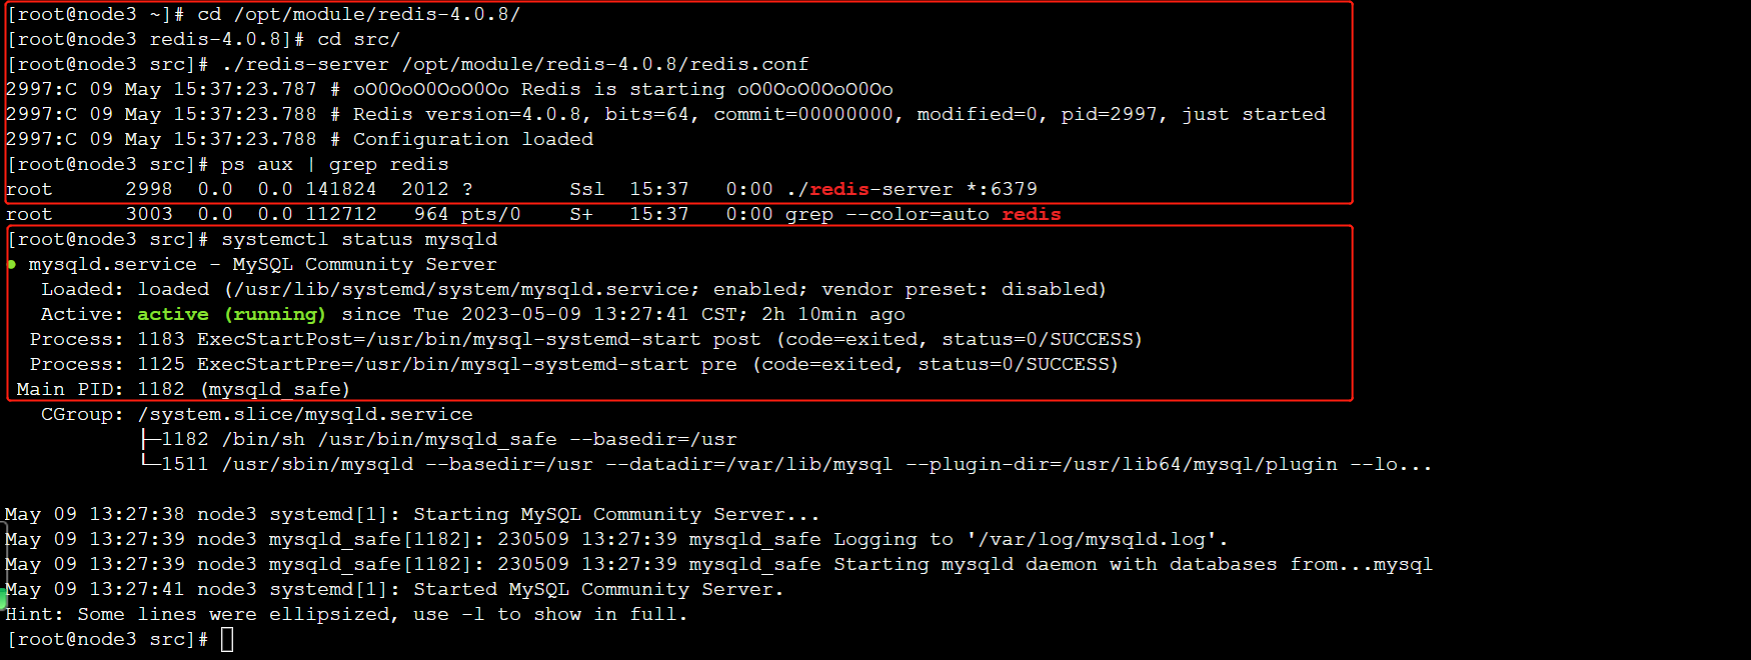
spring:datasource:driver-class-name: com.mysql.cj.jdbc.Driverusername: root password: 123456 url: jdbc:mysql://node3:3306/kongguan?autoReconnect=true&autoReconnectForPools=true&failOverReadOnly=false&serverTimezone=UTC redis:host: node3 port: 6379 database: 15注意:需要確保node3節點上的Redis和MySQL都已經正常啟動,可以參照前面安裝部署的任務中的步驟進行驗證。
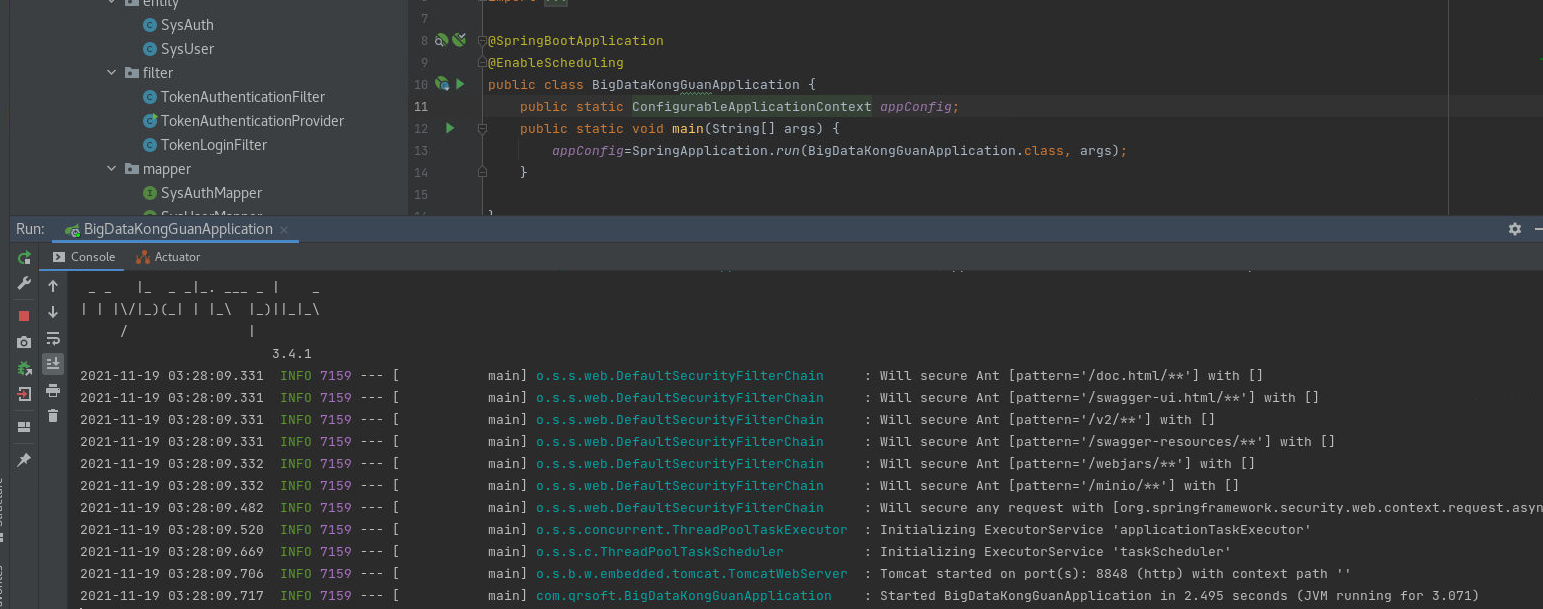
6、項目啟動類BigDataKongGuanApplication?的內容如下:
package com.qrsoft;import org.springframework.boot.SpringApplication;
import org.springframework.boot.autoconfigure.SpringBootApplication;
import org.springframework.context.ConfigurableApplicationContext;
import org.springframework.scheduling.annotation.EnableScheduling;@SpringBootApplication
@EnableScheduling
public class BigDataKongGuanApplication {public static ConfigurableApplicationContext appConfig;public static void main(String[] args) {appConfig=SpringApplication.run(BigDataKongGuanApplication.class, args);}
}
三、測試登錄功能
1、啟動后端Spring Boot程序。
2、啟動前端VUE程序。

3、輸入用戶名和密碼(例如:admin/admin)進行登錄。?


ii:uniapp路由響應攔截器處理token,以及微信小程序報錯當前頁面正在處于跳轉狀態,請稍后再進行跳轉....)


——完美轉發)


