[A133]uboot啟動流程
hongxi.zhu 2024-6-21
1. 第一階段
lds描述
從u-boot.lds中能找到程序的匯編入口ENTRY(_start)
brandy/brandy-2.0/u-boot-2018/u-boot.lds
OUTPUT_FORMAT("elf32-littlearm", "elf32-littlearm", "elf32-littlearm")
OUTPUT_ARCH(arm)
ENTRY(_start)
...
ENTRY(_start)的實現在start.S中,根據平臺架構, 有對應的實現,當前平臺是armv8
_start
brandy/brandy-2.0/u-boot-2018/arch/arm/cpu/armv8/start.S
.globl	_start
_start:
#if defined(LINUX_KERNEL_IMAGE_HEADER)
#include <asm/boot0-linux-kernel-header.h>
#elif defined(CONFIG_ENABLE_ARM_SOC_BOOT0_HOOK)
/** Various SoCs need something special and SoC-specific up front in* order to boot, allow them to set that in their boot0.h file and then* use it here.*/
#include <asm/arch/boot0.h>
#elseb	reset  /* 跳轉到reset塊 */
#endif
reset
brandy/brandy-2.0/u-boot-2018/arch/arm/cpu/armv8/start.S
reset:/* Allow the board to save important registers */b	save_boot_params  /*空實現,并跳轉回save_boot_params_ret*/
.globl	save_boot_params_ret
save_boot_params_ret:/** Could be EL3/EL2/EL1, Initial State:* Little Endian, MMU Disabled, i/dCache Disabled*/adr	x0, vectors 	/*將異常向量表基地址寫到x0*/switch_el x1, 3f, 2f, 1f	/*根據異常等級選擇el3/el2/el1情況處理*/
3:	msr	vbar_el3, x0  /*el3*/mrs	x0, scr_el3orr	x0, x0, #0xf			/* SCR_EL3.NS|IRQ|FIQ|EA */msr	scr_el3, x0msr	cptr_el3, xzr			/* Enable FP/SIMD */b	0f	/*設置完上述相關寄存器,跳出*/
2:	msr	vbar_el2, x0	/*el2*/mov	x0, #0x33ffmsr	cptr_el2, x0			/* Enable FP/SIMD */b	0f
1:	msr	vbar_el1, x0	/*el1*/mov	x0, #3 << 20msr	cpacr_el1, x0			/* Enable FP/SIMD */
0:  /* 空執行,相當于跳出 *//* Apply ARM core specific erratas */bl	apply_core_errata  /*arm核的特殊配置*//** Cache/BPB/TLB Invalidate* i-cache is invalidated before enabled in icache_enable()* tlb is invalidated before mmu is enabled in dcache_enable()* d-cache is invalidated before enabled in dcache_enable()*//* Processor specific initialization */bl	lowlevel_init  /* A133看起來沒做啥事情 */master_cpu:bl	_main  /*跳轉到_main*/
_main
brandy/brandy-2.0/u-boot-2018/arch/arm/lib/crt0_64.S
ENTRY(_main)/** Set up initial C runtime environment and call board_init_f(0).*//*清除x0寄存器的最低四位(#0xf即二進制1111)并賦值給sp棧指針, x0寄存器的值是調用方傳遞*/bic	sp, x0, #0xf	/* 16-byte alignment for ABI compliance */mov	x0, sp		/*將棧指針sp的值寫入x0寄存器作為下一條bl命令的參數,這個參數就是global區域的頂部地址top*/bl	board_init_f_alloc_reserve		/*跳轉到C中的board_init_f_alloc_reserve,給全局gd變量分配內存*/mov	sp, x0		/*上面的bl命令執行后,它的返回值存放在x0中,將這個新的棧指針值賦值給sp指針*//* set up gd here, outside any C code */mov	x18, x0		/*x18寄存器用作全局數據(Global Data, gd)的指針,上面board_init_f_alloc_reserve的返回值就是需要設置的gd的指針地址*/bl	board_init_f_init_reserve	/*跳轉到C中的board_init_f_init_reserve, 初始化gd變量的內容為0,并確定后續分配的gd變量內容偏移基地址*/mov	x0, #0		/*x0清零,下一個bl命令傳入參數值為0*/bl	board_init_f		/*跳轉到C中的board_init_f初始化一些早期硬件,并為重定位準備*/#if !defined(CONFIG_SPL_BUILD)
/** Set up intermediate environment (new sp and gd) and call* relocate_code(addr_moni). Trick here is that we'll return* 'here' but relocated.*/ldr	x0, [x18, #GD_START_ADDR_SP]	/* x0 <- gd->start_addr_sp */bic	sp, x0, #0xf	/* 16-byte alignment for ABI compliance */ldr	x18, [x18, #GD_NEW_GD]		/* x18 <- gd->new_gd */adr	lr, relocation_return/* Add in link-vs-relocation offset */ldr	x9, [x18, #GD_RELOC_OFF]	/* x9 <- gd->reloc_off */add	lr, lr, x9	/* new return address after relocation */ldr	x0, [x18, #GD_RELOCADDR]	/* x0 <- gd->relocaddr */b	relocate_coderelocation_return:/** Set up final (full) environment*/bl	c_runtime_cpu_setup		/* still call old routine */
#endif /* !CONFIG_SPL_BUILD *//** Clear BSS section*/ldr	x0, =__bss_start		/* this is auto-relocated! */ldr	x1, =__bss_end			/* this is auto-relocated! */
clear_loop:str	xzr, [x0], #8cmp	x0, x1b.lo	clear_loop/* call board_init_r(gd_t *id, ulong dest_addr) */mov	x0, x18				/* gd_t */ldr	x1, [x18, #GD_RELOCADDR]	/* dest_addr */b	board_init_r			/* PC relative jump *//* NOTREACHED - board_init_r() does not return */ENDPROC(_main)
board_init_f_alloc_reserve
brandy/brandy-2.0/u-boot-2018/common/init/board_init.c
ulong board_init_f_alloc_reserve(ulong top)
{.../* LAST : reserve GD (rounded up to a multiple of 16 bytes) */// 從global區域分配一塊大小為struct global_data大小的16字節對齊的內存存放全局的global_data變量// top就是x0寄存器傳入的值(具體值需要調試才知道)top = rounddown(top-sizeof(struct global_data), 16);return top;
}
board_init_f_init_reserve
brandy/brandy-2.0/u-boot-2018/common/init/board_init.c
void board_init_f_init_reserve(ulong base)
{struct global_data *gd_ptr;/** clear GD entirely and set it up.* Use gd_ptr, as gd may not be properly set yet.*/gd_ptr = (struct global_data *)base;  // 拿到寄存器x18里存的gd變量內存地址/* zero the area */memset(gd_ptr, '\0', sizeof(*gd));  //將這塊內存數據,初始化為0/* set GD unless architecture did it already */.../* next alloc will be higher by one GD plus 16-byte alignment */base += roundup(sizeof(struct global_data), 16);  //內存向上對齊16字節,這個地址就是gd變量后續分配內容的偏移基地址/** record early malloc arena start.* Use gd as it is now properly set for all architectures.*/...
}
board_init_f
brandy/brandy-2.0/u-boot-2018/common/board_f.c
void board_init_f(ulong boot_flags)
{gd->flags = boot_flags; // 這里匯編傳入的x0是0,所以boot_flags = 0gd->have_console = 0;//執行init_sequence_f數組中的每一個函數指針,會依次初始化cpu/dm/外設總線/串口/optee/等if (initcall_run_list(init_sequence_f))hang();
}
init_sequence_f數組中特別注意的是下面的函數,將接下來的鏈接重定位息息相關:
static const init_fnc_t init_sequence_f[] = {setup_mon_len, /*設置內存區域長度 gd->mon_len = __bss_end - __image_copy_start;*/
#ifdef CONFIG_OF_CONTROLfdtdec_setup, /*設置dtb的地址gd->fdt_blob*/
#endif
#ifdef CONFIG_TRACE_EARLYtrace_early_init,
#endifinitf_malloc,  //看起來這里并沒有實現f_malloc的區域,也許別的地方實現了log_init,initf_bootstage,	/* uses its own timer, so does not need DM */initf_console_record,
#if defined(CONFIG_HAVE_FSP)arch_fsp_init,
#endifarch_cpu_init,		/* basic arch cpu dependent setup */mach_cpu_init,		/* SoC/machine dependent CPU setup */initf_dm,arch_cpu_init_dm,
#if defined(CONFIG_BOARD_EARLY_INIT_F)board_early_init_f,
#endif
#if defined(CONFIG_PPC) || defined(CONFIG_SYS_FSL_CLK) || defined(CONFIG_M68K)/* get CPU and bus clocks according to the environment variable */get_clocks,		/* get CPU and bus clocks (etc.) */
#endif
#if !defined(CONFIG_M68K)timer_init,		/* initialize timer */
#endif
#if defined(CONFIG_BOARD_POSTCLK_INIT)board_postclk_init,
#endifenv_init,		/* initialize environment */  //初始化env驅動init_baud_rate,		/* initialze baudrate settings */  //從env讀取出設置的串口波特率serial_init,		/* serial communications setup */  //初始化串口console_init_f,		/* stage 1 init of console */  //從uboot的設備樹中獲取調試等級debug_mode等display_options,	/* say that we are here */  //"打印 U-Boot 2018.07 (xxxx) Allwinner Technology"display_text_info,	/* show debugging info if required *///打印bss段的內存起止地址(未初始化全局變量數據段)、text段內存起始地址(代碼段)
#if defined(CONFIG_PPC) || defined(CONFIG_SH) || defined(CONFIG_X86)checkcpu,
#endif
#if defined(CONFIG_DISPLAY_CPUINFO)print_cpuinfo,		/* display cpu info (and speed) */
#endif
#if defined(CONFIG_DTB_RESELECT)embedded_dtb_select,
#endif
#if defined(CONFIG_DISPLAY_BOARDINFO)show_board_info,
#endifINIT_FUNC_WATCHDOG_INIT
#if defined(CONFIG_MISC_INIT_F)misc_init_f,
#endifINIT_FUNC_WATCHDOG_RESET
#if defined(CONFIG_SYS_I2C)init_func_i2c,
#endif#if defined(CONFIG_VID) && !defined(CONFIG_SPL)init_func_vid,
#endif
#if defined(CONFIG_HARD_SPI)init_func_spi,
#endif
#if defined(CONFIG_OPTEE25)smc_init,
#endifannounce_dram_init,dram_init,		/* configure available RAM banks */
#ifdef CONFIG_POSTpost_init_f,
#endifINIT_FUNC_WATCHDOG_RESET
#if defined(CONFIG_SYS_DRAM_TEST)testdram,
#endif /* CONFIG_SYS_DRAM_TEST */INIT_FUNC_WATCHDOG_RESET#ifdef CONFIG_POSTinit_post,
#endifINIT_FUNC_WATCHDOG_RESET/** Now that we have DRAM mapped and working, we can* relocate the code and continue running from DRAM.** Reserve memory at end of RAM for (top down in that order):*  - area that won't get touched by U-Boot and Linux (optional)*  - kernel log buffer*  - protected RAM*  - LCD framebuffer*  - monitor code*  - board info struct*/setup_dest_addr,  //獲取內存區域的top地址
#ifdef CONFIG_PRAMreserve_pram,
#endifreserve_round_4k,  //內存4K對齊
#ifdef CONFIG_ARMreserve_mmu,
#endifreserve_video,reserve_trace,reserve_uboot,reserve_malloc,reserve_board,setup_machine,reserve_global_data,reserve_fdt,reserve_bootstage,reserve_arch,reserve_stacks,dram_init_banksize,show_dram_config,
#if defined(CONFIG_M68K) || defined(CONFIG_MIPS) || defined(CONFIG_PPC) || \defined(CONFIG_SH)setup_board_part1,
#endif
#if defined(CONFIG_PPC) || defined(CONFIG_M68K)INIT_FUNC_WATCHDOG_RESETsetup_board_part2,
#endifdisplay_new_sp,
#ifdef CONFIG_OF_BOARD_FIXUPfix_fdt,
#endifINIT_FUNC_WATCHDOG_RESETreloc_fdt,reloc_bootstage,setup_reloc,
#if defined(CONFIG_X86) || defined(CONFIG_ARC)copy_uboot_to_ram,do_elf_reloc_fixups,clear_bss,
#endif
#if defined(CONFIG_XTENSA)clear_bss,
#endif
#if !defined(CONFIG_ARM) && !defined(CONFIG_SANDBOX) && \!CONFIG_IS_ENABLED(X86_64)jump_to_copy,
#endifNULL,
};
init_sequence_f數組中特別注意的是下面的函數,將接下來的鏈接重定位內存結構息息相關
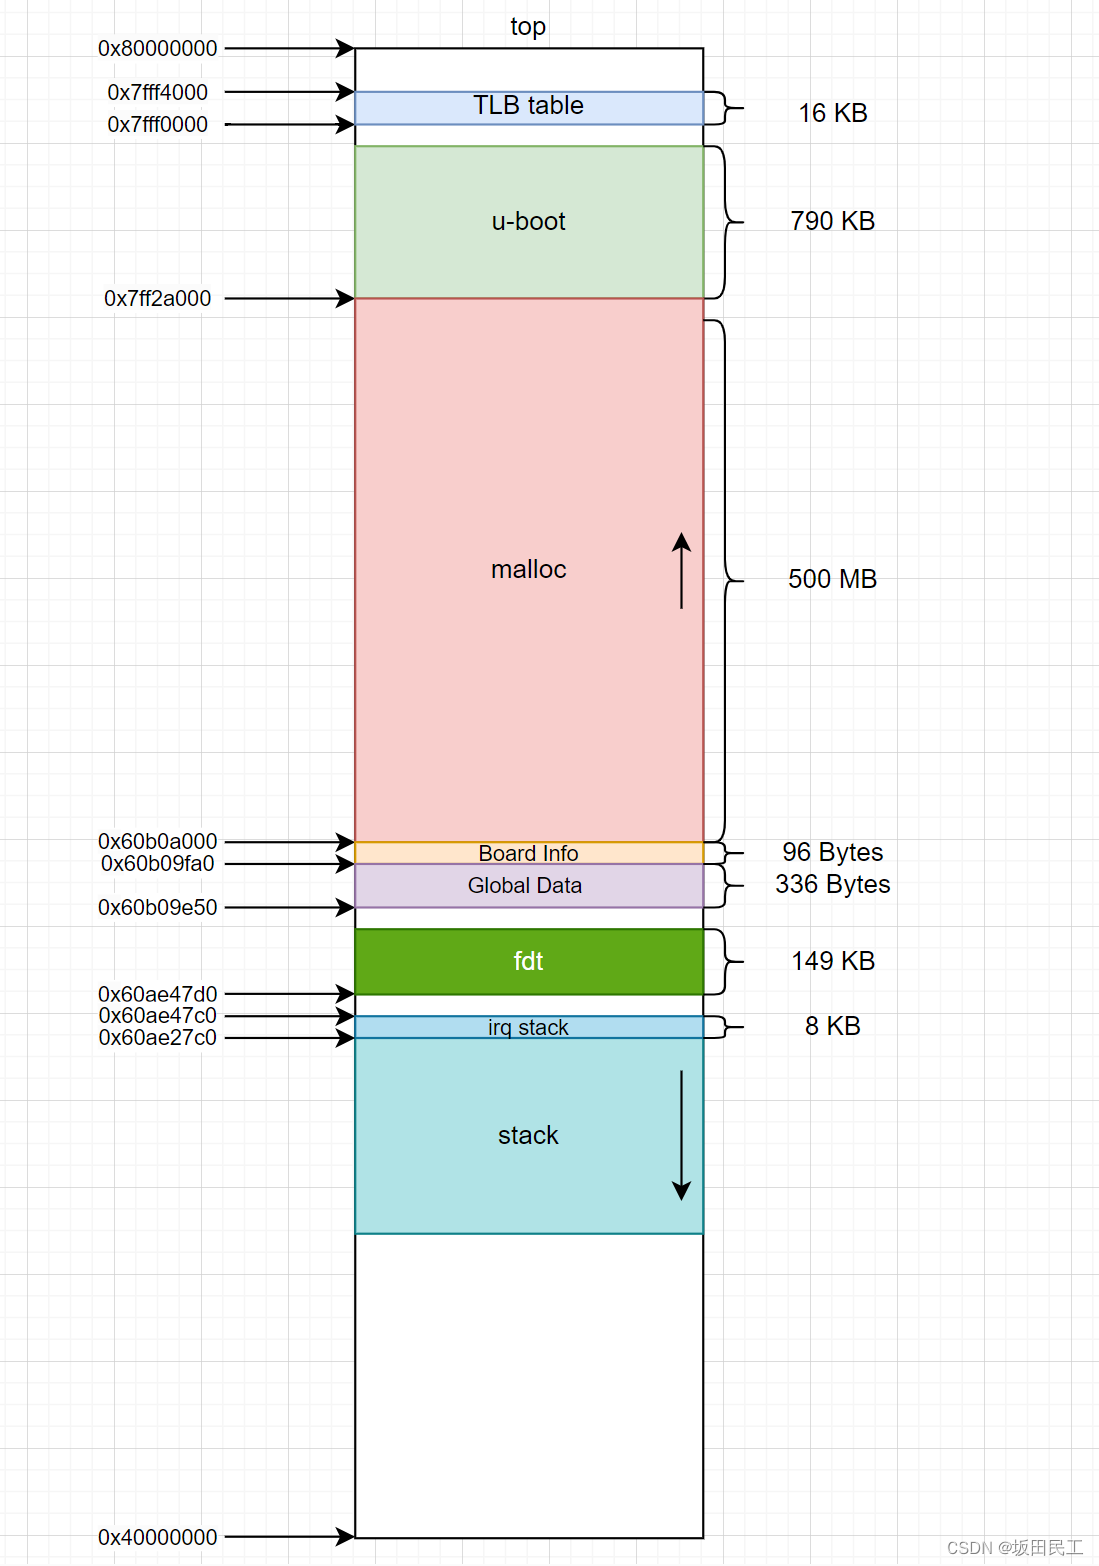
setup_dest_addr, //獲取內存區域的top地址reserve_round_4k, //內存4K對齊reserve_mmu, //在內存中為MMU TLB頁表分配16KB內存reserve_video, //fb相關,這里空實現reserve_uboot, //在內存中為U-Boot text, data & bss段分配790KB內存reserve_malloc, //在內存中為malloc區域預留500MB內存reserve_board, //在內存中為board info預留96 Byte內存reserve_global_data, // 在內存中為global_data預留336 Byte內存reserve_fdt, // 在內存中為fdt 設備樹預留149KB內存reserve_stacks, // 為棧空間預留空間(IRQ stack和stack)。sp指針指向的base地址dram_init_banksize, //空實現
相關打印
Ram size: 40000000  // 1GB
Ram top: 80000000  //高地址
TLB table from 7fff0000 to 7fff4000
Reserving 790k for U-Boot at: 7ff2a000
Reserving 512128k for malloc() at: 60b0a000
Reserving 96 Bytes for Board Info at: 60b09fa0
Reserving 336 Bytes for Global Data at: 60b09e50
Reserving 153216 Bytes for FDT at: 60ae47d0
Reserving 8192 Bytes for IRQ stack at: 60ae27c0
New Stack Pointer is: 60ae27b0
[01.588]Relocation Offset is: 35f2a000
Relocating to 7ff2a000, new gd at 60b09e50, sp at 60ae27b0
為即將重定位做的內存分配,此時結構如下
reloc_fdt
重定位設備樹文件
brandy/brandy-2.0/u-boot-2018/common/board_f.c
static int reloc_fdt(void)
{
#ifndef CONFIG_OF_EMBED,..if (gd->new_fdt) {  //前面的reserved fdt就分配了內存區域memcpy(gd->new_fdt, gd->fdt_blob, gd->fdt_size);  //將fdt文件拷貝到內存的新地址中gd->fdt_blob = gd->new_fdt;  //修改gd中fdt地址指向}
#endifreturn 0;
}
setup_reloc
重定位uboot text&bss&data段到內存中的新地址
brandy/brandy-2.0/u-boot-2018/common/board_f.c
static int setup_reloc(void)
{//gd->relocaddr就是前面內存模型中給uboot分配的空間的基地址//__image_copy_start是lds文件中描述拷貝uboot的起始地址gd->reloc_off = gd->relocaddr - (unsigned long)__image_copy_start;  //重新設置gd中uboot重定位地址偏移memcpy(gd->new_gd, (char *)gd, sizeof(gd_t));  //將gd從flash中拷貝內存中的global data區域, 后續都使用new_gdtick_printf("Relocation Offset is: %08lx\n", gd->reloc_off);debug("Relocating to %08lx, new gd at %08lx, sp at %08lx\n",gd->relocaddr, (ulong)map_to_sysmem(gd->new_gd),gd->start_addr_sp);return 0;
}
到這里重定位的準備工作都做完了,board_init_f函數執行結束并返回到_main匯編標簽往下執行
/** Set up intermediate environment (new sp and gd) and call* relocate_code(addr_moni). Trick here is that we'll return* 'here' but relocated.*/ldr x0, [x18, #GD_START_ADDR_SP] /* x0 <- gd->start_addr_sp */bic sp, x0, #0xf /* 16-byte alignment for ABI compliance */ldr x18, [x18, #GD_NEW_GD] /* x18 <- gd->new_gd */adr lr, relocation_return/* Add in link-vs-relocation offset */ldr x9, [x18, #GD_RELOC_OFF] /* x9 <- gd->reloc_off */add lr, lr, x9 /* new return address after relocation */ldr x0, [x18, #GD_RELOCADDR] /* x0 <- gd->relocaddr */b relocate_coderelocation_return:
逐行解析:
ldr x0, [x18, #GD_START_ADDR_SP] /* x0 <- gd->start_addr_sp */使用ARM64的
ldr指令從寄存器x18指向的結構體中加載GD_START_ADDR_SP偏移量處的值到寄存器x0。實際上x18是gd的指針。
GD_START_ADDR_SP從下面的匯編到C的map可知是gd->start_addr_spa133_linux/brandy/brandy-2.0/u-boot-2018/lib/asm-offsets.c
DEFINE(GD_START_ADDR_SP, offsetof(struct global_data, start_addr_sp));
bic sp, x0, #0xf /* 16-byte alignment for ABI compliance */
bic(位清除)指令將x0(即gd->start_addr_sp)的低4位清零,以確保棧指針(sp)是16字節對齊的。這是為了滿足ABI的要求
ldr x18, [x18, #GD_NEW_GD] /* x18 <- gd->new_gd */更新
x18寄存器,使其指向gd->new_gd。代碼重定位后,全局描述符的gd變量指向需要改變
adr lr, relocation_return使用
adr(地址寄存器)指令獲取relocation_return標簽的當前地址,并將其存儲在鏈接寄存器(lr)中。這將是代碼重定位后的返回地址。
ldr x9, [x18, #GD_RELOC_OFF] /* x9 <- gd->reloc_off */從
gd(new_gd)結構體中加載GD_RELOC_OFF(可能是重定位偏移量)到x9
add lr, lr, x9 /* new return address after relocation */將
x9(重定位偏移量)加到lr寄存器中,以得到重定位后的最終返回地址
ldr x0, [x18, #GD_RELOCADDR] /* x0 <- gd->relocaddr */從
gd(new_gd)結構體中加載GD_RELOCADDR到x0
b relocate_code跳轉到
relocate_code標簽執行,傳入的參數為GD_RELOCADDR
relocate_code
/** void relocate_code (addr_moni)** This function relocates the monitor code.* x0 holds the destination address.*/
ENTRY(relocate_code)stp	x29, x30, [sp, #-32]!	/* create a stack frame */mov	x29, spstr	x0, [sp, #16]/** Copy u-boot from flash to RAM*/adr	x1, __image_copy_start	/* x1 <- Run &__image_copy_start */subs	x9, x0, x1		/* x8 <- Run to copy offset */b.eq	relocate_done		/* skip relocation *//** Don't ldr x1, __image_copy_start here, since if the code is already* running at an address other than it was linked to, that instruction* will load the relocated value of __image_copy_start. To* correctly apply relocations, we need to know the linked value.** Linked &__image_copy_start, which we know was at* CONFIG_SYS_TEXT_BASE, which is stored in _TEXT_BASE, as a non-* relocated value, since it isn't a symbol reference.*/ldr	x1, _TEXT_BASE		/* x1 <- Linked &__image_copy_start */subs	x9, x0, x1		/* x9 <- Link to copy offset */adr	x1, __image_copy_start	/* x1 <- Run &__image_copy_start */adr	x2, __image_copy_end	/* x2 <- Run &__image_copy_end */
copy_loop:ldp	x10, x11, [x1], #16	/* copy from source address [x1] */stp	x10, x11, [x0], #16	/* copy to   target address [x0] */cmp	x1, x2			/* until source end address [x2] */b.lo	copy_loopstr	x0, [sp, #24]/** Fix .rela.dyn relocations*/adr	x2, __rel_dyn_start	/* x2 <- Run &__rel_dyn_start */adr	x3, __rel_dyn_end	/* x3 <- Run &__rel_dyn_end */
fixloop:ldp	x0, x1, [x2], #16	/* (x0,x1) <- (SRC location, fixup) */ldr	x4, [x2], #8		/* x4 <- addend */and	x1, x1, #0xffffffffcmp	x1, #R_AARCH64_RELATIVEbne	fixnext/* relative fix: store addend plus offset at dest location */add	x0, x0, x9add	x4, x4, x9str	x4, [x0]
fixnext:cmp	x2, x3b.lo	fixlooprelocate_done:switch_el x1, 3f, 2f, 1fbl	hang
3:	mrs	x0, sctlr_el3b	0f
2:	mrs	x0, sctlr_el2b	0f
1:	mrs	x0, sctlr_el1
0:	tbz	w0, #2, 5f	/* skip flushing cache if disabled */tbz	w0, #12, 4f	/* skip invalidating i-cache if disabled */ic	iallu		/* i-cache invalidate all */isb	sy
4:	ldp	x0, x1, [sp, #16]bl	__asm_flush_dcache_range
5:	ldp	x29, x30, [sp],#32ret
ENDPROC(relocate_code)
這個的內容比較繁雜涉及復雜的棧操作和鏈接操作,主要做了兩件事:
- 拷貝flash上面的uboot代碼段到內存中
- 重置鏈接中的
.rela.dyn內容(與重定位相關)
完成重定位后,返回到_main中,進入uboot第二階段
2. 第二階段
relocation_return:/** Set up final (full) environment*/bl	c_runtime_cpu_setup		/* still call old routine */  /*重定向向量表基址寄存器*/
#endif /* !CONFIG_SPL_BUILD *//** Clear BSS section  重定向后需要清除bss段內容,為接下來運行重定向的uboot做準備*/ldr	x0, =__bss_start		/* this is auto-relocated! */ldr	x1, =__bss_end			/* this is auto-relocated! */
clear_loop:str	xzr, [x0], #8cmp	x0, x1b.lo	clear_loop/* call board_init_r(gd_t *id, ulong dest_addr) */mov	x0, x18				/* gd_t */  /*傳遞新的gd的地址*/ldr	x1, [x18, #GD_RELOCADDR]	/* dest_addr */  /*gd->relocaddr就是重定向后,uboot在內存上運行的入口地址*/b	board_init_r			/* PC relative jump */  /*入口函數就是board_init_r函數,且不再返回*//* NOTREACHED - board_init_r() does not return */ENDPROC(_main)
board_init_r
brandy/brandy-2.0/u-boot-2018/common/board_r.c
void board_init_r(gd_t *new_gd, ulong dest_addr)
{gd->flags &= ~GD_FLG_LOG_READY;if (initcall_run_list(init_sequence_r))hang();/* NOTREACHED - run_main_loop() does not return */hang();
}
static init_fnc_t init_sequence_r[] = {initr_trace,initr_reloc,  // 更新fdt的地址到env fdtaddr字段中/* TODO: could x86/PPC have this also perhaps? */
#ifdef CONFIG_ARMinitr_caches,  //配置cpu smp和使能icache和dcache/* Note: For Freescale LS2 SoCs, new MMU table is created in DDR.*	 A temporary mapping of IFC high region is since removed,*	 so environmental variables in NOR flash is not available*	 until board_init() is called below to remap IFC to high*	 region.*/
#endifinitr_reloc_global_data,  //更新gd中一些地址偏移,A133這里基本空實現initr_barrier,  //空實現initr_malloc,  //初始化malloc區域log_init,initr_bootstage,	/* Needs malloc() but has its own timer */initr_console_record,  //空實現bootstage_relocate,
#ifdef CONFIG_DMinitr_dm,  //初始化dm驅動框架
#endif
#if defined(CONFIG_ARM) || defined(CONFIG_NDS32) || defined(CONFIG_RISCV)board_init,	/* Setup chipselects */  //全志平臺相關的初始化,如CPU/axp Power/rtc/dma等
#endifstdio_init_tables,  //stdio相關的配置initr_serial,  //串口驅動初始化initr_announce,  //打印說明當前uboot是運行在ram中
#ifdef CONFIG_SUNXI_LEDCinitr_ledc,  // led demo
#endifpower_init_board,  //空實現
#ifdef CONFIG_MMCinitr_mmc, //初始化mmc設備驅動,空實現
#endifinitr_secondary_cpu,  //初始化第二個cpu,一般uboot都是只運行在cpu0上,這里空實現stdio_add_devices,  //注冊標準輸入輸出的各種函數,如puts/gets/tstcinitr_jumptable,  //初始化函數跳轉表,例如上面的stdio的這些函數console_init_r,		/* fully init console as a device */  //初始化終端輸出,可以是串口或者lcd,并映射stdout/stdin/stderrinterrupt_init,  //空實現
#ifdef CONFIG_ARMinitr_enable_interrupts,  //空實現
#endif
#ifdef CONFIG_SUNXI_FAST_BURN_KEYsunxi_fast_burn_key,  //快速燒key相關功能
#endif
#ifdef CONFIG_ARCH_SUNXIinitr_sunxi_plat, //初始化flash相關
#endifboard_env_late_init,  //獲取pmu bootreason和keybox初始化
#ifdef CONFIG_ARCH_SUNXIsunxi_burn_key,  //燒key功能
#endifrun_main_loop,  //進入主循環,引導內核或者進入cli
};
因為uboot相當于重新運行了,所以init_sequence_r中首先需要做各種初始化,最后進入引導linux內核啟動流程或者進入cli_loop循壞中。


_HTTP基礎知識,HTTP 請求、響應格式,方法,狀態碼)
shell腳本)


】)


上)


)
:Yolov8n模型轉換及量化)


