點擊下方卡片,關注“小白玩轉Python”公眾號
在本文中,我將展示一個使用 MediaPipe Python 和 Rerun SDK 進行手部追蹤和手勢識別的示例。如果您有興趣深入了解并擴展您的知識,我將指導您如何安裝 MediaPipe Python 和 Rerun SDK 來進行手部追蹤、識別不同手勢并可視化數據。因此,您將學習到:
如何安裝 MediaPipe Python 和 Rerun
如何使用 MediaPipe 進行手部追蹤和手勢識別
如何在 Rerun Viewer 中可視化手部追蹤和手勢識別的結果
手部追蹤和手勢識別技術
在開始之前,讓我們感謝使這一技術成為可能的科技。手部追蹤和手勢識別技術旨在使設備能夠將手部動作和手勢解釋為命令或輸入。這項技術的核心是一個預訓練的機器學習模型,它分析視覺輸入并識別手部標志和手勢。這種技術的實際應用非常廣泛,因為手部動作和手勢可以用于控制智能設備。人機交互、機器人技術、游戲和增強現實是該技術最有前途的應用領域之一。
然而,我們應始終注意如何使用這項技術。在敏感和關鍵系統中使用它非常具有挑戰性,因為模型可能會誤解手勢,并且產生誤報的可能性并不小。利用這項技術會帶來倫理和法律挑戰,因為用戶可能不希望他們的手勢在公共場所被記錄。如果您打算在實際場景中實現這項技術,務必要考慮任何倫理和法律問題。
先決條件與設置
首先,您需要安裝必要的庫,包括 OpenCV、MediaPipe 和 Rerun。MediaPipe Python 是一個方便的工具,適合開發者在設備上集成計算機視覺和機器學習解決方案,而 Rerun 是一個可視化隨時間變化的多模態數據的 SDK。
# Install the required Python packages specified in the requirements file
pip install -r examples/python/gesture_detection/requirements.txt
然后,您需要從這里下載預定義模型:HandGestureClassifier。
使用 MediaPipe 進行手部追蹤和手勢識別
根據 Google 的手勢識別任務指南:“MediaPipe 手勢識別任務可以讓您實時識別手勢,并提供識別的手勢結果以及檢測到的手部標志。您可以使用此任務從用戶那里識別特定手勢,并調用與這些手勢對應的應用程序功能。”
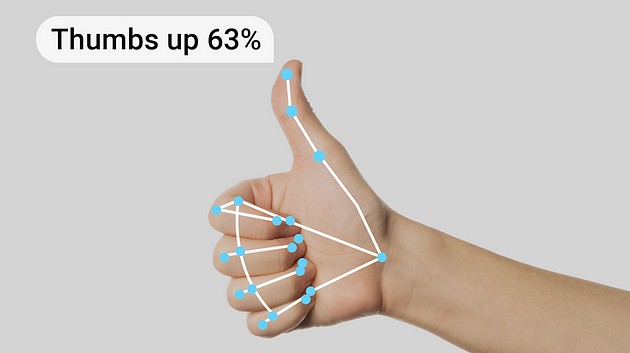
現在,讓我們嘗試使用 MediaPipe 預訓練模型進行手勢識別的示例圖像。總體來說,下面的代碼為初始化和配置 MediaPipe 手勢識別解決方案奠定了基礎。
from mediapipe.tasks.python import vision
from mediapipe.tasks import pythonclass GestureDetectorLogger:def __init__(self, video_mode: bool = False):self._video_mode = video_modebase_options = python.BaseOptions(model_asset_path='gesture_recognizer.task')options = vision.GestureRecognizerOptions(base_options=base_options,running_mode=mp.tasks.vision.RunningMode.VIDEO if self._video_mode else mp.tasks.vision.RunningMode.IMAGE)self.recognizer = vision.GestureRecognizer.create_from_options(options)def detect(self, image: npt.NDArray[np.uint8]) -> None:image = mp.Image(image_format=mp.ImageFormat.SRGB, data=image)# Get results from Gesture Detection modelrecognition_result = self.recognizer.recognize(image)for i, gesture in enumerate(recognition_result.gestures):# Get the top gesture from the recognition resultprint("Top Gesture Result: ", gesture[0].category_name)if recognition_result.hand_landmarks:# Obtain hand landmarks from MediaPipehand_landmarks = recognition_result.hand_landmarksprint("Hand Landmarks: " + str(hand_landmarks))# Obtain hand connections from MediaPipemp_hands_connections = mp.solutions.hands.HAND_CONNECTIONSprint("Hand Connections: " + str(mp_hands_connections))
GestureDetectorLogger 類中的 detect 函數接受一張圖片作為其參數,并打印出模型的結果,突出顯示識別出的頂部手勢和檢測到的手部標志點。有關模型的更多詳細信息,請參考其模型卡。
您可以使用以下代碼自行嘗試:
def run_from_sample_image(path)-> None:image = cv2.imread(str(path))show_image = cv2.cvtColor(image, cv2.COLOR_BGR2RGB)logger = GestureDetectorLogger(video_mode=False)logger.detect_and_log(show_image)# Run the gesture recognition on a sample image
run_from_sample_image(SAMPLE_IMAGE_PATH)
使用 Rerun 進行驗證、調試和演示
這一步允許您確保解決方案的可靠性和有效性。現在模型已經準備好,可以可視化結果以驗證準確性、調試潛在問題,并展示其功能。使用 Rerun SDK 可視化結果既簡單又快速。
如何使用 Rerun?
使用 Rerun SDK 從代碼中記錄多模態數據流
可視化并與本地或遠程的實時或錄制的流進行交互
交互式構建布局和自定義可視化
在需要時擴展 Rerun
在編寫代碼之前,您應該訪問安裝 Rerun Viewer 頁面以安裝 Viewer。然后,我強烈建議通過閱讀 Python 快速入門和在 Python 中記錄數據的指南來熟悉 Rerun SDK。這些初始步驟將確保設置順利,并幫助您開始即將進行的代碼實現。
從視頻或實時運行
對于視頻流,我們使用 OpenCV。您可以選擇特定視頻的文件路徑,或通過提供參數 0 或 1 訪問自己的攝像頭(使用 0 表示默認攝像頭;在 Mac 上,您可能需要使用 1)。
特別要強調的是時間線的引入。Rerun 時間線功能使得能夠將數據與一個或多個時間線相關聯。因此,視頻的每一幀都與其對應的時間戳相關聯。
def run_from_video_capture(vid: int | str, max_frame_count: int | None) -> None:"""Run the detector on a video stream.Parameters----------vid:The video stream to run the detector on. Use 0/1 for the default camera or a path to a video file.max_frame_count:The maximum number of frames to process. If None, process all frames."""cap = cv2.VideoCapture(vid)fps = cap.get(cv2.CAP_PROP_FPS)detector = GestureDetectorLogger(video_mode=True)try:it: Iterable[int] = itertools.count() if max_frame_count is None else range(max_frame_count)for frame_idx in tqdm.tqdm(it, desc="Processing frames"):ret, frame = cap.read()if not ret:breakif np.all(frame == 0):continueframe_time_nano = int(cap.get(cv2.CAP_PROP_POS_MSEC) * 1e6)if frame_time_nano == 0:frame_time_nano = int(frame_idx * 1000 / fps * 1e6)frame = cv2.cvtColor(frame, cv2.COLOR_BGR2RGB)rr.set_time_sequence("frame_nr", frame_idx)rr.set_time_nanos("frame_time", frame_time_nano)detector.detect_and_log(frame, frame_time_nano)rr.log("Media/Video",rr.Image(frame))except KeyboardInterrupt:passcap.release()cv2.destroyAllWindows()記錄數據進行可視化
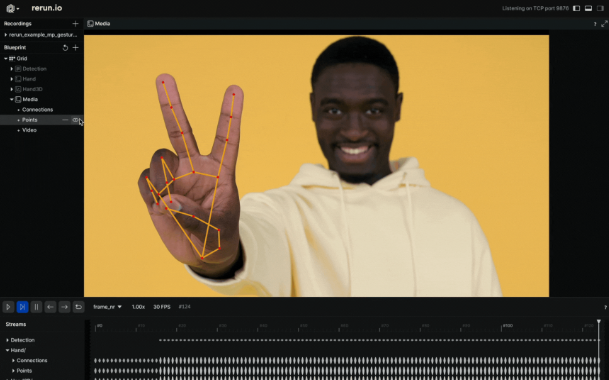
在 Rerun Viewer 中可視化數據,使用 Rerun SDK 記錄數據至關重要。之前提到的指南提供了這個過程的見解。在這種情況下,我們提取手部標志點作為規范化值,然后使用圖像的寬度和高度將其轉換為圖像坐標。這些坐標隨后作為 2D 點記錄到 Rerun SDK 中。此外,我們識別標志點之間的連接,并將它們作為 2D 線段記錄。
對于手勢識別,結果會打印到控制臺。然而,在源代碼中,您可以探索一種使用 TextDocument 和表情符號將這些結果呈現給查看器的方法。
class GestureDetectorLogger:def detect_and_log(self, image: npt.NDArray[np.uint8], frame_time_nano: int | None) -> None:# Recognize gestures in the imageheight, width, _ = image.shapeimage = mp.Image(image_format=mp.ImageFormat.SRGB, data=image)recognition_result = (self.recognizer.recognize_for_video(image, int(frame_time_nano / 1e6))if self._video_modeelse self.recognizer.recognize(image))# Clear the valuesfor log_key in ["Media/Points", "Media/Connections"]:rr.log(log_key, rr.Clear(recursive=True))for i, gesture in enumerate(recognition_result.gestures):# Get the top gesture from the recognition resultgesture_category = gesture[0].category_name if recognition_result.gestures else "None"print("Gesture Category: ", gesture_category) # Log the detected gestureif recognition_result.hand_landmarks:hand_landmarks = recognition_result.hand_landmarks# Convert normalized coordinates to image coordinatespoints = self.convert_landmarks_to_image_coordinates(hand_landmarks, width, height)# Log points to the image and Hand Entityrr.log("Media/Points",rr.Points2D(points, radii=10, colors=[255, 0, 0]))# Obtain hand connections from MediaPipemp_hands_connections = mp.solutions.hands.HAND_CONNECTIONSpoints1 = [points[connection[0]] for connection in mp_hands_connections]points2 = [points[connection[1]] for connection in mp_hands_connections]# Log connections to the image and Hand Entity rr.log("Media/Connections",rr.LineStrips2D(np.stack((points1, points2), axis=1),colors=[255, 165, 0]))def convert_landmarks_to_image_coordinates(hand_landmarks, width, height):return [(int(lm.x * width), int(lm.y * height)) for hand_landmark in hand_landmarks for lm in hand_landmark]3D 點
最后,我們檢查如何將手部標志呈現為 3D 點。我們首先在 init 函數中使用 Annotation Context 定義點之間的連接,然后將它們記錄為 3D 點。
class GestureDetectorLogger:
–def __init__(self, video_mode: bool = False):# ... existing code ...rr.log("/",rr.AnnotationContext(rr.ClassDescription(info=rr.AnnotationInfo(id=0, label="Hand3D"),keypoint_connections=mp.solutions.hands.HAND_CONNECTIONS)),timeless=True,)rr.log("Hand3D", rr.ViewCoordinates.RIGHT_HAND_X_DOWN, timeless=True)def detect_and_log(self, image: npt.NDArray[np.uint8], frame_time_nano: int | None) -> None:# ... existing code ...if recognition_result.hand_landmarks:hand_landmarks = recognition_result.hand_landmarkslandmark_positions_3d = self.convert_landmarks_to_3d(hand_landmarks)if landmark_positions_3d is not None:rr.log("Hand3D/Points",rr.Points3D(landmark_positions_3d, radii=20, class_ids=0, keypoint_ids=[i for i in range(len(landmark_positions_3d))]),)# ... existing code ...
詳細代碼可以參考:https://github.com/rerun-io/rerun
·? END? ·
HAPPY?LIFE

本文僅供學習交流使用,如有侵權請聯系作者刪除


target(SNAT、DNAT、MASQUERADE、REDIRECT))


)


POJO綁定)
