UnityURP 扭曲屏幕效果實現
- 前言
- 項目
- 下載URPGrabPass
- 空間扭曲著色器實現
- 添加可視化控制
- 創建材質球并設置
- 補充
- 粒子使用步驟
- CustomData映射
- 移動設備優化
- 鳴謝
前言
在Unity的Universal Render Pipeline (URP) 中,傳統的GrabPass功能被移除,借助URPGrabPass工具可以實現。
項目
下載URPGrabPass
下載地址:https://github.com/Haruma-K/URPGrabPass
下載完成后解壓放入工程
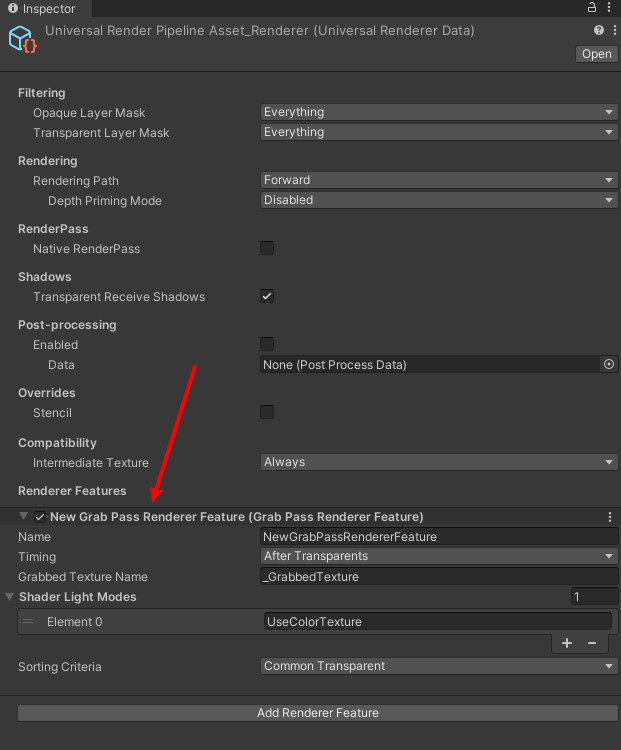
URPGrabPass通過ScriptableRendererFeature機制,在渲染管線中插入自定義的Pass來捕獲屏幕顏色紋理。
插件提供兩種渲染時機:
AfterOpaques: 在不透明物體渲染后捕獲AfterTransparents: 在透明物體渲染后捕獲插件自動將捕獲的屏幕紋理以
_GrabbedTexture的名稱傳遞給著色器,只需在著色器中聲明即可使用:sampler2D _GrabbedTexture;
記得在渲染管線中添加RendererFeature
空間扭曲著色器實現
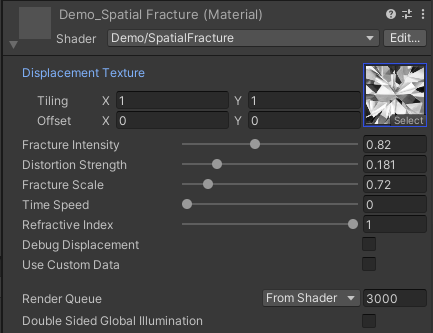
Shader "Demo/SpatialFracture"
{Properties{_DisplacementTex("Displacement Texture", 2D) = "gray" {}_FractureIntensity("Fracture Intensity", Range(0.0, 2.0)) = 0.5_DistortionStrength("Distortion Strength", Range(0.0, 1.0)) = 0.3_FractureScale("Fracture Scale", Range(0.1, 5.0)) = 1.0_TimeSpeed("Time Speed", Range(0.0, 5.0)) = 1.0_RefractiveIndex("Refractive Index", Range(0.0, 1.0)) = 0.67[Toggle] _DebugDisplacement("Debug Displacement", Float) = 0[Toggle] _UseCustomData("Use Custom Data", Float) = 0}SubShader{Tags{"RenderType" = "Transparent" "RenderPipeline" = "UniversalRenderPipeline""Queue" = "Transparent"}Pass{Tags{"LightMode" = "UseColorTexture"}HLSLPROGRAM#pragma vertex vert#pragma fragment frag#pragma shader_feature _DEBUGDISPLACEMENT_ON#pragma shader_feature _USECUSTOMDATA_ON#include "Packages/com.unity.render-pipelines.universal/ShaderLibrary/Core.hlsl"struct Attributes{float4 positionOS : POSITION;float2 uv : TEXCOORD0;half3 normal : NORMAL;#ifdef _USECUSTOMDATA_ONfloat4 customData : TEXCOORD1;#endif};struct Varyings{float4 positionHCS : SV_POSITION;float2 uv : TEXCOORD0;half2 samplingViewportPos : TEXCOORD1;float3 worldPos : TEXCOORD2;#ifdef _USECUSTOMDATA_ONfloat4 customData : TEXCOORD3;#endif};sampler2D _GrabbedTexture;sampler2D _DisplacementTex;float4 _DisplacementTex_ST;float _FractureIntensity;float _DistortionStrength;float _FractureScale;float _TimeSpeed;float _RefractiveIndex;Varyings vert(Attributes IN){Varyings OUT;OUT.positionHCS = TransformObjectToHClip(IN.positionOS);OUT.uv = TRANSFORM_TEX(IN.uv, _DisplacementTex);OUT.worldPos = TransformObjectToWorld(IN.positionOS);// Calculate base screen positionfloat4 screenPos = ComputeScreenPos(OUT.positionHCS);OUT.samplingViewportPos = screenPos.xy / screenPos.w;#ifdef _USECUSTOMDATA_ONOUT.customData = IN.customData;#endifreturn OUT;}half4 frag(Varyings IN) : SV_Target{float2 uv = IN.uv;float time = _Time.y * _TimeSpeed;// Get parameters from CustomData or use defaults#ifdef _USECUSTOMDATA_ONfloat fractureIntensity = IN.customData.x;float distortionStrength = IN.customData.y;float fractureScale = IN.customData.z;float refractiveIndex = IN.customData.w;#elsefloat fractureIntensity = _FractureIntensity;float distortionStrength = _DistortionStrength;float fractureScale = _FractureScale;float refractiveIndex = _RefractiveIndex;#endif// Sample displacement texture with animationfloat2 animatedUV = uv * fractureScale + float2(time * 0.1, time * 0.05);float4 displacement = tex2D(_DisplacementTex, animatedUV);#ifdef _DEBUGDISPLACEMENT_ONreturn half4(displacement.rgb, 1.0);#endif// Convert displacement to offsetfloat2 totalDisplacement = (displacement.rg - 0.5) * fractureIntensity * distortionStrength;// Apply refractive distortion based on displacementfloat3 viewDir = normalize(IN.worldPos - _WorldSpaceCameraPos.xyz);float displacementIntensity = length(displacement.rg - 0.5);float2 refractiveOffset = viewDir.xy * refractiveIndex * displacementIntensity * 0.05;// Combine distortionsfloat2 finalUV = IN.samplingViewportPos + totalDisplacement + refractiveOffset;// Sample the grabbed texture with distorted coordinateshalf4 grabbedColor = tex2D(_GrabbedTexture, finalUV);return grabbedColor;}ENDHLSL}}
}
添加可視化控制
搭配可視化操作更佳
using UnityEngine;public class SpatialFractureShaderHelper : MonoBehaviour
{[Header("Shader Control")]public Material targetMaterial;[Header("Debug Options 調試模式,只展示置換貼圖")]public bool debugDisplacement = false;[Header("使用ParticleSystem傳入CustomData")]public bool useCustomData = false;[Header("Manual Parameter Control")][Range(0f, 2f)]public float fractureIntensity = 0.5f;[Range(0f, 1f)]public float distortionStrength = 0.3f;[Range(0.1f, 5f)]public float fractureScale = 1f;[Range(0f, 1f)]public float refractiveIndex = 0.67f;void Update(){if (targetMaterial == null) return;// 設置關鍵字SetKeyword("_DEBUGDISPLACEMENT_ON", debugDisplacement);SetKeyword("_USECUSTOMDATA_ON", useCustomData);// 如果不使用CustomData,則設置材質參數if (!useCustomData){targetMaterial.SetFloat("_FractureIntensity", fractureIntensity);targetMaterial.SetFloat("_DistortionStrength", distortionStrength);targetMaterial.SetFloat("_FractureScale", fractureScale);targetMaterial.SetFloat("_RefractiveIndex", refractiveIndex);}}void SetKeyword(string keyword, bool enabled){if (enabled)targetMaterial.EnableKeyword(keyword);elsetargetMaterial.DisableKeyword(keyword);}
}
創建材質球并設置
補充
粒子使用步驟
- 在粒子系統中啟用"Custom Vertex Streams"
- 添加"Custom1.xyzw"到vertex streams列表
- 在CustomData模塊中設置參數值
- 在材質上啟用"Use Custom Data"選項
CustomData映射
Custom1.x→ 破裂強度 (Fracture Intensity)Custom1.y→ 扭曲強度 (Distortion Strength)Custom1.z→ 破裂縮放 (Fracture Scale)Custom1.w→ 折射指數 (Refractive Index)
移動設備優化
#ifdef _MOBILEOPTIMIZATION_ON
// 簡化版:直接使用位移作為折射偏移
half2 refractiveOffset = (displacement.rg - 0.5h) * refractiveIndex * 0.05h;
#else
// 完整版:基于視角方向的真實折射
half3 viewDir = normalize(IN.worldPos - _WorldSpaceCameraPos.xyz);
half displacementIntensity = length(displacement.rg - 0.5h);
half2 refractiveOffset = viewDir.xy * refractiveIndex * displacementIntensity * 0.05h;
#endif
鳴謝
URPGrabPass
Claude Code
軟件架構設計)


![[特殊字符] Ubuntu 下 MySQL 離線部署教學(含手動步驟與一鍵腳本)](http://pic.xiahunao.cn/[特殊字符] Ubuntu 下 MySQL 離線部署教學(含手動步驟與一鍵腳本))


)


)


![[硬件電路-119]:模擬電路 - 信號處理電路 - 比較器,模擬電路中的“決策者”,模擬信號到數字電平邏輯信號的轉化者...](http://pic.xiahunao.cn/[硬件電路-119]:模擬電路 - 信號處理電路 - 比較器,模擬電路中的“決策者”,模擬信號到數字電平邏輯信號的轉化者...)