- 操作系統:ubuntu22.04
- OpenCV版本:OpenCV4.9
- IDE:Visual Studio Code
- 編程語言:C++11
算法描述
cv::cuda::HoughSegmentDetector 是 OpenCV 的 CUDA 模塊中一個非常重要的類,它用于在 GPU 上執行 概率霍夫變換(Probabilistic Hough Transform),能夠檢測圖像中的線段端點(即直線段),而不是標準霍夫變換中表示為 (rho, theta) 的無限長直線。
類定義
class cv::cuda::HoughSegmentDetector : public cv::cuda::Algorithm
繼承自 cv::cuda::Algorithm,提供了 GPU 加速的線段檢測功能。
主要功能
- 在 GPU 上進行 概率霍夫變換
- 輸出為一系列 線段端點,格式為 Vec4i(x1, y1, x2, y2)
- 支持邊緣圖作為輸入(通常是 Canny 邊緣檢測后的圖像)
構造函數 & 創建方式
你可以通過以下方式創建該類的對象:
cv::Ptr<cv::cuda::HoughSegmentDetector> hough = cv::cuda::createHoughSegmentDetector(rho, theta, threshold, minLineLength, maxLineGap);
參數說明:
| 參數名 | 類型 | 含義 |
|---|---|---|
| rho | float | 距離分辨率(像素) |
| theta | float | 角度分辨率(弧度) |
| threshold | int | 投票閾值,只有投票數大于等于此值的線段才被保留 |
| minLineLength | int | 線段最小長度,小于該值的線段將被忽略 |
| maxLineGap | int | 同一線段上點之間的最大間隙 |
方法列表(常用方法)
| 方法名 | 功能 |
|---|---|
| detect(InputArray src, OutputArray lines, Stream& stream = Stream::Null()) | 執行霍夫變換檢測線段 |
| setRho(float rho) / getRho() | 設置/獲取距離分辨率 |
| setTheta(float theta) / getTheta() | 設置/獲取角度分辨率 |
| setThreshold(int threshold) / getThreshold() | 設置/獲取投票閾值 |
| setMinLineLength(int minLineLength) / getMinLineLength() | 設置/獲取線段最小長度 |
| setMaxLineGap(int maxLineGap) / getMaxLineGap() | 設置/獲取線段最大間隙 |
代碼示例
#include <opencv2/opencv.hpp>
#include <opencv2/cudaimgproc.hpp>int main()
{// Step 1: 加載圖像并轉為灰度圖cv::Mat h_src = cv::imread("/media/dingxin/data/study/OpenCV/sources/images/lines.png", cv::IMREAD_GRAYSCALE);if (h_src.empty()) {std::cerr << "無法加載圖像!" << std::endl;return -1;}// Step 1.1: 圖像預處理(高斯模糊降噪)cv::Mat h_blur;cv::GaussianBlur(h_src, h_blur, cv::Size(5, 5), 0);// Step 2: 上傳到 GPU 并執行 Canny 邊緣檢測cv::cuda::GpuMat d_src, d_edges;d_src.upload(h_blur);cv::Ptr<cv::cuda::CannyEdgeDetector> canny = cv::cuda::createCannyEdgeDetector(100, 200);canny->detect(d_src, d_edges);// Step 3: 創建概率霍夫變換檢測器float rho         = 1.0f;            // 距離分辨率float theta       = CV_PI / 180.0f;  // 角度分辨率(1 度)int threshold     = 30;              // 投票閾值(更敏感)int minLineLength = 50;              // 最小線段長度(更短也保留)int maxLineGap    = 20;              // 線段之間最大間隙(容許更大間隙)cv::Ptr<cv::cuda::HoughSegmentDetector> hough =cv::cuda::createHoughSegmentDetector(rho, theta, threshold, minLineLength, maxLineGap);// Step 4: 執行線段檢測cv::cuda::GpuMat d_lines;hough->detect(d_edges, d_lines);// Step 5: 下載結果std::vector<cv::Vec4i> h_lines;d_lines.download(h_lines);// Step 6: 繪制檢測到的線段cv::Mat display;cv::cvtColor(h_src, display, cv::COLOR_GRAY2BGR);for (const auto& line : h_lines){cv::Point pt1(line[0], line[1]);cv::Point pt2(line[2], line[3]);cv::line(display, pt1, pt2, cv::Scalar(0, 255, 0), 2);}// Step 7: 顯示結果cv::imshow("Detected Line Segments", display);cv::waitKey();return 0;
}
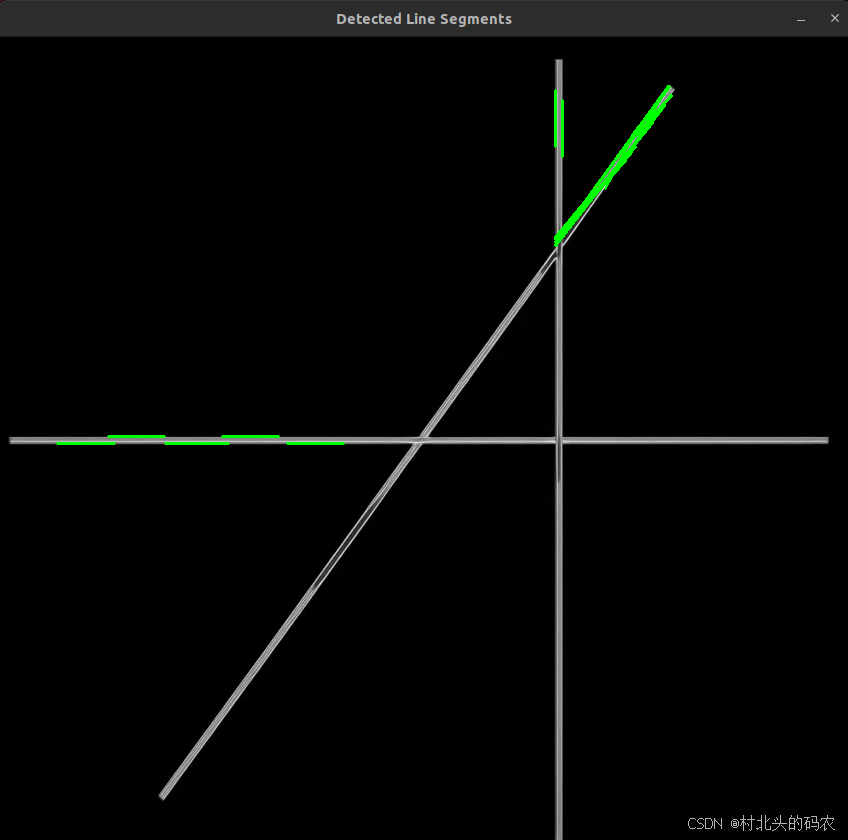
運行結果


)

)
+Leptos(0.7.8)開發桌面應用--簡單的工作進度管理)


![學習筆記(23): 機器學習之數據預處理Pandas和轉換成張量格式[1]](http://pic.xiahunao.cn/學習筆記(23): 機器學習之數據預處理Pandas和轉換成張量格式[1])


