??🧭 WPF MVVM入門系列教程
- 一、MVVM模式介紹
- 二、依賴屬性
- 三、數據綁定
- 四、ViewModel
- 五、命令和用戶輸入
- 六、ViewModel案例演示
在前面的文章中,介紹了ViewModel的基礎概念
本文會使用一些實例來進行ViewModel的演示
一個基礎的數據展示示例
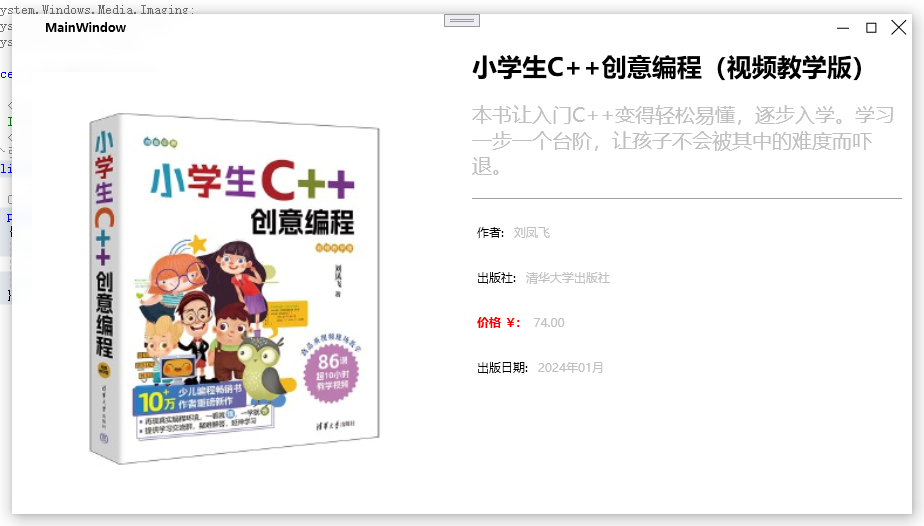
假設我們要在界面上對一本書籍的詳細信息進行展示。
首先我們定義一下View
MainWindow.xaml
界面上我們定義了兩列,左邊一列用于展示書籍封面,右邊一列用于展示詳細信息
 1 <Window x:Class="_1_ViewModelStartup.MainWindow"2         xmlns="http://schemas.microsoft.com/winfx/2006/xaml/presentation"3         xmlns:x="http://schemas.microsoft.com/winfx/2006/xaml"4         xmlns:d="http://schemas.microsoft.com/expression/blend/2008"5         xmlns:mc="http://schemas.openxmlformats.org/markup-compatibility/2006"6         xmlns:local="clr-namespace:_1_ViewModelStartup"7         mc:Ignorable="d"8         Title="MainWindow" Height="500" Width="900" WindowStartupLocation="CenterScreen">9     <Grid>
10         <Grid.ColumnDefinitions>
11             <ColumnDefinition/>
12             <ColumnDefinition/>
13         </Grid.ColumnDefinitions>
14
15         <Image Source="{Binding Book.CoverImageUrl}" Stretch="Uniform" Margin="20"></Image>
16
17         <StackPanel Grid.Column="1">
18             <TextBlock TextWrapping="WrapWithOverflow" Text="{Binding Book.Title}" FontSize="25" FontWeight="Bold" Margin="10"></TextBlock>
19             <TextBlock TextWrapping="WrapWithOverflow" Text="{Binding Book.Descrption}" FontSize="20" Foreground="Silver" Margin="10"></TextBlock>
20             <Separator Height="1" Foreground="Silver" Margin="10"></Separator>
21             <StackPanel Orientation="Horizontal" Margin="10">
22                 <Label Content="作者:"></Label>
23                 <Label Content="{Binding Book.Author}" Foreground="Silver"  ></Label>
24             </StackPanel>
25             <StackPanel Orientation="Horizontal" Margin="10">
26                 <Label Content="出版社:"></Label>
27                 <Label Content="{Binding Book.Publish}" Foreground="Silver"  ></Label>
28             </StackPanel>
29             <StackPanel Orientation="Horizontal" Margin="10">
30                 <Label Content="價格 ¥: " Foreground="Red" FontWeight="Bold"></Label>
31                 <Label Content="{Binding Book.Price}" Foreground="Silver"  ></Label>
32             </StackPanel>
33             <StackPanel Orientation="Horizontal" Margin="10">
34                 <Label Content="出版日期:"></Label>
35                 <Label Content="{Binding Book.Date}" Foreground="Silver"  ></Label>
36             </StackPanel>
37         </StackPanel>
38     </Grid>
39
40 </Window>
然后我們定義一下Model
Book.cs
 1 public class Book : INotifyPropertyChanged2 {3     private string title;4 5     public string Title6     {7         get => title;8         set9         {
10             title = value;
11             RaiseChanged();
12         }
13     }
14
15     private string author;
16     public string Author
17     {
18         get => author;
19         set
20         {
21             author = value;
22             RaiseChanged();
23         }
24     }
25
26     private string publish;
27
28     public string Publish
29     {
30         get => publish;
31         set
32         {
33             publish = value;
34             RaiseChanged();
35         }
36     }
37
38     private string price;
39
40     public string Price
41     {
42         get => price;
43         set
44         {
45             price = value;
46             RaiseChanged();
47         }
48     }
49
50     private string date;
51     public string Date
52     {
53         get => date;
54         set
55         {
56             date = value;
57             RaiseChanged();
58         }
59     }
60
61     private string description;
62
63     public string Descrption
64     {
65         get => description;
66         set
67         {
68             description = value;
69             RaiseChanged();
70         }
71     }
72
73
74     private string coverImageUrl;
75
76     public string CoverImageUrl
77     {
78         get => coverImageUrl;
79         set
80         {
81             coverImageUrl = value;
82             RaiseChanged();
83         }
84     }
85
86
87     public event PropertyChangedEventHandler PropertyChanged;
88
89
90     public void RaiseChanged([CallerMemberName] string memberName = "")
91     {
92         PropertyChanged?.Invoke(this, new PropertyChangedEventArgs(memberName));
93     }
94 }
定義ViewModel
MainWindowViewModel.cs
在ViewModel里,定義一個Book對象,并進行數據初始化。
而View上的元素分別綁定到了該對象的各個屬性。
 1   public class MainWindowViewModel : INotifyPropertyChanged2   {3       private Book book;4 5       public Book Book 6       {7           get => book;8           set9           {
10               book = value;
11               PropertyChanged?.Invoke(this, new PropertyChangedEventArgs("Book"));
12           }
13       }
14
15       public MainWindowViewModel()
16       {
17           LoadBook();
18       }
19
20       public event PropertyChangedEventHandler PropertyChanged;
21
22       private void LoadBook()
23       {
24           Book = new Book();
25           Book.CoverImageUrl = "http://img3m1.ddimg.cn/16/5/29681701-1_w_1709623057.jpg";
26           Book.Title = "小學生C++創意編程(視頻教學版)";
27           Book.Descrption = "本書讓入門C++變得輕松易懂,逐步入學。學習一步一個臺階,讓孩子不會被其中的難度而嚇退。";
28           Book.Author = "劉鳳飛";
29           Book.Publish = "清華大學出版社";
30           Book.Date = "2024年01月 ";
31           Book.Price = "74.00";
32       }
33   }
設置DataContext
1     public partial class MainWindow : TianXiaTech.BlurWindow
2     {
3         public MainWindow()
4         {
5             InitializeComponent();
6
7             this.DataContext = new MainWindowViewModel();
8         }
9     }
運行效果如下:
 ?
?
帶列表功能的示例
接下來我們將上面的示例進行升級,增加列表功能,并支持列表排序
首先我們升級一下界面,將書籍封面,移動到右上角,左側增加一個ListBox。
其中ListBox使用數據模板定義了數據呈現方式。
 1 <Window x:Class="_2_ShowBookList.MainWindow"2         xmlns="http://schemas.microsoft.com/winfx/2006/xaml/presentation"3         xmlns:x="http://schemas.microsoft.com/winfx/2006/xaml"4         xmlns:d="http://schemas.microsoft.com/expression/blend/2008"5         xmlns:mc="http://schemas.openxmlformats.org/markup-compatibility/2006"6         xmlns:local="clr-namespace:_2_ShowBookList"7         mc:Ignorable="d"8         Title="MainWindow" Height="450" Width="800">9     <Grid>
10         <Grid.ColumnDefinitions>
11             <ColumnDefinition Width="300"/>
12             <ColumnDefinition/>
13         </Grid.ColumnDefinitions>
14
15         <Grid>
16             <Grid.RowDefinitions>
17                 <RowDefinition/>
18                 <RowDefinition Height="45"/>
19             </Grid.RowDefinitions>
20
21             <ListBox ItemsSource="{Binding BookList}" SelectedItem="{Binding Book}" Margin="5">
22                 <ListBox.ItemTemplate>
23                     <DataTemplate>
24                         <Grid>
25                             <Grid.RowDefinitions>
26                                 <RowDefinition/>
27                                 <RowDefinition/>
28                             </Grid.RowDefinitions>
29
30                             <!--使用數據模板,讓書名支持換行-->
31                             <TextBlock Text="{Binding Title}" FontWeight="Bold" TextWrapping="WrapWithOverflow" Width="260"></TextBlock>
32                             <Grid Grid.Row="1" Margin="0,5,0,0">
33                                 <Grid.ColumnDefinitions>
34                                     <ColumnDefinition/>
35                                     <ColumnDefinition/>
36                                 </Grid.ColumnDefinitions>
37
38                                 <Label Content="{Binding Author}"></Label>
39                                 <TextBlock Text="{Binding Price,StringFormat={}{0}元}" HorizontalAlignment="Left"  Grid.Column="1"></TextBlock>
40                             </Grid>
41                         </Grid>
42                     </DataTemplate>
43                 </ListBox.ItemTemplate>
44             </ListBox>
45
46             <DockPanel LastChildFill="False" Grid.Row="1">
47                 <Button Content="價格升序" VerticalAlignment="Center" Margin="5,0,0,0" Command="{Binding OrderByPriceAscCommand}"></Button>
48                 <Button Content="價格降序" VerticalAlignment="Center" Margin="5,0,0,0" Command="{Binding OrderByPriceDescCommand}"></Button>
49             </DockPanel>
50         </Grid>
51
52         <StackPanel Grid.Column="1">
53             <Image Source="{Binding Book.CoverImageUrl}" Stretch="Uniform" Margin="20" Height="150"></Image>
54
55             <TextBlock TextWrapping="WrapWithOverflow" Text="{Binding Book.Title}" FontWeight="Bold" Margin="5"></TextBlock>
56             <TextBlock TextWrapping="WrapWithOverflow" Text="{Binding Book.Descrption}" Foreground="Silver" Margin="5"></TextBlock>
57             <Separator Height="1" Foreground="Silver" Margin="2"></Separator>
58             <StackPanel Orientation="Horizontal" Margin="5">
59                 <Label Content="作者:"></Label>
60                 <Label Content="{Binding Book.Author}" Foreground="Silver"  ></Label>
61             </StackPanel>
62             <StackPanel Orientation="Horizontal" Margin="5">
63                 <Label Content="出版社:"></Label>
64                 <Label Content="{Binding Book.Publish}" Foreground="Silver"  ></Label>
65             </StackPanel>
66             <StackPanel Orientation="Horizontal" Margin="5">
67                 <Label Content="價格 ¥: " Foreground="Red" FontWeight="Bold"></Label>
68                 <Label Content="{Binding Book.Price}" Foreground="Silver"  ></Label>
69             </StackPanel>
70             <StackPanel Orientation="Horizontal" Margin="5">
71                 <Label Content="出版日期:"></Label>
72                 <Label Content="{Binding Book.Date}" Foreground="Silver"  ></Label>
73             </StackPanel>
74         </StackPanel>
75     </Grid>
76
77 </Window>
此外,我們還要注意一下界面綁定:
ListBox的數據源綁定到BookList集合,SelectedItem綁定到Book對象
1 ListBox ItemsSource="{Binding BookList}" SelectedItem="{Binding Book}"
另外還增加了排序按鈕,分別綁定到兩個不同的Command
1 <Button Content="價格升序" VerticalAlignment="Center" Margin="5,0,0,0" Command="{Binding OrderByPriceAscCommand}"></Button>
2 <Button Content="價格降序" VerticalAlignment="Center" Margin="5,0,0,0" Command="{Binding OrderByPriceDescCommand}"></Button>
然后我們在前面的基礎上升級一下ViewModel
 1  public class MainWindowViewModel : INotifyPropertyChanged2  {3      private Book book;4 5      public Book Book6      {7          get => book;8          set9          {
10              book = value;
11              PropertyChanged?.Invoke(this, new PropertyChangedEventArgs("Book"));
12          }
13      }
14
15      private ObservableCollection<Book> bookList = new ObservableCollection<Book>();
16
17      public ObservableCollection<Book> BookList
18      {
19          get => bookList;
20          set
21          {
22              bookList = value;
23              PropertyChanged?.Invoke(this, new PropertyChangedEventArgs("BookList"));
24          }
25      }
26
27      public ICommand OrderByPriceAscCommand { get; private set; }
28
29      public ICommand OrderByPriceDescCommand { get; private set; }
30
31
32      public MainWindowViewModel()
33      {
34          OrderByPriceAscCommand = new RelayCommand(OrderByPriceAsc);
35          OrderByPriceDescCommand = new RelayCommand(OrderByPriceDesc);
36
37          LoadBook();
38      }
39
40      private void OrderByPriceDesc()
41      {
42          BookList = new ObservableCollection<Book>(BookList.OrderByDescending(x => x.Price));
43      }
44
45      private void OrderByPriceAsc()
46      {
47          BookList = new ObservableCollection<Book>(BookList.OrderBy(x => x.Price));
48      }
49
50      public event PropertyChangedEventHandler PropertyChanged;
51
52      private void LoadBook()
53      {
54          Book book = new Book();
55          book.CoverImageUrl = "http://img3m1.ddimg.cn/16/5/29681701-1_w_1709623057.jpg";
56          book.Title = "小學生C++創意編程(視頻教學版)";
57          book.Descrption = "本書讓入門C++變得輕松易懂,逐步入學。學習一步一個臺階,讓孩子不會被其中的難度而嚇退。";
58          book.Author = "劉鳳飛";
59          book.Publish = "清華大學出版社";
60          book.Date = "2024年01月 ";
61          book.Price = 74.00f;
62
63          Book book2 = new Book();
64          book2.CoverImageUrl = "http://img3m4.ddimg.cn/64/13/29798074-1_u_1731275892.jpg";
65          book2.Title = "漫畫趣讀西游記(7-14歲)和大人一起讀四大名著兒童文學,十萬個為什么中小學課外閱讀快樂讀書吧";
66          book2.Descrption = "拼音標注、無障閱讀、名著導讀、有聲伴讀、Q版漫畫、全彩印刷,鮮活的人物形象,激發興趣,提升孩子的學習力!";
67          book2.Author = "陳春燕";
68          book2.Publish = "四川美術出版社";
69          book2.Date = "2024年09月";
70          book2.Price = 4.89f;
71
72          BookList.Add(book);
73          BookList.Add(book2);
74      }
75  }
運行效果如下:
 ?
?
帶新增功能的示例
我們在前面列表的基礎上,再進行升級,支持從界面新增書籍。
 1   <Grid>2       <Grid.RowDefinitions>3           <RowDefinition/>4           <RowDefinition Height="35"/>5       </Grid.RowDefinitions>6 7       <Grid>8           <Grid.ColumnDefinitions>9               <ColumnDefinition/>
10               <ColumnDefinition/>
11           </Grid.ColumnDefinitions>
12
13           <Image Stretch="Uniform" Margin="0,0,0,30" Source="{Binding NewBook.CoverImageUrl}"></Image>
14           <Button Content="瀏覽封面" HorizontalAlignment="Center" VerticalAlignment="Bottom" Command="{Binding BrowseCoverCommand}"></Button>
15
16           <StackPanel Grid.Column="1">
17               <StackPanel Orientation="Horizontal" Margin="10">
18                   <Label Content="書名:"></Label>
19                   <TextBox Text="{Binding NewBook.Title}" Foreground="Silver" Width="200" ></TextBox>
20               </StackPanel>
21               <StackPanel Orientation="Horizontal" Margin="10">
22                   <Label Content="描述:"></Label>
23                   <TextBox Text="{Binding NewBook.Descrption}" Foreground="Silver" Width="200" ></TextBox>
24               </StackPanel>
25               <StackPanel Orientation="Horizontal" Margin="10">
26                   <Label Content="作者:"></Label>
27                   <TextBox Text="{Binding NewBook.Author}" Foreground="Silver" Width="200" ></TextBox>
28               </StackPanel>
29               <StackPanel Orientation="Horizontal" Margin="10">
30                   <Label Content="出版社:"></Label>
31                   <TextBox Text="{Binding NewBook.Publish}" Foreground="Silver"  Width="200"></TextBox>
32               </StackPanel>
33               <StackPanel Orientation="Horizontal" Margin="10">
34                   <Label Content="價格 ¥: " Foreground="Red" FontWeight="Bold"></Label>
35                   <TextBox Text="{Binding NewBook.Price}" Foreground="Silver"  Width="200"></TextBox>
36               </StackPanel>
37               <StackPanel Orientation="Horizontal" Margin="10">
38                   <Label Content="出版日期:"></Label>
39                   <TextBox Text="{Binding NewBook.Date}" Foreground="Silver" Width="200"></TextBox>
40               </StackPanel>
41           </StackPanel>
42       </Grid>
43
44       <Button Content="新增" Width="88" Height="28" HorizontalAlignment="Center" VerticalAlignment="Center" Grid.Row="1" Command="{Binding AddBookCommand}"/>
45   </Grid>
需要注意的是,這里我們將增加書籍的信息綁定到了一個NewBook對象。
此外,我們還定義了BrowseCoverCommand和AddBookCommand,分別用于瀏覽書籍封面和新增加書籍
然后我們更新ViewModel
這里為了防止混淆,將前面示例部分的代碼移除了,完整的代碼可以參考文末的示例代碼
 1 public class MainWindowViewModel2 {3     ... 4 5     private Book newBook = new Book();6 7     public Book NewBook8     {9         get => newBook;
10         set
11         {
12             newBook = value;
13             PropertyChanged?.Invoke(this, new PropertyChangedEventArgs("NewBook"));
14         }
15     }
16
17     public ICommand BrowseCoverCommand { get; private set; }
18
19     public ICommand AddBookCommand { get; private set; }
20
21
22     public event PropertyChangedEventHandler? PropertyChanged;
23
24     public MainWindowViewModel()
25     {
26         BrowseCoverCommand = new RelayCommand(BrowseCover);
27         AddBookCommand = new RelayCommand(AddBook);
28
29         LoadDemoData();
30     }
31
32     private void LoadDemoData()
33     {
34         Book book = new Book();
35         book.CoverImageUrl = "http://img3m1.ddimg.cn/16/5/29681701-1_w_1709623057.jpg";
36         book.Title = "小學生C++創意編程(視頻教學版)";
37         book.Descrption = "本書讓入門C++變得輕松易懂,逐步入學。學習一步一個臺階,讓孩子不會被其中的難度而嚇退。";
38         book.Author = "劉鳳飛";
39         book.Publish = "清華大學出版社";
40         book.Date = "2024年01月 ";
41         book.Price = "74.00";
42
43         Book book2 = new Book();
44         book2.CoverImageUrl = "http://img3m4.ddimg.cn/64/13/29798074-1_u_1731275892.jpg";
45         book2.Title = "漫畫趣讀西游記(7-14歲)和大人一起讀四大名著兒童文學,十萬個為什么中小學課外閱讀快樂讀書吧";
46         book2.Descrption = "拼音標注、無障閱讀、名著導讀、有聲伴讀、Q版漫畫、全彩印刷,鮮活的人物形象,激發興趣,提升孩子的學習力!";
47         book2.Author = "陳春燕";
48         book2.Publish = "四川美術出版社";
49         book2.Date = "2024年09月";
50         book2.Price = "4.89";
51
52         BookList.Add(book);
53         BookList.Add(book2);
54     }
55
56     private void AddBook()
57     {
58         var tempBook = new Book();
59         tempBook.Title = NewBook.Title;
60         tempBook.Descrption = NewBook.Descrption;
61         tempBook.Author = NewBook.Author;
62         tempBook.Publish = NewBook.Publish;
63         tempBook.Price = NewBook.Price;
64         tempBook.Date = NewBook.Date;
65         tempBook.CoverImageUrl = NewBook.CoverImageUrl;
66
67         //將NewBook添加到列表中
68         BookList.Add(tempBook);
69
70         //重置NewBook
71         NewBook.Title = "";
72         NewBook.Descrption = "";
73         NewBook.Author = "";
74         NewBook.Publish = "";
75         NewBook.Price = "";
76         NewBook.Date = "";
77         NewBook.CoverImageUrl = null;
78     }
79
80     private void BrowseCover()
81     {
82         Microsoft.Win32.OpenFileDialog openFileDialog = new Microsoft.Win32.OpenFileDialog();
83         openFileDialog.Filter = "圖片文件|*.jpg;*.bmp;*.png";
84
85         if (openFileDialog.ShowDialog() == true)
86         {
87             NewBook.CoverImageUrl = openFileDialog.FileName;
88         }
89     }
90
91     ...
92 }
運行效果如下:
 ?
?
示例代碼
https://github.com/zhaotianff/WPF-MVVM-Beginner/tree/main/6_ViewModelDemo

QTableView自定義委托集合,一個類實現若干委托)


)


——FFT)

)


