背景
由于DockerDesktop并非開源軟件,如果在公司使用,可能就有一些限制,那是不是除了使用DockerDesktop外,就沒其它辦法了呢,現在咱們來說說替換方案。
WSL
WSL是什么,可自行百度,這里引用WSL百度百科,下面咱們直接進入主題
開啟子系統
需要管理員權限執行下面操作,打開CMD或PowerShell
dism.exe /online /enable-feature /featurename:Microsoft-Windows-Subsystem-Linux /all /norestart
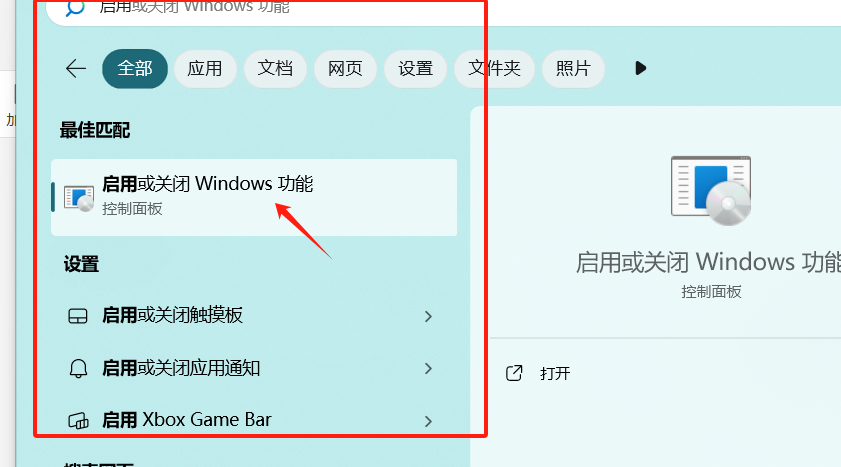
也可以通過下面方法啟用,打開開始菜單,輸入啟用或關閉Windows功能,在彈出菜單中,勾選虛擬機平臺和適用于 Linux 的 Windows 子系統,確定后重啟系統生效。

檢查系統版本
對于x86_64 系統:操作系統win 10版本是1903 或更高版本,內部版本為 18362.1049 或更高版本,Win 11也可以的,下面命令檢查系統版本
winver
啟動虛擬機功能
管理員權限運行,CMD或PowerShell都可以
dism.exe /online /enable-feature /featurename:VirtualMachinePlatform /all /norestart
更新Linux內核包
如果有必要的話,可以更新下,下載安裝x86_64機器的更新包
下載地址 安裝也是需要管理員權限。
更新WSL版本
更新不了,不更新可以用的話,也是OK的
wsl --update [--web-download http://xxxx]
--web-download 可選項,從指定地址下載而不是Microsoft Store 下載最新更新
檢查WSL狀態
wsl --status
默認分發:OracleLinux_8_5
默認版本:2
上面輸出默認版本不是2,可更改為2版本
wsl --set-default-version 2
安裝WSL包
這個WSL包,其實就是一個Linux系統了,選擇自己熟悉的就OK,可以安裝1個或多個,不過一般一個就OK,除非需要在不同系統做測試。
下面的系統,自行選擇下載。
- Ubuntu 24.04
- Ubuntu 22.04 LTS
- Ubuntu 20.04
- Debian GNU/Linux
- openSUSE Tumbleweed
- SUSE Linux Enterprise Server 15 SP3
- openSUSE Leap 15.3
- Oracle Linux 8.5
- Oracle Linux 7.9
- Fedora Remix for WSL
下載后是一些.Appx,.AppxBundle等后綴的文件,雙擊即可安裝,如果不行,可通過命令行安裝,打開Powershell執行
Add-AppxPackage .\xxx.Appx
Add-AppxPackage .\xxx.AppxBundle
安裝好后,可在開始菜單中找到,單擊即可打開,需要為新的 Linux 分發版創建用戶帳戶和密碼,這個就類似進入操作系統的用戶名和密碼,自己用設置123456亦可,后續忘記密碼,也可以wsl -u root -d Ubuntu_22.04進入根目錄,然后執行passwd更改密碼。
wsl具體的使用命令可自行搜索,此處略。
進入wsl子系統后,sudo su - 切換到root用戶。
跨文件系統工作
1、windows的盤自動默認掛載到了/mnt下。
2、windows下可執行這查看子系統目錄
start \\wsl$
3、借助 WSL,Windows 和 Linux 工具和命令可互換使用。
- 從 Linux 命令行運行 Windows 工具(即 notepad.exe)
- 從 Windows 命令行(如 PowerShell)運行 Linux 工具(如 grep)
- 在 Linux 和 Windows 之間共享環境變量
使用 Linux 命令 ls -la 列出文件,并使用 PowerShell 命令 findstr 來篩選包含“go”的單詞。
wsl ls -la | findstr "go"
使用 PowerShell 命令 dir 列出文件,并使用 Linux 命令 grep 來篩選包含“go”的單詞
C:\> dir | wsl grep go
使用 Linux 命令 ls -la 列出 /proc/cpuinfo Linux 文件系統路徑中的文件
C:\> wsl ls -la /proc/xxxx
在linux下也可以使用win的命令
ls -la | findstr.exe /etc/passwd
用win的記事本編輯WSL里的文件
notepad.exe "E:\yyy.txt"
4、禁用互操作特性
使用 root 身份運行以下命令,禁用針對單個 WSL 會話運行 Windows 工具的功能
echo 0 > /proc/sys/fs/binfmt_misc/WSLInterop
若要重新啟用 Windows 二進制文件,請退出所有 WSL 會話并重新運行 bash.exe,或者以 root 身份運行以下命令:
echo 1 > /proc/sys/fs/binfmt_misc/WSLInterop
注意:每次切換 WSL 會話后,禁用互操作的結果不會持久保留 – 啟動新會話后,會再次啟用互操作。
WSL設置
wsl.conf 和 .wslconfig 文件用于針對每個發行版 (wsl.conf) 和全局跨所有 WSL 2 發行版 (.wslconfig) 高級設置選項,為已安裝的 Linux 發行版配置設置,使它們在你每次啟動 WSL 時自動應用
- wslconfig 用于在 WSL 2 上運行的所有已安裝發行版中配置全局設置
- wsl.conf 用于為在 WSL 1 或 WSL 2 上運行的每個 Linux 發行版按各個發行版配置本地設置
必須停止所有的wsl版本超過8s,配置才會生效
# 關閉所有
wsl --shutdown
wsl.conf
使用 wsl.conf 為 WSL 1 或 WSL 2 上運行的每個 Linux 發行版按各個發行版配置本地設置
文件位于每個wsl的目錄/etc/wsl.conf,沒有可創建,支持五個部分:automount、network、interop 、boot和 user
下面是示例文件
# Automatically mount Windows drive when the distribution is launched
[automount]# Set to true will automount fixed drives (C:/ or D:/) with DrvFs under the root directory set above.
# Set to false means drives won't be mounted automatically, but need to be mounted manually or with fstab.
enabled = true# Sets the directory where fixed drives will be automatically mounted.
# This example changes the mount location, so your C-drive would be /c, rather than the default /mnt/c.
root = /mnt# DrvFs-specific options can be specified.
options = "metadata=disabled,uid=1001,gid=1001,umask=022,fmask=000,case=off"# Sets the `/etc/fstab` file to be processed when a WSL distribution is launched.
mountFsTab = true# Network host settings that enable the DNS server used by WSL 2.
# This example changes the hostname, sets generateHosts to false, preventing WSL from the default behavior of auto-generating /etc/hosts, and sets generateResolvConf to false, preventing WSL from auto-generating /etc/resolv.conf, so that you can create your own (ie. nameserver 1.1.1.1).
[network]
# wsl 的主機名
# hostname = DemoHost
generateHosts = true
generateResolvConf = true# Set whether WSL supports interop processes like launching Windows apps and adding path variables.
# Setting these to false will block the launch of Windows processes and block adding $PATH environment variables.
# 在預覽體驗成員內部版本 17713 和更高版本中可用
[interop]
# 是否支持啟動 Windows 進程
enabled = false
# 是否會將 Windows 路徑元素添加到 $PATH 環境變量
appendWindowsPath = false# Set the user when launching a distribution with WSL.
[user]
default = appuser# Set a command to run when a new WSL instance launches. This example starts the Docker container service.
[boot]
# 僅在 Windows 11 和 Server 2022 上可用
command = service docker start
# 啟用systemd支持
systemd=true
如果啟用了systemd,則應禁用或屏蔽可能導致 WSL 問題的單元。 以下已知會導致 WSL 分發中問題的單元:
- systemd-resolved.service
- systemd-networkd.service
- NetworkManager.service
- systemd-tmpfiles-setup.service
- systemd-tmpfiles-clean.service
- systemd-tmpfiles-clean.timer
- systemd-tmpfiles-setup-dev-early.service
- systemd-tmpfiles-setup-dev.service
- tmp.mount
.wslconfig
為 WSL 2上運行的所有已安裝的發行版配置全局設置,默認該文件不存在,必須創建并存儲在
%UserProfile%
目錄中才能應用這些配置設置,打開該位置
start %UserProfile%
示例文件
# Settings apply across all Linux distros running on WSL 2
[wsl2]# Limits VM memory to use no more than 4 GB, this can be set as whole numbers using GB or MB
memory=4GB # Sets the VM to use two virtual processors
processors=2# Specify a custom Linux kernel to use with your installed distros.
# The default kernel used can be found at https://github.com/microsoft/WSL2-Linux-Kernel
# kernel=C:\\temp\\myCustomKernel# Sets additional kernel parameters, in this case enabling older Linux base images such as Centos 6
# kernelCommandLine = vsyscall=emulate# 是否在“安全模式”中運行 WSL,這會禁用許多功能,應用于恢復處于錯誤狀態的發行版
# 僅適用于 Windows 11 和 WSL 版本 0.66.2+
safeMode = false# Sets amount of swap storage space to 8GB, default is 25% of available RAM。0 表示無交換文件
swap=1GB# Sets swapfile path location, default is %USERPROFILE%\AppData\Local\Temp\swap.vhdx
swapfile=D:\\soft\\wk\\wsldata\\wsl-swap.vhdx# Windows 是否能夠回收分配給 WSL 2 虛擬機的未使用內存
# Disable page reporting so WSL retains all allocated memory claimed from Windows and releases none back when free
pageReporting=true# 在 WSL 中打開或關閉對 GUI 應用程序的支持
guiApplications = true# Turn on default connection to bind WSL 2 localhost to Windows localhost. Setting is ignored when networkingMode=mirrored
localhostforwarding=true# 用于打開或關閉嵌套虛擬化的布爾值,使其他嵌套 VM 能夠在 WSL 2 中運行。 僅適用于 Windows 11
# Disables nested virtualization
nestedVirtualization=false# 用于在 WSL 2 發行版實例啟動時打開顯示 dmesg 內容的輸出控制臺窗口。 僅適用于 Windows 11
# Turns on output console showing contents of dmesg when opening a WSL 2 distro for debugging
debugConsole=false# VM 在關閉之前處于空閑狀態的毫秒數。 僅適用于 Windows 11
vmIdleTimeout = 60000# 僅適用于 networkingMode = NAT。
# 通知 WSL 將 Linux 中的 DNS 服務器配置為主機上的 NAT
# 設置為 false 會將 DNS 服務器從 Windows 鏡像到 Linux
dnsProxy = true# 如果值為 mirrored,則會啟用鏡像網絡模式。
# 默認或無法識別的字符串會生成 NAT 網絡。需要 Windows 11 版本 22H2 或更高版本
networkingMode = NAT# 如果設置為 true,則 Windows 防火墻規則以及特定于 Hyper-V 流量的規則可以篩選 WSL 網絡流量
# 需要 Windows 11 版本 22H2 或更高版本
firewall = true# 是否將 DNS 請求從 WSL 代理到 Windows 的方式。需要 Windows 11 版本 22H2 或更高版本
dnsTunneling = true# WSL 是否使用 Windows 的 HTTP 代理信息。僅在 Windows 11 中可用
autoProxy = true# 設置存儲 Linux 發行版(例如 Ubuntu)文件系統的虛擬硬盤 (VHD) 大小
# 可用于限制分發文件系統允許占用的最大大小
defaultVhdSize = 200GB# Enable experimental features
[experimental]
# 檢測空閑 CPU 使用率后,自動釋放緩存的內存
# 設置為 gradual 以慢速釋放,設置為 dropcache 以立即釋放緩存的內存
# disabled 禁用
autoMemoryReclaim = dropcache# 如果設置為 true,則任何新創建的 VHD 將自動設置為稀疏虛擬硬盤文件
# 只分配實際使用的磁盤空間,而不是預先分配整個文件大小的磁盤空間
sparseVhd = true# 僅當 wsl2.dnsTunneling 設置為 true 時才適用
# 如果設置為 true,Windows 將從 DNS 請求中提取問題并嘗試解決該問題,從而忽略未知記錄
# 需要 Windows 11 版本 22H2 或更高版本
bestEffortDnsParsing = false# 僅當 wsl2.dnsTunneling 設置為 true 時才適用
# 指定啟用 DNS 隧道的情況下將在 Linux resolv.conf 文件中配置的 nameserver
# 需要 Windows 11 版本 22H2 或更高版本
# dnsTunnelingIpAddress = 10.255.255.254        # 僅當 wsl2.autoProxy 設置為 true 時才適用
# 配置啟動 WSL 容器時,WSL 等待檢索 HTTP 代理信息的時長(以毫秒為單位)
# 如果代理設置在此時間之后解析,則必須重啟 WSL 實例才能使用檢索到的代理設置
# 僅在 Windows 11 中可用
initialAutoProxyTimeout = 1000# 僅當 wsl2.networkingMode 設置為 mirrored 時才適用
# 指定 Linux 應用程序可以綁定到哪些端口(即使該端口已在 Windows 中使用)
# 通過此設置,應用程序能夠僅偵聽 Linux 中的流量端口
# 因此即使該端口在 Windows 上用于其他用途,這些應用程序也不會被阻止
# 例如,WSL 將允許綁定到 Linux for Docker Desktop 中的端口 53,因為它只偵聽來自 Linux 容器中的請求
# 需要 Windows 11 版本 22H2 或更高版本
# ignoredPorts = 3000,9000,9090# 僅當 wsl2.networkingMode 設置為 mirrored 時才適用
# 如果設置為 True,將會允許容器通過分配給主機的 IP 地址連接到主機,或允許主機通過此方式連接到容器
# 始終可以使用 127.0.0.1 環回地址,此選項也允許使用所有額外分配的本地 IP 地址
# 僅支持分配給主機的 IPv4 地址
# 需要 Windows 11 版本 22H2 或更高版本
hostAddressLoopback = false
更換wsl默認安裝位置
wsl默認安裝到了
C:\Users\開機賬號\AppData\Local\Packages下的
比如類似這樣的:4210OracleAmericaInc.OracleLinux8.5_dm93watqnc2oz
每個子系統一個文件夾,該子目錄下的LocalState文件夾里就一個文件,占用空間很大,我們可以通過導出導入方式進行更改。
導出wsl
wsl --export 默認是tar格式
wsl --export Ubuntu D:/XXX/Ubuntu.tar
wsl --export OracleLinux_8_5 E:/wsl/OracleLinux_8_5.tar
取消wsl注冊
wsl --unregister <DistributionName>
取消注冊后,LocalState文件夾下的大文件被自動刪除,運行 wsl --list 將不會再列出
wsl --ungerister Ubuntu
wsl --ungerister OracleLinux_8_5
導入wsl
wsl --import
wsl --import Ubuntu E:/wsl/ubuntu Ubuntu.tar
wsl --import OracleLinux_8_5 E:/wsl/oracleLinux OracleLinux_8_5.tar
podman
Podman是開源軟件,大多數公司應該都允許直接使用,其實就是幾個二進制命令文件而已,下載地址
Podman Desktop是一個可視化的操作界面,不安裝這個也是OK的,熟悉命令的話,類似Docker和Docker Desktop的關系。
完成后,在命令行執行
# 這個需要下載一些東東,要花一些時間
podman machine init
# 啟動
podman machine start
# 查看鏡像
podman images
# 拉取鏡像
podman pull apache/flink
上面在執行podman machine init時,默認安裝podman-machine-default在了C盤,并且磁盤增加,即使刪除一些鏡像后不會縮小,如何更改位置,可自行研究下,目前本人還沒嘗試更改。由于podman也依賴于wsl,因此本人直接使用的就是wsl。


API調用接口的具體參數和使用方法,包括Python和C++的示例代碼)


:移動應用商業模式的深度剖析與實戰要點)


