目錄
- 模型加載
- Assimp
- 網格
- 模型及導入
- 深度測試
- 深度值精度
- 深度緩沖的可視化
- 深度沖突
- 模板測試
- 物體輪廓
GitHub主頁:https://github.com/sdpyy1
OpenGL學習倉庫:https://github.com/sdpyy1/CppLearn/tree/main/OpenGLtree/main/OpenGL):https://github.com/sdpyy1/CppLearn/tree/main/OpenGL
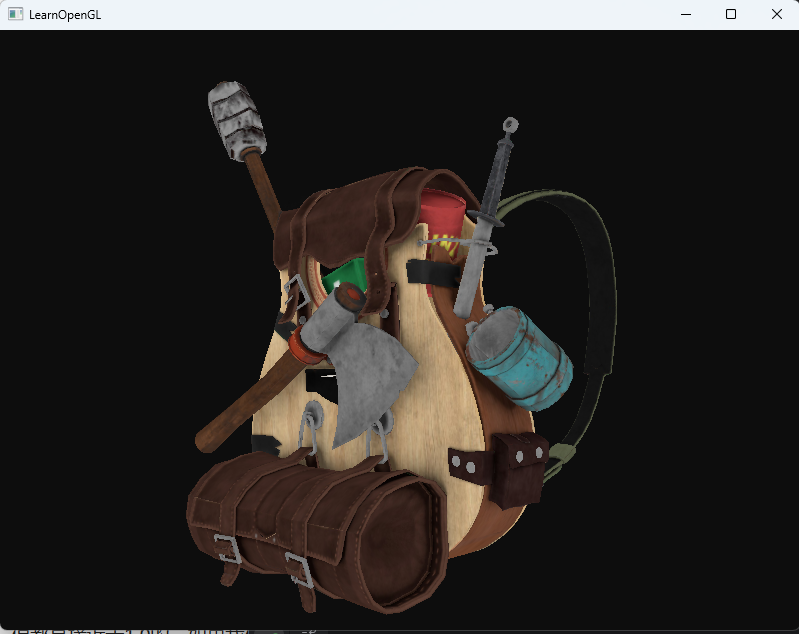
模型加載
模型通常都由3D藝術家在Blender、3DS Max或者Maya這樣的工具中精心制作。這些所謂的3D建模工具(3D Modeling Tool)可以讓藝術家創建復雜的形狀,并使用一種叫做UV映射(uv-mapping)的手段來應用貼圖。這樣子藝術家們即使不了解圖形技術細節的情況下,也能擁有一套強大的工具來構建高品質的模型了。所有的技術細節都隱藏在了導出的模型文件中。但是,作為圖形開發者,我們就必須要了解這些技術細節了。
- 像是Wavefront.obj這樣的模型格式,只包含了模型數據以及材質信息,像是模型顏色和漫反射/鏡面光貼圖。
- 而以XML為基礎的Collada文件格式則非常的豐富,包含模型、光照、多種材質、動畫數據、攝像機、完整的場景信息等等。
Assimp
一個非常流行的模型導入庫是Assimp,它是Open Asset Import Library(開放的資產導入庫)的縮寫。
當使用Assimp導入一個模型的時候,它通常會將整個模型加載進一個場景(Scene)對象,它會包含導入的模型/場景中的所有數據。Assimp會將場景載入為一系列的節點(Node),每個節點包含了場景對象中所儲存數據的索引,每個節點都可以有任意數量的子節點。Assimp數據結構的(簡化)模型如下

網格
通過使用Assimp,我們可以加載不同的模型到程序中,但是載入后它們都被儲存為Assimp的數據結構。我們最終仍要將這些數據轉換為OpenGL能夠理解的格式,這樣才能渲染這個物體。我們從上一節中學到,網格(Mesh)代表的是單個的可繪制實體,我們現在先來定義一個我們自己的網格類。這里就直接用它的代碼就行。
//
// Created by Administrator on 2025/4/7.
//#ifndef OPENGL_MESH_H
#define OPENGL_MESH_H
#include <glad/glad.h>
#include <GLFW/glfw3.h>
#include <glm/vec3.hpp>
#include <glm/vec2.hpp>
#include <string>
#include "Shader.h"using namespace std;
#define MAX_BONE_INFLUENCE 4struct Vertex {// positionglm::vec3 Position;// normalglm::vec3 Normal;// texCoordsglm::vec2 TexCoords;// tangentglm::vec3 Tangent;// bitangentglm::vec3 Bitangent;//bone indexes which will influence this vertexint m_BoneIDs[MAX_BONE_INFLUENCE];//weights from each bonefloat m_Weights[MAX_BONE_INFLUENCE];
};struct Texture {unsigned int id;string type;string path;
};class Mesh {
public:// mesh Datavector<Vertex>       vertices;vector<unsigned int> indices;vector<Texture>      textures;unsigned int VAO;// constructorMesh(vector<Vertex> vertices, vector<unsigned int> indices, vector<Texture> textures){this->vertices = vertices;this->indices = indices;this->textures = textures;// now that we have all the required data, set the vertex buffers and its attribute pointers.setupMesh();}// render the meshvoid Draw(Shader &shader){// bind appropriate texturesunsigned int diffuseNr  = 1;unsigned int specularNr = 1;unsigned int normalNr   = 1;unsigned int heightNr   = 1;for(unsigned int i = 0; i < textures.size(); i++){glActiveTexture(GL_TEXTURE0 + i); // active proper texture unit before binding// retrieve texture number (the N in diffuse_textureN)string number;string name = textures[i].type;if(name == "texture_diffuse")number = std::to_string(diffuseNr++);else if(name == "texture_specular")number = std::to_string(specularNr++); // transfer unsigned int to stringelse if(name == "texture_normal")number = std::to_string(normalNr++); // transfer unsigned int to stringelse if(name == "texture_height")number = std::to_string(heightNr++); // transfer unsigned int to string// now set the sampler to the correct texture unitglUniform1i(glGetUniformLocation(shader.ID, (name + number).c_str()), i);// and finally bind the textureglBindTexture(GL_TEXTURE_2D, textures[i].id);}// draw meshglBindVertexArray(VAO);glDrawElements(GL_TRIANGLES, static_cast<unsigned int>(indices.size()), GL_UNSIGNED_INT, 0);glBindVertexArray(0);// always good practice to set everything back to defaults once configured.glActiveTexture(GL_TEXTURE0);}private:// render dataunsigned int VBO, EBO;// initializes all the buffer objects/arraysvoid setupMesh(){// create buffers/arraysglGenVertexArrays(1, &VAO);glGenBuffers(1, &VBO);glGenBuffers(1, &EBO);glBindVertexArray(VAO);// load data into vertex buffersglBindBuffer(GL_ARRAY_BUFFER, VBO);// A great thing about structs is that their memory layout is sequential for all its items.// The effect is that we can simply pass a pointer to the struct and it translates perfectly to a glm::vec3/2 array which// again translates to 3/2 floats which translates to a byte array.glBufferData(GL_ARRAY_BUFFER, vertices.size() * sizeof(Vertex), &vertices[0], GL_STATIC_DRAW);glBindBuffer(GL_ELEMENT_ARRAY_BUFFER, EBO);glBufferData(GL_ELEMENT_ARRAY_BUFFER, indices.size() * sizeof(unsigned int), &indices[0], GL_STATIC_DRAW);// set the vertex attribute pointers// vertex PositionsglEnableVertexAttribArray(0);glVertexAttribPointer(0, 3, GL_FLOAT, GL_FALSE, sizeof(Vertex), (void*)0);// vertex normalsglEnableVertexAttribArray(1);glVertexAttribPointer(1, 3, GL_FLOAT, GL_FALSE, sizeof(Vertex), (void*)offsetof(Vertex, Normal));// vertex texture coordsglEnableVertexAttribArray(2);glVertexAttribPointer(2, 2, GL_FLOAT, GL_FALSE, sizeof(Vertex), (void*)offsetof(Vertex, TexCoords));// vertex tangentglEnableVertexAttribArray(3);glVertexAttribPointer(3, 3, GL_FLOAT, GL_FALSE, sizeof(Vertex), (void*)offsetof(Vertex, Tangent));// vertex bitangentglEnableVertexAttribArray(4);glVertexAttribPointer(4, 3, GL_FLOAT, GL_FALSE, sizeof(Vertex), (void*)offsetof(Vertex, Bitangent));// idsglEnableVertexAttribArray(5);glVertexAttribIPointer(5, 4, GL_INT, sizeof(Vertex), (void*)offsetof(Vertex, m_BoneIDs));// weightsglEnableVertexAttribArray(6);glVertexAttribPointer(6, 4, GL_FLOAT, GL_FALSE, sizeof(Vertex), (void*)offsetof(Vertex, m_Weights));glBindVertexArray(0);}
};#endif //OPENGL_MESH_H
模型及導入
目前只定義了一個渲染單位,下一步定義模型類
//
// Created by Administrator on 2025/4/7.
//#ifndef OPENGL_MODEL_H
#define OPENGL_MODEL_H
#include <glad/glad.h>
#include <GLFW/glfw3.h>
#include <glm/vec3.hpp>
#include <glm/vec2.hpp>
#include <string>
#include "Shader.h"
#include "mesh.h"
#define STB_IMAGE_IMPLEMENTATION
#include <stb_image.h>
#include <assimp/Importer.hpp>
#include <assimp/scene.h>
#include <assimp/postprocess.h>
using namespace std;unsigned int TextureFromFile(const char *path, const string &directory, bool gamma = false);class Model
{
public:// model datavector<Texture> textures_loaded;	// stores all the textures loaded so far, optimization to make sure textures aren't loaded more than once.vector<Mesh>    meshes;string directory;bool gammaCorrection;// constructor, expects a filepath to a 3D model.Model(string const &path, bool gamma = false) : gammaCorrection(gamma){loadModel(path);}// draws the model, and thus all its meshesvoid Draw(Shader &shader){for(unsigned int i = 0; i < meshes.size(); i++)meshes[i].Draw(shader);}private:// loads a model with supported ASSIMP extensions from file and stores the resulting meshes in the meshes vector.void loadModel(string const &path){// read file via ASSIMPAssimp::Importer importer;const aiScene* scene = importer.ReadFile(path, aiProcess_Triangulate | aiProcess_GenSmoothNormals | aiProcess_FlipUVs | aiProcess_CalcTangentSpace);// check for errorsif(!scene || scene->mFlags & AI_SCENE_FLAGS_INCOMPLETE || !scene->mRootNode) // if is Not Zero{cout << "ERROR::ASSIMP:: " << importer.GetErrorString() << endl;return;}// retrieve the directory path of the filepathdirectory = path.substr(0, path.find_last_of('/'));// process ASSIMP's root node recursivelyprocessNode(scene->mRootNode, scene);}// processes a node in a recursive fashion. Processes each individual mesh located at the node and repeats this process on its children nodes (if any).void processNode(aiNode *node, const aiScene *scene){// process each mesh located at the current nodefor(unsigned int i = 0; i < node->mNumMeshes; i++){// the node object only contains indices to index the actual objects in the scene.// the scene contains all the data, node is just to keep stuff organized (like relations between nodes).aiMesh* mesh = scene->mMeshes[node->mMeshes[i]];meshes.push_back(processMesh(mesh, scene));}// after we've processed all of the meshes (if any) we then recursively process each of the children nodesfor(unsigned int i = 0; i < node->mNumChildren; i++){processNode(node->mChildren[i], scene);}}Mesh processMesh(aiMesh *mesh, const aiScene *scene){// data to fillvector<Vertex> vertices;vector<unsigned int> indices;vector<Texture> textures;// walk through each of the mesh's verticesfor(unsigned int i = 0; i < mesh->mNumVertices; i++){Vertex vertex;glm::vec3 vector; // we declare a placeholder vector since assimp uses its own vector class that doesn't directly convert to glm's vec3 class so we transfer the data to this placeholder glm::vec3 first.// positionsvector.x = mesh->mVertices[i].x;vector.y = mesh->mVertices[i].y;vector.z = mesh->mVertices[i].z;vertex.Position = vector;// normalsif (mesh->HasNormals()){vector.x = mesh->mNormals[i].x;vector.y = mesh->mNormals[i].y;vector.z = mesh->mNormals[i].z;vertex.Normal = vector;}// texture coordinatesif(mesh->mTextureCoords[0]) // does the mesh contain texture coordinates?{glm::vec2 vec;// a vertex can contain up to 8 different texture coordinates. We thus make the assumption that we won't// use models where a vertex can have multiple texture coordinates so we always take the first set (0).vec.x = mesh->mTextureCoords[0][i].x;vec.y = mesh->mTextureCoords[0][i].y;vertex.TexCoords = vec;// tangentvector.x = mesh->mTangents[i].x;vector.y = mesh->mTangents[i].y;vector.z = mesh->mTangents[i].z;vertex.Tangent = vector;// bitangentvector.x = mesh->mBitangents[i].x;vector.y = mesh->mBitangents[i].y;vector.z = mesh->mBitangents[i].z;vertex.Bitangent = vector;}elsevertex.TexCoords = glm::vec2(0.0f, 0.0f);vertices.push_back(vertex);}// now wak through each of the mesh's faces (a face is a mesh its triangle) and retrieve the corresponding vertex indices.for(unsigned int i = 0; i < mesh->mNumFaces; i++){aiFace face = mesh->mFaces[i];// retrieve all indices of the face and store them in the indices vectorfor(unsigned int j = 0; j < face.mNumIndices; j++)indices.push_back(face.mIndices[j]);}// process materialsaiMaterial* material = scene->mMaterials[mesh->mMaterialIndex];// we assume a convention for sampler names in the shaders. Each diffuse texture should be named// as 'texture_diffuseN' where N is a sequential number ranging from 1 to MAX_SAMPLER_NUMBER.// Same applies to other texture as the following list summarizes:// diffuse: texture_diffuseN// specular: texture_specularN// normal: texture_normalN// 1. diffuse mapsvector<Texture> diffuseMaps = loadMaterialTextures(material, aiTextureType_DIFFUSE, "texture_diffuse");textures.insert(textures.end(), diffuseMaps.begin(), diffuseMaps.end());// 2. specular mapsvector<Texture> specularMaps = loadMaterialTextures(material, aiTextureType_SPECULAR, "texture_specular");textures.insert(textures.end(), specularMaps.begin(), specularMaps.end());// 3. normal mapsstd::vector<Texture> normalMaps = loadMaterialTextures(material, aiTextureType_HEIGHT, "texture_normal");textures.insert(textures.end(), normalMaps.begin(), normalMaps.end());// 4. height mapsstd::vector<Texture> heightMaps = loadMaterialTextures(material, aiTextureType_AMBIENT, "texture_height");textures.insert(textures.end(), heightMaps.begin(), heightMaps.end());// return a mesh object created from the extracted mesh datareturn Mesh(vertices, indices, textures);}// checks all material textures of a given type and loads the textures if they're not loaded yet.// the required info is returned as a Texture struct.vector<Texture> loadMaterialTextures(aiMaterial *mat, aiTextureType type, string typeName){vector<Texture> textures;for(unsigned int i = 0; i < mat->GetTextureCount(type); i++){aiString str;mat->GetTexture(type, i, &str);// check if texture was loaded before and if so, continue to next iteration: skip loading a new texturebool skip = false;for(unsigned int j = 0; j < textures_loaded.size(); j++){if(std::strcmp(textures_loaded[j].path.data(), str.C_Str()) == 0){textures.push_back(textures_loaded[j]);skip = true; // a texture with the same filepath has already been loaded, continue to next one. (optimization)break;}}if(!skip){   // if texture hasn't been loaded already, load itTexture texture;texture.id = TextureFromFile(str.C_Str(), this->directory);texture.type = typeName;texture.path = str.C_Str();textures.push_back(texture);textures_loaded.push_back(texture);  // store it as texture loaded for entire model, to ensure we won't unnecessary load duplicate textures.}}return textures;}
};unsigned int TextureFromFile(const char *path, const string &directory, bool gamma)
{string filename = string(path);filename = directory + '/' + filename;unsigned int textureID;glGenTextures(1, &textureID);int width, height, nrComponents;unsigned char *data = stbi_load(filename.c_str(), &width, &height, &nrComponents, 0);if (data){GLenum format;if (nrComponents == 1)format = GL_RED;else if (nrComponents == 3)format = GL_RGB;else if (nrComponents == 4)format = GL_RGBA;glBindTexture(GL_TEXTURE_2D, textureID);glTexImage2D(GL_TEXTURE_2D, 0, format, width, height, 0, format, GL_UNSIGNED_BYTE, data);glGenerateMipmap(GL_TEXTURE_2D);glTexParameteri(GL_TEXTURE_2D, GL_TEXTURE_WRAP_S, GL_REPEAT);glTexParameteri(GL_TEXTURE_2D, GL_TEXTURE_WRAP_T, GL_REPEAT);glTexParameteri(GL_TEXTURE_2D, GL_TEXTURE_MIN_FILTER, GL_LINEAR_MIPMAP_LINEAR);glTexParameteri(GL_TEXTURE_2D, GL_TEXTURE_MAG_FILTER, GL_LINEAR);stbi_image_free(data);}else{std::cout << "Texture failed to load at path: " << path << std::endl;stbi_image_free(data);}return textureID;
}
#endif //OPENGL_MODEL_H
把這些代碼背下來也沒什么用,用的時候能理解它怎么處理即可
深度測試
其實就是之前學習的ZBuffer,但有一點不同,OpenGL是在片段著色器之后執行深度測試的,這與理解不同,因為完全可以先判斷需不需要渲染再執行渲染,后來看文章解釋到,因為在片段著色器中可以修改深度值,如果提前判斷是不合理的。
現在大部分的GPU都提供一個叫做提前深度測試(Early Depth Testing)的硬件特性。提前深度測試允許深度測試在片段著色器之前運行。只要我們清楚一個片段永遠不會是可見的(它在其他物體之后),我們就能提前丟棄這個片段。當使用提前深度測試時,片段著色器的一個限制是你不能寫入片段的深度值。如果一個片段著色器對它的深度值進行了寫入,提前深度測試是不可能的。OpenGL不能提前知道深度值。
這里只介紹OpenGL對深度測試比較特殊的地方。OpenGL允許我們修改深度測試中使用的比較運算符。
glDepthFunc(GL_LESS);

深度值精度
深度緩沖包含了一個介于0.0和1.0之間的深度值,它將會與觀察者視角所看見的場景中所有物體的z值進行比較。在觀察空間中(視圖變換之后)z值可能是投影平截頭體的近平面(Near)和遠平面(Far)之間的任何值。我們需要一種方式來將這些觀察空間的z值變換到[0, 1]范圍之間,其中的一種方式就是將它們線性變換到[0, 1]范圍之間。
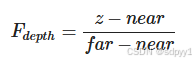
就是求z在兩面之間的比例。這種變化是線性的。
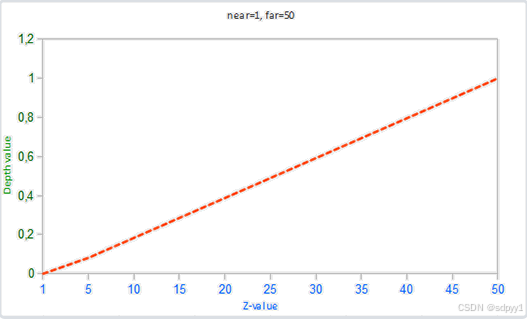
然而,在實踐中是幾乎永遠不會使用這樣的線性深度緩沖(Linear Depth Buffer)的。用下面的方程能達到更好的效果,因為離攝像機很遠的地方并不需要多大的精度,而近處需要更大的精度(即z軸距離很近的點反映到深度緩存中值差距也很大,這樣就更好區分誰前誰后)

可以看到,深度值很大一部分是由很小的z值所決定的,這給了近處的物體很大的深度精度。
這里可以看出深度緩存中值為0.5,在觀察空間中并不是中點。
這個方程是嵌入到投影矩陣的,投影矩陣執行完后得到裁剪空間,裁剪空間進行透視除法得到NDC空間。
深度緩沖的可視化
在片段著色器中,有內建參數gl_FragCoord向量的z值,包含了該像素的深度值,可以把這個深度值輸出為顏色,深度值范圍為[0,1]
void main()
{FragColor = vec4(vec3(gl_FragCoord.z), 1.0);
}
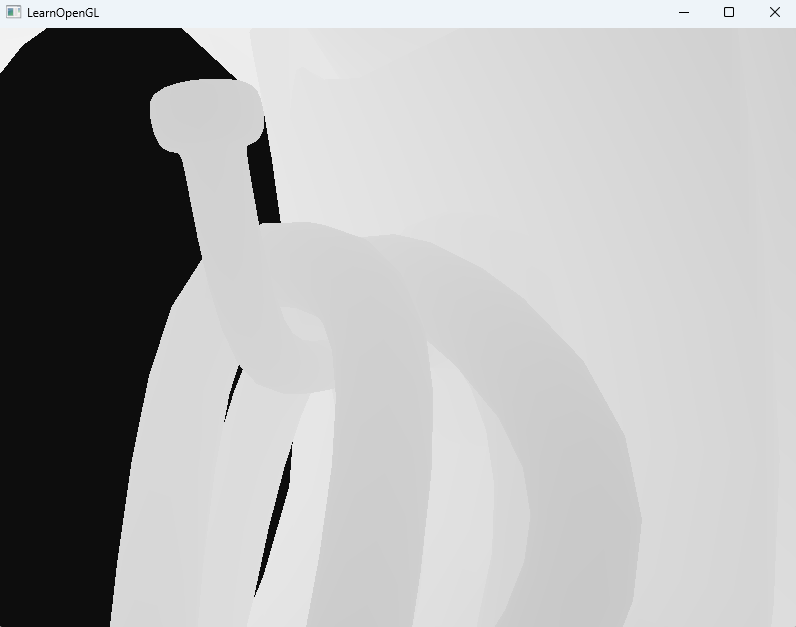
修改后發現模型全白

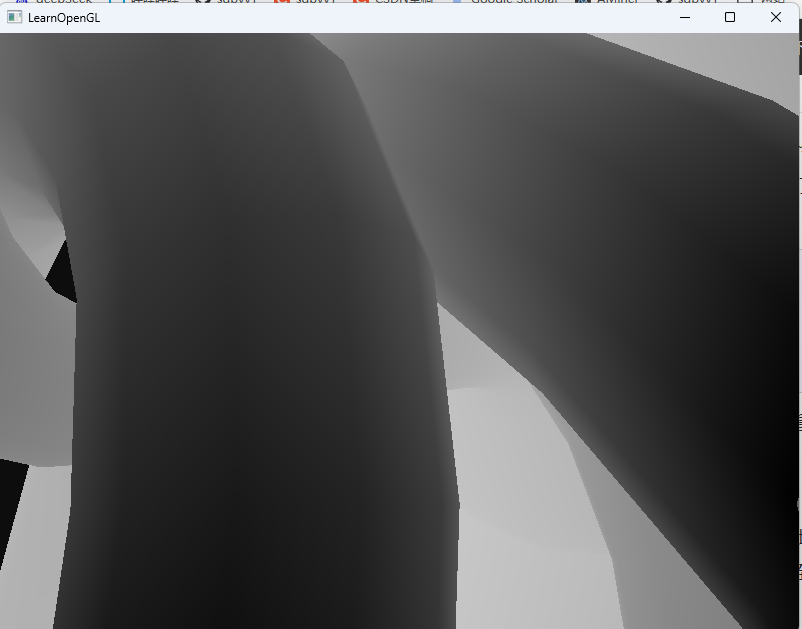
這是因為深度值是非線性的,在z值很大的時候精度很低,所以看上去都接近1了,因為攝像機離得比較遠,只有貼這攝像機的部分才會變化很大。這樣我們慢慢靠近讓z值變小過程就會發現模型逐漸變成灰色
這里可以看出z值比較小的情況下,移動一點就會讓z值變化很大
學到這我大概知道了為什么z插值時需要透視矯正了,因為z值變化是非線性的,而插值是一個線性的過程。
我們也可以通過一些處理來讓非線性變化轉為線性的。這也就意味著我們需要首先將深度值從[0, 1]范圍重新變換到[-1, 1]范圍的標準化設備坐標,緊接著反過來使用投影矩陣來還原
float LinearizeDepth(float depth)
{float z = depth * 2.0 - 1.0; // 轉換為 NDCreturn  (2.0 * near * far) / (far + near - z * (far - near));
}void main()
{float depth = LinearizeDepth(gl_FragCoord.z) / far; FragColor = vec4(vec3(depth), 1.0);
}
離得越近顏色越暗,可以看出變化是線性的
深度沖突
一個很常見的視覺錯誤會在兩個平面或者三角形非常緊密地平行排列在一起時會發生,深度緩沖沒有足夠的精度來決定兩個形狀哪個在前面。結果就是這兩個形狀不斷地在切換前后順序。這個現象叫做深度沖突(Z-fighting)。
根據前邊學到的z值的非線性變化,當z值很大時,精度很低,z-fighting現象會更明顯
防止z-fighting的方法:
- 永遠不要把多個物體擺得太靠近,以至于它們的一些三角形會重疊
- 盡可能將近平面設置遠一些
- 使用更高精度的深度緩沖
模板測試
模板測試在片段著色器之后,深度測試之前。他的效果大概就是對每個像素進行了一次if操作

通過在渲染時修改模板緩沖的內容,我們寫入了模板緩沖。。在同一個(或者接下來的)幀中,我們可以讀取這些值,來決定丟棄還是保留某個片段。使用模板緩沖的時候你可以盡情發揮
啟動模板測試
glEnable(GL_STENCIL_TEST);
注意在循環中也需要clear模板緩沖,類似深度緩沖
glClear(GL_COLOR_BUFFER_BIT | GL_DEPTH_BUFFER_BIT | GL_STENCIL_BUFFER_BIT);
可以用glStencilMask來控制緩沖的寫入方式,他的執行方法就是glStencilMask的屬于與要寫入的數據進行AND操作,來得到最終的寫入數據
glStencilMask(0xFF); // 每一位寫入模板緩沖時都保持原樣
glStencilMask(0x00); // 每一位在寫入模板緩沖時都會變成0(禁用寫入)
和深度測試一樣,我們對模板緩沖應該通過還是失敗,以及它應該如何影響模板緩沖,也是有一定控制的。一共有兩個函數能夠用來配置模板測試:glStencilFunc和glStencilOp。
glStencilFunc(GLenum func, GLint ref, GLuint mask)一共包含三個參數:
- func:設置模板測試函數(Stencil Test Function),GL_NEVER、GL_LESS、GL_LEQUAL、GL_GREATER、GL_GEQUAL、GL_EQUAL、GL_NOTEQUAL和GL_ALWAYS。它們的語義和深度緩沖的函數類似。
- ref:設置了模板測試的參考值(Reference Value)。模板緩沖的內容將會與這個值進行比較。
- mask:設置一個掩碼,它將會與參考值和儲存的模板值在測試比較它們之前進行與(AND)運算。初始情況下所有位都為1。
具體的測試方法就是:(ref & mask) xxxxx (stencil_value & mask) 其中xxxx就是在第一個參數設置的測試函數
glStencilOp(GLenum sfail, GLenum dpfail, GLenum dppass)一共包含三個選項,我們能夠設定每個選項應該采取的行為:主要是針對模板緩沖是該如何修改
- sfail:模板測試失敗時采取的行為。
- dpfail:模板測試通過,但深度測試失敗時采取的行為。
- dppass:模板測試和深度測試都通過時采取的行為。
所以,我們可以通過glStencilFunc設置如何比較,用glStencilOp設置緩存數據如何修改
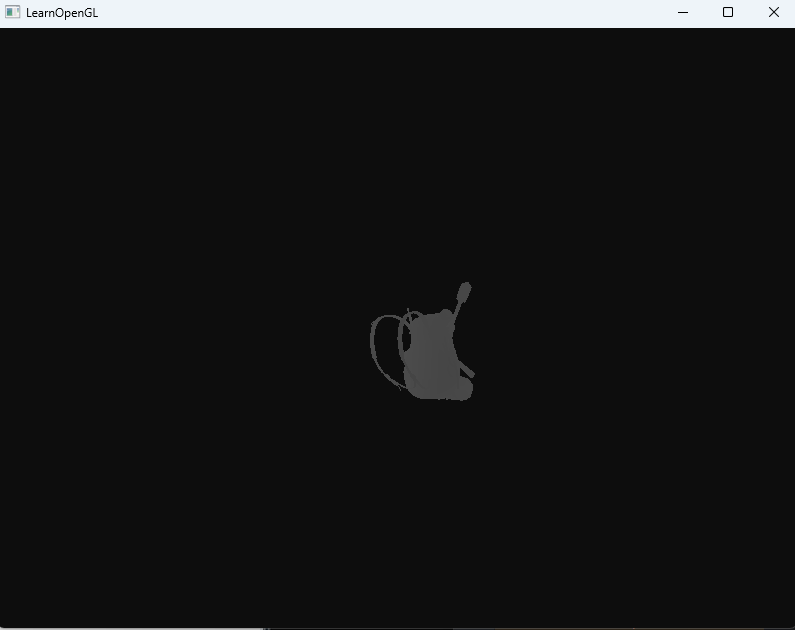
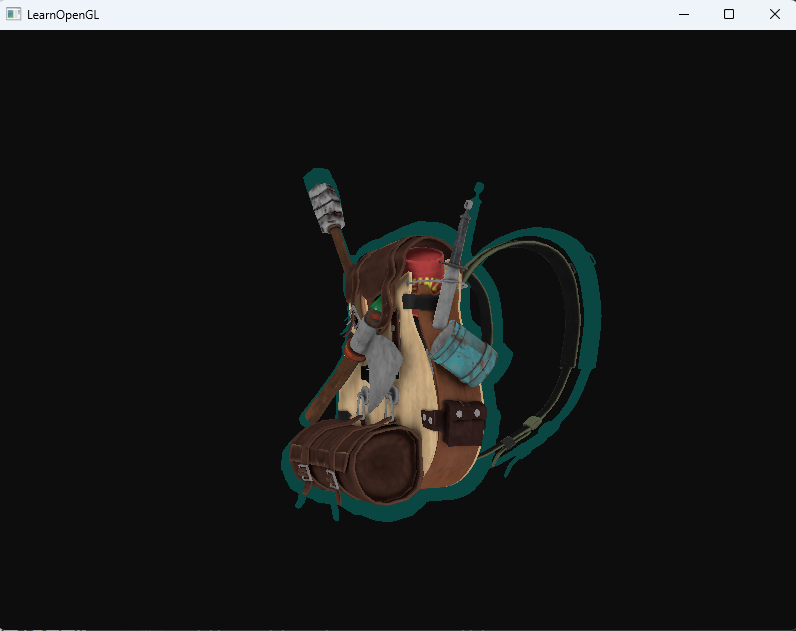
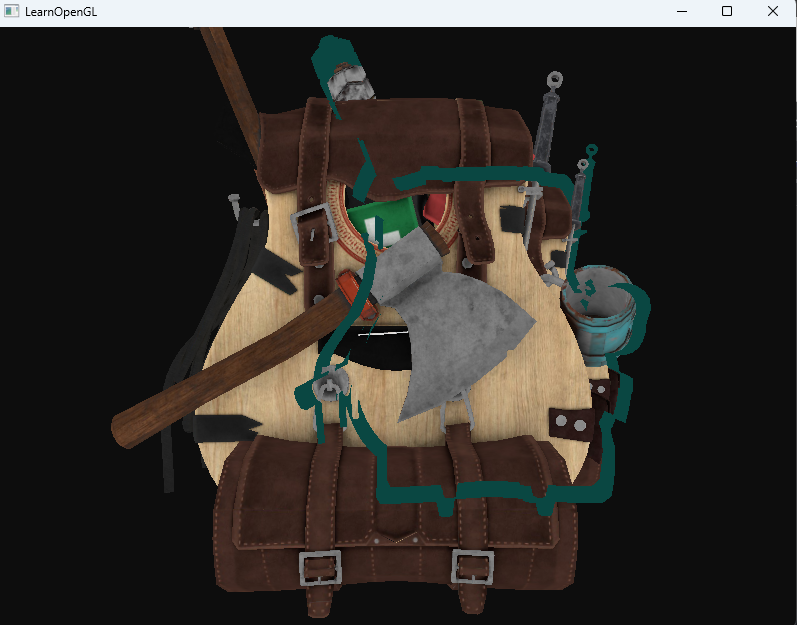
物體輪廓
- 啟用模板寫入。
- 在繪制(需要添加輪廓的)物體之前,將模板函數設置為GL_ALWAYS,每當物體的片段被渲染時,將模板緩沖更新為1。
- 渲染物體。
- 禁用模板寫入以及深度測試。
- 將每個物體縮放一點點(其實是擴大一點點,這樣外邊框的模板緩存中是0,內部都是1)。
- 使用一個不同的片段著色器,輸出一個單獨的(邊框)顏色。
- 再次繪制物體,但只在它們片段的模板值不等于1時才繪制。
- 再次啟用模板寫入和深度測試。
// 寫出來的循環是這樣的
while (!glfwWindowShouldClose(window)){auto currentFrame = static_cast<float>(glfwGetTime());deltaTime = currentFrame - lastFrame;lastFrame = currentFrame;processInput(window);// 清理窗口glClearColor(0.05f, 0.05f, 0.05f, 1.0f);// 啟動模板測試glEnable(GL_STENCIL_TEST);glClear(GL_COLOR_BUFFER_BIT | GL_DEPTH_BUFFER_BIT | GL_STENCIL_BUFFER_BIT);// 繪制物體glStencilFunc(GL_ALWAYS, 1, 0xFF); // 緩存會與1進行比較,但比較運算這里設置的永遠通過glStencilMask(0xFF); // 啟用模板緩沖寫入bagShader.use();drawModel(bagShader, model,{0.f,0.f,0.f},{1.0f,1.0f,1.0f});// 繪制新的glStencilFunc(GL_NOTEQUAL, 1, 0xFF); // 緩存與1比較,與1不相同才能通過glStencilMask(0x00); // 禁止模板緩沖的寫入glDisable(GL_DEPTH_TEST);layoutShader.use();drawModel(layoutShader,model,{0.f,0.f,0.f},{1.1f,1.1f,1.1f});glEnable(GL_DEPTH_TEST);glStencilMask(0xFF); // 這一行代碼有坑,如果你不寫,下次循環的clear就沒法清空緩存,出現BUG// 事件處理glfwPollEvents();// 雙緩沖glfwSwapBuffers(window);}

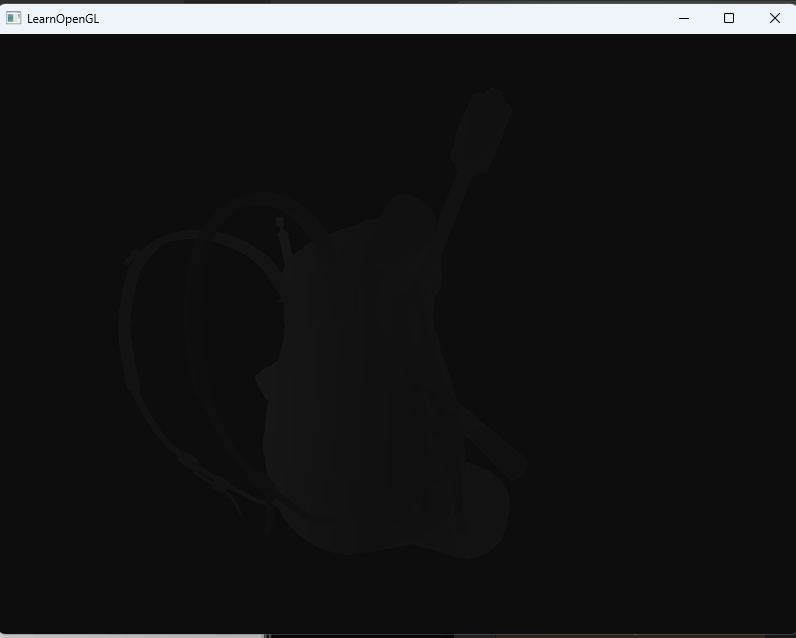
要想實現穿過其他物體來顯示邊框,需要注意渲染其他物體時,要關閉模板測試,渲染完再打開,否則會污染模板緩存
while (!glfwWindowShouldClose(window)){auto currentFrame = static_cast<float>(glfwGetTime());deltaTime = currentFrame - lastFrame;lastFrame = currentFrame;processInput(window);// 清理窗口glClearColor(0.05f, 0.05f, 0.05f, 1.0f);// 啟動模板測試glEnable(GL_STENCIL_TEST);glClear(GL_COLOR_BUFFER_BIT | GL_DEPTH_BUFFER_BIT | GL_STENCIL_BUFFER_BIT);// 繪制物體glStencilFunc(GL_ALWAYS, 1, 0xFF); // 緩存會與1進行比較,但比較運算這里設置的永遠通過glStencilMask(0xFF); // 啟用模板緩沖寫入bagShader.use();drawModel(bagShader, model,{1.f,0.f,-3.f},{1.0f,1.0f,1.0f});glDisable(GL_STENCIL_TEST);drawModel(bagShader, model,{0.f,0.f,0.f},{1.0f,1.0f,1.0f});glEnable(GL_STENCIL_TEST);// 繪制新的glStencilFunc(GL_NOTEQUAL, 1, 0xFF); // 緩存與1比較,與1不相同才能通過glStencilMask(0x00); // 禁止模板緩沖的寫入glDisable(GL_DEPTH_TEST);layoutShader.use();drawModel(layoutShader, model,{1.f,0.f,-3.f},{1.1f,1.1f,1.1f});glEnable(GL_DEPTH_TEST);glStencilMask(0xFF);// 事件處理glfwPollEvents();// 雙緩沖glfwSwapBuffers(window);}
我覺得他這里對模板測試的作用描述不是很清晰,我理解是第一次渲染時對每個像素設置模板緩沖,第二次渲染時利用第一次渲染的模板緩沖來實現各種效果。


![[ctfshow web入門] web39](http://pic.xiahunao.cn/[ctfshow web入門] web39)

)
