1、數據結構
基本概念:
- 數據項:一個數據元素可以由若干個數據項組成
- 數據對象:有相同性質的數據元素的集合,是數據的子集
- 數據結構:是相互之間存在一種或多種特定關系的數據元素的集合
邏輯結構和物理結構:
- 邏輯結構:是指數據對象中數據元素之間的相互關系。比如集合結構、線性結構、樹形結構、圖形結構
- 物理結構:是指數據的邏輯結構在計算機中的存儲形式。比如順序存儲結構、鏈式存儲結構
數據結構研究的內容:
- 線性表:零個或多個數據元素的有序序列
- 隊列:只允許在一端插入,而在另一端進行刪除操作的線性表
- 堆棧:棧是限定僅在表尾進行插入和刪除操作的線性表
- 樹:樹是 n 個節點的有序集。節點可以像樹一樣越向葉子節點就沒有交集
- 圖:由頂點的又窮空集合和頂點之間邊的集合組成
- 排序和查找算法:排序是對數據進行順序排列,查找是在大量數據中尋找我們需要的數據的過程
本系列的源碼如無特殊說明均來自 JDK 1.8
2、線性表
2.1 基本概念
先來看數組,數組的特點:
- 簡單:數組是一種最簡單的數據結構
- 占據連續內存:數組空間連續,按照申請的順序存儲,但是必須制定數組大小
- 數組空間效率低:數組中經常有空閑的區域沒有得到充分的應用
- 操作麻煩:數組的增加和刪除操作很麻煩(需要移動被操作位置后續的元素)
線性表是零個或多個數據元素的有序序列,它有兩種存儲結構:
- 順序存儲結構(順序表),內部實際上還是數組
- 鏈式存儲結構(鏈表),物理地址不是連續的,但是通過指針保存了下一個內存單元的首地址,形成了邏輯上的連續
Java 中對順序表的實現主要是 ArrayList,對鏈表的實現主要是 LinkedList。
2.2 順序表的增刪改查
Java 中對順序表的典型實現就是 ArrayList,我們先看如何向 ArrayList 添加數據。
增
public boolean add(E e) {// 至少要保證容量為 size + 1 才能添加一個新元素ensureCapacityInternal(size + 1); // Increments modCount!!// 在尾部添加新元素elementData[size++] = e;return true;}private void ensureCapacityInternal(int minCapacity) {ensureExplicitCapacity(calculateCapacity(elementData, minCapacity));}
add(E) 會在順序表尾部添加元素,添加前需要通過 ensureCapacityInternal() 保證順序表的容量充足,具體做法是計算出添加元素后所需要的容量,如果容量不足就計算后進行擴容:
private static final Object[] DEFAULTCAPACITY_EMPTY_ELEMENTDATA = {};private static final int DEFAULT_CAPACITY = 10;private static int calculateCapacity(Object[] elementData, int minCapacity) {// 如果是初始狀態,順序表是空的,那么就在 10 和 minCapacity 選大的作為初始容量if (elementData == DEFAULTCAPACITY_EMPTY_ELEMENTDATA) {return Math.max(DEFAULT_CAPACITY, minCapacity);}return minCapacity;}private void ensureExplicitCapacity(int minCapacity) {// 更新對當前 ArrayList 對象的修改次數modCount++;// 計算出需要增加的容量并擴容if (minCapacity - elementData.length > 0)grow(minCapacity);}private void grow(int minCapacity) {// overflow-conscious codeint oldCapacity = elementData.length;// 擴容是增加原來容量的一半int newCapacity = oldCapacity + (oldCapacity >> 1);// 如果擴容后還是比需要的最小容量 minCapacity 要小,就直接擴容到 minCapacityif (newCapacity - minCapacity < 0)newCapacity = minCapacity;// MAX_ARRAY_SIZE = Integer.MAX_VALUE - 8;if (newCapacity - MAX_ARRAY_SIZE > 0)newCapacity = hugeCapacity(minCapacity);// minCapacity is usually close to size, so this is a win:elementData = Arrays.copyOf(elementData, newCapacity);}private static int hugeCapacity(int minCapacity) {if (minCapacity < 0) // overflowthrow new OutOfMemoryError();return (minCapacity > MAX_ARRAY_SIZE) ?Integer.MAX_VALUE :MAX_ARRAY_SIZE;}
計算好了擴容后的容量 newCapacity 之后,通過 Arrays.copyOf() 將原來的 ArrayList 的所有元素拷貝到擴容后的新的 ArrayList 中。
此外還可以進行指定位置的添加:
public void add(int index, E element) {// 檢查 index 是否越界rangeCheckForAdd(index);ensureCapacityInternal(size + 1); // Increments modCount!!// 把 index 位置空出來,需要將原本 [index,size-1] 位置上的元素向后挪一位// 在 JDK 1.8 中是一個 Native 方法,參數含義是(源表,起始位置,目標表,目標位置,拷貝個數)// 即從哪個表的哪個起始位置開始拷貝,拷貝到哪個表的哪個位置,拷貝多少個元素System.arraycopy(elementData, index, elementData, index + 1,size - index);// 空出的 index 位置保存新添加的元素elementData[index] = element;size++;}
在 ArrayList 的中間位置插入元素,需要通過 System.arraycopy() 將 index 這個位置開始到后面的元素都向后移動一位,空出的 elementData[index] 才能保存新插入的元素。這就是 ArrayList 在中間進行添加/刪除元素效率低的主要原因。
其余的添加方法,如 addAll 之類的也是類似的,就不多贅述。
刪
remove() 可以傳索引,也可以傳對象。先看傳 index 的:
public E remove(int index) {rangeCheck(index);modCount++;E oldValue = elementData(index);// 如果需要移動的元素個數大于 0 就需要通過 arraycopy 將元素前移一位// 只有當 index = size - 1,即 index 在表尾部刪除元素時才不用移位int numMoved = size - index - 1;if (numMoved > 0)System.arraycopy(elementData, index+1, elementData, index,numMoved);// 將原本最后一個位置的對象置為 null,因為它不再是 ArrayList 使用的一員,// 需要觸發 GC 盡快回收它elementData[--size] = null; // clear to let GC do its workreturn oldValue;}
與 add(index) 類似,也是在尾部刪除元素時才不用移動后續數據,否則都要用 System.arraycopy() 將數據前移,影響執行效率。
如果是直接移除對象的話,需要從前至后遍歷 ArrayList,找到第一個與傳入的參數 o 相同的對象并移除掉它:
public boolean remove(Object o) {// 如果 o 是 null 則移除掉第一個 null 元素if (o == null) {for (int index = 0; index < size; index++)if (elementData[index] == null) {fastRemove(index);return true;}} else {// 如果 o 不是 null 則移除掉第一個與 o 值相同的元素for (int index = 0; index < size; index++)if (o.equals(elementData[index])) {fastRemove(index);return true;}}return false;}private void fastRemove(int index) {modCount++;int numMoved = size - index - 1;if (numMoved > 0)System.arraycopy(elementData, index+1, elementData, index,numMoved);elementData[--size] = null; // clear to let GC do its work}
改
由于是順序表可以很容易的根據 index 獲取到對應的元素,直接去改:
public E set(int index, E element) {rangeCheck(index);E oldValue = elementData(index);elementData[index] = element;return oldValue;}
2.3 ArrayList 繼承關系
ArrayList 是一個容器,它通過繼承抽象類 AbstractCollection 實現了容器接口 Collection,還直接實現了 List 接口。
既然 ArrayList 實現了那么多接口,肯定會具有相應接口的特性,我們主要看對 Iterator 的實現。
Iterator
Iterator 接口內容如下:
public interface Iterator<E> {// 是否還有下一個元素boolean hasNext();// 獲取下一個元素E next();// 默認方法,移除(下一個)元素default void remove() {throw new UnsupportedOperationException("remove");}// 默認方法,對元素內剩余的每一個元素執行 action 操作default void forEachRemaining(Consumer<? super E> action) {Objects.requireNonNull(action);while (hasNext())action.accept(next());}
}
迭代器接口主要是用于向后遍歷元素,即快速輪詢容器,方法功能已經在注釋上標出。
ArrayList 通過內部類 Itr 實現 Iterator 接口:
private class Itr implements Iterator<E> {int cursor; // index of next element to returnint lastRet = -1; // index of last element returned; -1 if no suchint expectedModCount = modCount;Itr() {}public boolean hasNext() {return cursor != size;}@SuppressWarnings("unchecked")public E next() {checkForComodification();int i = cursor;if (i >= size)throw new NoSuchElementException();Object[] elementData = ArrayList.this.elementData;if (i >= elementData.length)throw new ConcurrentModificationException();cursor = i + 1;return (E) elementData[lastRet = i];}public void remove() {if (lastRet < 0)throw new IllegalStateException();checkForComodification();try {ArrayList.this.remove(lastRet);cursor = lastRet;lastRet = -1;expectedModCount = modCount;} catch (IndexOutOfBoundsException ex) {throw new ConcurrentModificationException();}}@Override@SuppressWarnings("unchecked")public void forEachRemaining(Consumer<? super E> consumer) {Objects.requireNonNull(consumer);final int size = ArrayList.this.size;int i = cursor;if (i >= size) {return;}final Object[] elementData = ArrayList.this.elementData;if (i >= elementData.length) {throw new ConcurrentModificationException();}while (i != size && modCount == expectedModCount) {consumer.accept((E) elementData[i++]);}// update once at end of iteration to reduce heap write trafficcursor = i;lastRet = i - 1;checkForComodification();}final void checkForComodification() {if (modCount != expectedModCount)throw new ConcurrentModificationException();}}
next() 和 remove() 操作的都是 elementData[lastRet],在 next() 內將 lastRet 指向下一個元素,而 remove() 刪除的也正是 next() 返回的下一個元素。
面試常問問題
都是些簡單問題:
- ArrayList 的大小是如何自動增加的?
- 在 add() 時檢查容量是否足以再添加一個元素,如果不夠就進行擴容,增加元容量的一半(oldCapacity + oldCapacity >> 1)
- 什么情況下你會使用 ArrayList?
- 考察應用場景:在尾部插入或刪除元素時,需要隨機訪問或修改容器內元素時(在 ArrayList 中間插入或刪除節點需要通過 System.arrayCopy() 移動元素,會影響效率,此時應該使用鏈表而不是順序表)
- 在索引中 ArrayList 的增加或者刪除某個對象的運行過程的效率很低嗎?解釋一下為什么?
- 在最后一個位置增刪效率還是高的,但是在中間增刪效率就低了,因為需要通過 System.arrayCopy() 移動因為被增加/刪除元素所影響到的元素,該方法是一個很耗時的操作
- ArrayList 如何順序刪除節點?
- 從尾部向頭部刪除效率高,因為刪除 ArrayList 的最后一個元素時不用進行 System.arrayCopy() 操作;如果從頭刪除,刪除掉第一個元素之后,需要把第二個元素到最后一個元素通過 System.arrayCopy() 向前移一位
- ArrayList 的遍歷方法?
- 推薦用迭代器提供的 hasNext() 和 next() 方法進行遍歷
- 使用 for 循環(或 forEach)遍歷也是可行的,但是盡量就只使用 get(i) 去獲取元素,不要進行增刪改操作,容易出問題
2.4 鏈表
定義:線性表的鏈式存儲結構的特點是用一組任意的存儲單元存儲線性表的數據元素,這組存儲單元可以是連續的,也可以是不連續的(扯犢子定義,這是特點):
// 單向鏈表
class Node {// 保存數據Object data;// 保存下一個元素的引用(地址)Node next;
}// 雙向鏈表(使用了泛型的形式)
class Node<E> {// 保存數據E data;// 下一個元素的引用Node<E> next;// 前一個元素的引用Node<E> prev;
}
鏈表又分為單向鏈表和雙向鏈表,我們著重看看兩種鏈表的增刪改查。
單向鏈表的增刪改查

簡單描述一下上述過程:
- 增:一定是先執行 s.next = p.next,如果先執行了 p.next = s,那么原本的 p.next 就和整個鏈表斷開了,無法指定 s.next,因為此時 p.next 已經是 s 了
- 刪:比增簡單一些,直接讓待刪的前驅結點的 next 指向待刪的后繼節點即可
- 改:直接修改鏈表節點的數據即可
- 查:要從鏈表頭部開始遍歷去找目標節點,因此在查找上的效率要低于支持隨機訪問的順序表(但是增刪效率高)
單鏈表的主要應用在源碼中就是 JDK 1.7 之前的 HashMap,用于解決哈希沖突(當然從 JDK 1.8 開始就不用單鏈表改用紅黑樹進一步提升性能)。
雙向鏈表的增刪改查
雙向鏈表的增刪改查會結合 LinkedList 的源碼來看,因為 JDK 的 LinkedList 就是通過雙向鏈表實現的。
首先是增:

在雙向鏈表中增加一個節點需要四步:
- s.next = p.next
- p.next.prev = s
- s.prev = p
- p.next = s
注意第 2 步與第 4 步的順序不能顛倒,否則會出現 a1.next 指向 a2,而 a2.prev 指向 a1 的循環關系。
在具體的代碼實現上,看 LinkedList 的 add 方法:
public void add(int index, E element) {// 檢查 index 的合法性 —— 是否超出邊界checkPositionIndex(index);// 如果 index 在鏈表尾部,則在尾部插入if (index == size)linkLast(element);elselinkBefore(element, node(index));}
如果在尾部插入,通過 linkLast() 執行尾插:
/*** Links e as last element.*/void linkLast(E e) {// last 是當前的尾節點final Node<E> l = last;// 為 e 創建 Node 對象,prev 指向當前鏈表的尾節點final Node<E> newNode = new Node<>(l, e, null);// 更新尾節點引用last = newNode;// 如果原來的尾節點為空,說明隊列為空,需要把頭節點引用也指向 newNodeif (l == null)first = newNode;else// 將原本尾節點的 next 指向 newNode 完成雙向互指l.next = newNode;size++;modCount++;}
如果不是在鏈表尾部插入,通過 linkBefore(element, node(index)) 來完成插入。首先要看 node(index) 如何生成 index 指定的 Node 節點:
/*** Returns the (non-null) Node at the specified element index.*/Node<E> node(int index) {// assert isElementIndex(index);// 如果 index 在隊列的前一半(離隊頭近),就從隊頭向后遍歷找 index 指定的 Nodeif (index < (size >> 1)) {Node<E> x = first;for (int i = 0; i < index; i++)x = x.next;return x;} else {// 否則(離隊尾近)從隊尾開始向前遍歷找 index 指定的 NodeNode<E> x = last;for (int i = size - 1; i > index; i--)x = x.prev;return x;}}
找到 index 指定的 Node 后才由 linkBefore() 將 Node(e) 插入到 Node(index) 的前面:
/*** Inserts element e before non-null Node succ.*/void linkBefore(E e, Node<E> succ) {// assert succ != null;final Node<E> pred = succ.prev;final Node<E> newNode = new Node<>(pred, e, succ);succ.prev = newNode;if (pred == null)first = newNode;elsepred.next = newNode;size++;modCount++;}
以上是雙向鏈表增加元素的分析,刪除元素相對要簡單一點,只需要被刪除元素的一個引用即可:

源碼實現看 LinkedList 的 remove(),該方法有多個重載方法,看核心的 remove(index):
public E remove(int index) {checkElementIndex(index);return unlink(node(index));}E unlink(Node<E> x) {// assert x != null;final E element = x.item;final Node<E> next = x.next;final Node<E> prev = x.prev;// x 前驅節點處理// 如果 prev 為空說明 x 是隊頭,刪除隊頭直接將 first 指向 next 即可if (prev == null) {first = next;} else {// prev 存在,將 prev 的 next 指向 next,并斷開 x 的 prevprev.next = next;x.prev = null;}// x 后繼節點處理// next 為空說明 x 是隊尾,刪除 x 需要讓 last 指向 x 的前驅節點if (next == null) {last = prev;} else {// next 存在,讓 next 的 prev 指向前驅節點,并斷開 x 的 nextnext.prev = prev;x.next = null;}x.item = null;size--;modCount++;return element;}
2.5 線性表總結
首先是三種表的知識總結與應用場景:

訪問和尾插可以用順序表(ArrayList),涉及到數據的增刪改則使用鏈表,雙向鏈表(LinkedList)的效率比單向鏈表更高。
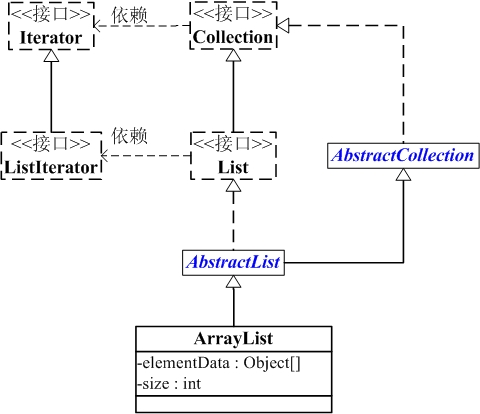
List 總結圖:

大致總結:
- Iterator 迭代器接口定義了向后迭代的接口方法 hasNext() 和 next(),一個容器想要擁有迭代功能都應該實現該接口
- ListIterator 繼承了 Iterator 接口,又額外定義了 hasPrevious()、previous() 這兩個向前迭代的方法,此外還定義了 nextIndex() 與 previousIndex() 這兩個用于獲取前后索引值的方法,再就是對集合的增刪改操作 add()、remove() 和 set(),其中 remove() 是將父接口的默認方法覆蓋為接口方法,另外兩個是新增的接口方法。可以看到 ListIterator 就是為了針對 List 這種結構而設計的接口方法
- Collection 作為所有容器的接口,通過返回 Iterator 實例的接口方法 iterator() 依賴于 Iterator 接口,同時還提供了容器通用操作的 size()、isEmpty()、contains()、toArray()、add()、remove()、containsAll()、addAll() 等接口方法
- List 接口繼承自 Collection 接口,同時通過
ListIterator<E> listIterator()接口方法依賴 ListIterator - AbstractCollection 為 Collection 接口的部分方法提供了實現,如 contains()、isEmpty() 等,但是像 iterator()、size() 這種需要子類實現的方法就覆蓋為抽象方法了
- AbstractList 繼承 AbstractCollection 且實現 List 接口,它還是在父類(接口)的前提下,實現了部分方法,比如 add(E)、indexOf()、lastIndexOf() 等,但是仍有一個抽象方法 get() 等待子類去實現,另外像 set()、add(int, E)、remove() 等方法提供的默認實現都是拋出 UnsupportedOperationException,還是需要子類重寫的
- ArrayList 繼承 AbstractList 同時也實現了 List 和 Serializable 接口(為什么父類 AbstractList 已經實現了 List,ArrayList 還要再實現一次呢?是不是因為父類的實現不滿足使用需求呢?)
- LinkedList 繼承自 AbstractSequentialList,還實現了 List、Deque、Serializable 接口
- Vector 是 JDK 1.0 版本就有的容器,但是后來繼承了 JDK 1.2 版本才誕生的 AbstractList,此外還實現了 List、RandomAccess、Serializable 接口,這一支的容器用的就很少了
3、鏈表與 LRU 算法
3.1 緩存與 LRU 算法
緩存分為硬件緩存和軟件緩存,最早誕生的是硬件緩存:
- 硬件緩存:位于 CPU 與內存之間的臨時存儲器,解決 CPU 和內存之間的速度差異問題
- 軟件緩存:一般用三級緩存,速度依次遞減:內存緩存、數據庫緩存、網絡緩存
內存緩存是指預先將數據寫到了容器(List、Map、Set)等數據存儲單元中,就是軟件內存緩存。
內存空間有限,因此內存緩存也有限,這就涉及到內存緩存的淘汰策略算法:
- FIFO(First In First Out):先進先出
- LFU(Least Frequently Used):最低使用頻率
- LRU(Least Recently Used):最近最少使用
LRU 算法步驟:
- 新數據插入到鏈表頭部
- 當緩存命中(即緩存數據被訪問),數據要移到表頭
- 當鏈表滿的時候,將鏈表尾部的數據丟棄

3.2 算法實現
單鏈表實現:
public class LinkedList<T> {private Node head;private int size;public LinkedList() {head = null;size = 0;}/*** 在鏈表頭部添加元素*/public void add(T data) {head = new Node(data, head);size++;}/*** 在指定位置添加元素*/public void add(T data, int index) {checkPositionIndex(index);if (index == 0) {add(data);} else {Node node = head;// 從鏈表頭部開始遍歷,找到指定位置的前一個節點for (int i = 0; i < index - 1; i++) {node = node.next;}// 添加節點node.next = new Node(data, node.next);size++;}}private void checkPositionIndex(int index) {// 邊界判斷if (index < 0 || index > size) {throw new IndexOutOfBoundsException();}}/*** 刪除頭部節點*/public T remove() {Node deletedNode = head;if (deletedNode != null) {head = deletedNode.next;size--;T data = deletedNode.data;// 促進 GC 回收該對象,不置為 null 的話可能會因為指向其他節點而無法回收造成內存泄漏deletedNode = null;return data;}return null;}/*** 刪除指定位置的節點*/public T removeAt(int index) {checkPositionIndex(index);Node curNode = head;// 找到指定位置的前一個節點for (int i = 0; i < index - 1; i++) {curNode = curNode.next;}Node deletedNode = curNode.next;curNode.next = curNode.next.next;T data = deletedNode.data;// GCdeletedNode = null;size--;return data;}/*** 刪除尾部節點*/public T removeLast() {return removeAt(size - 1);}/*** 修改指定位置的元素*/public void set(T data, int index) {checkPositionIndex(index);Node curNode = head;for (int i = 0; i < index; i++) {curNode = curNode.next;}curNode.data = data;}/*** 獲取頭部節點數據*/public T get() {return head != null ? head.data : null;}/*** 獲取指定位置的元素*/public T get(int index) {checkPositionIndex(index);Node curNode = head;for (int i = 0; i < index; i++) {curNode = curNode.next;}return curNode.data;}@Overridepublic String toString() {Node node = head;StringBuilder sb = new StringBuilder();while (node != null) {sb.append(node.data).append(" ");node = node.next;}sb.append("\n");return sb.toString();}class Node {T data;Node next;public Node(T data, Node next) {this.data = data;this.next = next;}}public static void main(String[] args) {LinkedList<Integer> linkedList = new LinkedList<>();for (int i = 0; i < 10; i++) {linkedList.add(i);}System.out.println(linkedList);}
}
LRU 算法實現,繼承 LinkedList 在其基礎上擴展:
public class LruLinkedList<T> extends LinkedList<T> {private static final int DEFAULT_CAPACITY = 10;private int capacity;public LruLinkedList() {this(DEFAULT_CAPACITY);}public LruLinkedList(int capacity) {this.capacity = capacity;}public void put(T data) {if (size >= capacity) {removeLast();}// 無論 size >= capacity 是否成立,都要將 data 加到鏈表頭add(data);}public T delete() {return removeLast();}/*** 獲取指定索引的元素,并將該元素移到鏈表的頭部* 訪問元素也要將該元素移到鏈表的頭部*/public T get(int index) {checkPositionIndex(index);// 目標節點Node curNode = head;// 目標節點的前驅結點Node preNode = head;for (int i = 0; i < index; i++) {preNode = curNode;curNode = curNode.next;}// 目標節點的前驅節點的 next 指向目標節點的下一個節點preNode.next = curNode.next;// 將目標節點插入到鏈表的頭部curNode.next = head;// 更新頭部head = curNode;// 返回目標節點的數據return curNode.data;}public static void main(String[] args) {LruLinkedList<Integer> lruLinkedList = new LruLinkedList<>(5);for (int i = 0; i < 5; i++) {lruLinkedList.put(i);}System.out.println(lruLinkedList); // 4 3 2 1 0lruLinkedList.get(3);System.out.println(lruLinkedList); // 1 4 3 2 0lruLinkedList.put(10);lruLinkedList.put(20);System.out.println(lruLinkedList); // 20 10 1 4 3lruLinkedList.delete();System.out.println(lruLinkedList); // 20 10 1 4}
}


第二篇:元素定位的方法_xpath路徑定位)

electron-builde和electron Forge的打包方式)


)


)
 操作系統的結構與系統調用)