本文基于 apollo-client 2.1.0 版本源碼進行分析
Apollo 是攜程開源的配置中心,能夠集中化管理應用不同環境、不同集群的配置,配置修改后能夠實時推送到應用端,并且具備規范的權限、流程治理等特性。
Apollo支持4個維度管理Key-Value格式的配置:
- application (應用)
- environment (環境)
- cluster (集群)
- namespace (命名空間)
同時,Apollo基于開源模式開發,開源地址:https://github.com/ctripcorp/apollo
一. SpringBoot集成Apollo
1.1 引入Apollo客戶端依賴
<dependency><groupId>com.ctrip.framework.apollo</groupId><artifactId>apollo-client</artifactId><version>2.1.0</version>
</dependency>
1.2 配置apollo
#Apollo 配置
app:id: apollo-test                            #應用ID
apollo:meta: http://10.10.10.12:8080            #DEV環境配置中心地址autoUpdateInjectedSpringProperties: true   #是否開啟 Spring 參數自動更新bootstrap:enabled: true                            #是否開啟 Apollonamespaces: application.yaml                 #設置 NamespaceeagerLoad:enabled: true                         #將 Apollo 加載提到初始化日志系統之前
-
app.id:AppId是應用的身份信息,是配置中心獲取配置的一個重要信息。
-
apollo.bootstrap.enabled:在應用啟動階段,向Spring容器注入被托管的application.properties文件的配置信息。 -
apollo.bootstrap.eagerLoad.enabled:將 Apollo 配置加載提到初始化日志系統之前。將Apollo配置加載提到初始化日志系統之前從1.2.0版本開始,如果希望把日志相關的配置(如1ogging.level.root=info或1ogback-spring.xml中的參數)也放在Apollo管理,來使Apollo的加載順序放到日志系統加載之前,不過這會導致Apollo的啟動過程無法通過日志的方式輸出(因為執行Apollo加載的時的日志輸出便沒有任何內容)。
1.3 啟動項目
啟動項目后,我們更改 apollo 中的配置,SpringBoot中的配置會自動更新:
[Apollo-Config-1] c.f.a.s.p.AutoUpdateConfigChangeListener : Auto update apollo changed value successfully, new value: hahhahaha12311, key: test.hello, beanName: mongoController, field: cn.bigcoder.mongo.mongodemo.web.MongoController.hello
二. SpringBoot如何在啟動時加載Apollo配置
2.1 ApolloApplicationContextInitializer
spring.factories 文件 是 SpringBoot 中實現 SPI 機制的重要組成,在這個文件中可以定義SpringBoot各種擴展點的實現類。Apollo 客戶端 與 SpringBoot 的集成就借助了這個機制,apollo-client 包中的 META-INF/spring.factories 文件配置如下:
org.springframework.boot.autoconfigure.EnableAutoConfiguration=\
com.ctrip.framework.apollo.spring.boot.ApolloAutoConfiguration
org.springframework.context.ApplicationContextInitializer=\
com.ctrip.framework.apollo.spring.boot.ApolloApplicationContextInitializer
org.springframework.boot.env.EnvironmentPostProcessor=\
com.ctrip.framework.apollo.spring.boot.ApolloApplicationContextInitializer
ApolloApplicationContextInitializer 實現了 ApplicationContextInitializer 和 EnvironmentPostProcessor 兩個擴展點,使得 apollo-client 能在Spring容器啟動前從Apollo Server中加載配置。
EnvironmentPostProcessor:當我們想在Bean中使用配置屬性時,那么我們的配置屬性必須在Bean實例化之前就放入到Spring到Environment中。即我們的接口需要在 application context refreshed 之前進行調用,而EnvironmentPostProcessor正好可以實現這個功能。ApplicationContextInitializer:是Spring框架原有的概念,這個類的主要目的就是在ConfigurableApplicationContext類型(或者子類型)的ApplicationContext做refresh之前,允許我們對ConfigurableApplicationContext的實例做進一步的設置或者處理。
兩者雖都實現在 Application Context 做 refresh 之前加載配置,但是 EnvironmentPostProcessor 的擴展點相比 ApplicationContextInitializer 更加靠前,使得 Apollo 配置加載能夠提到初始化日志系統之前。
ApolloApplicationContextInitializer.postProcessEnvironment 擴展點:
// com.ctrip.framework.apollo.spring.boot.ApolloApplicationContextInitializer#postProcessEnvironment
/**** 為了早在Spring加載日志系統階段之前就加載Apollo配置,這個EnvironmentPostProcessor可以在ConfigFileApplicationListener成功之后調用。* 處理順序是這樣的: 加載Bootstrap屬性和應用程序屬性----->加載Apollo配置屬性---->初始化日志系** @param configurableEnvironment* @param springApplication*/@Overridepublic void postProcessEnvironment(ConfigurableEnvironment configurableEnvironment, SpringApplication springApplication) {// should always initialize system properties like app.id in the first placeinitializeSystemProperty(configurableEnvironment);// 獲取 apollo.bootstrap.eagerLoad.enabled 配置Boolean eagerLoadEnabled = configurableEnvironment.getProperty(PropertySourcesConstants.APOLLO_BOOTSTRAP_EAGER_LOAD_ENABLED, Boolean.class, false);// 如果你不想在日志系統初始化之前進行阿波羅加載,就不應該觸發EnvironmentPostProcessorif (!eagerLoadEnabled) {// 如果未開啟提前加載,則 postProcessEnvironment 擴展點直接返回,不加載配置return;}// 是否開啟了 apollo.bootstrap.enabled 參數,只有開啟了才會在Spring啟動階段加載配置Boolean bootstrapEnabled = configurableEnvironment.getProperty(PropertySourcesConstants.APOLLO_BOOTSTRAP_ENABLED, Boolean.class, false);if (bootstrapEnabled) {DeferredLogger.enable();// 初始化Apollo配置,內部會加載Apollo Server配置initialize(configurableEnvironment);}}
ApolloApplicationContextInitializer.initialize 擴展點:
//com.ctrip.framework.apollo.spring.boot.ApolloApplicationContextInitializer#initialize(org.springframework.context.ConfigurableApplicationContext)@Overridepublic void initialize(ConfigurableApplicationContext context) {ConfigurableEnvironment environment = context.getEnvironment();// 判斷是否配置了 apollo.bootstrap.enabled=trueif (!environment.getProperty(PropertySourcesConstants.APOLLO_BOOTSTRAP_ENABLED, Boolean.class, false)) {logger.debug("Apollo bootstrap config is not enabled for context {}, see property: ${{}}", context, PropertySourcesConstants.APOLLO_BOOTSTRAP_ENABLED);return;}logger.debug("Apollo bootstrap config is enabled for context {}", context);// 初始化Apollo配置,內部會加載Apollo Server配置initialize(environment);}
兩個擴展點最終都會調用 ApolloApplicationContextInitializer#initialize(ConfigurableEnvironment environment) 方法初始化 apollo client,并加載遠端配置:
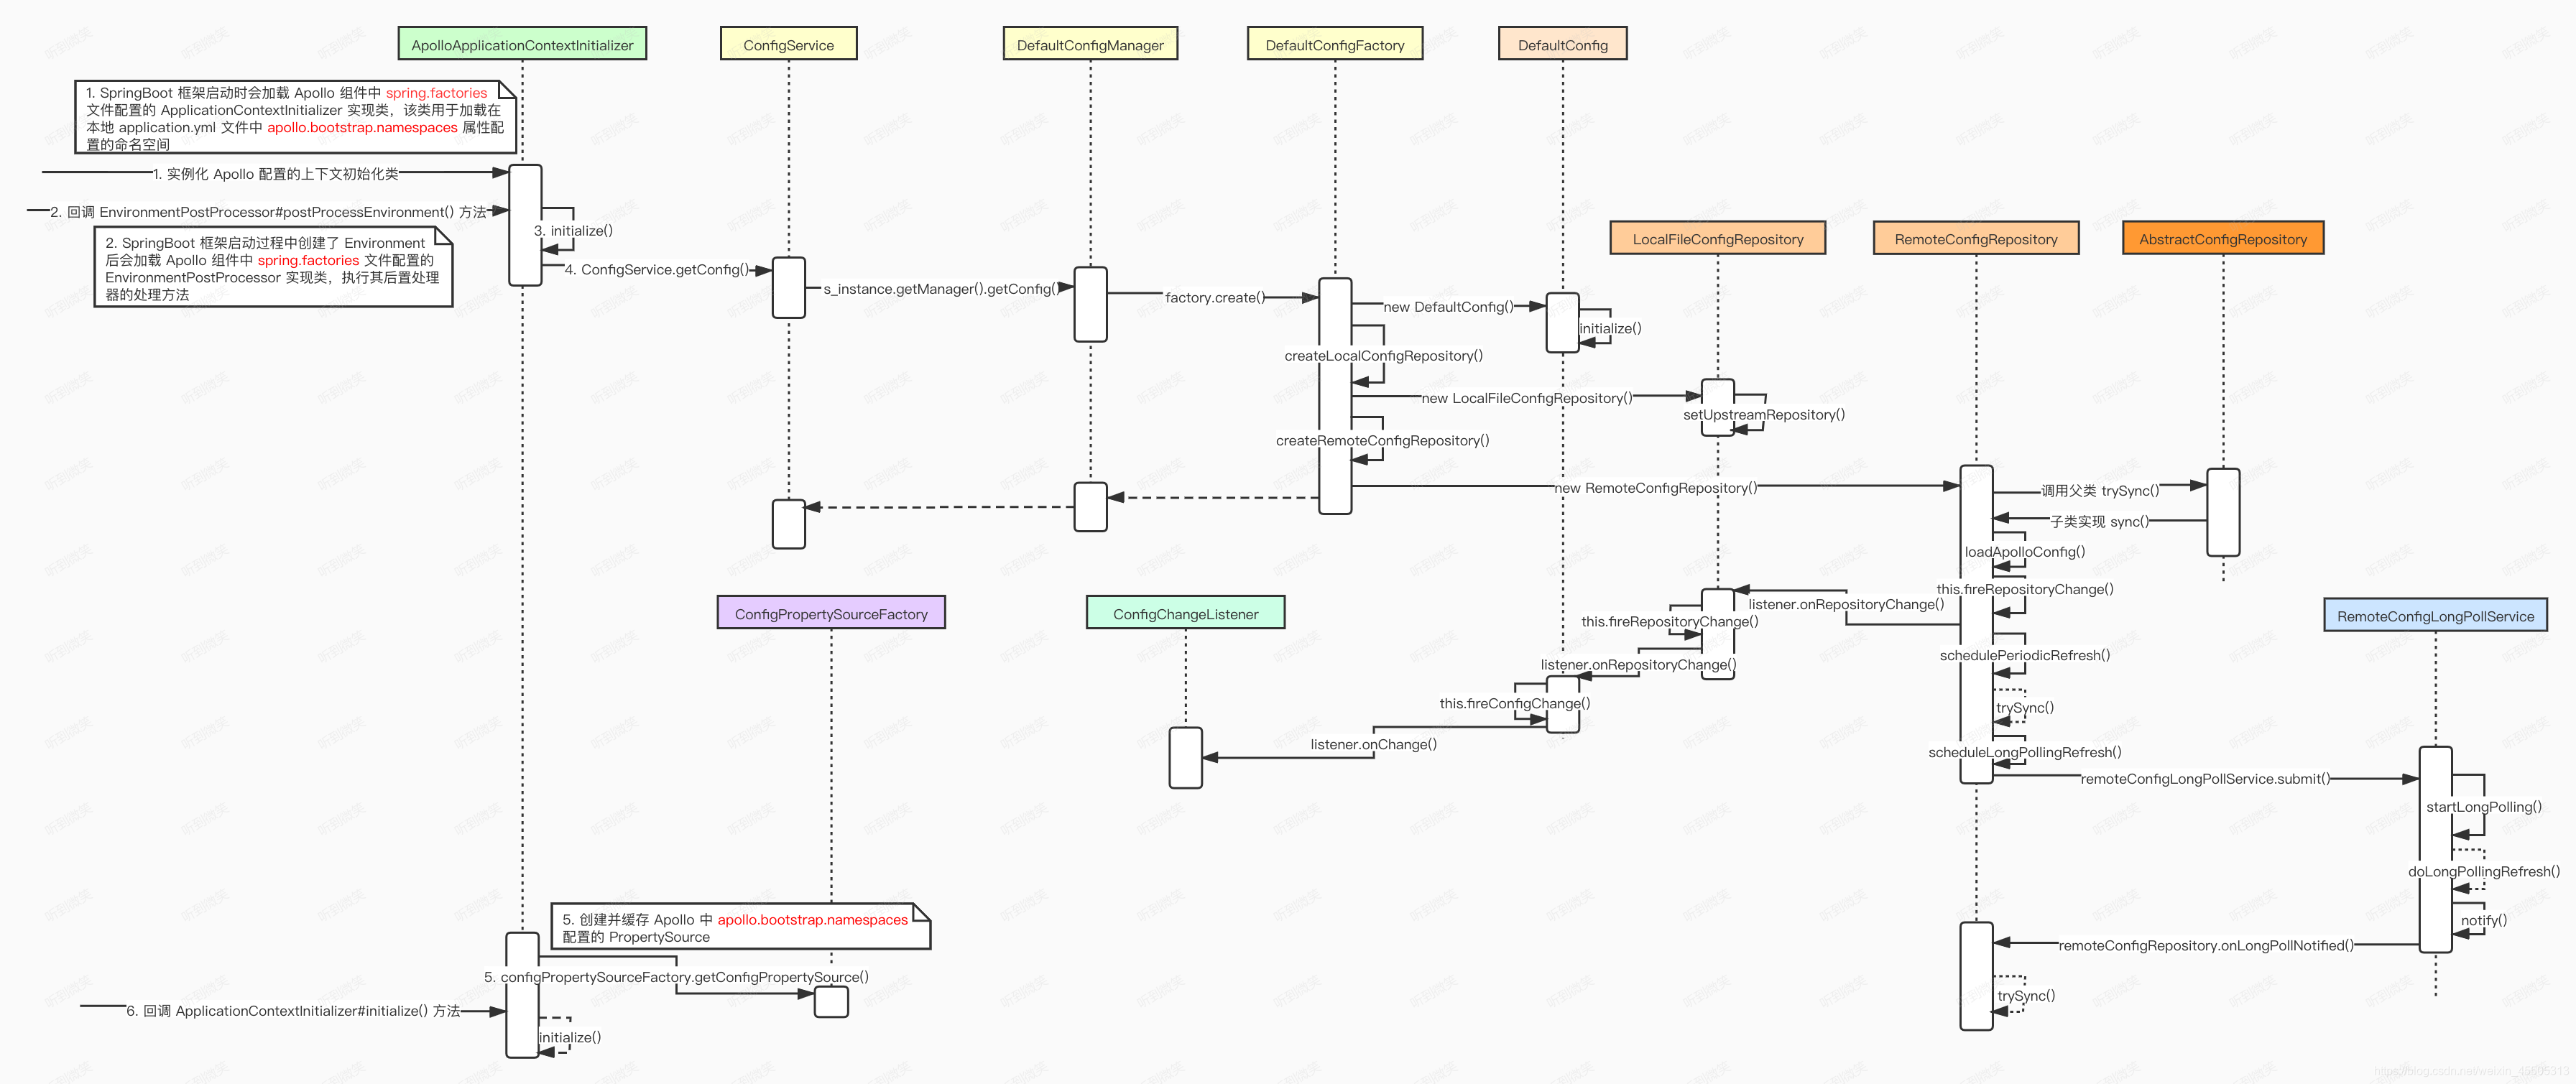
//com.ctrip.framework.apollo.spring.boot.ApolloApplicationContextInitializer#initialize(org.springframework.core.env.ConfigurableEnvironment) /*** 初始化Apollo配置** @param environment*/protected void initialize(ConfigurableEnvironment environment) {final ConfigUtil configUtil = ApolloInjector.getInstance(ConfigUtil.class);if (environment.getPropertySources().contains(PropertySourcesConstants.APOLLO_BOOTSTRAP_PROPERTY_SOURCE_NAME)) {// 已經初始化,重播日志系統初始化之前打印的日志DeferredLogger.replayTo();if (configUtil.isOverrideSystemProperties()) {// 確保ApolloBootstrapPropertySources仍然是第一個,如果不是會將其調整為第一個,這樣從Apollo加載出來的配置擁有更高優先級PropertySourcesUtil.ensureBootstrapPropertyPrecedence(environment);}// 因為有兩個不同的觸發點,所以該方法首先檢查 Spring 的 Environment 環境中是否已經有了 key 為 ApolloBootstrapPropertySources 的目標屬性,有的話就不必往下處理,直接 returnreturn;}// 獲取配置的命名空間參數String namespaces = environment.getProperty(PropertySourcesConstants.APOLLO_BOOTSTRAP_NAMESPACES, ConfigConsts.NAMESPACE_APPLICATION);logger.debug("Apollo bootstrap namespaces: {}", namespaces);// 使用","切分命名參數List<String> namespaceList = NAMESPACE_SPLITTER.splitToList(namespaces);CompositePropertySource composite;if (configUtil.isPropertyNamesCacheEnabled()) {composite = new CachedCompositePropertySource(PropertySourcesConstants.APOLLO_BOOTSTRAP_PROPERTY_SOURCE_NAME);} else {composite = new CompositePropertySource(PropertySourcesConstants.APOLLO_BOOTSTRAP_PROPERTY_SOURCE_NAME);}for (String namespace : namespaceList) {// 從遠端拉去命名空間對應的配置Config config = ConfigService.getConfig(namespace);// 調用ConfigPropertySourceFactory#getConfigPropertySource() 緩存從遠端拉取的配置,并將其包裝為 PropertySource,// 最終將所有拉取到的遠端配置聚合到一個以 ApolloBootstrapPropertySources 為 key 的屬性源包裝類 CompositePropertySource 的內部composite.addPropertySource(configPropertySourceFactory.getConfigPropertySource(namespace, config));}if (!configUtil.isOverrideSystemProperties()) {if (environment.getPropertySources().contains(StandardEnvironment.SYSTEM_ENVIRONMENT_PROPERTY_SOURCE_NAME)) {environment.getPropertySources().addAfter(StandardEnvironment.SYSTEM_ENVIRONMENT_PROPERTY_SOURCE_NAME, composite);return;}}// 將 CompositePropertySource 屬性源包裝類添加到 Spring 的 Environment 環境中,注意是插入在屬性源列表的頭部,// 因為取屬性的時候其實是遍歷這個屬性源列表來查找,找到即返回,所以出現同名屬性時,前面的優先級更高environment.getPropertySources().addFirst(composite);}
流程如下:
-
因為有兩個不同的觸發點,所以該方法首先檢查 Spring 的 Environment 環境中是否已經有了 key 為
ApolloBootstrapPropertySources的目標屬性,有的話就不必往下處理,直接 return。 -
從 Environment 環境中獲取
apollo.bootstrap.namespaces屬性配置的啟動命名空間字符串,如果沒有的話就取默認的 application 命名空間。 -
按逗號分割處理配置的啟動命名空間字符串,然后調用
ConfigService#getConfig()依次拉取各個命名空間的遠端配置,下節詳細分析這部分 -
創建
CompositePropertySource復合屬性源,因為 apollo-client 啟動時可以加載多個命名空間的配置,每個命名空間對應一個PropertySource,而多個PropertySource就會被封裝在CompositePropertySource對象中,若需要獲取apollo中配置的屬性時,就會遍歷多個命名空間所對應的PropertySource,找到對應屬性后就會直接返回,這也意味著,先加載的namespace中的配置具有更高優先級:public class CompositePropertySource extends EnumerablePropertySource<Object> {private final Set<PropertySource<?>> propertySources = new LinkedHashSet<>();@Override@Nullablepublic Object getProperty(String name) {for (PropertySource<?> propertySource : this.propertySources) {Object candidate = propertySource.getProperty(name);if (candidate != null) {return candidate;}}return null;} } -
調用
ConfigPropertySourceFactory#getConfigPropertySource()緩存從遠端拉取的配置,并將其包裝為PropertySource,最終將所有拉取到的遠端配置聚合到一個以ApolloBootstrapPropertySources為 key 的屬性源包裝類CompositePropertySource的內部。public ConfigPropertySource getConfigPropertySource(String name, Config source) {// 將 Apollo 的 Config 配置封裝為繼承自 Spring 內置的 EnumerablePropertySource 類的 ConfigPropertySource 對象ConfigPropertySource configPropertySource = new ConfigPropertySource(name, source);// 將新生成的 ConfigPropertySource 對象緩存到內部列表,以備后續為每個配置實例添加配置變化監聽器使用configPropertySources.add(configPropertySource);return configPropertySource;} -
將
CompositePropertySource屬性源包裝類添加到 Spring 的 Environment 環境中,注意是插入在屬性源列表的頭部,因為取屬性的時候其實是遍歷這個屬性源列表來查找,找到即返回,所以出現同名屬性時,前面的優先級更高。這樣在當本地配置文件和Apollo中配置了同名參數時會使得Apollo中的優先級更高。
2.2 從遠端加載配置
在 ApolloApplicationContextInitializer.initialize 中會調用 ConfigService.getConfig() 加載遠端命名空間配置。getConfig方法處理流程如下:
// com.ctrip.framework.apollo.ConfigService#getConfig/*** 獲取名稱空間的配置實例** @param namespace the namespace of the config* @return config instance*/public static Config getConfig(String namespace) {// s_instance.getManager() 實際通過 ApolloInjector 去獲取 ConfigManager實例, ApolloInjector 其實采用了 Java 中的 ServiceLoader 機制,此處不作討論,讀者有興趣可自行搜索return s_instance.getManager().getConfig(namespace);}private ConfigManager getManager() {if (m_configManager == null) {synchronized (this) {if (m_configManager == null) {m_configManager = ApolloInjector.getInstance(ConfigManager.class);}}}return m_configManager;}
s_instance.getManager()實際通過ApolloInjector去獲取ConfigManager實例,ApolloInjector其實采用了 Java 中的ServiceLoader機制,此處不作討論,讀者有興趣可自行搜索ConfigManager其實只有一個實現類,此處最終將調用到DefaultConfigManager#getConfig()方法。
DefaultConfigManager#getConfig() 方法處理邏輯較為清晰,重點如下:
@Overridepublic Config getConfig(String namespace) {// 首先從緩存中獲取配置,緩存中沒有則從遠程拉取,注意此處在 synchronized 代碼塊內部也判了一次空,采用了雙重檢查鎖機制Config config = m_configs.get(namespace);if (config == null) {synchronized (this) {config = m_configs.get(namespace);// 加鎖后再次判斷if (config == null) {// 遠程拉取配置首先需要通過 ConfigFactoryManager#getFactory() 方法獲取 ConfigFactory 實例ConfigFactory factory = m_factoryManager.getFactory(namespace);// 再通過 ConfigFactory#create() 去實際地進行拉取操作。此處 Factory 的創建也使用了 ServiceLoader 機制,暫不討論,可知最后實際調用到 DefaultConfigFactory#create()config = factory.create(namespace);// 將從遠端拉取到的配置緩存m_configs.put(namespace, config);}}}
- 首先從緩存中獲取配置,緩存中沒有則從遠程拉取,注意此處在 synchronized 代碼塊內部也判了一次空,采用了雙重檢查鎖機制。
- 遠程拉取配置首先需要通過
ConfigFactoryManager#getFactory()方法獲取ConfigFactory實例,這里實際上獲取的是DefaultConfigFactory,再通過DefaultConfigFactory#create()去獲取 Apollo Server 中的配置。
在 DefaultConfigFactory#create() 中會根據加載namespace類型,創建對應的 ConfigRepository:
//com.ctrip.framework.apollo.spi.DefaultConfigFactory#create @Overridepublic Config create(String namespace) {// 確定本地配置緩存文件的格式。對于格式不是屬性的命名空間,必須提供文件擴展名,例如application.yamlConfigFileFormat format = determineFileFormat(namespace);ConfigRepository configRepository = null;if (ConfigFileFormat.isPropertiesCompatible(format) &&format != ConfigFileFormat.Properties) {// 如果是YML類型的配置configRepository = createPropertiesCompatibleFileConfigRepository(namespace, format);} else {// 如果是 Properties 類型的配置configRepository = createConfigRepository(namespace);}logger.debug("Created a configuration repository of type [{}] for namespace [{}]",configRepository.getClass().getName(), namespace);// 創建 DefaultConfig對象,并將當前 DefaultConfig 對象 對象注冊進 configRepository 更新通知列表,這樣configRepository中的配置發生變更時,就會通知 DefaultConfigreturn this.createRepositoryConfig(namespace, configRepository);}
我們就以 properties 配置類型為例,會調用 DefaultConfigFactory.createConfigRepository 創建 ConfigRepository:
// com.ctrip.framework.apollo.spi.DefaultConfigFactory#createConfigRepositoryConfigRepository createConfigRepository(String namespace) {if (m_configUtil.isPropertyFileCacheEnabled()) {// 默認是開啟緩存機制的return createLocalConfigRepository(namespace);}return createRemoteConfigRepository(namespace);}
2.3 Apollo ConfigRepository 分層設計
Apollo ConfigRepository 適用于加載配置的接口,默認有兩種實現:

- LocalFileConfigRepository:從本地文件中加載配置。
- RemoteConfigRepository:從遠端Apollo Server加載配置。
在調用 DefaultConfigFactory#createConfigRepository 創建 ConfigRepository 時默認會創建多級對象,創建時的順序為:RemoteConfigRepository --> LocalFileConfigRepository --> DefaultConfig
其中 DefaultConfig 持有 LocalFileConfigRepository,LocalFileConfigRepository 持有 RemoteConfigRepository。
DefaultConfig 監聽 LocalFileConfigRepository 變化,LocalFileConfigRepository 監聽 RemoteConfigRepository 變化。

創建流程如下:
ConfigRepository createConfigRepository(String namespace) {if (m_configUtil.isPropertyFileCacheEnabled()) {// 默認是開啟緩存機制的return createLocalConfigRepository(namespace);}return createRemoteConfigRepository(namespace);}LocalFileConfigRepository createLocalConfigRepository(String namespace) {if (m_configUtil.isInLocalMode()) {logger.warn("==== Apollo is in local mode! Won't pull configs from remote server for namespace {} ! ====",namespace);return new LocalFileConfigRepository(namespace);}// 創建 RemoteConfigRepository 和 LocalFileConfigRepository,并將 LocalFileConfigRepository 注冊進 RemoteConfigRepository的變更通知列表中return new LocalFileConfigRepository(namespace, createRemoteConfigRepository(namespace));}RemoteConfigRepository createRemoteConfigRepository(String namespace) {return new RemoteConfigRepository(namespace);}
Apollo 通過多層 ConfigRepository 設計實現如下配置加載機制,既保證了配置的實時性,又保證了Apollo Server出現故障時對接入的服務影響最小:
-
客戶端和服務端保持了一個長連接(通過Http Long Polling實現),從而能第一時間獲得配置更新的推送(RemoteConfigRepository)
-
客戶端還會定時從Apollo配置中心服務端拉取應用的最新配置。
- 這是一個fallback機制,為了防止推送機制失效導致配置不更新。客戶端定時拉取會上報本地版本,所以一般情況下,對于定時拉取的操作,服務端都會返回304 - Not Modified
- 定時頻率默認為每5分鐘拉取一次,客戶端也可以通過在運行時指定System Property:apollo.refreshInterval來覆蓋,單位為分鐘
-
客戶端會把從服務端獲取到的配置在本地文件系統緩存一份在遇到服務不可用,或網絡不通的時候,依然能從本地恢復配置(LocalFileConfigRepository)
-
客戶端從Apollo配置中心服務端獲取到應用的最新配置后,會保存在內存中(DefaultConfig)
2.4.1 RemoteConfigRepository
RemoteConfigRepository 實現 AbstractConfigRepository 抽象類,遠程配置Repository。實現從Apollo Server拉取配置,并緩存在內存中。定時 + 實時刷新緩存:
構造方法:
public class RemoteConfigRepository extends AbstractConfigRepository {private static final Logger logger = DeferredLoggerFactory.getLogger(RemoteConfigRepository.class);private static final Joiner STRING_JOINER = Joiner.on(ConfigConsts.CLUSTER_NAMESPACE_SEPARATOR);private static final Joiner.MapJoiner MAP_JOINER = Joiner.on("&").withKeyValueSeparator("=");private static final Escaper pathEscaper = UrlEscapers.urlPathSegmentEscaper();private static final Escaper queryParamEscaper = UrlEscapers.urlFormParameterEscaper();private final ConfigServiceLocator m_serviceLocator;private final HttpClient m_httpClient;private final ConfigUtil m_configUtil;/*** 遠程配置長輪詢服務*/private final RemoteConfigLongPollService remoteConfigLongPollService;/*** 指向ApolloConfig的AtomicReference,拉取的遠端配置緩存*/private volatile AtomicReference<ApolloConfig> m_configCache;private final String m_namespace;private final static ScheduledExecutorService m_executorService;private final AtomicReference<ServiceDTO> m_longPollServiceDto;private final AtomicReference<ApolloNotificationMessages> m_remoteMessages;/*** 加載配置的RateLimiter*/private final RateLimiter m_loadConfigRateLimiter;/*** 是否強制拉取緩存的標記* 若為true,則多一輪從Config Service拉取配置* 為true的原因:RemoteConfigRepository知道Config Service有配置刷新*/private final AtomicBoolean m_configNeedForceRefresh;/*** 失敗定時重試策略*/private final SchedulePolicy m_loadConfigFailSchedulePolicy;private static final Gson GSON = new Gson();static {m_executorService = Executors.newScheduledThreadPool(1,ApolloThreadFactory.create("RemoteConfigRepository", true));}/*** Constructor.** @param namespace the namespace*/public RemoteConfigRepository(String namespace) {m_namespace = namespace;m_configCache = new AtomicReference<>();m_configUtil = ApolloInjector.getInstance(ConfigUtil.class);m_httpClient = ApolloInjector.getInstance(HttpClient.class);m_serviceLocator = ApolloInjector.getInstance(ConfigServiceLocator.class);remoteConfigLongPollService = ApolloInjector.getInstance(RemoteConfigLongPollService.class);m_longPollServiceDto = new AtomicReference<>();m_remoteMessages = new AtomicReference<>();m_loadConfigRateLimiter = RateLimiter.create(m_configUtil.getLoadConfigQPS());m_configNeedForceRefresh = new AtomicBoolean(true);m_loadConfigFailSchedulePolicy = new ExponentialSchedulePolicy(m_configUtil.getOnErrorRetryInterval(),m_configUtil.getOnErrorRetryInterval() * 8);// 嘗試同步配置this.trySync();// 初始化定時刷新配置的任務this.schedulePeriodicRefresh();// 注冊自己到RemoteConfigLongPollService中,實現配置更新的實時通知this.scheduleLongPollingRefresh();}
}
RemoteConfigRepository 構造方法中分別調用了 trySync() 嘗試同步配置,schedulePeriodicRefresh() 初始化定時刷新配置的任務,scheduleLongPollingRefresh() 注冊自己到 RemoteConfigLongPollService 中實現配置更新的實時通知。
trySync():
public abstract class AbstractConfigRepository implements ConfigRepository {protected boolean trySync() {try {// 調用實現類的sync方法sync();return true;} catch (Throwable ex) {Tracer.logEvent("ApolloConfigException", ExceptionUtil.getDetailMessage(ex));logger.warn("Sync config failed, will retry. Repository {}, reason: {}", this.getClass(), ExceptionUtil.getDetailMessage(ex));}return false;}
}
RemoteConfigRepository 構造方法中調用的 trySync 方法,最終會調用實現類的自己的 sync 方法:
// com.ctrip.framework.apollo.internals.RemoteConfigRepository#sync@Overrideprotected synchronized void sync() {Transaction transaction = Tracer.newTransaction("Apollo.ConfigService", "syncRemoteConfig");try {// 緩存的 Apollo服務端配置ApolloConfig previous = m_configCache.get();// 從Apollo Server加載配置ApolloConfig current = loadApolloConfig();//reference equals means HTTP 304if (previous != current) {logger.debug("Remote Config refreshed!");// 若不相等,說明更新了,設置到緩存中m_configCache.set(current);// 發布配置變更事件,實際上是回調 LocalFileConfigRepository.onRepositoryChangethis.fireRepositoryChange(m_namespace, this.getConfig());}if (current != null) {Tracer.logEvent(String.format("Apollo.Client.Configs.%s", current.getNamespaceName()),current.getReleaseKey());}transaction.setStatus(Transaction.SUCCESS);} catch (Throwable ex) {transaction.setStatus(ex);throw ex;} finally {transaction.complete();}}
-
調用
loadApolloConfig()方法加載遠端配置信息。// com.ctrip.framework.apollo.internals.RemoteConfigRepository#loadApolloConfigprivate ApolloConfig loadApolloConfig() {// 限流if (!m_loadConfigRateLimiter.tryAcquire(5, TimeUnit.SECONDS)) {try {// 如果被限流則sleep 5sTimeUnit.SECONDS.sleep(5);} catch (InterruptedException e) {}}String appId = m_configUtil.getAppId();String cluster = m_configUtil.getCluster();String dataCenter = m_configUtil.getDataCenter();String secret = m_configUtil.getAccessKeySecret();Tracer.logEvent("Apollo.Client.ConfigMeta", STRING_JOINER.join(appId, cluster, m_namespace));//計算重試次數int maxRetries = m_configNeedForceRefresh.get() ? 2 : 1;long onErrorSleepTime = 0; // 0 means no sleepThrowable exception = null;//獲得所有的Apollo Server的地址List<ServiceDTO> configServices = getConfigServices();String url = null;//循環讀取配置重試次數直到成功 每一次都會循環所有的ServiceDTO數組retryLoopLabel:for (int i = 0; i < maxRetries; i++) {List<ServiceDTO> randomConfigServices = Lists.newLinkedList(configServices);// 隨機所有的Config Service 的地址Collections.shuffle(randomConfigServices);// 優先訪問通知配置變更的Config Service的地址 并且獲取到時,需要置空,避免重復優先訪問if (m_longPollServiceDto.get() != null) {randomConfigServices.add(0, m_longPollServiceDto.getAndSet(null));}//循環所有的Apollo Server的地址for (ServiceDTO configService : randomConfigServices) {if (onErrorSleepTime > 0) {logger.warn("Load config failed, will retry in {} {}. appId: {}, cluster: {}, namespaces: {}",onErrorSleepTime, m_configUtil.getOnErrorRetryIntervalTimeUnit(), appId, cluster, m_namespace);try {m_configUtil.getOnErrorRetryIntervalTimeUnit().sleep(onErrorSleepTime);} catch (InterruptedException e) {//ignore}}// 組裝查詢配置的地址url = assembleQueryConfigUrl(configService.getHomepageUrl(), appId, cluster, m_namespace,dataCenter, m_remoteMessages.get(), m_configCache.get());logger.debug("Loading config from {}", url);//創建HttpRequest對象HttpRequest request = new HttpRequest(url);if (!StringUtils.isBlank(secret)) {Map<String, String> headers = Signature.buildHttpHeaders(url, appId, secret);request.setHeaders(headers);}Transaction transaction = Tracer.newTransaction("Apollo.ConfigService", "queryConfig");transaction.addData("Url", url);try {// 發起請求,返回HttpResponse對象HttpResponse<ApolloConfig> response = m_httpClient.doGet(request, ApolloConfig.class);// 設置是否強制拉取緩存的標記為falsem_configNeedForceRefresh.set(false);// 標記成功m_loadConfigFailSchedulePolicy.success();transaction.addData("StatusCode", response.getStatusCode());transaction.setStatus(Transaction.SUCCESS);if (response.getStatusCode() == 304) {logger.debug("Config server responds with 304 HTTP status code.");// 無新的配置, 直接返回緩存的 ApolloConfig 對象return m_configCache.get();}// 有新的配置,進行返回新的ApolloConfig對象ApolloConfig result = response.getBody();logger.debug("Loaded config for {}: {}", m_namespace, result);return result;} catch (ApolloConfigStatusCodeException ex) {ApolloConfigStatusCodeException statusCodeException = ex;//config not foundif (ex.getStatusCode() == 404) {String message = String.format("Could not find config for namespace - appId: %s, cluster: %s, namespace: %s, " +"please check whether the configs are released in Apollo!",appId, cluster, m_namespace);statusCodeException = new ApolloConfigStatusCodeException(ex.getStatusCode(),message);}Tracer.logEvent("ApolloConfigException", ExceptionUtil.getDetailMessage(statusCodeException));transaction.setStatus(statusCodeException);exception = statusCodeException;if(ex.getStatusCode() == 404) {break retryLoopLabel;}} catch (Throwable ex) {Tracer.logEvent("ApolloConfigException", ExceptionUtil.getDetailMessage(ex));transaction.setStatus(ex);exception = ex;} finally {transaction.complete();}// if force refresh, do normal sleep, if normal config load, do exponential sleeponErrorSleepTime = m_configNeedForceRefresh.get() ? m_configUtil.getOnErrorRetryInterval() :m_loadConfigFailSchedulePolicy.fail();}}String message = String.format("Load Apollo Config failed - appId: %s, cluster: %s, namespace: %s, url: %s",appId, cluster, m_namespace, url);throw new ApolloConfigException(message, exception);} -
如果配置發生變更,回調
LocalFileConfigRepository.onRepositoryChange方法,從而將最新配置同步到LocalFileConfigRepository。而LocalFileConfigRepository在更新完本地文件緩存配置后,同樣會回調DefaultConfig.onRepositoryChange同步內存緩存,具體源碼我們在后文分析。
schedulePeriodicRefresh:
// com.ctrip.framework.apollo.internals.RemoteConfigRepository#schedulePeriodicRefreshprivate void schedulePeriodicRefresh() {logger.debug("Schedule periodic refresh with interval: {} {}",m_configUtil.getRefreshInterval(), m_configUtil.getRefreshIntervalTimeUnit());m_executorService.scheduleAtFixedRate(new Runnable() {@Overridepublic void run() {Tracer.logEvent("Apollo.ConfigService", String.format("periodicRefresh: %s", m_namespace));logger.debug("refresh config for namespace: {}", m_namespace);// 同步配置trySync();Tracer.logEvent("Apollo.Client.Version", Apollo.VERSION);}// 默認每5分鐘同步一次配置}, m_configUtil.getRefreshInterval(), m_configUtil.getRefreshInterval(),m_configUtil.getRefreshIntervalTimeUnit());}
scheduleLongPollingRefresh():
// com.ctrip.framework.apollo.internals.RemoteConfigRepository#scheduleLongPollingRefreshprivate void scheduleLongPollingRefresh() {//將自己注冊到RemoteConfigLongPollService中,實現配置更新的實時通知//當RemoteConfigLongPollService長輪詢到該RemoteConfigRepository的Namespace下的配置更新時,會回調onLongPollNotified()方法remoteConfigLongPollService.submit(m_namespace, this);}// com.ctrip.framework.apollo.internals.RemoteConfigRepository#onLongPollNotifiedpublic void onLongPollNotified(ServiceDTO longPollNotifiedServiceDto, ApolloNotificationMessages remoteMessages) {//設置長輪詢到配置更新的Config Service 下次同步配置時,優先讀取該服務m_longPollServiceDto.set(longPollNotifiedServiceDto);m_remoteMessages.set(remoteMessages);// 提交同步任務m_executorService.submit(new Runnable() {@Overridepublic void run() {// 設置是否強制拉取緩存的標記為truem_configNeedForceRefresh.set(true);//嘗試同步配置trySync();}});}
2.4.2 RemoteConfigLongPollService
RemoteConfigLongPollService 遠程配置長輪詢服務。負責長輪詢 Apollo Server 的配置變更通知 /notifications/v2 接口。當有新的通知時,觸發 RemoteConfigRepository.onLongPollNotified,立即輪詢 Apollo Server 的配置讀取/configs/{appId}/{clusterName}/{namespace:.+}接口。
構造方法:
public class RemoteConfigLongPollService {private static final Logger logger = LoggerFactory.getLogger(RemoteConfigLongPollService.class);private static final Joiner STRING_JOINER = Joiner.on(ConfigConsts.CLUSTER_NAMESPACE_SEPARATOR);private static final Joiner.MapJoiner MAP_JOINER = Joiner.on("&").withKeyValueSeparator("=");private static final Escaper queryParamEscaper = UrlEscapers.urlFormParameterEscaper();private static final long INIT_NOTIFICATION_ID = ConfigConsts.NOTIFICATION_ID_PLACEHOLDER;//90 seconds, should be longer than server side's long polling timeout, which is now 60 secondsprivate static final int LONG_POLLING_READ_TIMEOUT = 90 * 1000;/*** 長輪詢ExecutorService*/private final ExecutorService m_longPollingService;/*** 是否停止長輪詢的標識*/private final AtomicBoolean m_longPollingStopped;/*** 失敗定時重試策略*/private SchedulePolicy m_longPollFailSchedulePolicyInSecond;/*** 長輪詢的RateLimiter*/private RateLimiter m_longPollRateLimiter;/*** 是否長輪詢已經開始的標識*/private final AtomicBoolean m_longPollStarted;/*** 長輪詢的Namespace Multimap緩存* key:namespace的名字* value:RemoteConfigRepository集合*/private final Multimap<String, RemoteConfigRepository> m_longPollNamespaces;/*** 通知編號Map緩存* key:namespace的名字* value:最新的通知編號*/private final ConcurrentMap<String, Long> m_notifications;/*** 通知消息Map緩存* key:namespace的名字* value:ApolloNotificationMessages 對象*/private final Map<String, ApolloNotificationMessages> m_remoteNotificationMessages;//namespaceName -> watchedKey -> notificationIdprivate Type m_responseType;private static final Gson GSON = new Gson();private ConfigUtil m_configUtil;private HttpClient m_httpClient;private ConfigServiceLocator m_serviceLocator;private final ConfigServiceLoadBalancerClient configServiceLoadBalancerClient = ServiceBootstrap.loadPrimary(ConfigServiceLoadBalancerClient.class);/*** Constructor.*/public RemoteConfigLongPollService() {m_longPollFailSchedulePolicyInSecond = new ExponentialSchedulePolicy(1, 120); //in secondm_longPollingStopped = new AtomicBoolean(false);m_longPollingService = Executors.newSingleThreadExecutor(ApolloThreadFactory.create("RemoteConfigLongPollService", true));m_longPollStarted = new AtomicBoolean(false);m_longPollNamespaces =Multimaps.synchronizedSetMultimap(HashMultimap.<String, RemoteConfigRepository>create());m_notifications = Maps.newConcurrentMap();m_remoteNotificationMessages = Maps.newConcurrentMap();m_responseType = new TypeToken<List<ApolloConfigNotification>>() {}.getType();m_configUtil = ApolloInjector.getInstance(ConfigUtil.class);m_httpClient = ApolloInjector.getInstance(HttpClient.class);m_serviceLocator = ApolloInjector.getInstance(ConfigServiceLocator.class);m_longPollRateLimiter = RateLimiter.create(m_configUtil.getLongPollQPS());}
}
submit:
// com.ctrip.framework.apollo.internals.RemoteConfigLongPollService#submitpublic boolean submit(String namespace, RemoteConfigRepository remoteConfigRepository) {// 將遠程倉庫緩存下來boolean added = m_longPollNamespaces.put(namespace, remoteConfigRepository);m_notifications.putIfAbsent(namespace, INIT_NOTIFICATION_ID);if (!m_longPollStarted.get()) {// 若未啟動長輪詢定時任務,進行啟動startLongPolling();}return added;}
startLongPolling:
// com.ctrip.framework.apollo.internals.RemoteConfigLongPollService#startLongPollingprivate void startLongPolling() {// CAS設置 m_longPollStarted 為 true,代表長輪詢已啟動if (!m_longPollStarted.compareAndSet(false, true)) {//already startedreturn;}try {final String appId = m_configUtil.getAppId();final String cluster = m_configUtil.getCluster();final String dataCenter = m_configUtil.getDataCenter();final String secret = m_configUtil.getAccessKeySecret();// 獲得長輪詢任務的初始化延遲時間,單位毫秒final long longPollingInitialDelayInMills = m_configUtil.getLongPollingInitialDelayInMills();// 提交長輪詢任務 該任務會持續且循環執行m_longPollingService.submit(new Runnable() {@Overridepublic void run() {if (longPollingInitialDelayInMills > 0) {try {logger.debug("Long polling will start in {} ms.", longPollingInitialDelayInMills);TimeUnit.MILLISECONDS.sleep(longPollingInitialDelayInMills);} catch (InterruptedException e) {//ignore}}// 執行長輪詢doLongPollingRefresh(appId, cluster, dataCenter, secret);}});} catch (Throwable ex) {m_longPollStarted.set(false);ApolloConfigException exception =new ApolloConfigException("Schedule long polling refresh failed", ex);Tracer.logError(exception);logger.warn(ExceptionUtil.getDetailMessage(exception));}}doLongPollingRefresh:
// com.ctrip.framework.apollo.internals.RemoteConfigLongPollService#doLongPollingRefreshprivate void doLongPollingRefresh(String appId, String cluster, String dataCenter, String secret) {ServiceDTO lastServiceDto = null;// 循環執行,直到停止或線程中斷while (!m_longPollingStopped.get() && !Thread.currentThread().isInterrupted()) {if (!m_longPollRateLimiter.tryAcquire(5, TimeUnit.SECONDS)) {//wait at most 5 secondstry {// 若被限流,則等待5sTimeUnit.SECONDS.sleep(5);} catch (InterruptedException e) {}}Transaction transaction = Tracer.newTransaction("Apollo.ConfigService", "pollNotification");String url = null;try {// 獲得Apollo Server的地址if (lastServiceDto == null) {lastServiceDto = this.resolveConfigService();}// 組裝長輪詢通知變更的地址url =assembleLongPollRefreshUrl(lastServiceDto.getHomepageUrl(), appId, cluster, dataCenter,m_notifications);logger.debug("Long polling from {}", url);// 創建HttpRequest對象,并設置超時時間HttpRequest request = new HttpRequest(url);request.setReadTimeout(LONG_POLLING_READ_TIMEOUT);if (!StringUtils.isBlank(secret)) {Map<String, String> headers = Signature.buildHttpHeaders(url, appId, secret);request.setHeaders(headers);}transaction.addData("Url", url);// 發起請求,返回HttpResponse對象final HttpResponse<List<ApolloConfigNotification>> response =m_httpClient.doGet(request, m_responseType);logger.debug("Long polling response: {}, url: {}", response.getStatusCode(), url);// 有新的通知,刷新本地的緩存if (response.getStatusCode() == 200 && response.getBody() != null) {updateNotifications(response.getBody());updateRemoteNotifications(response.getBody());transaction.addData("Result", response.getBody().toString());// 通知對應的RemoteConfigRepository們notify(lastServiceDto, response.getBody());}//try to load balance// 無新的通知,重置連接的Config Service的地址,下次請求不同的Config Service,實現負載均衡if (response.getStatusCode() == 304 && ThreadLocalRandom.current().nextBoolean()) {lastServiceDto = null;}// 標記成功m_longPollFailSchedulePolicyInSecond.success();transaction.addData("StatusCode", response.getStatusCode());transaction.setStatus(Transaction.SUCCESS);} catch (Throwable ex) {lastServiceDto = null;Tracer.logEvent("ApolloConfigException", ExceptionUtil.getDetailMessage(ex));transaction.setStatus(ex);long sleepTimeInSecond = m_longPollFailSchedulePolicyInSecond.fail();logger.warn("Long polling failed, will retry in {} seconds. appId: {}, cluster: {}, namespaces: {}, long polling url: {}, reason: {}",sleepTimeInSecond, appId, cluster, assembleNamespaces(), url, ExceptionUtil.getDetailMessage(ex));try {TimeUnit.SECONDS.sleep(sleepTimeInSecond);} catch (InterruptedException ie) {//ignore}} finally {transaction.complete();}}}
notify:
private void notify(ServiceDTO lastServiceDto, List<ApolloConfigNotification> notifications) {if (notifications == null || notifications.isEmpty()) {return;}for (ApolloConfigNotification notification : notifications) {String namespaceName = notification.getNamespaceName();// 創建新的RemoteConfigRepository數組,避免并發問題List<RemoteConfigRepository> toBeNotified =Lists.newArrayList(m_longPollNamespaces.get(namespaceName));// 獲得遠程的ApolloNotificationMessages對象并克隆ApolloNotificationMessages originalMessages = m_remoteNotificationMessages.get(namespaceName);ApolloNotificationMessages remoteMessages = originalMessages == null ? null : originalMessages.clone();//since .properties are filtered out by default, so we need to check if there is any listener for ittoBeNotified.addAll(m_longPollNamespaces.get(String.format("%s.%s", namespaceName, ConfigFileFormat.Properties.getValue())));// 循環RemoteConfigRepository進行通知for (RemoteConfigRepository remoteConfigRepository : toBeNotified) {try {// 回調 RemoteConfigRepository.onLongPollNotified 方法,讓其重新拉取最新的配置remoteConfigRepository.onLongPollNotified(lastServiceDto, remoteMessages);} catch (Throwable ex) {Tracer.logError(ex);}}}}
至此 RemoteConfigRepository 從遠端拉取配置的整個流程就已經分析完畢,Spring啟動流程創建 RemoteConfigRepository 對象時會嘗試第一次拉取namespace對應的配置,拉取完后會創建定時拉取任務和長輪詢任務,長輪詢任務調用 RemoteConfigLongPollService#startLongPolling 來實現,若服務端配置發生變更,則會回調 RemoteConfigRepository#onLongPollNotified 方法,在這個方法中會調用 RemoteConfigRepository#sync 方法重新拉取對應 namespace 的遠端配置。
2.4.3 LocalFileConfigRepository
前文我們提到當服務端配置發生變更后,RemoteConfigRepository 會收到配置變更通知并調用 sync 方法同步配置,若配置發生變更,則會繼續回調 LocalFileConfigRepository#onRepositoryChange:
// LocalFileConfigRepository.onRepositoryChange@Overridepublic void onRepositoryChange(String namespace, Properties newProperties) {if (newProperties.equals(m_fileProperties)) {return;}Properties newFileProperties = propertiesFactory.getPropertiesInstance();newFileProperties.putAll(newProperties);// 將最新配置寫入本地文件updateFileProperties(newFileProperties, m_upstream.getSourceType());// 回調 DefaultConfig.onRepositoryChange 方法this.fireRepositoryChange(namespace, newProperties);}
2.4.4 DefaultConfig
當 LocalFileConfigRepository 收到 RemoteConfigRepository 的配置變更通知并更新本地配置文件后,會繼續回調 DefaultConfig#onRepositoryChange:
// com.ctrip.framework.apollo.internals.DefaultConfig#onRepositoryChange@Overridepublic synchronized void onRepositoryChange(String namespace, Properties newProperties) {// 如果屬性配置未發生變更,則直接退出if (newProperties.equals(m_configProperties.get())) {return;}// 獲取配置源類型,默認情況下 這里是 LocalFileConfigRepositoryConfigSourceType sourceType = m_configRepository.getSourceType();Properties newConfigProperties = propertiesFactory.getPropertiesInstance();newConfigProperties.putAll(newProperties);// 更新配置緩存,并計算實際發生變更的key, key為發生變更的配置key,value是發生變更的配置信息Map<String, ConfigChange> actualChanges = updateAndCalcConfigChanges(newConfigProperties,sourceType);//check double checked resultif (actualChanges.isEmpty()) {// 如果未發生屬性變更,則直接退出return;}// 發送 屬性變更給注冊的 ConfigChangeListenerthis.fireConfigChange(m_namespace, actualChanges);Tracer.logEvent("Apollo.Client.ConfigChanges", m_namespace);}
整體流程:
-
更新配置緩存,并計算實際發生變更的key,key為發生變更的配置key,value是發生變更的配置信息:
例如我們變更
test.hello配置以及新增一個test.hello3配置:
-
發送屬性變更通知,注意在這里就不像
Resporsitory層發送的是整個倉庫的變更事件,而發送的是某一個屬性變更的事件。Repository配置變更事件監聽是實現RepositoryChangeListener,屬性變更事件監聽是實現ConfigChangeListener
三. Apollo如何實現Spring Bean配置屬性的實時更新
在 SpringBoot 中使用 Apollo 客戶端一般都需要啟用 @EnableApolloConfig 注解:
@Retention(RetentionPolicy.RUNTIME)
@Target(ElementType.TYPE)
@Documented
@Import(ApolloConfigRegistrar.class)
public @interface EnableApolloConfig {/*** Apollo namespaces to inject configuration into Spring Property Sources.*/String[] value() default {ConfigConsts.NAMESPACE_APPLICATION};/*** The order of the apollo config, default is {@link Ordered#LOWEST_PRECEDENCE}, which is Integer.MAX_VALUE.* If there are properties with the same name in different apollo configs, the apollo config with smaller order wins.* @return*/int order() default Ordered.LOWEST_PRECEDENCE;
}
@EnableApolloConfig 通過 @Import 注解注入了 ApolloConfigRegistrar 類,該類是Apollo組件注入的入口:
public class ApolloConfigRegistrar implements ImportBeanDefinitionRegistrar, EnvironmentAware {private final ApolloConfigRegistrarHelper helper = ServiceBootstrap.loadPrimary(ApolloConfigRegistrarHelper.class);@Overridepublic void registerBeanDefinitions(AnnotationMetadata importingClassMetadata, BeanDefinitionRegistry registry) {helper.registerBeanDefinitions(importingClassMetadata, registry);}@Overridepublic void setEnvironment(Environment environment) {this.helper.setEnvironment(environment);}}
該類實現了兩個擴展點:
- EnvironmentAware:凡注冊到Spring容器內的bean,實現了EnvironmentAware接口重寫setEnvironment方法后,在工程啟動時可以獲得application.properties的配置文件配置的屬性值。
- ImportBeanDefinitionRegistrar:該擴展點作用是通過自定義的方式直接向容器中注冊bean。實現ImportBeanDefinitionRegistrar接口,在重寫的registerBeanDefinitions方法中定義的Bean,就和使用xml中定義Bean效果是一樣的。ImportBeanDefinitionRegistrar是Spring框架提供的一種機制,允許通過api代碼向容器批量注冊BeanDefinition。它實現了BeanFactoryPostProcessor接口,可以在所有bean定義加載到容器之后,bean實例化之前,對bean定義進行修改。使用ImportBeanDefinitionRegistrar,我們可以向容器中批量導入bean,而不需要在配置文件中逐個配置。
ApolloConfigRegistrar#setEnvironment 將 Environment 暫存下來;ApolloConfigRegistrar#registerBeanDefinitions 中調用 ApolloConfigRegistrarHelper.registerBeanDefinitions 注冊了一系列Spring擴展點實例至Ioc容器:
// com.ctrip.framework.apollo.spring.spi.DefaultApolloConfigRegistrarHelper#registerBeanDefinitions@Overridepublic void registerBeanDefinitions(AnnotationMetadata importingClassMetadata, BeanDefinitionRegistry registry) {AnnotationAttributes attributes = AnnotationAttributes.fromMap(importingClassMetadata.getAnnotationAttributes(EnableApolloConfig.class.getName()));final String[] namespaces = attributes.getStringArray("value");final int order = attributes.getNumber("order");final String[] resolvedNamespaces = this.resolveNamespaces(namespaces);PropertySourcesProcessor.addNamespaces(Lists.newArrayList(resolvedNamespaces), order);Map<String, Object> propertySourcesPlaceholderPropertyValues = new HashMap<>();// to make sure the default PropertySourcesPlaceholderConfigurer's priority is higher than PropertyPlaceholderConfigurerpropertySourcesPlaceholderPropertyValues.put("order", 0);// PropertySourcesPlaceholderConfigurer是 SpringBoot 框架自身的占位符處理配置,占位符的處理主要是將 ${apollo.value} 這樣的字符串解析出 關鍵字 apollo.value,再使用這個 key 通過 PropertySourcesPropertyResolver 從 PropertySource 中找到對應的屬性值替換掉占位符BeanRegistrationUtil.registerBeanDefinitionIfNotExists(registry, PropertySourcesPlaceholderConfigurer.class,propertySourcesPlaceholderPropertyValues);BeanRegistrationUtil.registerBeanDefinitionIfNotExists(registry, AutoUpdateConfigChangeListener.class);// 用于拉取 @EnableApolloConfig 配置的 namespace 的遠程配置BeanRegistrationUtil.registerBeanDefinitionIfNotExists(registry, PropertySourcesProcessor.class);// 用于處理 Apollo 的專用注解BeanRegistrationUtil.registerBeanDefinitionIfNotExists(registry, ApolloAnnotationProcessor.class);// 用于處理 @Value 注解標注的類成員變量和對象方法BeanRegistrationUtil.registerBeanDefinitionIfNotExists(registry, SpringValueProcessor.class);// 用于處理 XML 文件中的占位符BeanRegistrationUtil.registerBeanDefinitionIfNotExists(registry, SpringValueDefinitionProcessor.class);}
PropertySourcesProcessor 是 Apollo 最關鍵的組件之一,并且其實例化優先級也是最高的,PropertySourcesProcessor#postProcessBeanFactory() 會在該類實例化的時候被回調,該方法的處理如下:
// com.ctrip.framework.apollo.spring.config.PropertySourcesProcessor#postProcessBeanFactory@Overridepublic void postProcessBeanFactory(ConfigurableListableBeanFactory beanFactory) throws BeansException {this.configUtil = ApolloInjector.getInstance(ConfigUtil.class);// 調用 PropertySourcesProcessor#initializePropertySources() 拉取遠程 namespace 配置initializePropertySources();// 調用 PropertySourcesProcessor#initializeAutoUpdatePropertiesFeature() 給所有緩存在本地的 Config 配置添加監聽器initializeAutoUpdatePropertiesFeature(beanFactory);}
-
調用
PropertySourcesProcessor#initializePropertySources()拉取遠程 namespace 配置: -
調用
PropertySourcesProcessor#initializeAutoUpdatePropertiesFeature()給所有緩存在本地的 Config 配置添加監聽器// com.ctrip.framework.apollo.spring.config.PropertySourcesProcessor#initializeAutoUpdatePropertiesFeature private void initializeAutoUpdatePropertiesFeature(ConfigurableListableBeanFactory beanFactory) {if (!AUTO_UPDATE_INITIALIZED_BEAN_FACTORIES.add(beanFactory)) {return;}// 當收到配置變更回調后,會發送 ApolloConfigChangeEvent 事件ConfigChangeListener configChangeEventPublisher = changeEvent ->applicationEventPublisher.publishEvent(new ApolloConfigChangeEvent(changeEvent));List<ConfigPropertySource> configPropertySources = configPropertySourceFactory.getAllConfigPropertySources();for (ConfigPropertySource configPropertySource : configPropertySources) {// 將配置變更監聽器注冊進 DefaultConfig中configPropertySource.addChangeListener(configChangeEventPublisher);}}ConfigPropertySource#addChangeListener()方法如下,在上文中分析過ConfigPropertySource包裝類,我們知道這里的this.source.addChangeListener(listener)實際調用的是DefaultConfig#addChangeListener()方法。在上文中我們了解DefaultConfig收到來自LocalFileConfigRepository配置變更后,會計算出具體的屬性變更信息,并回調ConfigChangeListener#onChange方法,而在這里的定義中,onChange方法會發送一個ApolloConfigChangeEvent類型的Spring事件:ConfigChangeListener configChangeEventPublisher = changeEvent ->applicationEventPublisher.publishEvent(new ApolloConfigChangeEvent(changeEvent));
在 DefaultApolloConfigRegistrarHelper#registerBeanDefinitions 會注冊 AutoUpdateConfigChangeListener Bean進入Ioc容器,而該監聽器就是用于監聽 ApolloConfigChangeEvent 事件,當屬性發生變更調用 AutoUpdateConfigChangeListener#onChange 方法:
// com.ctrip.framework.apollo.spring.property.AutoUpdateConfigChangeListener#onChange@Overridepublic void onChange(ConfigChangeEvent changeEvent) {Set<String> keys = changeEvent.changedKeys();if (CollectionUtils.isEmpty(keys)) {return;}for (String key : keys) {// 1. check whether the changed key is relevantCollection<SpringValue> targetValues = springValueRegistry.get(beanFactory, key);if (targetValues == null || targetValues.isEmpty()) {continue;}// 2. update the valuefor (SpringValue val : targetValues) {updateSpringValue(val);}}}
onChange 方法會調用 updateSpringValue 更新對應Bean的屬性值:
// com.ctrip.framework.apollo.spring.property.AutoUpdateConfigChangeListener#updateSpringValueprivate void updateSpringValue(SpringValue springValue) {try {Object value = resolvePropertyValue(springValue);springValue.update(value);logger.info("Auto update apollo changed value successfully, new value: {}, {}", value,springValue);} catch (Throwable ex) {logger.error("Auto update apollo changed value failed, {}", springValue.toString(), ex);}}
- 首先調用
AutoUpdateConfigChangeListener#resolvePropertyValue()方法借助 SpringBoot 的組件將 @Value 中配置的占位符替換為 PropertySource 中的對應 key 的屬性值,此處涉及到 Spring 創建 Bean 對象時的屬性注入機制,比較復雜,暫不作深入分析。 - 調用
SpringValue#update()方法實際完成屬性值的更新。
SpringValue#update()方法其實就是使用反射機制運行時修改 Bean 對象中的成員變量,至此自動更新完成:
// com.ctrip.framework.apollo.spring.property.SpringValue#update public void update(Object newVal) throws IllegalAccessException, InvocationTargetException {if (isField()) {injectField(newVal);} else {injectMethod(newVal);}}private void injectField(Object newVal) throws IllegalAccessException {Object bean = beanRef.get();if (bean == null) {return;}boolean accessible = field.isAccessible();field.setAccessible(true);field.set(bean, newVal);field.setAccessible(accessible);}
四. 總結
Apollo 啟動時會在 ApolloApplicationContextInitializer 擴展點開始加載遠端配置,而Apollo客戶端獲取配置采用多層設計 DefaultConfig->LocalFileConfigRepository->RemoteConfigRepository,最終由 RemoteConfigRepository 完成遠端配置拉取
每一層的作用各不一樣:
RemoteConfigRepository負責拉取遠端配置并通知LocalFileConfigRepository更新配置。LocalFileConfigRepository負責將遠端配置緩存至本地文件,設計這一層主要是為了在Apollo Server 不可用時保證業務服務的可用性。當LocalFileConfigRepository配置發生變更時負責通知DefaultConfig更新配置。DefaultConfig負責緩存Apollo配置信息在內存中,當DefaultConfig配置發生變更時,會回調AutoUpdateConfigChangeListener#onChange方法更新Java Bean 中的屬性。
Apollo 客戶端為了能夠實時更新 Apollo Server 中的配置,使用下列手段來實現服務端配置變更的感知:
-
客戶端和服務端保持了一個長連接(通過Http Long Polling實現),從而能第一時間獲得配置更新的推送(
RemoteConfigRepository) -
客戶端還會定時從Apollo配置中心服務端拉取應用的最新配置。
-
這是一個fallback機制,為了防止推送機制失效導致配置不更新。客戶端定時拉取會上報本地版本,所以一般情況下,對于定時拉取的操作,服務端都會返回304 - Not Modified
-
定時頻率默認為每5分鐘拉取一次,客戶端也可以通過在運行時指定
System Property:apollo.refreshInterval來覆蓋,單位為分鐘
-
參考文章:
Apollo 客戶端集成 SpringBoot 的源碼分析(1)-啟動時配置獲取_spring 無法實例化apolloapplicationcontextinitializer的解決-CSDN博客
Apollo 客戶端集成 SpringBoot 的源碼分析(2)-配置屬性的注入更新-CSDN博客
Spring Boot 啟動生命周期分析,每個組件的執行時序,擴展點分析等【建議收藏】(持續更新,見到一個分析一個) - 掘金 (juejin.cn)
apollo client 自動更新深入解析 - 掘金 (juejin.cn)
Apollo核心源碼解析(二):Apollo Client輪詢配置(ConfigRepository與RemoteConfigLongPollService)、配置中心通用設計模型_apollo客戶端和服務端保持長連接的源碼-CSDN博客
SpringBoot快速入門-ImportBeanDefinitionRegistrar詳解 – 編程技術之美-IT之美 (itzhimei.com)


智能體理論與實戰(下):多智能體開發)


)
)

)


