一、概述
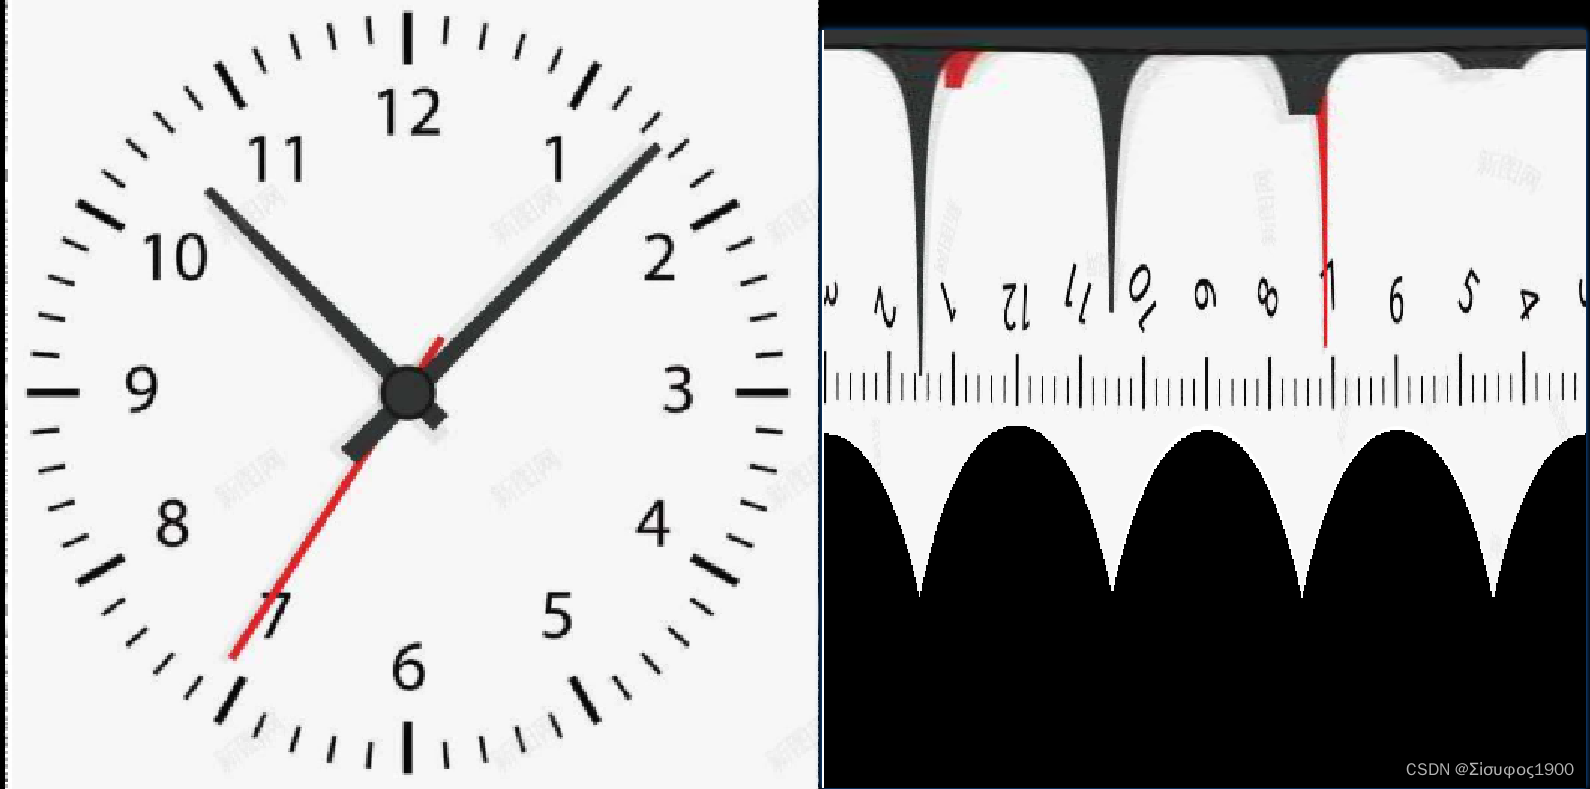
先看效果

將圓形的用極坐標轉換成矩性然后再進行識別或者其他缺陷檢測,最后在還圓到原圖中
二、原理:
halcon 圓環類缺陷檢測的一種方法(極坐標變換法)_halcon缺口檢測-CSDN博客
圖像極坐標變換與反變換(Halcon + OpenCV)_將 環形虹膜圖像的極坐標轉換成矩形圖像-CSDN博客
?極坐標轉換: 圓形圖像--》矩形圖像? ?
原理:
三、實踐
案例一
dev_open_window (0, 0, 512, 512, 'black', WindowHandle)
read_image (Beer, '/tem.png')
get_image_size (Beer, Width, Height)
draw_circle (WindowHandle, Row1, Column1, Radius)
gen_circle (Circle, Row1, Column1, Radius)
reduce_domain (Beer, Circle, ImageReduced)
PI:=3.1415926
*WidthPolar := (OuterRadius - 5)*2*3.14
W:=(Radius-150)*2*3.14
H:=300
*逆時針,從0度到360度,轉一圈
*                        原始圖像     極坐標之后的圖像   圖像中心坐標row col  起始角度 終止角度  開始半徑 結束半徑                   差值方式
polar_trans_image_ext (ImageReduced, PolarTransImage,  Row1,  Column1,      0,      2*PI,     0,     Radius*2,   W, H, 'bilinear')dev_display (ImageZoomed)
*長和寬必須是原圖像的長和寬,否則尺寸太小的話,圖像容易超出,導致一片黑,看不到轉換結果
*極坐標圖像轉笛卡爾坐標系圖像  恢復之前的圖像
polar_trans_image_inv (PolarTransImage, RestoreImage, Row1, Column1, 0, 2*PI, 0, Radius, Width, Height, 'bilinear')
write_image (RestoreImage, 'jpeg 100', 0, 'd:\\2.jpg')*點坐標的轉換
*Contour的原坐標是基于極坐標系,我們把它轉到笛卡爾坐標系
gen_contour_polygon_xld (Contour, [155.568, 137.404, 30], [47.4712, 116.479, 260])
polar_trans_contour_xld_inv (Contour, XYTransContour, Row1, Column1, 0, 2*PI, 0, Radius, Width, Height, Width, Height)
 ?
?
?案例二、
dev_update_off ()
get_system ('clip_region', Information)
set_system ('clip_region', 'true')
read_image (Image, 'barcode.png')
get_image_size (Image, Width, Height)
dev_close_window ()
dev_open_window (0, 0, Width / 2, Height / 2, 'black', WindowHandle)
dev_set_colored (12)
dev_display (Image)
stop ()
* 分割包含條形碼的CD上的環。
threshold (Image, Region, 0, 100)
closing_circle (Region, Region, 3.5)
connection (Region, ConnectedRegions)
*篩選出圓環
select_shape (ConnectedRegions, Ring, ['width','height'], 'and', [550,550], [750,750])
shape_trans (Ring, OuterCircle, 'outer_circle')
complement (Ring, RegionComplement)
connection (RegionComplement, ConnectedRegions)
select_shape (ConnectedRegions, InnerCircle, ['width','height'], 'and', [450,450], [650,650])
*提取并生成圓環區域外圓,內圓
* 確定包含條形碼的環的參數。
smallest_circle (Ring, Row, Column, OuterRadius)
smallest_circle (InnerCircle, InnerRow, InnerColumn, InnerRadius)
dev_set_color ('green')
dev_set_draw ('margin')
dev_set_line_width (3)
dev_display (Image)
dev_display (OuterCircle)
dev_display (InnerCircle)
stop ()
* 現在讀條形碼。這是通過計算包含條形碼的圖像中圓環的極坐標變換來實現的。
* WidthPolar := 1440
*內圓的周長
WidthPolar := (OuterRadius - 5)*2*3.14
HeightPolar := round(OuterRadius - InnerRadius - 10)
*極坐標變換(中心Row, Column,用圓環的圓心坐標。起始角度是0到360度。起始半徑分別是圓環內圓的半徑和外圓的半徑。
*寬高分別是圓環外圓的周長和外圓半徑減去內圓半徑的值)
polar_trans_image_ext (Image, PolarTransImage, Row, Column,0, rad(360), InnerRadius + 5, OuterRadius - 5, WidthPolar, HeightPolar, 'bilinear')
*逆向轉換回圓環圖像,以查看此函數效果
polar_trans_image_inv (PolarTransImage, XYTransImage, Row, Column, 0, rad(360), InnerRadius + 5, OuterRadius - 5, Width, Height, 'nearest_neighbor')
invert_image (PolarTransImage, ImageInvert)
* 由于條形碼區域相當平坦,因此圖像的高度增加了一倍。
zoom_image_factor (ImageInvert, ImageZoomed, 1, 2, 'weighted')
get_image_size (ImageZoomed, Width1, Height1)
dev_resize_window_fit_size (0, 0, Width1, Height1, -1, -1)
dev_display (ImageZoomed)
stop()
create_bar_code_model ([], [], BarCodeHandle)
* 條形比較小,對比度也低;因此,閾值從0.05提高到0.1。
set_bar_code_param (BarCodeHandle, 'element_size_min', 1.5)
set_bar_code_param (BarCodeHandle, 'meas_thresh', 0.3)
find_bar_code (ImageZoomed, SymbolRegions, BarCodeHandle, 'Code 128', DecodedDataStrings)
clear_bar_code_model (BarCodeHandle)
dev_set_window_extents (-1, -1, WidthPolar / 2, HeightPolar)
dev_display (ImageZoomed)
dev_display (SymbolRegions)
set_system ('clip_region', Information)
disp_message (WindowHandle, DecodedDataStrings, 'image', 10, 180, 'black', 'true')
stop ()* 主要是要顯示到原來的那個區域
* 將條碼區域轉換回原始圖像并顯示。
zoom_region (SymbolRegions, SymbolRegions, 1, 0.5)
polar_trans_region_inv (SymbolRegions, CodeRegionCircular, Row, Column, 0, rad(360), InnerRadius + 5, OuterRadius - 5, WidthPolar, HeightPolar, Width, Height, 'nearest_neighbor')
dev_set_window_extents (-1, -1, Width / 2, Height / 2)
dev_display (Image)
dev_display (CodeRegionCircular)
disp_message (WindowHandle, DecodedDataStrings, 'window', 12, 12, 'black', 'true')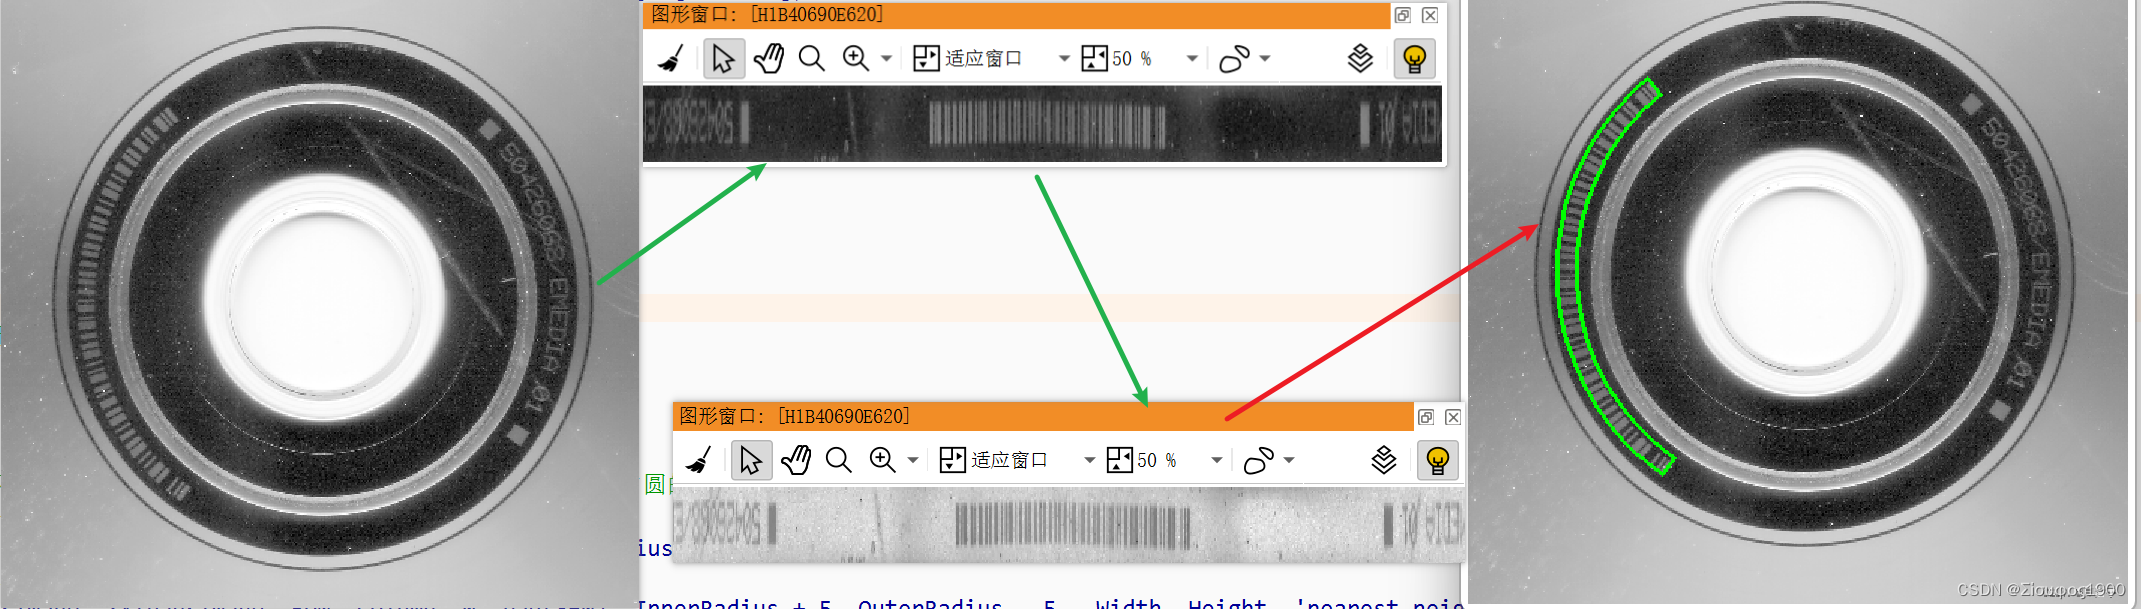 ?案例三
?案例三
*
* tuning parameters
SmoothX := 501
ThresholdOffset := 25
MinDefectSize := 50
*
* initialization
PolarResolution := 640
RingSize := 70
get_system ('store_empty_region', StoreEmptyRegion)
set_system ('store_empty_region', 'false')
read_image (Image, 'bottles/bottle_mouth_01')
dev_update_off ()
dev_close_window ()
dev_close_window ()
dev_open_window_fit_image (Image, 0, 0, 640, 512, WindowHandle1)
set_display_font (WindowHandle1, 16, 'mono', 'true', 'false')
dev_display (Image)
dev_set_draw ('margin')
dev_set_line_width (3)
dev_open_window_fit_size (0, 648, RingSize, PolarResolution, 150, 512, WindowHandle)
dev_set_draw ('margin')
dev_set_line_width (3)
dev_set_color ('red')
*
* Main loop
*
* Detect defects in bottle necks
for Index := 1 to 16 by 1read_image (Image, 'bottles/bottle_mouth_' + Index$'.02')* * Part 1: 使用blob 分析將外部圓找出來auto_threshold (Image, Regions, 2)select_obj (Regions, DarkRegion, 1)opening_circle (DarkRegion, RegionOpening, 3.5)closing_circle (RegionOpening, RegionClosing, 25.5)fill_up (RegionClosing, RegionFillUp)boundary (RegionFillUp, RegionBorder, 'outer')dilation_circle (RegionBorder, RegionDilation, 3.5)reduce_domain (Image, RegionDilation, ImageReduced)* * 使用邊緣亞像素來找輪廓  并擬合圓edges_sub_pix (ImageReduced, Edges, 'canny', 0.5, 20, 40)segment_contours_xld (Edges, ContoursSplit, 'lines_circles', 5, 4, 2)union_cocircular_contours_xld (ContoursSplit, UnionContours, 0.9, 0.5, 0.5, 200, 50, 50, 'true', 1)length_xld (UnionContours, Length)select_obj (UnionContours, LongestContour, sort_index(Length)[|Length| - 1] + 1)fit_circle_contour_xld (LongestContour, 'ahuber', -1, 0, 0, 3, 2, Row, Column, Radius, StartPhi, EndPhi, PointOrder)* * Part 2: 極坐標轉換gen_circle (Circle, Row, Column, Radius)dilation_circle (Circle, RegionDilation, 5)erosion_circle (Circle, RegionErosion, RingSize - 5)difference (RegionDilation, RegionErosion, RegionDifference)reduce_domain (Image, RegionDifference, ImageReduced)polar_trans_image_ext (ImageReduced, ImagePolar, Row, Column, 0, rad(360), Radius - RingSize, Radius, PolarResolution, RingSize, 'nearest_neighbor')* * Part 3:檢測是否有缺陷scale_image_max (ImagePolar, ImageScaleMax)mean_image (ImageScaleMax, ImageMean, SmoothX, 3)*原圖區域-均值后的區域  =有差異的區域dyn_threshold (ImageScaleMax, ImageMean, Regions1, 55, 'not_equal')connection (Regions1, Connection)select_shape (Connection, SelectedRegions, 'height', 'and', 9, 99999)* ignore noise regionsclosing_rectangle1 (SelectedRegions, RegionClosing1, 10, 20)union1 (RegionClosing1, RegionUnion)* re-transform defect regions for visualizationpolar_trans_region_inv (RegionUnion, XYTransRegion, Row, Column, 0, rad(360), Radius - RingSize, Radius, PolarResolution, RingSize, 1280, 1024, 'nearest_neighbor')* * Part 4: Display results* display original image with resultsdev_set_window (WindowHandle1)dev_display (Image)dev_set_color ('blue')dev_display (RegionDifference)dev_set_color ('red')dev_display (XYTransRegion)* display polar transformed inspected region with results* The image and resulting region are rotated by 90 degrees* only for visualization purposes! (I.e. to fit better on the screen)* The rotation is NOT necessary for the detection algorithm.dev_set_window (WindowHandle)*旋轉圖像rotate_image (ImagePolar, ImageRotate, 90, 'constant')dev_display (ImageRotate)count_obj (RegionUnion, Number)if (Number > 0)mirror_region (RegionUnion, RegionMirror, 'diagonal', PolarResolution)mirror_region (RegionMirror, RegionMirror, 'row', PolarResolution)dev_display (RegionMirror)disp_message (WindowHandle1, 'Not OK', 'window', 12, 12, 'red', 'false')elsedisp_message (WindowHandle1, 'OK', 'window', 12, 12, 'forest green', 'false')endifif (Index < 16)disp_continue_message (WindowHandle1, 'black', 'true')stop ()endif
endfor
* Reset system parameters
set_system ('store_empty_region', StoreEmptyRegion)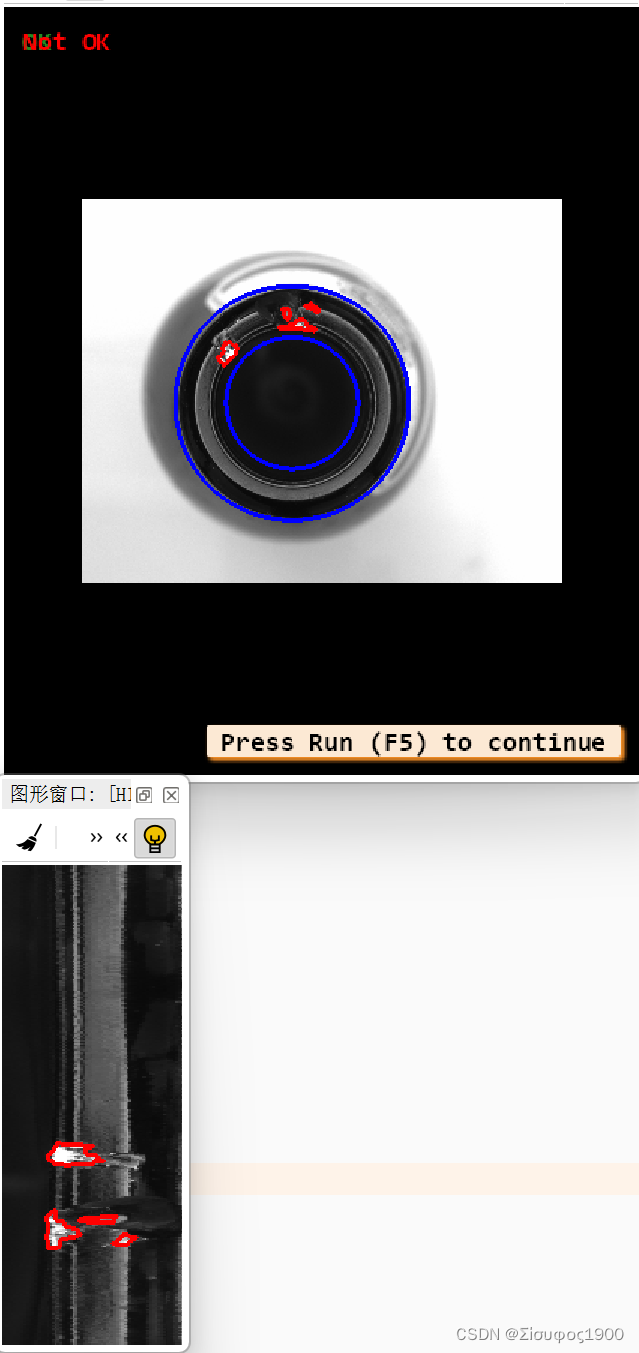
案例四
https://blog.csdn.net/cashmood/article/details/104709546
ead_image (Image, '1.png')
rgb3_to_gray (Image, Image, Image, ImageGray)
dev_open_window_fit_image (ImageGray, 0, 0, -1, -1, WindowHandle)
dev_set_draw ('margin')
dev_set_line_width (3)
dev_set_draw ('margin')
* dev_set_draw ('fill')
get_image_size (ImageGray, Width, Height)
binary_threshold (ImageGray, Region, 'max_separability', 'dark', UsedThreshold)
connection (Region, ConnectedRegions)
select_shape_std (ConnectedRegions, SelectedRegions, 'max_area', 70) * 計算最外測圓的直徑
smallest_circle (SelectedRegions, Row2, Column2, Radius)
gen_circle (Circle, Row2, Column2, Radius)
reduce_domain (ImageGray, Circle, ImageReduced2)
gray_closing_rect (ImageReduced2, ImageClosing1, 10, 4)
*極坐標轉換
polar_trans_image_ext (ImageClosing1, PolarTransImage1, Row2, Column2, 0, 6.28319, Radius-100, Radius-10, 6.28*Radius, 90, 'nearest_neighbor') mean_image (PolarTransImage1, ImageMean1, 500, 2)
dyn_threshold (PolarTransImage1, ImageMean1, RegionDynThresh1, 7, 'dark')
connection (RegionDynThresh1, ConnectedRegions1)
select_shape (ConnectedRegions1, SelectedRegions1, 'area', 'and',100, 9000000)
union1 (SelectedRegions1, RegionUnion)
closing_rectangle1 (RegionUnion, RegionClosing1, 10, 20)
connection (RegionClosing1, ConnectedRegions3) opening_rectangle1 (ConnectedRegions3, RegionOpening1, 10, 20) * 將區域還原到原圖上
polar_trans_region_inv (RegionOpening1, XYTransRegion1, Row2, Column2, 0, 6.28319, Radius-100, Radius-10, 6.28*Radius, 90, Width, Height, 'nearest_neighbor')
smallest_circle (XYTransRegion1, Row, Column, Radius1)
gen_circle (Circle1, Row, Column, Radius1)
dev_display (ImageGray)
dev_display (Circle1)
五、Opencv :
#include <iostream>
#include <opencv2/opencv.hpp>using namespace std;
using namespace cv;int main() {Mat img = imread("rainbow.png");if (!img.data) {cout << "請檢查圖像文件名稱是否正確" << endl;return -1;}Mat   img1, img2;Point center = Point(img.cols / 2, img.rows / 2); //極坐標在圖像中的原點//正極坐標變換->方變圓warpPolar(img, img1, Size(512, 512), center, center.x, WARP_POLAR_LINEAR);//逆極坐標變換->圓變方warpPolar(img1,img2,Size(img.rows,img.cols),center,center.x,WARP_INVERSE_MAP);imshow("Original", img);imshow("Anti Polar Result", img2);imshow("Polar Result", img1);waitKey(0);return 0;
}
圖像極坐標變換與反變換(Halcon + OpenCV)_將 環形虹膜圖像的極坐標轉換成矩形圖像-CSDN博客?
//
// Created by zzl on 2020/12/20.
//#include <iostream>
#include "opencv2/opencv.hpp"using namespace std;
using namespace cv;// 矩形圖像轉圓形
Mat Rectangle_to_Circle(const Mat &src, int Width);Mat Circle_to_Rectangle(const Mat &src);uchar getPixel(const Mat &src, double X, int X_up, int X_down, double Y, int Y_up, int Y_down);int main(int argc, char **argv) {// 讀入圖像Mat src, dst;src = imread("/home/zzl/Blog/CoordinateTrans/Data/testimage4.jpg", 0);namedWindow("InputImages", WINDOW_NORMAL);imshow("InputImages", src);dst = Rectangle_to_Circle(src, 2 * src.rows);namedWindow("OutputImages", WINDOW_NORMAL);imshow("OutputImages", dst);Mat dst2;dst2 = Circle_to_Rectangle(dst);namedWindow("OutputImages2", WINDOW_FREERATIO);imshow("OutputImages2", dst2);cout << "Hello World" << endl;waitKey();return 0;
}Mat Rectangle_to_Circle(const Mat &src, int Width) {int src_height = src.rows;int src_width = src.cols;Size dstSize = Size(2 * src_height, 2 * src_height);Mat dst = Mat::zeros(dstSize, CV_8UC1);// 極坐標變換double scale_r = 2 * src_height / (dstSize.width);double scale_theta = src_width / CV_2PI;Mat tmp = Mat::zeros(dst.size(), CV_64FC1);for (int i = 0; i < dstSize.height; ++i) {for (int j = 0; j < dstSize.width; ++j) {// 計算距離Point2d center(dstSize.width / 2, dstSize.width / 2);double distance = sqrt(pow(i - center.y, 2) + pow(j - center.x, 2));
//            tmp.at<double>(j, i) = distance;if (distance < dstSize.width / 2) {// 處于邊界內部的點,可以提取像素// 坐標變換求對應方圖上的點的坐標double Rec_Y = distance * scale_r; //Y 方向坐標if (Rec_Y < 0) {Rec_Y = 0;}if (Rec_Y > dstSize.width / 2) {Rec_Y = dstSize.width / 2;}double line_theta = atan2(i - center.y, j - center.x);if (line_theta < 0) {line_theta += CV_2PI;}if (line_theta < 0) {cout << "仍然小于0" << endl;}double Rec_X = line_theta * scale_theta;dst.at<uchar>(i, j) = src.at<uchar>((int) Rec_Y, (int) Rec_X);}}}// ---- 顯示圖像邊界距離
//    normalize(tmp, tmp, 0, 1, NORM_MINMAX);
//    Mat display;
//    tmp.convertTo(display, CV_8UC1, 255.0);
//
//    namedWindow("Distance", WINDOW_NORMAL);
//    imshow("Distance", display);
//    waitKey();
//    circle(display, Point2d(Width / 2, Width / 2), Width / 2, 0, 10, LINE_8);
//    imshow("Distance", display);
//    waitKey();return dst;
}Mat Circle_to_Rectangle(const Mat &src) {// 變換不同的圖像大小有不同的效果Mat dst = Mat::zeros(Size((int) (src.cols * CV_PI) + 1, src.cols / 2 + 1), CV_8UC1);
//    Mat dst = Mat::zeros(Size(src.cols / 2 + 1, src.cols / 2 + 1), CV_8UC1);double scale_r = src.cols / (dst.rows);double scale_theta = 2 * CV_PI / dst.cols;for (int i = 0; i < dst.cols; ++i) {double theta = i * scale_theta;double sinTheta = sin(theta);double cosTheta = cos(theta);for (int j = 0; j < dst.rows; ++j) {double p = j * scale_r;double X = (src.rows / 2 + cosTheta * p);double Y = (src.cols / 2 + sinTheta * p);int X_up = ceil(X);int X_down = floor(X);int Y_up = ceil(Y);int Y_down = floor(Y);if (X > src.cols) {X = src.cols;}if (X < 0) {X = 0;}if (Y > src.rows) {Y = src.rows;}if (Y < 0) {Y = 0;}// 若使用插值算法需要取消注釋
//            uchar tmp_Pixel = getPixel(src, X, X_up, X_down, Y, Y_up, Y_down);
//            dst.at<uchar>(j, i) = tmp_Pixel;dst.at<uchar>(j, i) = src.at<uchar>(Y, X); // 最近鄰算法}}return dst;
}uchar getPixel(const Mat &src, double X, int X_up, int X_down, double Y, int Y_up, int Y_down) {// 插值算法// X 為水平方向坐標 X_up、X_down分別為向上向下取整后的值 Y同理double inter_val = 0;if (X_up == X_down && Y_up == Y_down) {inter_val = saturate_cast<uchar>(src.at<uchar>(Y_up, X_up));} else if (X_up == X_down) {inter_val = saturate_cast<uchar>((Y_up - Y) * src.at<uchar>(Y_up, X_up) +(Y - Y_down) * src.at<uchar>(Y_down, X_up));} else if (Y_up == Y_down) {inter_val = saturate_cast<uchar>((X_up - X) * src.at<uchar>(Y_up, X_up) +(X - X_down) * src.at<uchar>(Y_up, X_down));} else {double Y_tmp = saturate_cast<uchar>((X_up - X) * src.at<uchar>(Y_down, X_up) +(X - X_down) * src.at<uchar>(Y_down, X_down));double X_tmp = saturate_cast<uchar>((X_up - X) * src.at<uchar>(Y_up, X_up) +(X - X_down) * src.at<uchar>(Y_up, X_down));inter_val = (Y_up - Y) * X_tmp + (Y - Y_down) * Y_tmp;}return (uchar) inter_val;
}
?
?
?
3.4-3.5)


)


超詳細教程)


