目錄
一、通過el-tree自定義渲染網頁版工作目錄
1.1、需求介紹
1.2、使用el-tree生成文檔目錄
1.2.1、官方基礎用法
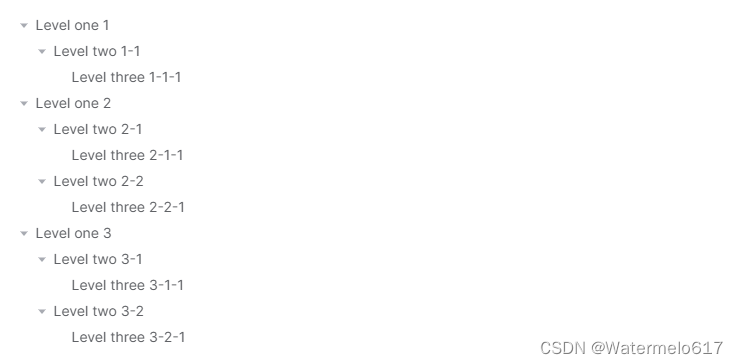
? ? ? ? ①效果
? ? ? ? ②代碼:
1.2.2、自定義文檔目錄(實現鼠標懸浮顯示完整名稱、用icon區分文件和文件夾)
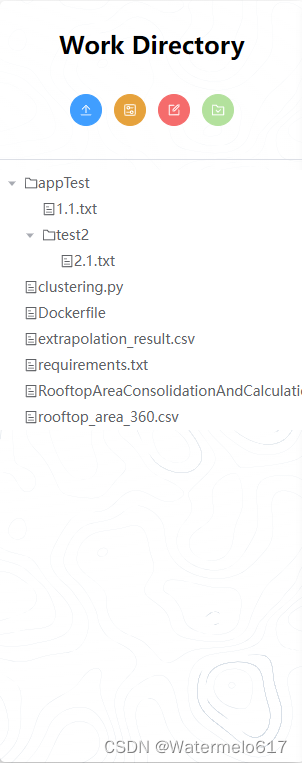
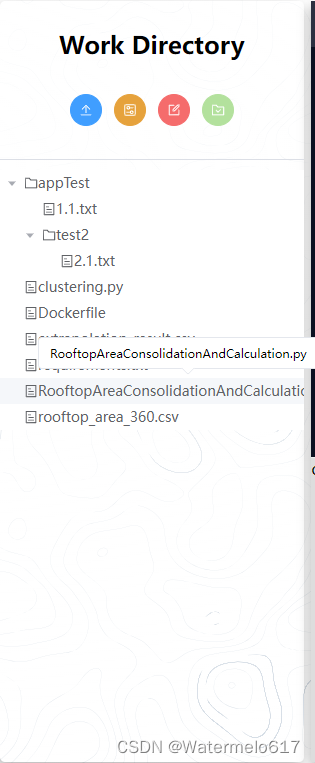
? ? ? ? ①效果(直接效果-左、鼠標懸浮顯示完整名稱的效果-右):
? ? ? ? ?②template代碼
? ? ? ? ③javascript代碼
二、總結
一、通過el-tree自定義渲染網頁版工作目錄
1.1、需求介紹
????????最近做項目時需要做一些云原生相關的內容,有個需求要在服務器上做臨時文件夾作為工作目錄,同時要將工作目錄映射到docker image中和前端頁面上。那么將服務器的本地工作目錄渲染到前端頁面上是必須要實現的部分,其中從后端API獲取本地目錄信息后,將數據渲染成自定義的前端工作目錄是篇博客將要談到的主要內容。
????????本篇博客不講docker、不講云原生,想要了解這方面知識的請關注我的其他博客,不了解這些知識的不影響閱讀本文。
????????本文會從前端渲染頁面開始,還有一篇博客去講如何設計后端API讀取本地目錄,獲取文件信息和文件系統層級數據。
????????傳送門:Java||Springboot讀取本地目錄的文件和文件結構,讀取服務器文檔目錄數據供前端渲染的API實現-CSDN博客
1.2、使用el-tree生成文檔目錄
1.2.1、官方基礎用法
? ? ? ? 官方文檔傳送門:Tree 樹形控件 | Element Plus
????????這里就簡單提一下,具體的可以在官方文檔里面看看,最基礎的直接導入就行。
? ? ? ? ①效果
? ? ? ? ②代碼:
<template><el-treestyle="max-width: 600px":data="data":props="defaultProps"@node-click="handleNodeClick"/>
</template><script lang="ts" setup>
interface Tree {label: stringchildren?: Tree[]
}const handleNodeClick = (data: Tree) => {console.log(data)
}const data: Tree[] = [{label: 'Level one 1',children: [{label: 'Level two 1-1',children: [{label: 'Level three 1-1-1',},],},],},{label: 'Level one 2',children: [{label: 'Level two 2-1',children: [{label: 'Level three 2-1-1',},],},{label: 'Level two 2-2',children: [{label: 'Level three 2-2-1',},],},],},{label: 'Level one 3',children: [{label: 'Level two 3-1',children: [{label: 'Level three 3-1-1',},],},{label: 'Level two 3-2',children: [{label: 'Level three 3-2-1',},],},],},
]const defaultProps = {children: 'children',label: 'label',
}
</script>
1.2.2、自定義文檔目錄(實現鼠標懸浮顯示完整名稱、用icon區分文件和文件夾)
? ? ? ? 官方提供的基礎版本側重于多種類型,但忽視每種類型的普適性,這其實就是讓我們自己設計滿足具體情況的文檔目錄樣式,官方只提供不同類型的用法。
? ? ? ? 自定義設計就是經典套路了,插槽該出場了。
? ? ? ? 數據請參考(其中有完整的數據結構和內容):Java||Springboot讀取本地目錄的文件和文件結構,讀取服務器文檔目錄數據供前端渲染的API實現-CSDN博客
? ? ? ? ①效果(直接效果-左、鼠標懸浮顯示完整名稱的效果-右):
? ? ? ? ?②template代碼
? ? ? ? 其中el-icon有個v-if判斷,確定是文件夾就添加文件夾的圖標,否則就是文件圖標,這里有具體的需求可以寫的更加豐富些。el-tooltip是用來懸浮鼠標的時候提供完整名稱的。
<el-tree:data="treeData":props="defaultProps"@node-click="handleNodeClick"><template #default="{ node, data }"><el-icon v-if="data.children && data.children.length > 0"><Folder/></el-icon><el-icon v-else><Tickets /></el-icon><el-tooltipclass="item"effect="light":content="data.label"placement="top-start"><span>{{ node.label }}</span></el-tooltip></template></el-tree>? ? ? ? ③javascript代碼
? ? ? ? 其中getDirectory是從后端獲取數據的API,后端數據請參考另一篇博客,treeData是提供的測試數據,如果還沒有后端數據可以先用這個數據做測試。
import {Upload,FolderChecked,SetUp,Edit,Box,ShoppingTrolley,
} from "@element-plus/icons-vue";
import { Ref, onMounted, ref } from "vue";/*** area-left* 左側工作目錄所需要包含的代碼*/// 樹形控件所需要的數據及對應設置
// 樹形控件所需要的數據及對應設置
// 樹形控件所需要的數據及對應設置
interface Tree {label: string;children?: Tree[];
}// const treeData: Tree[] = [
//   {
//     label: "Level one 1",
//     children: [
//       {
//         label: "Level two 1-1",
//         children: [
//           {
//             label: "Level three 1-1-1",
//           },
//         ],
//       },
//     ],
//   },
//   {
//     label: "Level one 2",
//     children: [
//       {
//         label: "Level two 2-1",
//         children: [
//           {
//             label: "Level three 2-1-1",
//           },
//         ],
//       },
//       {
//         label: "Level two 2-2",
//         children: [
//           {
//             label: "Level three 2-2-1",
//           },
//         ],
//       },
//     ],
//   },
//   {
//     label: "Level one 3",
//     children: [
//       {
//         label: "Level two 3-1",
//         children: [
//           {
//             label: "Level three 3-1-1",
//           },
//         ],
//       },
//       {
//         label: "Level two 3-2",
//         children: [
//           {
//             label: "Level three 3-2-1",
//           },
//         ],
//       },
//     ],
//   },
// ];const defaultProps = {children: "children",label: "label",
};const nodeSelected = ref();
// 點擊節點觸發的事件
const handleNodeClick = (data: Tree) => {nodeSelected.value = data;// console.log(nodeSelected.value);
};const treeData: Ref<Tree[]> = ref([] as Tree[]);// 從后端獲取和格式化工作目錄的方法
const getAndFormatDirectory = async () => {const response = await getDirectory();treeData.value = formatDirectory(response);
};// 格式化后端工作目錄的方法
const formatDirectory = (data: any, n = []) => {return data.map((item: any) => {// 這里n和newArr都是為了將文件的層級以及在哪些文件夾目錄下保留下來,方便讀取和編輯if (item.directory == true) {var newArr: any = [...n];// newArr[0] += 1;newArr.push(item.name);}return {label: item.name,children: item.children ? formatDirectory(item.children, newArr) : [],generation: n,};});
};// 加載頁面時,先讀取一次工作目錄
onMounted(async () => {getAndFormatDirectory();
});
? ? ? ? 至此,就完成了對el-tree顯示效果的自定義,這里我的需求比較輕量,寫的就比較簡潔,如果有更復雜詳細的需求也是用這樣的方法,只是多寫一些代碼而已。
二、總結
? ? ? ? el-tree用來做前端的文檔目錄還是挺好用的,尤其是自帶的node-click事件,真的給后續功能的實現提供了很多幫助,其他的事件方法也很全面,用起來還是很舒服的。
? ? ? ? 博客不應該只有代碼和解決方案,重點應該在于給出解決方案的同時分享思維模式,只有思維才能可持續地解決問題,只有思維才是真正值得學習和分享的核心要素。如果這篇博客能給您帶來一點幫助,麻煩您點個贊支持一下,還可以收藏起來以備不時之需,有疑問和錯誤歡迎在評論區指出~


)


