
一、spring 和 springboot
Spring框架提供了全面的基礎架構支持。包含依賴注入和開箱即用等模塊,如:Spring JDBC 、Spring MVC 、Spring Security、 Spring AOP 、Spring ORM 、Spring Test
Spring Boot 約定大于配置-----消除了設置Spring應用程序所需的XML配置
1.特點
1:創建獨立的spring應用。
2:嵌入Tomcat, Jetty Undertow 而且不需要部署他們。
3:提供的“starters” poms來簡化Maven配置
4:盡可能自動配置spring應用。
5:提供生產指標,健壯檢查和外部化配置
6:絕對沒有代碼生成和XML配置要求
2.區別
2.1 Spring 是引導配置
web.xml方法的步驟:
- Servlet容器(服務器)讀取web.xml
- web.xml中定義的DispatcherServlet由容器實例化
- DispatcherServlet通過讀取WEB-INF / {servletName} -servlet.xml來創建WebApplicationContext
- DispatcherServlet注冊在應用程序上下文中定義的bean
- 容器搜索實現ServletContainerInitializer的類并執行
- SpringServletContainerInitializer找到實現所有類WebApplicationInitializer
- WebApplicationInitializer創建具有XML或上下文@Configuration類
- WebApplicationInitializer創建DispatcherServlet的 與先前創建的上下文。
2.2 SpringBoot 有是如何配置
Spring Boot應用程序的入口點是使用@SpringBootApplication注釋的類:
- 默認情況下,Spring Boot使用嵌入式容器來運行應用程序。Spring Boot使用public static void main入口點來啟動嵌入式Web服務器。它還負責將Servlet,Filter和ServletContextInitializer bean從應用程序上下文綁定到嵌入式servlet容器。
- Spring Boot的另一個特性是它會自動掃描同一個包中的所有類或Main類的子包中的組件。
- Spring Boot提供了將其部署到外部容器的方式。在這種情況下,我們必須擴展SpringBootServletInitializer:
外部servlet容器查找在war包下的META-INF文件夾下MANIFEST.MF文件中定義的Main-class,SpringBootServletInitializer將負責綁定Servlet,Filter和ServletContextInitializer。
2.3 打包部署
兩個框架都支持Maven和Gradle等通用包管理技術。在部署方面,框架差異很大。例如,Spring Boot Maven插件在Maven中提供Spring Boot支持。它還允許打包可執行jar或war包并就地運行應用程序。
在部署環境中Spring Boot 對比Spring的一些優點包括:
- 提供嵌入式容器支持
- 使用命令java -jar獨立運行jar
- 在外部容器中部署時,可以選擇排除依賴關系以避免潛在的jar沖突
- 部署時靈活指定配置文件的選項
- 用于集成測試的隨機端口生成
3.springboot核心功能
- 可獨立運行的Spring項目:Spring Boot可以以jar包的形式獨立運行。
- 內嵌的Servlet容器:Spring Boot可以選擇內嵌Tomcat、Jetty或者Undertow,無須以war包形式部署項目。
- 簡化的Maven配置:Spring提供推薦的基礎 POM 文件來簡化Maven 配置。
- 自動配置Spring:Spring Boot會根據項目依賴來自動配置Spring 框架,極大地減少項目要使用的配置。
- 提供生產就緒型功能:提供可以直接在生產環境中使用的功能,如性能指標、應用信息和應用健康檢查。
- 無代碼生成和xml配置:Spring Boot不生成代碼。完全不需要任何xml配置即可實現Spring的所有配置。
二、IOC控制反轉
1.控制反轉
ioc控制反轉:對象的創建和銷毀就都交給容器來控制,用戶只關注業務需求就好;
反轉:正轉其實就是對象去找實例,而反轉通過容器 讓實例來找對象
依賴:將對象理解為Bean,bean和容器之間有個依賴關系,bean對象的創建是依賴容器的
注入:通過容器注入了bean對象,容器會自動找到和bean對象匹配的類型實例注入到對象中;
2.ioc加載過程:

二、Springboot啟動流程


四、容器refresh()
- Spring容器在啟動的時候,先會保存所有注冊進來的Bean的定義信息;
- xml注冊bean;
- 注解注冊Bean;@Service、@Component、@Bean、xxx
- Spring容器會合適的時機創建這些Bean
- 用到這個bean的時候;利用getBean創建bean;創建好以后保存在容器中;
- 統一創建剩下所有的bean的時候;finishBeanFactoryInitialization();
- 后置處理器;BeanPostProcessor
- 每一個bean創建完成,都會使用各種后置處理器進行處理;來增強bean的功能;
AutowiredAnnotationBeanPostProcessor:處理自動注入
AnnotationAwareAspectJAutoProxyCreator:來做AOP功能;
xxx…
增強的功能注解:
AsyncAnnotationBeanPostProcessor
- 每一個bean創建完成,都會使用各種后置處理器進行處理;來增強bean的功能;
- 事件驅動模型;
- ApplicationListener;事件監聽;ApplicationEventMulticaster;事件派發:

1、 prepareRefresh:準備刷新上下文環境
protected void prepareRefresh() {// 容器啟動的時間this.startupDate = System.currentTimeMillis();//容器關閉this.closed.set(false);//容器激活this.active.set(true);if (logger.isDebugEnabled()) {if (logger.isTraceEnabled()) {logger.trace("Refreshing " + this);}else {logger.debug("Refreshing " + getDisplayName());}}// Initialize any placeholder property sources in the context environment.//空方法,留給子類自己去實現,initPropertySources();// Validate that all properties marked as required are resolvable:// see ConfigurablePropertyResolver#setRequiredProperties//獲取系統環境對象,在進入refresh方法之前獲取的 StandardEnvironment 實例對象(包含了全部的系統變量和系統屬性),這里的環境對象不為空,直接將對象值返回。對屬性驗證getEnvironment().validateRequiredProperties();// Store pre-refresh ApplicationListeners...//創建事件監聽對象if (this.earlyApplicationListeners == null) {this.earlyApplicationListeners = new LinkedHashSet<>(this.applicationListeners);}else {// Reset local application listeners to pre-refresh state.this.applicationListeners.clear();this.applicationListeners.addAll(this.earlyApplicationListeners);}// Allow for the collection of early ApplicationEvents,// to be published once the multicaster is available...this.earlyApplicationEvents = new LinkedHashSet<>();}
擴展initPropertySources

2、 obtainFreshBeanFactory:獲取告訴子類初始化Bean工廠,不同工廠有不同的實現
- 創建beanFactory
- 加載并解析了bean.xml為BeanDefinition保存到beanFactory
3、prepareBeanFactory(beanFactory):對bean工廠進行填充屬性
- 屬性填充(設置類型加載器、EL表達式解析器,、默認的propertyEditor屬性編輯器的注冊器,、忽略自動裝配的接口,、監聽器)
- 系統環境變量(Environment)相關的bean到一級緩存中

4、postProcessBeanFactory(beanFactory):BeanFactory準備工作完成后進行的后置處理工作
留個子類去實現該接口,bean工廠的后置處理器,子類通過重寫這個方法來在BeanFactory創建并預準備完成以后做進一步的設置
====== BeanFactory的創建及預準備工作 完成 ===================
5、invokeBeanFactoryPostProcessors(beanFactory):調用bean工廠的后置處理器.
執行BeanFactoryPostProcessor的方法;BeanFactory的后置處理器。在BeanFactory標準初始化之后執行的;
兩個接口:BeanFactoryPostProcessor、BeanDefinitionRegistryPostProcessor。通過指定順序, 遍歷調用各種實現了BeanDefinitionRegistryPostProcessor接口或BeanFactoryPostProcessor接口, 的beanFactory后處理器
- 執行BeanFactoryPostProcessor的方法;
- 先執行BeanDefinitionRegistryPostProcessor
- 獲取所有的BeanDefinitionRegistryPostProcessor;
- 看先執行實現了PriorityOrdered優先級接口的BeanDefinitionRegistryPostProcessor、postProcessor.postProcessBeanDefinitionRegistry(registry)(定位、加載、解析、注冊相關注解)
- 在執行實現了Ordered順序接口的BeanDefinitionRegistryPostProcessor、postProcessor.postProcessBeanDefinitionRegistry(registry)
- 最后執行沒有實現任何優先級或者是順序接口的BeanDefinitionRegistryPostProcessors;
- 再執行BeanFactoryPostProcessor的方法 :postProcessor.postProcessBeanDefinitionRegistry(registry)
- 獲取所有的BeanFactoryPostProcessor
- 看先執行實現了PriorityOrdered優先級接口的BeanFactoryPostProcessor、postProcessor.postProcessBeanFactory()
- 在執行實現了Ordered順序接口的BeanFactoryPostProcessor、 postProcessor.postProcessBeanFactory()
- 最后執行沒有實現任何優先級或者是順序接口的BeanFactoryPostProcessor、postProcessor.postProcessBeanFactory()(對加了@Configuration的配置類進行CGLIB增強處理(代理配置類),添加ImportAwareBeanPostProcessor后置處理類)
- 先執行BeanDefinitionRegistryPostProcessor
6、registerBeanPostProcessors(beanFactory);注冊bean的后置處理器
注冊BeanPostProcessor(Bean的后置處理器)【 intercept bean creation】
不同接口類型的BeanPostProcessor;在Bean創建前后的執行時機是不一樣的
【BeanPostProcessor、DestructionAwareBeanPostProcessor、 InstantiationAwareBeanPostProcessor、 SmartInstantiationAwareBeanPostProcessor
MergedBeanDefinitionPostProcessor【internalPostProcessors】】
- 獲取所有的 BeanPostProcessor;后置處理器都默認可以通過PriorityOrdered、Ordered接口來執行優先級
- 先注冊PriorityOrdered優先級接口的BeanPostProcessor; 把每一個BeanPostProcessor;添加到BeanFactory中
beanFactory.addBeanPostProcessor(postProcessor); - 再注冊Ordered接口的
- 最后注冊沒有實現任何優先級接口的
- 最終注冊MergedBeanDefinitionPostProcessor;
- 注冊一個ApplicationListenerDetector;來在Bean創建完成后檢查是否是ApplicationListener,如果是
applicationContext.addApplicationListener((ApplicationListener<?>) bean);
7、initMessageSource();初始化國際化資源處理器.
初始化MessageSource組件(做國際化功能;消息綁定,消息解析);
- 獲取BeanFactory
- 看容器中是否有id為messageSource的,類型是MessageSource的組件,如果有賦值給messageSource,如果沒有自己創建一個DelegatingMessageSource MessageSource:取出國際化配置文件中的某個key的值;能按照區域信息獲取;
- 把創建好的MessageSource注冊在容器中,以后獲取國際化配置文件的值的時候,可以自動注入MessageSource;
beanFactory.registerSingleton(MESSAGE_SOURCE_BEAN_NAME, this.messageSource);
MessageSource.getMessage(String code, Object[] args, String defaultMessage, Locale locale);
8、initApplicationEventMulticaster();初始化事件派發器;
- 獲取BeanFactory
- 從BeanFactory中獲取applicationEventMulticaster的ApplicationEventMulticaster;
- 如果上一步沒有配置;創建一個SimpleApplicationEventMulticaster
- 將創建的ApplicationEventMulticaster添加到BeanFactory中,以后其他組件直接自動注入
9、onRefresh();
留給子容器(子類):子類重寫這個方法,在容器刷新的時候可以自定義邏輯;
10、registerListeners();容器中將所有項目里面的ApplicationListener注冊進來;
- 從容器中拿到所有的ApplicationListener
- 將每個監聽器添加到事件派發器中; getApplicationEventMulticaster().addApplicationListenerBean(listenerBeanName);
- 派發之前步驟產生的事件;
11、finishBeanFactoryInitialization(beanFactory);
初始化所有剩下的單實例bean;
beanFactory.preInstantiateSingletons();初始化后剩下的單實例bean
- 獲取容器中的所有Bean,依次進行初始化和創建對象
- 獲取Bean的定義信息;RootBeanDefinition
- Bean不是抽象的,是單實例的,是懶加載;
- 判斷是否是FactoryBean;是否是實現FactoryBean接口的Bean;
- 不是工廠Bean。利用getBean(beanName);創建對象
- getBean(beanName); ioc.getBean();
- doGetBean(name, null, null, false);
- 先獲取緩存中保存的單實例Bean。如果能獲取到說明這個Bean之前被創建過(所有創建過的單實例Bean都會被緩存起來)
從private final Map<String, Object> singletonObjects = new ConcurrentHashMap<String, Object>(256);獲取的 - 緩存中獲取不到,開始Bean的創建對象流程;
- 標記當前bean已經被創建
- 獲取Bean的定義信息;
- 【獲取當前Bean依賴的其他Bean;如果有按照getBean()把依賴的Bean先創建出來;】
============== - 啟動單實例Bean的創建流程;
- createBean(beanName, mbd, args);
- Object bean = resolveBeforeInstantiation(beanName, mbdToUse);讓BeanPostProcessor先攔截返回代理對象;
【InstantiationAwareBeanPostProcessor】:提前執行;先觸發:postProcessBeforeInstantiation(); 如果有返回值:觸發postProcessAfterInitialization(); - 如果前面的InstantiationAwareBeanPostProcessor沒有返回代理對象;調用4)
- Object beanInstance = doCreateBean(beanName, mbdToUse, args);創建Bean
- 【創建Bean實例】;createBeanInstance(beanName, mbd, args);利用工廠方法或者對象的構造器創建出Bean實例
- applyMergedBeanDefinitionPostProcessors(mbd, beanType, beanName);調用MergedBeanDefinitionPostProcessor的postProcessMergedBeanDefinition(mbd, beanType, beanName);
- 【Bean屬性賦值】populateBean(beanName, mbd, instanceWrapper);
- ===========
- 賦值之前:
- 拿到InstantiationAwareBeanPostProcessor后置處理器;postProcessAfterInstantiation();
- 拿到InstantiationAwareBeanPostProcessor后置處理器;postProcessPropertyValues();
- ===賦值之前:=
- 應用Bean屬性的值;為屬性利用setter方法等進行賦值; applyPropertyValues(beanName, mbd, bw, pvs);
- 【Bean初始化】initializeBean(beanName, exposedObject, mbd);
- 【執行Aware接口方法】invokeAwareMethods(beanName, bean);執行xxxAware接口的方法
BeanNameAware\BeanClassLoaderAware\BeanFactoryAware - 【執行后置處理器初始化之前】applyBeanPostProcessorsBeforeInitialization(wrappedBean, beanName);
BeanPostProcessor.postProcessBeforeInitialization(); - 【執行初始化方法】invokeInitMethods(beanName, wrappedBean, mbd);
- 是否是InitializingBean接口的實現;執行接口規定的初始化;
- 是否自定義初始化方法;
- 【執行后置處理器初始化之后】applyBeanPostProcessorsAfterInitialization
BeanPostProcessor.postProcessAfterInitialization(); - 注冊Bean的銷毀方法;
- 將創建的Bean添加到緩存中singletonObjects;
ioc容器就是這些Map;很多的Map里面保存了單實例Bean,環境信息;
所有Bean都利用getBean創建完成以后;
檢查所有的Bean是否是SmartInitializingSingleton接口的;如果是;就執行afterSingletonsInstantiated();
- 【執行Aware接口方法】invokeAwareMethods(beanName, bean);執行xxxAware接口的方法
- Object bean = resolveBeforeInstantiation(beanName, mbdToUse);讓BeanPostProcessor先攔截返回代理對象;
- createBean(beanName, mbd, args);
- getBean(beanName); ioc.getBean();
12、finishRefresh();完成BeanFactory的初始化創建工作;IOC容器就創建完成;
- initLifecycleProcessor();初始化和生命周期有關的后置處理器;LifecycleProcessor 默認從容器中找是否有lifecycleProcessor的組件【LifecycleProcessor】;如果沒有new DefaultLifecycleProcessor(); 加入到容器;寫一個LifecycleProcessor的實現類,可以在BeanFactory
void onRefresh(); void onClose(); - getLifecycleProcessor().onRefresh(); 拿到前面定義的生命周期處理器(BeanFactory);回調onRefresh();
- publishEvent(new ContextRefreshedEvent(this));發布容器刷新完成事件;
- liveBeansView.registerApplicationContext(this);
五、bean生命周期
1.BeanDefinitionReader
-
讀取配置信息。通過BeanDefinitionReader 讀取指定的配置文件生成bean的定義信息,然后到完整的bean定義信息(BeanDefinition對象),
-
BeanDefinitionReder可分為以下幾種:AnnotededBeanDefinitionReader、ConfigurationClassBeanDefinitionReader、ClassPathBeanDefinitionScanner
-
這里只是存儲bean的定義信息,還沒有實例化bean對象;
-
到invokeBeanFactoryPostProcessors之前已經獲取到
<bean id="student" class="com.dd.controller.beanextend.Student"><property name="name" value="AAA"/><property name="age" value="1"/></bean><bean id="myBeanFactoryPostProcessor" class="com.dd.controller.beanextend.MyBeanFactoryPostProcessor"/>
package com.dd.controller.beanextend;import lombok.AllArgsConstructor;
import lombok.Builder;
import lombok.Data;
import lombok.NoArgsConstructor;@NoArgsConstructor
@AllArgsConstructor
@Builder
@Data
public class Student {private String name;private int age;
}
package com.dd.controller.beanextend;import org.springframework.beans.BeansException;
import org.springframework.beans.MutablePropertyValues;
import org.springframework.beans.factory.config.BeanDefinition;
import org.springframework.beans.factory.config.BeanFactoryPostProcessor;
import org.springframework.beans.factory.config.ConfigurableListableBeanFactory;
import org.springframework.core.Ordered;
import org.springframework.stereotype.Component;import java.util.Objects;/*** 自定義BeanFactoryPostProcessor* BeanFactoryPostProcessor在容器實例化任何bean之前讀取bean的定義并可以修改他* 可以通過實現Ordered接口指定order屬性的值,從而設置BeanFactoryPostProcessor的執行順序,order值越小,優先級越高*/
@Component
public class MyBeanFactoryPostProcessor implements BeanFactoryPostProcessor, Ordered {@Overridepublic void postProcessBeanFactory(ConfigurableListableBeanFactory beanFactory) throws BeansException {System.out.println("執行MyBeanFactoryPostProcessor01的postProcessBeanFactory方法");//獲取工廠當前所有注冊的beanNamesString[] beanDefinitionNames = beanFactory.getBeanDefinitionNames();for (String beanDefinitionName : beanDefinitionNames) {if(Objects.equals("student", beanDefinitionName)) {//獲取對應的屬性值BeanDefinition beanDefinition = beanFactory.getBeanDefinition(beanDefinitionName);MutablePropertyValues propertyValues = beanDefinition.getPropertyValues();//更新屬性值if(propertyValues.contains("name")) {System.out.println("修改name屬性值,舊值:" + propertyValues.get("name"));propertyValues.add("name", "BBB");}}}}@Overridepublic int getOrder() {return 0;}
}package com.dd.controller.beanextend;import org.springframework.context.support.ClassPathXmlApplicationContext;public class Test {@org.junit.Testpublic void test() {ClassPathXmlApplicationContext applicationContext = new ClassPathXmlApplicationContext("classpath:spring-config.xml");System.out.println(applicationContext.getBean("student"));}
}運行結果


2 進入invokeBeanFactoryPostProcessors 方法
獲取 S p r i n g 配置文件中定義的所有實現 B e a n F a c t o r y P o s t P r o c e s s o r 接口的 b e a n ,然后根據優先級進行排序 \textcolor{yellow}{獲取Spring配置文件中定義的所有實現BeanFactoryPostProcessor接口的bean,然后根據優先級進行排序} 獲取Spring配置文件中定義的所有實現BeanFactoryPostProcessor接口的bean,然后根據優先級進行排序
- 首先對BeanFactoryPostProcessor的子類BeanDefinitionRegistryPostProcessor進行處理,從容器找出所有實現BeanDefinitionRegistryPostProcessor接口的Bean,然后按照優先級進行排序后,依次回調BeanDefinitionRegistryPostProcessor的postProcessBeanDefinitionRegistry()方法;
- 接著處理普通的BeanFactoryPostProcessor接口,同樣的,從容器找出所有實現BeanFactoryPostProcessor接口的Bean,使用三個不同的集合,分別存放實現了PriorityOrdered接口、實現了Ordered接口、普通的BeanFactoryPostProcessor。接著按照優先級排序后,會執行postProcessBeanFactory()回調;
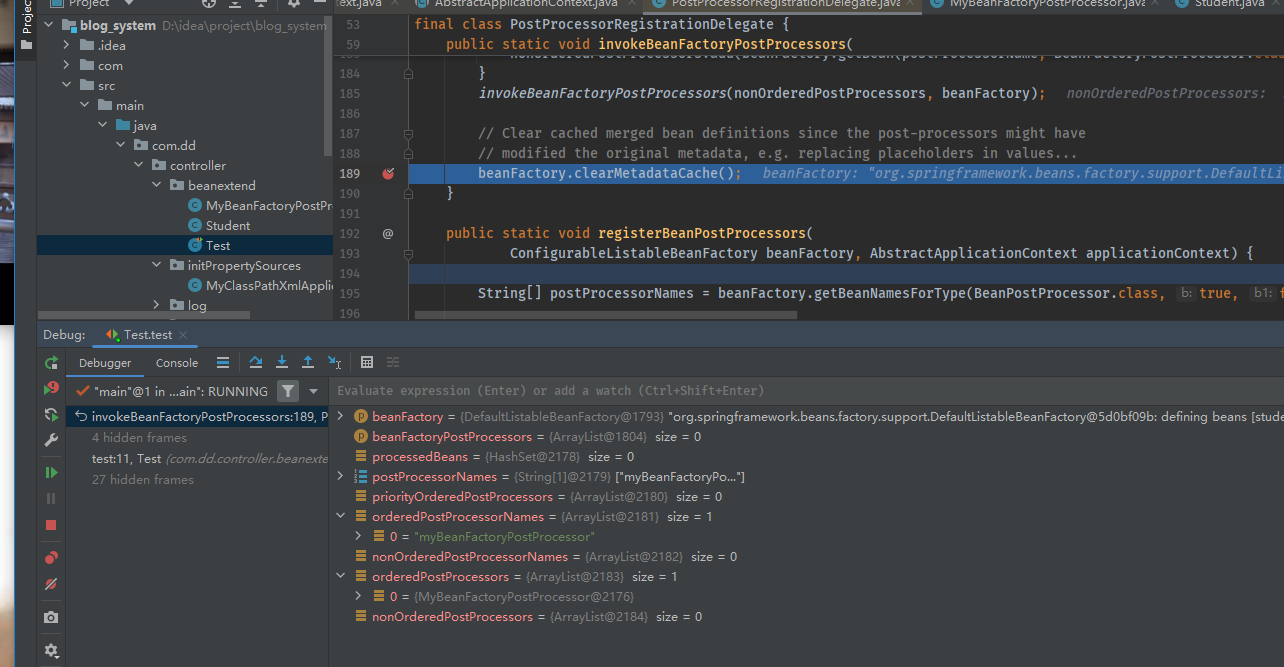
// org.springframework.context.support.PostProcessorRegistrationDelegate#invokeBeanFactoryPostProcessors(org.springframework.beans.factory.config.ConfigurableListableBeanFactory, java.util.List<org.springframework.beans.factory.config.BeanFactoryPostProcessor>)
public static void invokeBeanFactoryPostProcessors(ConfigurableListableBeanFactory beanFactory, List<BeanFactoryPostProcessor> beanFactoryPostProcessors) {// Invoke BeanDefinitionRegistryPostProcessors first, if any.// 記錄已經處理過的BeanFactoryPostProcessor集合,無需重復執行Set<String> processedBeans = new HashSet<>();// 對BeanDefinitionRegistry類型的處理if (beanFactory instanceof BeanDefinitionRegistry) {BeanDefinitionRegistry registry = (BeanDefinitionRegistry) beanFactory;// 存放普通的BeanFactoryPostProcessorList<BeanFactoryPostProcessor> regularPostProcessors = new ArrayList<>();// 存放BeanDefinitionRegistryPostProcessor,BeanDefinitionRegistryPostProcessor繼承了BeanFactoryPostProcessorList<BeanDefinitionRegistryPostProcessor> registryProcessors = new ArrayList<>();// 循環遍歷硬編碼方式注冊的BeanFactoryPostProcessor后置處理器for (BeanFactoryPostProcessor postProcessor : beanFactoryPostProcessors) {// 區分普通的BeanFactoryPostProcessor和BeanDefinitionRegistryPostProcessor,分別放入不同的集合中if (postProcessor instanceof BeanDefinitionRegistryPostProcessor) {BeanDefinitionRegistryPostProcessor registryProcessor =(BeanDefinitionRegistryPostProcessor) postProcessor;// 如果是BeanDefinitionRegistryPostProcessor的話,直接執行BeanDefinitionRegistryPostProcessor接口的postProcessBeanDefinitionRegistry方法registryProcessor.postProcessBeanDefinitionRegistry(registry);// BeanDefinitionRegistryPostProcessorregistryProcessors.add(registryProcessor);}else {// 普通BeanFactoryPostProcessorregularPostProcessors.add(postProcessor);}}// Do not initialize FactoryBeans here: We need to leave all regular beans// uninitialized to let the bean factory post-processors apply to them!// Separate between BeanDefinitionRegistryPostProcessors that implement// PriorityOrdered, Ordered, and the rest.// 記錄本次要執行的BeanDefinitionRegistryPostProcessorList<BeanDefinitionRegistryPostProcessor> currentRegistryProcessors = new ArrayList<>();// 配置注冊的后置處理器// 1、調用所有實現PriorityOrdered接口的BeanDefinitionRegistryPostProcessor實現類// 找出所有實現BeanDefinitionRegistryPostProcessor接口的BeanString[] postProcessorNames =beanFactory.getBeanNamesForType(BeanDefinitionRegistryPostProcessor.class, true, false);// 循環遍歷,判斷是否實現PriorityOrdered接口for (String ppName : postProcessorNames) {if (beanFactory.isTypeMatch(ppName, PriorityOrdered.class)) {currentRegistryProcessors.add(beanFactory.getBean(ppName, BeanDefinitionRegistryPostProcessor.class));// 添加到將要執行的集合中,避免重復執行processedBeans.add(ppName);}}// 按照優先級進行排序sortPostProcessors(currentRegistryProcessors, beanFactory);registryProcessors.addAll(currentRegistryProcessors);// 調用BeanDefinitionRegistryPostProcessor的postProcessBeanDefinitionRegistry()方法invokeBeanDefinitionRegistryPostProcessors(currentRegistryProcessors, registry);currentRegistryProcessors.clear();// 2、調用所有實現了Ordered接口的BeanDefinitionRegistryPostProcessor實現類// 找出所有實現BeanDefinitionRegistryPostProcessor接口的類postProcessorNames = beanFactory.getBeanNamesForType(BeanDefinitionRegistryPostProcessor.class, true, false);// 循環遍歷,判斷是否實現Ordered接口for (String ppName : postProcessorNames) {// 未執行過 && 實現Ordered接口if (!processedBeans.contains(ppName) && beanFactory.isTypeMatch(ppName, Ordered.class)) {currentRegistryProcessors.add(beanFactory.getBean(ppName, BeanDefinitionRegistryPostProcessor.class));// 添加到將要執行的集合中,避免重復執行processedBeans.add(ppName);}}// 按照order排序sortPostProcessors(currentRegistryProcessors, beanFactory);registryProcessors.addAll(currentRegistryProcessors);// 調用BeanDefinitionRegistryPostProcessor的postProcessBeanDefinitionRegistry()方法invokeBeanDefinitionRegistryPostProcessors(currentRegistryProcessors, registry);currentRegistryProcessors.clear();// 3、調用所有剩下的BeanDefinitionRegistryPostProcessorsboolean reiterate = true;while (reiterate) {reiterate = false;postProcessorNames = beanFactory.getBeanNamesForType(BeanDefinitionRegistryPostProcessor.class, true, false);for (String ppName : postProcessorNames) {// 未執行過的if (!processedBeans.contains(ppName)) {currentRegistryProcessors.add(beanFactory.getBean(ppName, BeanDefinitionRegistryPostProcessor.class));processedBeans.add(ppName);reiterate = true;}}// 排序sortPostProcessors(currentRegistryProcessors, beanFactory);registryProcessors.addAll(currentRegistryProcessors);// 調用BeanDefinitionRegistryPostProcessor的postProcessBeanDefinitionRegistry()方法invokeBeanDefinitionRegistryPostProcessors(currentRegistryProcessors, registry);currentRegistryProcessors.clear();}// 回調所有BeanDefinitionRegistryPostProcessor的postProcessBeanFactory方法invokeBeanFactoryPostProcessors(registryProcessors, beanFactory);// 回調普通BeanFactoryPostProcessor的postProcessBeanFactory方法invokeBeanFactoryPostProcessors(regularPostProcessors, beanFactory);}else {// 調用在上下文實例中注冊的工廠處理器invokeBeanFactoryPostProcessors(beanFactoryPostProcessors, beanFactory);}// Do not initialize FactoryBeans here: We need to leave all regular beans// uninitialized to let the bean factory post-processors apply to them!// 從bean工廠中獲取到BeanFactoryPostProcessor//!!!!!!!!!!!!!!!!!!!!!!  huoString[] postProcessorNames =beanFactory.getBeanNamesForType(BeanFactoryPostProcessor.class, true, false);// Separate between BeanFactoryPostProcessors that implement PriorityOrdered,// Ordered, and the rest.// 存放實現了PriorityOrdered接口的BeanFactoryPostProcessorList<BeanFactoryPostProcessor> priorityOrderedPostProcessors = new ArrayList<>();// 存放實現了Ordered接口的BeanFactoryPostProcessorList<String> orderedPostProcessorNames = new ArrayList<>();// 存放其它BeanFactoryPostProcessorList<String> nonOrderedPostProcessorNames = new ArrayList<>();// 循環從工廠中獲取的BeanFactoryPostProcessor, 分別存入到三個不同的集合中for (String ppName : postProcessorNames) {// 針對已經處理過的BeanFactoryPostProcessor,不做任何操作,無需重復執行if (processedBeans.contains(ppName)) {// skip - already processed in first phase above}else if (beanFactory.isTypeMatch(ppName, PriorityOrdered.class)) {// PriorityOrdered接口的BeanFactoryPostProcessorpriorityOrderedPostProcessors.add(beanFactory.getBean(ppName, BeanFactoryPostProcessor.class));}else if (beanFactory.isTypeMatch(ppName, Ordered.class)) {// Ordered接口的BeanFactoryPostProcessororderedPostProcessorNames.add(ppName);}else {// 普通BeanFactoryPostProcessornonOrderedPostProcessorNames.add(ppName);}}// 1、調用所有實現PriorityOrdered接口的BeanFactoryPostProcessor// 排序sortPostProcessors(priorityOrderedPostProcessors, beanFactory);// 執行postProcessBeanFactory()回調invokeBeanFactoryPostProcessors(priorityOrderedPostProcessors, beanFactory);// 2、調用所有實現Ordered接口的BeanFactoryPostProcessorList<BeanFactoryPostProcessor> orderedPostProcessors = new ArrayList<>();for (String postProcessorName : orderedPostProcessorNames) {// 這里會觸發BeanFactoryPostProcessor的創建流程orderedPostProcessors.add(beanFactory.getBean(postProcessorName, BeanFactoryPostProcessor.class));}// 排序sortPostProcessors(orderedPostProcessors, beanFactory);// 執行postProcessBeanFactory()回調invokeBeanFactoryPostProcessors(orderedPostProcessors, beanFactory);// 3、調用所有其他BeanFactoryPostProcessorList<BeanFactoryPostProcessor> nonOrderedPostProcessors = new ArrayList<>();for (String postProcessorName : nonOrderedPostProcessorNames) {nonOrderedPostProcessors.add(beanFactory.getBean(postProcessorName, BeanFactoryPostProcessor.class));}// 執行postProcessBeanFactory()回調invokeBeanFactoryPostProcessors(nonOrderedPostProcessors, beanFactory);// Clear cached merged bean definitions since the post-processors might have// modified the original metadata, e.g. replacing placeholders in values...// 清除元數據緩存beanFactory.clearMetadataCache();
}
// 從bean工廠中獲取到BeanFactoryPostProcessor
//!!!!!!!!!!!!!!!!!!!!!! 通過beanFactory.getBeanNamesForType(BeanFactoryPostProcessor.class, true, false),獲取Spring配置文件中定義的所有實現BeanFactoryPostProcessor接口的bean,然后根據優先級進行排序String[] postProcessorNames =beanFactory.getBeanNamesForType(BeanFactoryPostProcessor.class, true, false);

3.bean生命周期
3.bean 生命周期
實例化,初始化,使用中(完整對象),銷毀 \textcolor{green}{實例化,初始化,使用中(完整對象),銷毀} 實例化,初始化,使用中(完整對象),銷毀
3.1 實例化
實例化前置:


1. 實例化前置 I n s t a n t i a t i o n A w a r e B e a n P o s t P r o c e s s o r . p o s t P r o c e s s B e f o r e I n s t a n t i a t i o n ( C l a s s < ? > b e a n C l a s s , S t r i n g b e a n N a m e ) \textcolor{green}{實例化前置 InstantiationAwareBeanPostProcessor.postProcessBeforeInstantiation(Class<?> beanClass, String beanName)} 實例化前置InstantiationAwareBeanPostProcessor.postProcessBeforeInstantiation(Class<?>beanClass,StringbeanName)
對象實例化之前對bean對象的class信息進行修改或者擴展,底層是動態代理AOP技術實現的;是bean生命周期中最先執行的方法;
- 返回了非空的值,那么以后我們需要用到這個bean的時候,拿到的就現在返回的對象了,也就不會去走第二步去實例化對象了;
- 默認也是返回null值的,那么就直接返回,接下來會調用doCreateBean方法來實例化對象;
2. 實例化對象 \textcolor{green}{實例化對象} 實例化對象
- 進入 doGetBean(),從 getSingleton() 沒有找到對象,進入創建 Bean 的邏輯
- doCreateBean方法創建實例,反射, 只是將對象實例化了,對象內的屬性還未設置;
- 進入 doCreateBean() 后,調用 createBeanInstance()。
- 進入 createBeanInstance() 后,調用 instantiateBean()。
3. 實例化后置 I n s t a n t i a t i o n A w a r e B e a n P o s t P r o c e s s o r . p o s t P r o c e s s A f t e r I n s t a n t i a t i o n ( O b j e c t b e a n , S t r i n g b e a n N a m e ) \textcolor{green}{實例化后置 InstantiationAwareBeanPostProcessor.postProcessAfterInstantiation(Object bean, String beanName)} 實例化后置InstantiationAwareBeanPostProcessor.postProcessAfterInstantiation(Objectbean,StringbeanName)
在目標對象實例化之后調用,這個時候對象已經被實例化,但是該實例的屬性還未被設置,都是null。因為他的返回值是決定要不要調用postProcessPropertyValues方法中的一個因素(因為還有一個因素是mbd.getDependencyCheck());
- 返回false :如果該方法返回false,并且不需要check,那么postProcessPropertyValues就會被忽略不執行;
- 返回true : 如果返回true,postProcessPropertyValues就會被執行
4… 屬性修改 I n s t a n t i a t i o n A w a r e B e a n P o s t P r o c e s s o r . P r o p e r t y V a l u e s p o s t P r o c e s s P r o p e r t y V a l u e s ( P r o p e r t y V a l u e s p v s , P r o p e r t y D e s c r i p t o r [ ] p d s , O b j e c t b e a n , S t r i n g b e a n N a m e ) \textcolor{green}{屬性修改 InstantiationAwareBeanPostProcessor.PropertyValues postProcessPropertyValues(PropertyValues pvs, PropertyDescriptor[] pds, Object bean, String beanName)} 屬性修改InstantiationAwareBeanPostProcessor.PropertyValuespostProcessPropertyValues(PropertyValuespvs,PropertyDescriptor[]pds,Objectbean,StringbeanName)
此方法可對屬性值進行修改,修改范圍包括添加、修改、刪除操作;,如果實例化后置 postProcessAfterInstantiation() 方法返回false,那么該方法不會被調用;
3.2.初始化

5.給用戶賦值 A b s t r a c t A u t o w i r e C a p a b l e B e a n F a c t o r y . p o p u l a t e B e a n ( ) \textcolor{green}{AbstractAutowireCapableBeanFactory.populateBean()} AbstractAutowireCapableBeanFactory.populateBean()
為 Bean 設置相關屬性和依賴
- 再回到 doCreateBean(),繼續往后走,進入 populateBean() this.populateBean(beanName, mbd, instanceWrapper)。[依賴注入邏輯]
- 進入 populateBean() 后,執行 applyPropertyValues()
- 進入 applyPropertyValues(),執行 bw.setPropertyValues()
- 進入 processLocalProperty(),執行 ph.setValue()。
6.給容器屬性賦值 實現一些 A w a r e 接口方法 \textcolor{green}{實現一些Aware接口方法} 實現一些Aware接口方法
A l l A w a r e I n t e r f a c e \textcolor{green}{AllAwareInterface} AllAwareInterface

7.初始化前置 B e a n P o s t P r o c e s s o r . p o s t P r o c e s s B e f o r e I n i t i a l i z a t i o n ( ) \textcolor{green}{BeanPostProcessor.postProcessBeforeInitialization()} BeanPostProcessor.postProcessBeforeInitialization()
在每一個 Bean 初始化之前執行的方法(有多少 Bean 調用多少次)
注意 : 啟用該方法后,標注了@PostConstruct注解的方法會失效
8.執行初始化方法 @ P o s t C o n s t r u c t \textcolor{green}{@PostConstruct } @PostConstruct
初始化方法:
- 添加了@PostConstruct 注解的方法
- 實現InitializingBean接口,實現afterPropertiesset()方法。
- 在@bean注解上添加 initMethod屬性
場景:預加載一部分數據,舉例:要開發一個短信發送服務,在服務中,有些基本的配置信息是存放在數據庫的,那么在Spring Bean初始化就需要從數據庫加載到這些配置信息。
//1.定義了一個普通的java類DemoService4,然后通過配置類BeanConfig的@Bean進行注入。
//2.在@Bean注入的時候,指定了初始化方法initMethod
//3.對于@PostConstruct的使用只需要在類的方法上添加注解即可。
//4.對于InitializingBean的使用需要實現接口InitializingBean中的afterPropertiesSet方法。
public class InitDemoService4 implements InitializingBean {@Autowiredprivate Environment environment;public InitDemoService4(){System.out.println("DemoService4的構造方法打印environment="+environment);}/*** 使用JSR-250規范定義的@Postconstruct注解*/@PostConstructpublic void postConstruct() {System.out.println("DemoService4使用@postConstruct打印environment="+environment);}/*** 使用@Bean的init-method屬性  initMethod就是原來spring配置文件里bean標簽上的init-method,可以額外的@Configuration來聲明一個@Bean。*/public void initMethod() {System.out.println("DemoService4使用initMethod打印environment="+environment);}/*** InitializingBean接口中的方法  相當于與Spring框架深度綁定了* eg: MyBatis 的 SqlSessionFactoryBean* @throws Exception*/@Overridepublic void afterPropertiesSet() throws Exception {System.out.println("DemoService4使用InitializingBean打印environment=" + environment);}}
調用順序:構造函數 --> @PostConstruct --> InitializingBean接口 --> @Bean init-method
9.初始化方法一:@PostConstruct
在bean對象內添加@PostConstruct 注解后即可實現初始化的功能,被@PostConstruct修飾的方法會在構造函數之后,init()方法之前運行。 有多個則會執行多次;
注意:
- 如果spring 實現了 BeanPostProcessor接口的postProcessBeforeInitialization() 的初始后置方法,那么@PostConstruct注解會失效;
10.InitializingBean.afterPropertiesSet()
spring 初始化方法之一,作用是在BeanFactory完成屬性設置之后,執行自定義的初始化行為。
執行順序:在initMethod之前執行,在@PostConstruct之后執行
@Component
public class ExtInitializingBean implements InitializingBean {@Overridepublic void afterPropertiesSet() throws Exception {// 一個 InitializingBean 執行一次// spring 初始化方法,作用是在BeanFactory完成屬性設置之后,執行自定義的  初始化行為.// 執行順序:在initMethod之前執行,在@PostConstruct之后執行System.out.println("InitializingBean");}
示例:MyBatis 的 SqlSessionFactoryBean
11.init-method
bean 配置文件屬性 init-method 用于在bean初始化時指定執行方法,用來替代繼承 InitializingBean接口,
注意:只有一個類完整的實例被創建出來后,才能走初始化方法。
3.3 使用中
13.使用中
bean對象就已經完全創建好了,是一個完整對象了,并且正在被其他對象使用了
3.4 銷毀
14.銷毀流程
被spring容器管理的bean默認是單例的,默認在類上面有個 @Scope注解
@Scope(value = ConfigurableBeanFactory.SCOPE_SINGLETON)@Scope(value = ConfigurableBeanFactory.SCOPE_PROTOTYPE)
多例模式也叫原型模式,它底層不是重新創建一個bean對象出來,而是使用深拷貝技術實現的,就是復制一個對象出來進行使用
(1)DisposableBean.destroy()
單例模式,會先執行 DisposableBean.destroy()方法,然后在執行 destroy-Method 方法;
(2)destory-method方法
在@Bean注解里加上 destroyMethod屬性,指向銷毀方法 :destroyMethod_1()
@Component()
public class InitMethod {// 在@Bean注解上添加initMethod屬性,指向類中的 initMethod_1 執行初始化方法// 在@Bean注解上添加destroyMethod屬性,指向類中的 destroyMethod_1 執行銷毀方法@Bean(initMethod = "initMethod_1",destroyMethod = "destroyMethod_1")public BeanTest getBeanTest(){return new BeanTest();}執行順序:
(1)初始化之后執行順序: @PostConstruct > InitializingBean > Bean init-method(xml注解或者@Bean)
(2)銷毀之前執行順序:@preDestroy > DisposableBean > destroy-method(xml注解或者@Bean)
15 返回bean給用戶,剩下的生命周期由用戶控制
多例模式下,spring無法進行管理,所以將生命周期交給用戶控制,用戶用完bean對象后,java垃圾處理器會自動將無用的對象進行回收操作;
六、可擴展的接口啟動調用順序
1 ApplicationContextInitializer - 用于在刷新容器之前初始化Spring的回調接口。
o r g . s p r i n g f r a m e w o r k . c o n t e x t . A p p l i c a t i o n C o n t e x t I n i t i a l i z e r \textcolor{green}{org.springframework.context.ApplicationContextInitializer} org.springframework.context.ApplicationContextInitializer
刷新容器之前初始化ConfigurableApplicationContext的回調接口
在容器刷新之前調用此類的initialize方法。可以在整個spring容器還沒被初始化之前做一些事情。
自定義初始化器:通常用于需要對應用程序上下文進行編程初始化的web應用程序中。例如,根據上下文環境注冊屬性源或激活概要文件。
@Component
public class P implements BeanDefinitionRegistryPostProcessor {@Overridepublic void postProcessBeanDefinitionRegistry(BeanDefinitionRegistry registry) throws BeansException {// 創建一個bean的定義類的對象RootBeanDefinition rootBeanDefinition = new RootBeanDefinition(C.class);// 將Bean 的定義注冊到Spring環境registry.registerBeanDefinition("c", rootBeanDefinition);//第一、先調用這個注冊cSystem.out.println("postProcessBeanDefinitionRegistry----注冊c");}@Overridepublic void postProcessBeanFactory(ConfigurableListableBeanFactory beanFactory) throws BeansException {// bean的名字為key, bean的實例為value// 第二、當bean都完成注冊后,調用這個方法// 這里只是做好了bean 的定義,但是沒有真正的如,初始化bean和bean的注入String[] strings = beanFactory.getBeanDefinitionNames();System.out.println("postProcessBeanFactory----start");for (String string : strings) {System.out.println(string);}System.out.println("postProcessBeanFactory----end");}
}
3.BeanFactoryPostProcessor - 讀取配置元數據,并可以根據需要進行修改
o r g . s p r i n g f r a m e w o r k . b e a n s . f a c t o r y . c o n f i g . B e a n F a c t o r y P o s t P r o c e s s o r \textcolor{green}{org.springframework.beans.factory.config.BeanFactoryPostProcessor} org.springframework.beans.factory.config.BeanFactoryPostProcessor
beanFactory的擴展接口,調用時機在spring在讀取beanDefinition信息之后,實例化bean之前。
場景:通過實現這個擴展接口來自行處理一些東西,比如修改已經注冊的beanDefinition的元信息。
(1)對敏感信息的解密處理
數據庫的連接配置,redis的連接配置、shiro的加密算法、rabbitmq的連接配置等等,凡是涉及到敏感信息的,都需要進行加密處理,信息安全非常重要。
配置的時候以密文配置,在真正用到之前在spring容器中進行解密,然后用解密后的信息進行真正的操作。
(2)Spring中占位符的處理
public class MyBeanFactoryPostProcessor implements BeanFactoryPostProcessor {@Overridepublic void postProcessBeanFactory(ConfigurableListableBeanFactory beanFactory) throws BeansException {System.out.println("調用自定義BeanFactoryPostProcessor");BeanDefinition beanDefinition = beanFactory.getBeanDefinition("student1");System.out.println("開始修改屬性的值");MutablePropertyValues propertyValues = beanDefinition.getPropertyValues();propertyValues.add("name","Tom");}
}
4.InstantiationAwareBeanPostProcessor
o r g . s p r i n g f r a m e w o r k . b e a n s . f a c t o r y . c o n f i g . I n s t a n t i a t i o n A w a r e B e a n P o s t P r o c e s s o r \textcolor{green}{org.springframework.beans.factory.config.InstantiationAwareBeanPostProcessor} org.springframework.beans.factory.config.InstantiationAwareBeanPostProcessor
該接口繼承了BeanPostProcess接口,區別如下:
BeanPostProcess接口只在bean的初始化階段進行擴展(注入spring上下文前后),而InstantiationAwareBeanPostProcessor接口在此基礎上增加了3個方法,把可擴展的范圍增加了實例化階段和屬性注入階段。
該類主要的擴展點有以下5個方法,主要在bean生命周期的兩大階段:實例化階段和初始化階段,下面一起進行說明,按調用順序為:
postProcessBeforeInstantiation:實例化bean之前,相當于new這個bean之前 BeanPostProcessor可以返回一個代理對象,在doCreateBean()生成對象之前, 用戶可以自定義返回一個對象。返回了一個你自己創建的bean的話,那么之后的代碼就不會執行了。
實例化之后 resolveBeforeInstantiation()沒有返回bean.則創建Bean,會經過**populateBean(beanName, mbd, instanceWrapper)**方法。
populateBean(beanName, mbd, instanceWrapper)依次執行postProcessAfterInstantiation() 與postProcessPropertyValues()
postProcessAfterInstantiation:實例化bean之后,相當于new這個bean之后, 默認返回true,什么也不做,繼續下一步。postProcessPropertyValues:bean已經實例化完成,在屬性注入時階段觸發,@Autowired,@Resource等注解原理基于此方法實現, 高版本已經過時了,使用postProcessProperties代替postProcessBeforeInitialization:初始化bean之前,相當于把bean注入spring上下文之前postProcessAfterInitialization:初始化bean之后,相當于把bean注入spring上下文之后
場景:對實現了某一類接口的bean在各個生命期間進行收集,或者對某個類型的bean進行統一的設值等等。
- 典型的應用場景:在AOP生成代理對象的時候,AOP代理需要創建被代理類的對象,才能對對象進行代理。根據代理的特點,通過在BeanPostProcessor#postProcessAfterInitialization方法執行的時候,對被代理對象進行增強,這樣就可以生成新的代理對象。
eg:
(1)AOP 就是基于 InstantiationAwareBeanPostProcessor實現的
(2)Autowired進行注入對象的時候,也是通過BeanPostProcessor完成。
(3)處理自定義注解:bean可以添加我們自定義的注解,自定義的注解處理方式在該類中實現,如通過注解識別一組或幾組bean,在后續的業務處理中根據組bean進行邏輯。
(4)打印日志:將每個bean的初始化情況打印出來;打印初始化時間等
com.dahua.evo.edu.boot.common.i18n.I18nMessageInitializer
public class MyInstantiationAwareBeanPostProcessor implements InstantiationAwareBeanPostProcessor {// 1 實例化前置@Overridepublic Object postProcessBeforeInstantiation(Class<?> beanClass, String beanName) throws BeansException {System.out.println("1.postProcessBeforeInstantiation被調用了----在對象實例化之前調用-----beanName:" + beanName);if ("student".equals(beanName)) {System.out.println("before==============student1");}
//        Student1 postProcessBeforeInstantiation = new Student1("postProcessBeforeInstantiation", 100);
//        return postProcessBeforeInstantiation;// 默認什么都不做,返回nullreturn null;}// 3.實例化后置@Overridepublic boolean postProcessAfterInstantiation(Object bean, String beanName) throws BeansException {System.out.println("3.postProcessAfterInstantiation被調用了---------beanName:" + beanName);//默認返回true,什么也不做,繼續下一步return false;}// 4.屬性修改@Overridepublic PropertyValues postProcessPropertyValues(PropertyValues pvs, PropertyDescriptor[] pds, Object bean, String beanName) throws BeansException {System.out.println("4.postProcessPropertyValues被調用了---------beanName:"+beanName);// 此方法可對bean中的屬性值進行、添加、修改、刪除操作;// 對屬性值進行修改,如果postProcessAfterInstantiation方法返回false,該方法可能不會被調用,System.out.println("屬性修改。。。。。。");System.out.println(bean);MutablePropertyValues mutablePropertyValues = new MutablePropertyValues(pvs);List<PropertyValue> propertyValueList = mutablePropertyValues.getPropertyValueList();PropertyValue pv = new PropertyValue("age", 999);propertyValueList.add(pv);return mutablePropertyValues;}/*** 在每一個 Bean 初始化之前執行的方法(有多少 Bean 調用多少次)* 注意 : 啟用該方法后,標注了@PostConstruct注解的方法會失效*/@Overridepublic Object postProcessBeforeInitialization(Object o, String s) throws BeansException {
//        System.out.println("postProcessBeforeInstantiation被調用了----在對象實例化之前調用-----beanName:" + o);
//        if (o.getClass().getSimpleName().equals("student1")) {
//            System.out.println("before==============student1");
//        }return null;}@Overridepublic Object postProcessAfterInitialization(Object o, String s) throws BeansException {return null;}
}
5.SmartInstantiationAwareBeanPostProcessor - 確定執行哪一個構造方法
o r g . s p r i n g f r a m e w o r k . b e a n s . f a c t o r y . c o n f i g . S m a r t I n s t a n t i a t i o n A w a r e B e a n P o s t P r o c e s s o r \textcolor{green}{org.springframework.beans.factory.config.SmartInstantiationAwareBeanPostProcessor} org.springframework.beans.factory.config.SmartInstantiationAwareBeanPostProcessor
擴展接口有3個觸發點方法:
5.1 predictBeanType**
該觸發點發生在postProcessBeforeInstantiation之前,這個方法用于預測Bean的類型,返回第一個預測成功的Class類型,如果不能預測返回null;當你調用BeanFactory.getType(name)時當通過bean的名字無法得到bean類型信息時就調用該回調方法來決定類型信息。
? BeanFactory.getType(name)時當通過Bean定義無法得到Bean類型信息時就調用該回調方法來決定類型信息;
? BeanFactory.isTypeMatch(name, targetType)用于檢測給定名字的Bean是否匹配目標類型(如在依賴注入時需要使用)。
5.2 determineCandidateConstructors
檢測Bean的構造器,可以檢測出多個候選構造器,再由相應的策略決定使用哪一個,如AutowiredAnnotationBeanPostProcessor實現將自動掃描通過@Autowired/@Value注解的構造器從而可以完成構造器注入
觸發點:
? 該觸發點發生在postProcessBeforeInstantiation之后, 對象實例化之前執行。用于確定該bean的構造函數之用,返回的是該bean的所有構造函數列表。可以擴展這個點,來自定義選擇相應的構造器來實例化這個bean。
使用:
? 當一個bean中有兩個構造方法的時候,一個無參構造方法,一個有參構造方法,那么spring在進行bean初始化的時候回默認調用無參的構造方法:
? 如果我們想要執行有參的構造方法,則需要在有參構造方法上面加上@Autowired注解即可:
在這個過程中,如果推斷出有一個構造方法加了@Autowired注解,那么spring會把它放到一個臨時變量當中,在判斷臨時變量是否為空,如果不為空,則把這個變量轉換成臨時數組返回出去,而如果構造方法都沒有加@Autowired注解,那么spring就無法判斷要把哪個加入到臨時變量中,所以最后返回一個null,然后spring根據返回的null來使用默認的構造方法。
5.3 getEarlyBeanReference:
獲得提前暴露的bean引用,主要用于解決循環引用的問題.
該觸發點發生在postProcessAfterInstantiation之后,當有循環依賴的場景,當bean實例化好之后,為了防止有循環依賴,會提前暴露回調方法,用于bean實例化的后置處理。這個方法就是在提前暴露的回調方法中觸發。
//AutowiredAnnotationBeanPostProcessor 使用
public Constructor<?>[] determineCandidateConstructors(Class<?> beanClass, final String beanName) throws BeanCreationException {if (!this.lookupMethodsChecked.contains(beanName)) {try {ReflectionUtils.doWithMethods(beanClass, new MethodCallback() {public void doWith(Method method) throws IllegalArgumentException, IllegalAccessException {Lookup lookup = (Lookup)method.getAnnotation(Lookup.class);................
大致步驟:
(1)獲取類的所有構造方法(2)遍歷構造方法- 只有一個無參構造方法, 則返回null。- 只有一個有參構造方法, 則返回這個構造方法。- 有多個構造方法且沒有@Autowired, 此時spring不知道使用哪一個了. 當選擇不了的時候, 干脆返回 null。- 有多個構造方法, 且在其中一個方法上標注了 @Autowired , 則會返回這個標注的構造方法- 有多個構造方法, 且在多個方法上標注了@Autowired, 則spring會拋出異常。
6.BeanFactoryAware
o r g . s p r i n g f r a m e w o r k . b e a n s . f a c t o r y . B e a n F a c t o r y A w a r e \textcolor{green}{org.springframework.beans.factory.BeanFactoryAware} org.springframework.beans.factory.BeanFactoryAware
public interface BeanFactoryAware extends Aware {void setBeanFactory(BeanFactory var1) throws BeansException;
}
這個類只有一個觸發點,發生在bean的實例化之后,注入屬性之前,也就是Setter之前。這個類的擴展點方法為setBeanFactory,可以拿到BeanFactory這個屬性。
場景:在bean實例化之后,初始化之前,拿到 BeanFactory,可以對每個bean作特殊化的定制。也或者可以把BeanFactory拿到進行緩存,日后使用。
eg:假設有2個業務處理對象,都繼承了BeanFactoryHelper,但是具體處理的時候要哪個業務的對象呢?
這個依賴于用戶的選擇。 你可以注入2個BeanFactoryHelper實例,然后用if --else,但增加一個業務你都需要改代碼。
若變動,還要添加代碼。如果實現BeanFactoryAware,那么一切都好說,因為Spring實例化之后,只需要根據bean的名稱獲取對象即可。不會去實例化每一個對象。下面的代碼一個片段:
 public class ControlServiceImpl implements IControlService, BeanFactoryAware {private BeanFactory factory;@Overridepublic void setBeanFactory(BeanFactory factory) {this.factory = factory;}@Overridepublic OutputObject execute(InputObject inputObject) {System.out.println("--------------ControlServiceImpl.execute()方法---------");OutputObject outputObject = new OutputObject(ControlConstants.RETURN_CODE.IS_OK);try {outputObject.setReturnCode(ControlConstants.RETURN_CODE.IS_OK);if (inputObject != null) {Object object = factory.getBean(inputObject.getService());Method mth = object.getClass().getMethod(inputObject.getMethod(), InputObject.class, OutputObject.class);mth.invoke(object, inputObject, outputObject);} else {throw new Exception("InputObject can't be null !!!");}} catch (Exception e) {// 異常處理} finally {}return outputObject;}
}
7.ApplicationContextAwareProcessor
o r g . s p r i n g f r a m e w o r k . c o n t e x t . s u p p o r t . A p p l i c a t i o n C o n t e x t A w a r e P r o c e s s o r \textcolor{green}{org.springframework.context.support.ApplicationContextAwareProcessor} org.springframework.context.support.ApplicationContextAwareProcessor
類內部卻有6個擴展點可供實現 ,這些類觸發的時機在bean實例化之后,初始化之前
該類用于執行各種驅動接口,在bean實例化之后,屬性填充之后。所以這里應該來說是有6個擴展點,這里就放一起來說了
EnvironmentAware:用于獲取EnviromentAware的一個擴展類, 可以獲得系統內的所有參數。spring內部也可以通過注入的方式來直接獲得。EmbeddedValueResolverAware:用于獲取StringValueResolver的一個擴展類,StringValueResolver用于獲取基于String類型的properties的變量,都用@Value的方式可以獲取,如果實現了這個Aware接口,把StringValueResolver緩存起來,通過這個類去獲取String類型的變量,效果是一樣的。ResourceLoaderAware:用于獲取ResourceLoader的一個擴展類,ResourceLoader可以用于獲取classpath內所有的資源對象,可以擴展此類來拿到ResourceLoader對象。ApplicationEventPublisherAware:用于獲取ApplicationEventPublisher的一個擴展類,ApplicationEventPublisher可以用來發布事件,結合ApplicationListener來共同使用,下文在介紹ApplicationListener時會詳細提到。這個對象也可以通過spring注入的方式來獲得。MessageSourceAware:用于獲取MessageSource的一個擴展類,MessageSource主要用來做國際化。ApplicationContextAware:用來獲取ApplicationContext的一個擴展類,ApplicationContext應該是很多人非常熟悉的一個類了,就是spring上下文管理器,可以手動的獲取任何在spring上下文注冊的bean,我們經常擴展這個接口來緩存spring上下文,包裝成靜態方法。同時ApplicationContext也實現了BeanFactory,MessageSource,ApplicationEventPublisher等接口,也可以用來做相關接口的事情。
8.BeanNameAware
o r g . s p r i n g f r a m e w o r k . b e a n s . f a c t o r y . B e a n N a m e A w a r e \textcolor{green}{org.springframework.beans.factory.BeanNameAware} org.springframework.beans.factory.BeanNameAware
觸發點:在bean的初始化之前,也就是postProcessBeforeInitialization之前,這個類的觸發點方法只有一個:setBeanName
場景:用戶可以擴展這個點,在初始化bean之前拿到spring容器中注冊的的beanName,來自行修改這個beanName的值(@Component(“haha”))。
9.@PostConstruct
在bean的初始化階段,如果對一個方法標注了@PostConstruct,會先調用這個方法。觸發點是在postProcessBeforeInitialization之后,InitializingBean.afterPropertiesSet之前。
使用場景:用戶可以對某一方法進行標注,來進行初始化某一個屬性 考慮業務
10.InitializingBean
o r g . s p r i n g f r a m e w o r k . b e a n s . f a c t o r y . I n i t i a l i z i n g B e a n \textcolor{green}{org.springframework.beans.factory.InitializingBean} org.springframework.beans.factory.InitializingBean
為bean提供了初始化方法的方式,它只包括afterPropertiesSet方法,凡是繼承該接口的類,在初始化bean的時候都會執行該方法。
觸發時機在postProcessAfterInitialization之前。
場景:用戶實現此接口,來進行系統啟動的時候一些業務指標的初始化工作。
@Component
public class ExtInitializingBean implements InitializingBean {@Overridepublic void afterPropertiesSet() throws Exception {// 一個 InitializingBean 執行一次// spring 初始化方法,作用是在BeanFactory完成屬性設置之后,執行自定義的  初始化行為.// 執行順序:在initMethod之前執行,在@PostConstruct之后執行System.out.println("InitializingBean");}
}
Spring是通過反射來調用init-method指定方法,而實現InitializingBean接口是直接調用afterPropertiesSet方法,所以后者效率高,但使用init-method方式減少了對Spring的依賴
如果調用afterPropertiesSet方法時報錯,則不會再調用init-method指定的方法
11.FactoryBean
o r g . s p r i n g f r a m e w o r k . b e a n s . f a c t o r y . F a c t o r y B e a n \textcolor{green}{org.springframework.beans.factory.FactoryBean} org.springframework.beans.factory.FactoryBean
一般情況下,Spring通過反射機制利用bean的class屬性指定支線類去實例化bean,在某些情況下,實例化Bean過程比較復雜,如果按照傳統的方式,則需要在bean中提供大量的配置信息。配置方式的靈活性是受限的,這時采用編碼的方式可能會得到一個簡單的方案。Spring為此提供了一個org.springframework.bean.factory.FactoryBean的工廠類接口,可以通過實現該接口定制實例化Bean的邏輯。
FactoryBean接口對于Spring框架來說占用重要的地位,Spring自身就提供了70多個FactoryBean的實現。它們隱藏了實例化一些復雜bean的細節,給上層應用帶來了便利。從Spring3.0開始,FactoryBean開始支持泛型,即接口聲明改為FactoryBean<T>的形式
場景:可以擴展這個類,為要實例化的bean作一個代理,比如為該對象的所有的方法作一個攔截,在調用前后輸出一行log,
模仿ProxyFactoryBean的功能。
ProxyFactoryBean是創建AOP代理對象的FactoryBean、ProxyFactoryBean的作用就是創建目標對象的代理對象。將對目標對象方法的調用轉到對應的代理對象的方法,而且代理對象方法調用前后會執行與之匹配的各個通知器中定義好的方法
ProxyFactoryBean的屬性:
- target:需要被切面增強的對象
- proxyInterfaces:代理對象所需要實現的接口
- interceptorsNames:通知器集合(一個Advisor集合)
12.SmartInitializingSingleton
o r g . s p r i n g f r a m e w o r k . b e a n s . f a c t o r y . S m a r t I n i t i a l i z i n g S i n g l e t o n \textcolor{green}{org.springframework.beans.factory.SmartInitializingSingleton} org.springframework.beans.factory.SmartInitializingSingleton
是spring 4.1中引入的新特效,與InitializingBean的功能類似,都是bean實例化后執行自定義初始化,都是屬于spring bean生命周期的增強。但是,SmartInitializingSingleton的定義及觸發方式方式上有些區別,它的定義不在當前的bean中。
SmartInitializingSingleton&InitializingBean的區別
(1)SmartInitializingSingleton接口只能作用于非惰性單實例Bean,InitializingBean接口無此要求。
(2)SmartInitializingSingleton接口是在所有非惰性單實例初始化完成之后進行激活回調,InitializingBean接口是在每一個Bean實例初始化完成之后進行激活回調。
這個接口中只有一個方法afterSingletonsInstantiated,其作用是是 在spring容器管理的所有單例對象(非懶加載對象)初始化完成之后調用的回調接口。其觸發時機為postProcessAfterInitialization之后。
場景:用戶可以擴展此接口在對所有單例對象初始化完畢后,做一些后置的業務處理。
eg: **spring 容器中 SmartInitializingSingleton 的使用 ** EventListenerMethodProcessor
要用于完成@EventListener注解方式的事件監聽。在afterSingletonsInstantiated()方法用于篩選實例中被指定注解修飾的方法。
13.CommandLineRunner
o r g . s p r i n g f r a m e w o r k . b o o t . C o m m a n d L i n e R u n n e r \textcolor{green}{org.springframework.boot.CommandLineRunner} org.springframework.boot.CommandLineRunner
public interface CommandLineRunner {void run(String... var1) throws Exception;
}
//對比
public interface ApplicationRunner {void run(ApplicationArguments var1) throws Exception;
}
場景”:需要在容器啟動的時候執行一些內容,比如:讀取配置文件信息,數據庫連接,刪除臨時文件,清除緩存信息,在Spring框架下是通過ApplicationListener監聽器來實現的。在Spring Boot中給我們提供了兩個接口CommandLineRunner和ApplicationRunner,來幫助我們實現這樣的需求
這個接口也只有一個方法:run(String... args),觸發時機為整個項目啟動完畢后,自動執行。如果有多個CommandLineRunner,可以利用@Order來進行排序。
相同點
- 都可以獲取到啟動時指定的外部參數。
- 主邏輯方法名稱都是 run 。
- 在 run 方法內部拋出異常時, 應用都將無法正常啟動。
不同點
run 方法的參數不一致, 一個是 String[]數組, 一個是 ApplicationArguments 。
執行順序
- 在沒有指定加載順序 @Order 時或 @Order 值一致時, 先執行 ApplicationRunner。
- 如果指定了加載順序 @Order,則按照 @Order 的順序進行執行。
說明:數字越小,優先級越高,也就是@Order(1)注解的類會在@Order(2)注解的類之前執行。
使用場景
應用服務啟動時,加載一些數據和執行一些應用的初始化動作。
- 刪除臨時文件。
- 緩存預熱:項目啟動時熱加載數據庫數據至緩存。通過相應的服務從獲取到數據;將獲取到的數據放到緩存中;
- 清除緩存信息。
- 讀取
14.DisposableBean
o r g . s p r i n g f r a m e w o r k . b e a n s . f a c t o r y . D i s p o s a b l e B e a n \textcolor{green}{org.springframework.beans.factory.DisposableBean} org.springframework.beans.factory.DisposableBean
這個擴展點也只有一個方法:destroy(),其觸發時機為當此對象銷毀時,會自動執行這個方法。比如說運行applicationContext.registerShutdownHook時,就會觸發這個方法。
15.ApplicationListener
o r g . s p r i n g f r a m e w o r k . c o n t e x t . A p p l i c a t i o n L i s t e n e r \textcolor{green}{org.springframework.context.ApplicationListener} org.springframework.context.ApplicationListener
準確的說,這個應該不算spring&springboot當中的一個擴展點,ApplicationListener可以監聽某個事件的event,觸發時機可以穿插在業務方法執行過程中,用戶可以自定義某個業務事件。
spring內部也有一些內置事件,這種事件,可以穿插在啟動調用中。我們也可以利用這個特性,來自己做一些內置事件的監聽器來達到和前面一些觸發點大致相同的事情。
spring事件:
- ApplicationEvent:事件本身 事件接口。
- ApplicationListener:事件監聽者 事件監聽器接口,所有的監聽器都實現該接口。
- ApplicationEventPublisher:事件發布者 事件發布接口,ApplicationContext實現了該接口。
- ApplicationEventMulticaster: Spring事件機制中的事件廣播器,執行事件。
執行流程:
-
事件源產生事件,通過事件發布器ApplicationEventPublisher發布事件,
-
事件廣播器ApplicationEventMulticaster會去事件注冊表ApplicationContext中找到事件監聽器ApplicationListnener,并逐個執行監聽器的onApplicationEvent方法,完成事件監聽器的邏輯。
spring主要的內置事件:
-
ContextRefreshedEvent
ApplicationContext 被初始化或刷新時,該事件被發布。這也可以在
ConfigurableApplicationContext接口中使用refresh()方法來發生。此處的初始化是指:所有的Bean被成功裝載,后處理Bean被檢測并激活,所有Singleton Bean 被預實例化,ApplicationContext容器已就緒可用。 -
ContextStartedEvent
當使用
ConfigurableApplicationContext(ApplicationContext子接口)接口中的start()方法啟動ApplicationContext時,該事件被發布。你可以調查你的數據庫,或者你可以在接受到這個事件后重啟任何停止的應用程序。 -
ContextStoppedEvent
當使用
ConfigurableApplicationContext接口中的stop()停止ApplicationContext時,發布這個事件。你可以在接受到這個事件后做必要的清理的工作 -
ContextClosedEvent
當使用
ConfigurableApplicationContext接口中的close()方法關閉ApplicationContext時,該事件被發布。一個已關閉的上下文到達生命周期末端;它不能被刷新或重啟 -
RequestHandledEvent
這是一個 web-specific 事件,告訴所有 bean HTTP 請求已經被服務。只能應用于使用DispatcherServlet的Web應用。在使用Spring作為前端的MVC控制器時,當Spring處理用戶請求結束后,系統會自動觸發該事件
springboot默認啟動事件:
- ApplicationStartingEvent: SpringBoot啟動開始的時候執行的事件
- ApplicationEnvironmentPreparedEvent: SpringBoot對應Enviroment已經準備完畢,但此時上下文context還沒有創建。在該監聽中獲取
- ConfigurableEnvironment后可以對配置信息做操作,例如:修改默認的配置信息,增加額外的配置信息等等。
- ApplicationPreparedEvent: SpringBoot上下文context創建完成,但此時Spring中的bean是沒有完全加載完成的。在獲取完上下文后,可以將上下文傳遞出去做一些額外的操作。值得注意的是:在該監聽器中是無法獲取自定義bean并進行操作的。
- ApplicationReadyEvent: SpringBoot加載完成時候執行的事件。
- ApplicationFailedEvent: SpringBoot啟動異常時執行事件。
合理利用spring提供給我們的擴展點,在spring啟動的各個階段內做一些事情。以達到自定義初始化的目的配置文件信息。
- 打印日志用于標識服務啟動成功或者標識某些屬性加載成功。
- 設置屬性值或者啟動組件,例如開啟某些組件的開關、一些應用級別緩存的加載、啟動定時任務等等。
- 需要使用main方法的入參。


----ComboBox)


大模型的推理綜述)


函數和any()函數)