注:本文為 “Linux Bash | Capture Output / Recall” 相關文章合輯。
英文引文,機翻未校。
中文引文,略作重排。
Automatically Capture Output of the Last Command Into a Variable Using Bash
使用 Bash自動將最后一個命令的輸出捕獲到變量中
Last updated: March 18, 2024
Written by: baeldung
Reviewed by: Ashley Frieze
1. Overview
When using commands, we may wish to pass the output of one command into another. This is most commonly achieved using pipes, but when scripting, we may prefer to store the output in a variable so we can process it.
在使用命令時,我們可能希望將一個命令的輸出傳遞給另一個命令。這通常是通過 管道 來實現的,但在編寫腳本時,我們可能更傾向于將輸出存儲在一個變量中,以便對其進行處理。
2. Use Cases
2. 用例
Let’s start by looking at a couple of commands with different sizes of outputs. The wc command outputs the count of words in a file, which is a scalar value. The ls command outputs a list of values, which we may then wish to use with mv to move the files somewhere.
讓我們先來看一些輸出大小不同的命令。wc 命令輸出文件中的單詞數,這是一個標量值。ls 命令輸出一個值的列表,我們可能隨后會用它與 mv 一起將文件移動到某個位置。
While the solutions presented are compatible with both use cases, the difference between storing a single value or a list is in how we use the resulting variable.
雖然提供的解決方案適用于這兩種用例,但存儲單個值或列表的區別在于我們如何使用結果變量。
2.1. Change the Directory Based on the Number of Words of a File
2.1. 根據文件的單詞數更改目錄
The first use case deals with storing the output of the wc -w command:
第一個用例涉及存儲 wc -w 命令的輸出:
$ wc -w < file_with_5_words
5
In this case, the file file_with_5_words has 5 words.
在這個例子中,文件 file_with_5_words 包含 5 個單詞。
Let’s imagine we want to change to the directory whose name corresponds to that output:
假設我們想切換到與該輸出對應的目錄名稱:
$ cd 5
2.2. Move Certain Files Based on the Contents of a Folder
2.2. 根據文件夾內容移動特定文件
The second use case is to move a list of files (those whose extension is txt) to a directory. To do so, we would first need to list the files:
第二個用例是將一個文件列表(擴展名為 txt 的文件)移動到一個目錄中。為此,我們首先需要列出這些文件:
$ ls *.txt
ax.txt ay.txt
The syntax of the mv command is:
mv 命令的語法是:
mv file1 file2 ... targetDir
This means that the command accepts multiple files as input at the same time.
這意味著該命令可以同時接受多個文件作為輸入。
These solutions don’t require the creation of functions or extra files. They’re ideal for occasional use.
這些解決方案不需要創建函數或額外的文件。它們適用于偶爾使用。
By default, the shell stores no information about the output of a command. We can refer back to the exit code of the last command. We can also run the history command to see the command lines of each operation. Thus, we need to run the command a certain way to capture its output.
默認情況下,shell 不會存儲有關命令輸出的信息。我們可以查看上一個命令的退出代碼。我們還可以運行 history 命令來查看每次操作的命令行。因此,我們需要以特定的方式運行命令以捕獲其輸出。
3.1. Explicitly Using Variables
3.1. 顯式使用變量
We can assign a variable to contain the output to stdout of a command:
我們可以將一個變量分配為命令的 stdout 輸出:
$ var=$(wc -w < file_with_5_words)
This can also be achieved using backward quotes:
這也可以通過使用反引號來實現:
$ var=`wc -w < file_with_5_words`
The old-style backward quote substitution doesn’t preserve the meaning of special characters like KaTeX parse error: Got function '\`' with no arguments as subscript at position 21: …or the actual _\?`?_ itself. These…(…) treats no character in any special way.
舊式的反引號替換 不會保留特殊字符(如 KaTeX parse error: Got function '\`' with no arguments as subscript at position 11: _、\ 或實際的 _\?`?_)的含義。這些字符需要用反斜…(…) 不會對任何字符進行特殊處理。
With both of these approaches, we’re storing the output of the wc -w in a variable named var. We can then use the variable by prefixing the dollar sign before it in a command:
通過這兩種方法,我們將 wc -w 的輸出存儲在一個名為 var 的變量中。然后我們可以通過在命令中在變量前加上美元符號來使用該變量:
$ cd $var
The solution for the second use case is similar, except that the variable contains multiple values. Let’s check that with the echo command:
第二個用例的解決方案類似,只是變量中包含多個值。我們用 echo 命令來檢查:
$ var=`ls *.txt`
$ echo $var
ax.txt ay.txt
After checking the content of the variable with echo and seeing that it has two files, let’s now use it with mv:
在用 echo 檢查變量內容并確認它包含兩個文件后,我們現在用它與 mv 一起使用:
$ mv $var 5
3.2. What If We Use the Variables Incorrectly?
3.2. 如果錯誤地使用變量會怎樣?
Shell variables don’t have a type. We should act as though all variables were strings. Thus, we need to be careful to use the contents of a variable only with commands that can accept them.
Shell 變量沒有類型。我們應該將所有變量都視為字符串。因此,我們需要小心,只在可以接受它們的命令中使用變量的內容。
For example, let’s see what happens if we use the output from ls (which is a list) with the cd command:
例如,讓我們看看如果將 ls 的輸出(這是一個列表)與 cd 命令一起使用會發生什么:
$ var=$(ls *.txt)
$ echo $var
ax.txt ay.txt
$ cd $var
-bash: cd: too many arguments
Here, the cd command failed because it accepts only one input value and not multiple values separated with spaces.
在這里,cd 命令失敗了,因為它只接受一個輸入值,而不是用空格分隔的多個值。
3.3. Using History Expansion – !!
3.3. 使用歷史擴展 – !!
Though the shell does not track the output of a command, we can use history expansion to re-run a previous command to assign its output to a variable:
雖然 shell 不會跟蹤命令的輸出,但我們可以使用歷史擴展來重新運行之前的命令,以將其輸出分配給變量:
$ ls *.txt
ax.txt ay.txt
$ var=$(!!)
var=$(ls *.txt)
$ echo $var
ax.txt ay.txt
Similarly, we can use the number from the output of history to re-run an earlier command:
同樣,我們也可以使用 history 輸出中的編號來重新運行之前的命令:
$ history  1097  git log  1098  ls *.txt
$ var=$(!1098)
We should note that this approach may produce unwanted results. For example, if the output of the command changes on each invocation, then our variable will contain the output of the most recent call.
我們需要注意的是,這種方法可能會產生不希望的結果。例如,如果命令的輸出在每次調用時都會改變,那么我們的變量將包含最近一次調用的輸出。
4. Longer-Term Solutions
4. 長期解決方案
If we’re capturing command output a lot, we may wish to set up some scripting on our system to help us.
如果我們經常需要捕獲命令的輸出,我們可能希望在我們的系統上設置一些腳本來幫助我們。
4.1. Using a Bash Function
4.1. 使用 Bash 函數
Let’s define a function, out2var, to capture command output and put it in var:
我們定義一個函數 out2var,用于捕獲命令輸出并將其放入 var 中:
out2var() {  var=$("$@")  printf '%s\n'$var
}
This takes the command line to execute via the input parameter @ and then stores the output in var. As we want to see the output, we have a printf call.
這通過輸入參數 @ 接收要執行的命令行,然后將輸出存儲在 var 中。因為我們想看到輸出,所以我們調用了 printf。
Every time the function out2var is invoked, the variable var is assigned:
每次調用函數 out2var 時,變量 var 都會被賦值:
$ out2var wc -w < file_with_5_words
5
$ echo $var
5
$ cd $var
We may put this function into our current terminal or even add it to our .bashrc file.
我們可以將這個函數放入當前終端,甚至可以將其添加到我們的 .bashrc 文件中。
4.2. Using a Temporary File and an Environmental Variable
4.2. 使用臨時文件和環境變量
Rather than run a special wrapper on our commands, we can implement a hook to store the output of every command into a file.
與其為我們的命令運行一個特殊的包裝器,我們不如實現一個鉤子,將每個命令的輸出存儲到一個文件中。
This solution uses environmental variables:
這種解決方案使用了環境變量:
$ PROMPT_COMMAND='touch /tmp/last_command; var="$(cat /tmp/last_command)"; exec >/dev/tty; exec > >(tee /tmp/last_command)'
First, we create the temporary file and set the variable name, var, that we will invoke later to retrieve the output. Then, it prints the content of the temporary file located in /tmp/last_command. After the first semicolon, we execute the command with exec in the current console terminal (represented by /dev/tty). Finally, after the last semicolon, the tee command with the pipe sends the standard output to the temporary file and also to the screen.
首先,我們創建臨時文件并設置變量名 var,稍后我們將調用它來檢索輸出。然后,它打印位于 /tmp/last_command 的臨時文件的內容。在第一個分號之后,我們使用 exec 在當前控制臺終端(由 /dev/tty 表示)中執行命令。最后,在最后一個分號之后,帶有管道的 tee 命令將標準輸出發送到臨時文件以及屏幕上。
The use is relatively straightforward, as, after any given command, the output is automatically stored:
使用起來相對簡單,因為任何給定命令的輸出都會自動存儲:
$ ls *.txt
ax.txt ay.txt
$ echo $var
ax.txt ay.txt
$ mv $var 5
This should be the preferred approach if we want to automate the process of capturing outputs. However, this approach has two drawbacks:
如果我們要自動化捕獲輸出的過程,這應該是首選方法。然而,這種方法有兩個缺點:
- We should remember that, as the procedure is automatic, we cannot rely on *KaTeX parse error: Undefined control sequence: \* at position 1: \?*? _var_ multiple…var_ every time we execute one command**.
我們應該記住,由于該過程是自動的,我們不能多次依賴 *KaTeX parse error: Undefined control sequence: \* at position 1: \?*? _var_。與之前需要顯式調…var_ 的內容**。 - It captures the output of every command, which may cause problems with interactive commands (for example, vim).
它會捕獲每個命令的輸出,這可能會導致 與交互式命令(例如,vim)出現問題。
To stop the automatic storage of the outputs, we can run:
要停止自動存儲輸出,我們可以運行:
$ unset PROMPT_COMMAND
5. Conclusion
5. 結論
In this article, we discussed different ways of storing the output of a command in a variable.
在本文中,我們討論了將命令輸出存儲到變量中的不同方法。
We saw how to use this variable as part of the input for another command.
我們看到了如何將這個變量用作另一個命令的輸入。
We also looked at some scripts we can create to help capture command output more frequently.
我們還查看了一些可以創建的腳本,以幫助我們更頻繁地捕獲命令輸出。
Recalling Previous Commands or Their Arguments in Bash
在 Bash 中召回之前的命令或其參數
Last updated: March 18, 2024
Written by: Kai Yuan
Reviewed by: Eric Martin
1. Overview
When we work on the Linux command line, we often need to recall or reference the previously executed command or some parts of that command in the current one.
在 Linux 命令行中工作時,我們經常需要召回或引用之前執行的命令或其部分內容到當前命令中。
For example, most of us know that we can press Ctrl-p (or the Up-Arrow key) to recall the last command so that we can modify it and press Enter to execute it.
例如,大多數人都知道,我們可以按 Ctrl-p(或 上箭頭 鍵)來召回上一條命令,然后修改它并按 Enter 鍵執行。
In this tutorial, we’ll learn some tricks to reuse different parts from the last command in Bash.
在本教程中,我們將 學習一些在 Bash 中重用上一條命令不同部分的技巧。
All keyboard shortcuts we’ll see in this tutorial are based on Emacs-binding, which is Bash’s default key-binding.
本教程中我們將看到的所有鍵盤快捷鍵都基于 Emacs 綁定,這是 Bash 的默認鍵綁定方式。
2. Referencing the Last Command in the Current Command
2. 在當前命令中引用上一條命令
We’ve mentioned pressing Ctrl-p or the Up-Arrow key can bring the last command to the current line. However, sometimes, we want the last command to be a part of the current command.
我們提到過,按 Ctrl-p 或 上箭頭 鍵可以將上一條命令帶到當前行。然而,有時,我們希望上一條命令成為當前命令的一部分。
An example may explain this requirement quickly. Let’s say we want to create a file under the /opt directory. As regular users, we often execute the touch command but forget to add sudo:
一個例子可以快速解釋這一需求。假設我們想在 /opt 目錄下創建一個文件。作為普通用戶,我們經常執行 touch 命令,但忘記添加 sudo:
kent$ touch /opt/myFile.txt
touch: cannot touch '/opt/myFile.txt': Permission denied
Then, we realized from the error message above that sudo was missing. So we want to prepend sudo to the previous command.
然后,我們從上面的錯誤信息中意識到缺少了 sudo。因此,我們希望在上一條命令前加上 sudo。
Of course, we can press Ctrl-p to recall the last command, move the cursor to the right position, and type sudo. Well, “sudo” is short, and moving the cursor (pressing Ctrl-a) to the very beginning isn’t hard to do. However, if we’d like to insert the previous command in the middle of the current complex command, this approach makes us build a complex command by starting from the middle part. Moreover, if we want to reference the last command multiple times in the current command, the Ctrl-p way cannot help us anymore.
當然,我們可以按 Ctrl-p 回召上一條命令,將光標移到正確的位置,然后輸入 sudo。嗯,“sudo” 很短,將光標(按 Ctrl-a)移到最前面也不是很難做到。然而,如果我們想在當前復雜命令的中間插入上一條命令,這種方法就讓我們從中間部分開始構建一個復雜的命令。此外,如果我們在當前命令中多次引用上一條命令,Ctrl-p 的方式就無能為力了。
Next, let’s see another way to reference the last command in the current line.
接下來,讓我們看看另一種在當前行引用上一條命令的方法。
2.1. Using !! to Reference the Last Command
2.1. 使用 !! 引用上一條命令
We know that we can execute the last command in the command history with the history expansion ‘!!’. For example:
我們知道可以通過歷史擴展 ‘!!’ 執行命令歷史中的上一條命令。例如:
$ echo "Linux is awesome!"
Linux is awesome!
$ !!
echo "Linux is awesome!"
Linux is awesome!
So, we can use !! in the current command to reference the last command.
因此,我們可以在當前命令中使用 !! 來引用上一條命令。
Now, let’s solve the previous “sudo” problem in this way:
現在,讓我們用這種方法解決前面的 “sudo” 問題:
kent$ touch /opt/myFile.txt
touch: cannot touch '/opt/myFile.txt': Permission denied
kent$ sudo !!
sudo touch /opt/myFile.txt
[sudo] password for kent:
kent$ ls -l /opt/myFile.txt
-rw-r--r-- 1 root root 0 Aug  6 00:41 /opt/myFile.txt
Next, let’s see another example:
接下來,讓我們看看另一個例子:
$ uptime  00:50:46 up 7 days,  8:28,  1 user,  load average: 3.20, 3.20, 3.27
$ echo "The output of the cmd: <!!> is: $(!!)"
echo "The output of the cmd: <uptime> is: $(uptime)"
The output of the cmd: <uptime> is:  00:51:05 up 7 days,  8:28,  1 user,  load average: 2.99, 3.15, 3.25
In the example above, first, we test the command uptime to check its output. Then, we want to reference the command twice in a new command.
在上面的例子中,我們首先測試了 uptime 命令的輸出,然后我們希望在新命令中兩次引用該命令。
As we can see, in this case, using !! is pretty handy to solve this problem.
正如我們所見,在這種情況下,使用 !! 非常方便地解決了這個問題。
However, we may have a question – while !! references the last command, is it possible to use it if we’d like to make some changes based on the last command?
然而,我們可能會有一個問題——雖然 !! 引用了上一條命令,但如果我們要根據上一條命令進行一些修改,是否可以使用它呢?
The answer is “yes”. So next, let’s look at performing history expansion in Bash.
答案是 “可以”。接下來,讓我們看看在 Bash 中執行歷史擴展。
2.2. Performing History Expansion
2.2. 執行歷史擴展
In Bash, we can perform history expansion by pressing M-^. It’s worth mentioning that, here, ‘M’ is the Alt key, and ‘^’ is Shift-6. So, in other words, pressing Alt-Shift-6 performs history expansion on the current line.
在 Bash 中,我們可以通過按 M-^ 來執行歷史擴展。值得一提的是,這里的 “M” 是 Alt 鍵,而 “^” 是 Shift-6。換句話說,按下 Alt-Shift-6 將在當前行執行歷史擴展。
As usual, let’s understand it through a simple example:
像往常一樣,我們通過一個簡單的例子來理解它:
kent$ touch /opt/tehFile.txt
touch: cannot touch '/opt/tehFile.txt': Permission denied
As the example shows, we try to create a file called “theFile.txt” under /opt. But, again, we forget to type sudo. Further, we’ve made a typo: “teh”.
如示例所示,我們試圖在 /opt 下創建一個名為 “theFile.txt” 的文件。但,我們又忘記了輸入 sudo。此外,我們還打錯了字:“teh”。
Next, let’s see how to reuse the previous command and fix the typo:
接下來,讓我們看看如何重用上一條命令并修正拼寫錯誤:
如演示所示,在輸入 “!!” 后,我們按下了 Alt-Shift-6,然后 “!!” 得到了擴展,這樣我們就可以對上一條命令進行一些修改了。
3. Referencing the Arguments of the Previous Bash Command
3. 引用上一條 Bash 命令的參數
We’ve learned how to reference the entire previous command in the current command. In practice, we often want to reference some parts from the last executed command, such as some arguments. For example, we first edit a file using the Vim editor:
我們已經學會了如何在當前命令中引用上一條完整的命令。在實踐中,我們經常希望引用上一條執行的命令的某些部分,例如某些參數。例如,我們首先使用 Vim 編輯器編輯一個文件:
$ vim /a/file/sits/deeply/in/some/directory/file.txt
After we save the changes and exit Vim, we want to copy the file to another directory. So, it would be pretty convenient if we could reference the argument of the previous vim command:
保存更改并退出 Vim 后,我們希望將文件復制到另一個目錄。因此,如果能夠引用上一條 vim 命令的參數,將會非常方便:
$ cp <reference the file of the vim command> /other/dir
To make the problem more general, let’s execute an echo command with seven arguments:
為了使問題更具普遍性,我們來執行一個帶有七個參數的 echo 命令:
$ echo one two three four five six seven
one two three four five six seven
Next, in the current command, we would like to reference one or several parameters from the echo command.
接下來,在當前命令中,我們希望引用 echo 命令的一個或多個參數。
3.1. Understanding Word Designators in Bash’s History Expansion
3.1. 理解 Bash 歷史擴展中的單詞設計符
Before we address how to reference desired arguments from the previous command, let’s first understand how Bash’s word designators work.
在我們探討如何引用上一條命令中所需的參數之前,讓我們首先了解 Bash 的單詞設計符是如何工作的。
Bash indexes the previous command’s words as a zero-based array. For example, our echo command is indexed in this way:
Bash 將上一條命令的單詞索引為一個基于零的數組。例如,我們的 echo 命令是這樣索引的:
echo one two three four five six seven
---- --- --- ----- ---- ---- --- -----  0   1   2    3    4     5   6    7
As we can see, index 0 indicates the command itself. Then, from the first argument until the last one, we have index 1 – n.
正如我們所見,索引 0 表示命令本身。然后,從第一個參數到最后一個參數,我們有索引 1 – n。
Bash’s history expansion supports several ways to reference arguments in the previous command. Let’s take our echo command as an example to learn some commonly used expansions:
Bash 的歷史擴展支持幾種引用上一條命令參數的方法。讓我們以我們的 echo 命令為例,學習一些常用的擴展:
-
!:$– referencing the last argument -> “seven”
!:$– 引用最后一個參數 -> “seven” -
!:n– referencing the n-th argument, for example:!:0-> “echo”,!:5-> “five”
!:n– 引用第 n 個參數,例如:!:0-> “echo”,!:5-> “five” -
!:\*– referencing all arguments -> “one two three …. seven”
!:\*– 引用所有參數 -> “one two three …. seven” -
!:x-y– referencing arguments in the given range, for instance,!:3-5-> “three four five”
!:x-y– 引用指定范圍內的參數,例如,!:3-5-> “three four five”
Now that we understand how history expansion works together with the previous commands’ argument indexes, referencing them in the current command isn’t a challenge for us at all.
現在我們已經理解了歷史擴展是如何與上一條命令的參數索引一起工作的,那么在當前命令中引用它們對我們來說就不是什么挑戰了。
3.2. Getting Any Parts From the Previous Command
3.2. 獲取上一條命令的任何部分
Now, let’s see a few examples of using those history expansions in action. For simplicity, let’s assume the previous command is always “echo one two … seven”.
現在,讓我們看看一些使用這些歷史擴展的實際例子。為了簡單起見,我們假設上一條命令總是 “echo one two … seven”。
First, let’s reference the first and the last arguments in a new command:
首先,讓我們在新命令中引用第一個和最后一個參數:
$ echo "!:^ and !:$"
echo "one and seven"
one and seven
Next, let’s reference from the second until the sixth argument:
接下來,讓我們引用從第二個到第六個參數:
$ echo "arg 2nd-6th: !:2-6"
echo "arg 2nd-6th: two three four five six"
arg 2nd-6th: two three four five six
Finally, let’s reference the fourth argument twice and then the second argument:
最后,讓我們兩次引用第四個參數,然后引用第二個參數:
$ echo "The 4th, 4th, 2nd: !:4 !:4 !:2"
echo "The 4th, 4th, 2nd: four four two"
The 4th, 4th, 2nd: four four two
3.4. Using Keyboard Shortcuts
3.4. 使用鍵盤快捷鍵
So far, we’ve seen how to reference different parts from the previous command by history expansion. However, sometimes, we want the history expansions to get expanded so that we can verify if we’ve referenced the expected arguments or make some changes to the arguments.
到目前為止,我們已經看到了如何通過歷史擴展引用上一條命令的不同部分。然而,有時,我們希望歷史擴展能夠展開,以便我們可以驗證是否引用了預期的參數,或者對參數進行一些修改。
We’ve learned pressing Alt-Shift-6 can perform history expansions in the current command. This shortcut works for argument references too:
我們已經了解到,按下 Alt-Shift-6 可以在當前命令中執行歷史擴展。這個快捷鍵也適用于參數引用:
Further, we can use the following shortcuts to recall arguments from the previous command directly without writing history expansions:
此外,我們可以使用以下快捷鍵 直接回憶上一條命令的參數,而無需編寫歷史擴展:
-
Alt-. – The last argument
Alt-. – 最后一個參數 -
Alt-n-. – The n-th argument ( When pressing n and the dot key, the Alt key should always be pressed and held. )
Alt-n-. – 第 n 個參數(在按下 n 和 點 鍵時,應始終按住 Alt 鍵。)
Next, let’s see a demo of recalling the last, the fifth, and the first arguments from the previous command:
接下來,讓我們看看一個從上一條命令中回憶最后一個、第五個和第一個參數的演示:

As the demo shows, when we’ve pressed Alt-5, Bash prompts (arg: 5) at the beginning of the line. Then if we press the dot key with the Alt key held, “five” is inserted into the cursor position.
如演示所示,當我們按下 Alt-5 時,Bash 在行首提示 (arg: 5)。然后,如果我們按住 Alt 鍵并按下 點 鍵,“five” 就會被插入到光標位置。
4. Conclusion
4. 結論
In this article, we’ve explored using Bash’s history expansion to reference the previous command entirely or only the desired arguments.
在本文中,我們探討了使用 Bash 的歷史擴展來引用上一條完整的命令或僅引用所需的參數。
Moreover, we’ve learned keyboard shortcuts to perform history expansions or recall any arguments of the last command in the current command.
此外,我們還學習了執行歷史擴展或在當前命令中回憶上一條命令的任何參數的鍵盤快捷鍵。
With these techniques in mind, we can work with the command line more productively.
掌握了這些技巧,我們可以更高效地使用命令行。
在終端快速選中上一個命令的輸出內容
Posted on 2021 年 6 月 12 日 by laixintao
在終端中,一個非常常見的操作是選中上一個命令的輸出內容。例如,使用文本處理程序處理服務器的 IP 地址,最終得到結果后需要將其復制給同事或粘貼到工單系統中;或者使用 date 命令轉換日期格式,然后將結果復制到其他地方使用;最常見的操作之一是使用 date +%s 命令獲取當前時間戳,然后復制該時間戳。如果你經常使用終端,那么每天可能需要重復這種操作數十次。
本文將討論如何高效地完成這一操作:復制上一個命令的輸出結果。雖然看似簡單,但為了節省幾秒鐘的時間,我曾苦苦思索多年,也發現許多人同樣在尋找高效的方法。這篇文章將介紹幾種實現這一操作的方法,雖然我最終使用的方法并非我首創,但其背后的巧妙思路和技巧同樣精彩。希望這篇文章能幫助讀者每天節省幾秒鐘,同時也能帶來一些樂趣。
笨拙的方法
最顯而易見的方法是使用鼠標。為了復制上一個命令的輸出內容,我們需要將手從鍵盤移開,放到鼠標上,選中文本,然后按下 Command + C(在其他系統中可能是其他按鍵組合),將內容復制到剪貼板中。
這種方法顯而易見地浪費時間。首先,任何需要將手從鍵盤移開的操作都是低效的;其次,選中操作本身也并非易事,需要兩次定位文本的開頭和結尾。相比之下,鍵盤操作是二進制的,按下就是按下,不按就是不按,即使閉上眼睛也能操作。而鼠標操作需要精確的定位,閉上眼睛是無法完成的。如果需要復制的命令輸出較長(例如 cat info.log | grep code=404 | tail 的日志輸出),則同時使用鼠標進行定位和翻頁將變得極為困難。
這種增加心智負擔的方法顯得非常不人性化。
樸素的方法
Unix 系統中的管道是一個偉大的發明。由于終端中程序的輸出是標準輸出(stdout),理論上我們可以使用一個程序將標準輸出導入到系統剪貼板中。例如,在 Mac OS X 上可以使用 pbcopy 將程序的輸出內容導入到剪貼板中,然后使用 pbpaste 或直接按下 Command + V 粘貼出來。
在其他 Linux 系統中,也可以實現類似的功能,例如使用 xsel 和 xclip。其原理非常簡單,只需調用系統提供的剪貼板相關 API,將標準輸入(stdin)的內容寫入即可。
類似的工具還有很多,例如 fpp。它可以自動識別標準輸出中的文件路徑,并提供一個圖形界面供用戶選擇文件,按下 Enter 鍵即可打開。例如,可以使用 git stat | fpp。
這種方法的優點是可靠,不涉及鼠標操作。雖然效率也并非特別高,因為需要輸入較多的字符(但可以通過別名簡化)。
這種方法的最大缺點是不直觀。很多時候需要先輸入命令查看標準輸出,確認無誤后再輸入相同的命令并附加 | pbcopy 將其復制到剪貼板中。在運行時間較長或資源消耗較大的情況下,這種方法顯得不太合適。雖然可以使用 tee 程序同時將輸出寫入標準輸出和管道中,但這樣一來命令的復雜度又增加了。這種復雜的命令難以形成肌肉記憶,因此本質上效率也不算特別高。
優雅的方法
另一種簡單而直觀的方法是使用 iTerm2 自帶的功能。在 iTerm2 中,可以通過選擇 “Edit -> Select Output of Last Command” 來選中上一條命令的輸出,快捷鍵為 Command + Shift + A。
如果該選項為灰色,說明尚未安裝 Shell 集成。在菜單欄中選擇 “Install Shell Integration” 即可。iTerm2 將執行一個 Curl xxx | bash 命令來安裝相關依賴。
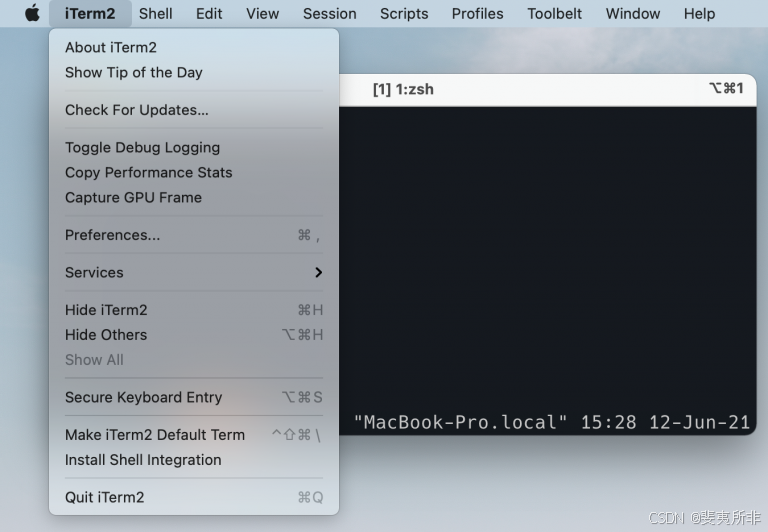
這種方法的優點是操作簡單,只需一個快捷鍵即可完成選中和復制,無需再按下 Command + C。如果大部分時間都使用 iTerm2 作為終端模擬器,那么這種方法已經足夠。
然而,這種方法的缺點也很明顯。這是 iTerm2 提供的功能,如果使用的是其他終端模擬器(例如在 Ubuntu 上),則無法使用。此外,其工作原理是基于在 iTerm2 中運行的命令,因此可以捕獲命令的輸出信息。這帶來了一些嚴重的問題,例如,如果使用 Tmux,則無論在 Tmux 中打開多少個 session 和 window,iTerm2 都將其視為一個程序,因此無法在 Tmux 中成功捕獲標準輸出。
即使不使用 Tmux,還有一個無法避免的場景是通過 SSH 連接到遠程機器。在這種情況下,iTerm2 只能看到一個 SSH 命令,因此如果嘗試復制內容,它會將 SSH 命令下看到的所有內容都復制下來(實際上,前面提到的 pbcopy 也無法在遠程機器上工作)。
為了在 SSH 下也能正常工作,必須不區分是在遠程機器上執行的命令還是在本地執行的命令,而是從整個終端模擬器的緩沖區入手。使用正則匹配可能是一個好的方法。
黑客的方法
由于沒有一個方法能夠既省心又省力地完成這個任務,我多年來一直為此感到煩惱。
有一天,在 Hacker News 上看到有人分享了 Tmux 復制文本的操作方法,我點進去閱讀后有些失望,因為這些內容我已經知道了。然而,當網頁加載完成并播放了播客中的 GIF 時,我發現其中有一段是在命令的輸出之間跳來跳去的!這正是我多年來苦苦尋找的東西!
在確認這并非 Tmux 本身的功能后,我給作者發郵件詢問他是如何在 Tmux 中快速選擇上一個命令的輸出的。
沒想到作者很快回復了我的郵件。
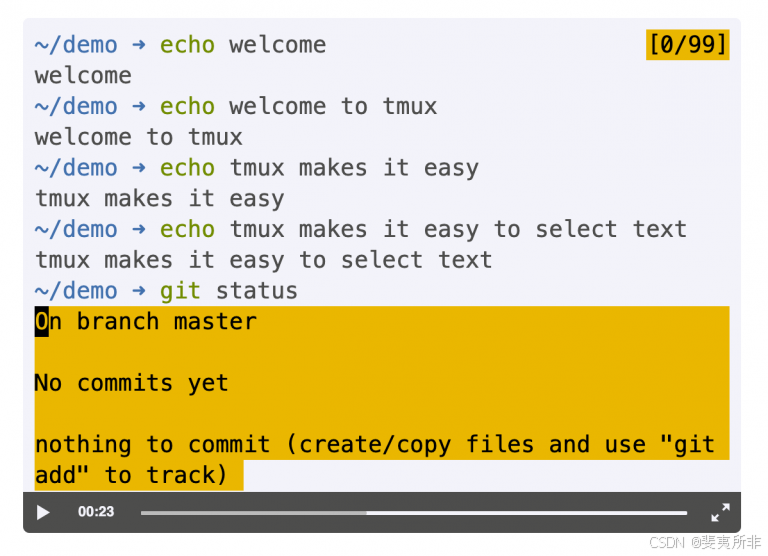
整個思路非常簡單,只需使用一個腳本即可實現,只用到了 Tmux 自身的命令。核心思想是復制當前光標所在的 Shell Prompt 和上一個 Shell Prompt 之間的內容,通過 Tmux 的命令控制光標移動并選擇文本。
腳本如下(現在作者有一篇博客,Quickly copy the output of the last shell command you ran,詳細介紹了這個腳本的每一步操作)。
bind -n S-M-Up {copy-modesend -X clear-selectionsend -X start-of-linesend -X start-of-linesend -X cursor-upsend -X start-of-linesend -X start-of-lineif -F "#{m:*?\u00A0*,#{copy_cursor_line}}" {send -X search-forward-text "?\u00A0"send -X stop-selectionsend -X -N 2 cursor-rightsend -X begin-selectionsend -X end-of-linesend -X end-of-lineif "#{m:*?\u00A0?*,#{copy_cursor_line}}" {send -X cursor-left}} {send -X end-of-linesend -X end-of-linesend -X begin-selectionsend -X search-backward-text "?\u00A0"send -X end-of-linesend -X end-of-linesend -X cursor-rightsend -X stop-selection}
}
bind -n 的意思是將此操作綁定到 root key table,默認情況下綁定到 Prefix table。改為綁定到 root 后,此操作無需按下 Tmux 的 Prefix key。S-M-Up 表示同時按下 Shift + Option + Up 鍵,即將這三個鍵綁定到下面的腳本。
然后,此腳本進入 copy-mode,先將光標移動到行首。之后分為兩個 block。首先看 if 不滿足的下面那個 block,基本上是向前尋找之前的 Shell Prompt。如果找到,則從這里開始復制,這樣兩個 Shell Prompt 之間的內容就被選中了。再來看 if 里面的內容,意思是如果當前行有 Shell Prompt,則直接復制整行。這樣就可以依次向上選中上一個 output、上一個命令、再上一個 output、再上一個命令…… 缺點是只能向上選擇,不支持向下選擇。不過,這已經足夠用了。if 里面的嵌套 if 是處理 Tmux 在 vi 的 copy-mode 下的一個特殊情況,詳細解釋可以參考原文。
這里有一個需要注意的地方:如果 Shell Prompt 的格式中包含空格,例如以 $? 結尾,在 Tmux 的復制模式下,對于沒有執行過命令的行(例如多按了幾次回車),Tmux 會直接將這些行中 Shell Prompt 的空格刪除,這會導致腳本無法匹配到空格。例如,在下面的 Shell 中,復制模式下在 date 和 echo 命令之間的三行就沒有空格了。

解決方法是將 Shell Prompt 最后的空格改為 Non-breaking space,其 Unicode 編碼為 \u00A0(可以看到,上面的腳本匹配的就是這個 Unicode)。如果使用 Vim,可以在輸入模式下按下 Ctrl + V,進入 ins-special-keys 模式,然后依次輸入 u 0 0 a 0,即可輸入這個 Unicode 字符。
這種方法對我來說幾乎是一個完美的解決方案。如果閱讀作者的博客,就會發現其中的坑實在太多了,例如 Tmux 在 vi 的 copy mode 下的行為、刪除空格的行為、跳轉行為(在行被 Wrap 的情況下必須執行兩次 start-of-line 才能真正跳轉到行首等)。估計作者也花了很長時間才寫好這個腳本。
在 SSH 的情況下,理論上也可以實現,因為這種方法是針對 Tmux 顯示的緩沖區進行操作的。但需要修改腳本的匹配規則,因為遠程主機的 Prompt 可能與本地計算機不同。將上面的腳本中的 search-forward-text 改為 search-forward,就可以按照正則表達式進行搜索。
未實現的方法
這種方法是我很久之前的一個嘗試,但至今仍未完成。
之前看到過一個項目:
- GitHub - dequis/tmux-url-select: Keyboard based URL selector that integrates with tmux
https://github.com/dequis/tmux-url-select
它可以快速選擇當前 Tmux 窗口中的 URL 并復制或打開。
查看代碼,發現其思路非常巧妙。具體步驟如下:
- 捕獲當前窗口的全部內容;
- 打開一個新的窗口,覆蓋原來的窗口;
- 新窗口實際上是一個新的 GUI 程序,將老窗口的內容顯示出來,并在該程序中實現選擇、跳轉和定義按鍵等功能。
由于用戶實際上是進入了一個新的程序,但該程序通過修改 Tmux 窗口的名字,讓用戶感覺仍然在 Tmux 中。由于這是一個新的程序,它可以不受限制地完成任何事情。
看到這個項目后,我第一個想法是將其 fork 過來,將選擇 URL 改為選擇上一個命令的輸出。理論上應該是可行的。至今仍未完成的原因是……這個項目是用 Perl 寫的,而 Perl 的可讀性較差。
Ian(上文提到的作者)也表示,這種思路雖然有趣,但從長期來看,不如花時間改進 Tmux 自身的 copy mode 更有意義。他計劃為 Tmux 提交補丁。
其他方法
在與作者 Ian 的交流中,他還向我介紹了其他一些實用的工具。
tmux-thumbs 非常有趣。它類似于 vimium/vimperator 的操作模式,可以通過按鍵快速選擇當前緩沖區中的文本塊。
- GitHub - fcsonline/tmux-thumbs: A lightning fast version of tmux-fingers written in Rust, copy/pasting tmux like vimium/vimperator
https://github.com/fcsonline/tmux-thumbs
extrakto 與上述工具類似,但使用的是 fzf 模式。可以通過模糊搜索查找當前緩沖區中出現過的文本并快速選中。不過,它似乎無法將內容復制到剪貼板。
- GitHub - laktak/extrakto: extrakto for tmux - quickly select, copy/insert/complete text without a mouse
https://github.com/laktak/extrakto
2021 年 07 月 06 日更新:
我發現在服務器上復制命令時,連同命令本身以及提示符一起復制更加實用,因為我們的提示符帶有機器的主機名、標簽、IP 地址等信息。復制命令可以讓同事知道這個輸出是如何生成的,例如打開的文件路徑、使用的 awk 或 grep 等,都能一目了然。因此,我將腳本進行了修改,← 是只復制輸出,↑ 是向上復制提示符、命令以及輸出,↓ 也是如此,但方向是向下選擇。
詳情見:https://twitter.com/laixintao/status/1412081667498332161
實現代碼如下(commit,可以關注 myrc 倉庫,我將所有配置文件都放在這里,從這里可以看到最新版本):
bind -n S-M-Up {copy-modesend -X clear-selectionsend -X start-of-linesend -X start-of-linesend -X cursor-leftsend -X begin-selectionsend -X search-backward "(\\$ )|(# )"send -X start-of-linesend -X start-of-linesend -X stop-selection
}bind -n S-M-Down {copy-modesend -X clear-selectionsend -X end-of-linesend -X end-of-linesend -X search-forward "(\\$ )|(# )"send -X start-of-linesend -X start-of-linesend -X begin-selectionsend -X search-forward "(\\$ )|(# )"send -X search-forward "(\\$ )|(# )"send -X start-of-linesend -X start-of-linesend -X cursor-leftsend -X stop-selection
}
N 種方式復制上一條命令的輸出
23 December 2021
在寫技術 Blog 的時候,經常會遇到粘貼一段命令及其輸出的情況。對于粘貼上一條命令有很簡單的方法,讀取 history 文件就好了,比如下面這條 alias
alias '@cpc'='echo -n $(fc -l -1 | awk "{\$1=\"\";print substr(\$0,2)}") | xclip -select clipboard'
對于命令的輸出,因為默認沒有寫入文件。想要復制的時候總是處于事后的狀態,本文分享幾種方式去簡化這一操作
The first Way
重復執行上一條命令然后將輸出通過管道發送到剪貼板,比如
$ !! | xclip -select clipboard
!! 是指代上一條命令,shell 會自動展開,同樣的還有 !-2, !-3 分別指代向上第 N 條命令。
缺點:
需要重復執行命令,對于沒有冪等或者有 side effect 的情況下,同一條命令多次執行輸出可能都不一樣
The second way
第二種方式使用 PROMPT_COMMAND,這個是 Bash 獨有的。對于 Zsh 的用戶,可以通過 precmd 這個 hook 來做這件事情
precmd() { eval "$PROMPT_COMMAND" }
Bash 會在顯示 PS1 變量之前執行 PROMPT_COMMAND,比如
[kumiko@misaka ~]$ echo $PS1
[\u@\h \W]\$
[kumiko@misaka ~]$ export PROMPT_COMMAND="date +%H:%M:%S"
13:01:50
[kumiko@misaka ~]$ echo 'hello'
hello
13:01:53
我們可以看到時間被顯示在每次輸出 PS1 中的內容 [kumiko@misaka ~]$ 之前(此處不能理解為每次命令執行后輸出時間)。利用這個 hook 我們可以 Hack 掉 File Descriptors,代碼如下
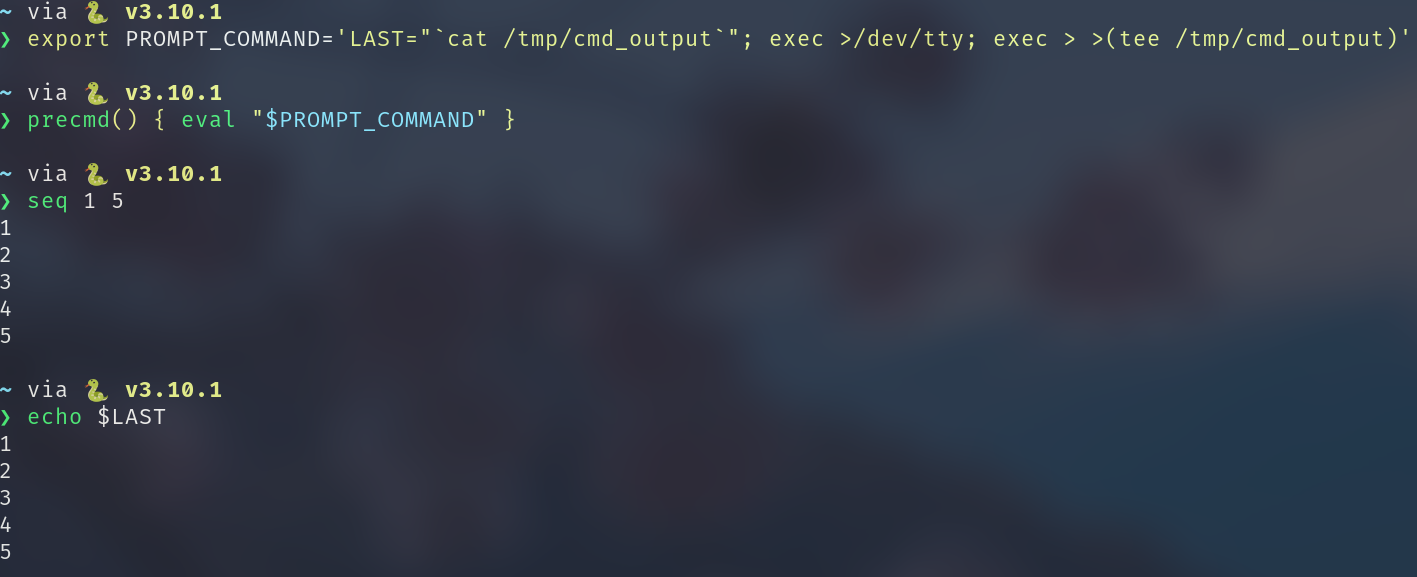
export PROMPT_COMMAND='LAST="`cat /tmp/cmd_output`"; exec 1>/dev/tty; exec 1> >(tee /tmp/cmd_output)'
這條命令由三部分組成,可能對于 shell 不熟悉的同學比較奇怪 exec >/dev/tty 是什么意思。因為大多數情況下,exec 的使用場景是替換當前進程空間,執行一條命令。這里是 exec 的另一個用法,打開指定的 FD 進行讀寫。比如
$ echo 'hahah' > a.txt$ exec 0< a.txt; cat  # 0< 要連在一起,否則會判斷 0 是一條命令字符串
hahah
對于一個進程的 FD ,默認情況下是
- 0:
STDIN- 標準輸入 - 1:
STDOUT- 標準輸出 - 2:
STDERR- 標準錯誤輸出
當我們沒有參數執行 cat 的時候,STDIN 實際上是打開的 /dev/tty,所以會從當前終端讀取數據,然后進行回顯。但是前面的 exec 0< a.txt 將默認的 0 號 FD 的指向替換成了一個讀取 a.txt 的 FD,就相當于我們平常使用的重定向。知道了這點,上面的命令便不難理解了。LAST 變量保存的是一個執行過程,對應著 /tmp/cmd_output 文件的內容。exec 1>/dev/tty 將標準輸出定向到 /dev/tty ,所以我們可以在終端看到命令的輸出,exec 1> >(tee /tmp/cmd_output) 相當于 dup 了 FD,使得標準輸出還會在 /tmp/cmd_output 中寫入一份
然后我們的 $LAST 就是上一條命令的輸出了,效果如下
如果需要同時支持 STDOUT 和 STDERR ,可以使用下面命令,原理相同
export PROMPT_COMMAND='LAST="`cat /tmp/cmd_output`"; exec 1>/dev/tty; exec 1> >(tee /tmp/cmd_output); exec 2>/dev/tty; exec 2> >(tee /tmp/cmd_output);'
缺點:
- 如果你有多個 Shell 進程同時執行命令,會出現單文件同時寫入的情況。這里需要每個 Shell 分配一個獨立文件名稱,比較麻煩
The third way
個人目前使用的方式。我們先來觀察一下終端中,執行命令后的輸出有什么特點。我這里是 starship 和 Zsh 的組合,其他的可以照抄然后自己改動一下
兩個 PS1 之間就是我們的命令 + 輸出部分。命令正常執行成功后顯示的是綠色的 ?,如果上一次命令的 ExitCode 不為 0,那么顯示的是紅色的 ?。此符號在 starship 中可以進行配置,參考文檔 https://starship.rs/config/#character
success_symbol: The format string used before the text input if the previous command succeeded.error_symbol: The format string used before the text input if the previous command failed.
這里順便提一下 starship 的原理,其本質是 Hack 掉PROMPT 變量,更改為執行 starship 的二進制文件,并將 Shell 中的上下文作為參數傳入,比如 STARSHIP_CMD_STATUS 就是上一條命令的 ExitCode。通過一番組合后輸出 PS1,參考 starship.zsh#L95
根據以上信息我們可以將 success_symbol 和 error_symbol 作為錨點,然后模擬文本選擇。下面有兩種方式
- 對于支持快捷鍵選區的 Terminal,比如 Alacritty。可以通過
xdotool來發送按鍵指令,通過腳本替代人工選擇 - 對于 Tmux 下,我們可以編寫 Tmux Script 來做
這里我選擇更加通用的 Tmux 來進行說明:
第一步,為了讓我們可以移動光標進行區塊選擇,我們要先進 copy 模式
copy-mode
然后根據清除當前的已有的選區,這步是避免環境不干凈,確保在一個當前沒有任何選區的情況下執行命令
send -X clear-selection
下面我們開始移動光標,先移動到行首,因為我們當前有可能已經輸入了文字
send -X start-of-line
send -X start-of-line
需要注意,這里需要執行兩次,因為有邏輯行和物理行的概念。比如我的寬度只有16個字符,如果我輸入了 17 個字符那么會產生折行,但是邏輯上我沒有換行的。執行兩次我們能夠到達真正的行首。之后我們需要向上移動光標
send -X cursor-up
send -X cursor-up
send -X cursor-up
因為默認的 starship 配置有一項 add_newline = True 導致每次命令執行后會換行一次,所以我們著力需要執行 3 次才能到達上一條命令輸出的最后一行。目前光標還在最后一行輸出的行首,我們需要移動到行尾,同樣移動兩次
send -X end-of-line
send -X end-of-line
開始進行選區
send -X begin-selection
我們向前搜索,找到上一條命令的開始處。這里不是大于符號,是一個 unicode 字符,可以直接復制過來
send -X search-backward-text "?"
我們向下一行就是輸出結果的開始處,這里是移動到行尾然后向右一個光標就自動到下一行的行首了
send -X end-of-line
send -X end-of-line
send -X cursor-right
結束選區,并復制
send -X stop-selection
send -X copy-selection-and-cancel
上面還有點小瑕疵,如果我的命令輸出里面包含了 ? 怎么辦,選區就不完整了。我目前采用的方法使用零寬字符來當作錨點。比如 \u200b 。需要配置一下 starship
[character]
success_symbol = "[?](bold green)\u200b"
error_symbol = "[?](bold red)\u200b"
vicmd_symbol = "[?](bold green)\u200b"
然后將查找條件改為
send -X search-backward-te "?\u200b"
以上完整代碼如下,根據自己的 Prompt 做修改后放到 tmux.conf 種就可以了
bind -n <your key binding> {copy-modesend -X clear-selectionsend -X start-of-linesend -X start-of-linesend -X cursor-upsend -X cursor-upsend -X cursor-upsend -X end-of-linesend -X end-of-linesend -X begin-selectionsend -X search-backward-text "?\u200b"send -X end-of-linesend -X end-of-linesend -X cursor-rightsend -X stop-selectionsend -X copy-selection-and-cancel
}
上述腳本也可以通過 shell 的函數執行
alias '@cpo'='tmux_copy_cmd_output >> /dev/null 2>&1'tmux_copy_cmd_output() {tmux copy-modetmux send -X clear-selectiontmux send -X start-of-linetmux send -X start-of-linetmux send -X cursor-uptmux send -X cursor-uptmux send -X cursor-up  tmux send -X cursor-up  # 這里多一次,因為現在我們執行的是一條命令了,需要多敲一個 Entertmux send -X end-of-linetmux send -X end-of-linetmux send -X begin-selectiontmux send -X search-backward-te "?\u200b"tmux send -X end-of-linetmux send -X end-of-linetmux send -X cursor-righttmux send -X stop-selectiontmux send -X copy-selection-and-cancel
}
最終效果如下:

缺點:
- 對其他組件具有入侵性,依賴 Tmux 或者 Alacritty 之類的 Terminal
- 有 Buffer 限制,比如復制一個
seq 1 10000的輸出就失敗了
Reference
- Tmux man page
篇外:討論
Copy the output of the last command in Terminal.app
將最后一個命令的輸出復制到 Terminal.app
11
!! | pbcopy would also run the commands again and couldn’t be used with interactive commands.
!! | “pbcopy”也會再次運行這些命令,并且不能與交互式命令一起使用。
This relies on the prompt always being $ :
這依賴于提示符始終為 $ :
tell application "Terminal" to tell window 1 to history
do shell script "/bin/echo " & quoted form of result & ?
" | ruby -e 'puts $<.read.split(/^\\$ .*?$/)[-2][1..-1]'"
set the clipboard to result
Does anyone know any better options?
有誰知道更好的選擇?
asked Nov 19, 2011 at 17:39
Lri
And !! not good for command with side effects
并且“!!”不適合有副作用的命令
– Rich Homolka
CommentedNov 21, 2011 at 0:41
2
Can you add a real example of what you’re trying to accomplish with this? Fill in the blanks "I want to copy the output of the last command, because the last command was and I want to paste it into "
您能添加一個真實的例子來說明您試圖用它完成什么嗎?填空:“我想復制最后一個命令的輸出,因為最后一個命令是____,并且我想把它粘貼到___”
– Doug Harris
CommentedNov 21, 2011 at 18:40
-
@DougHarris I’d just want to assign a keyboard shortcut to a general purpose script for copying the previous output. That fill in the blanks thing is insanely patronizing BTW.
-
@DougHarris 我只是想為用于復制先前輸出的通用腳本分配一個鍵盤快捷鍵。順便說一句,那個填空的事情太盛氣凌人了。
– Lri
Commented Nov 21, 2011 at 19:36
You might consider it patronising, but it’s often the best way to succinctly understand what a user wants.
您可能會認為這是居高臨下的,但這通常是簡潔地了解用戶需求的最佳方式。
– Chris Down
CommentedNov 22, 2011 at 16:23
You could make exec script $( date +%Y%m%d-%H%M%S ) your Terminal startup command to log everything to a dated log file. One unfortunate side effect is that script is a lousy shell (e.g. always 80 wide) in my limited testing.
你可以將“exec script $( date +%Y%m%d-%H%M%S )”設置為終端啟動命令,以便將所有內容記錄到帶有日期的日志文件中。一個不幸的副作用是,在我有限的測試中,“script”是一個糟糕的 shell(例如,寬度始終為 80)。
– Daniel Beck ?
CommentedNov 28, 2011 at 20:06
Add a comment
2 Answers
If you are using at least el Capitan you can use Cmd-shift-A to select the output of the last command and Cmd-C to copy it. Unfortunately this doesn’t work for previous versions.
如果你至少在使用“el Capitan”,你可以使用 Cmd+shift+A 來選擇最后一個命令的輸出,然后用 Cmd+C 來復制它。不幸的是,這不適用于以前的版本。
Edited to add updates from the comments:
編輯以添加來自評論的更新:
- this also works for other than just the latest command: first select any part of the output of any previous command manually, and then hit Cmd + Shift + A
這不僅適用于最新命令:首先手動選擇任何先前命令輸出的任何部分,然后按 Cmd + Shift + A
- after trying this shortcut in iTerm, it asks to install some Shell Integrations and then this keyboard shortcut starts working in iTerm as well, see https://superuser.com/a/1242752/676978 for more details
在 iTerm 中嘗試此快捷方式后,它會要求安裝一些 Shell 集成,然后此鍵盤快捷方式也開始在 iTerm 中起作用,有關更多詳細信息,請參閱 https://superuser.com/a/1242752/676978
edited Dec 31, 2021 at 4:22
answered Dec 19, 2016 at 22:01
Enrico
4
This is great. And this also works for other than just the latest command: first select any part of the output of any previous command manually, and then hit Cmd + Shift + A.
這太棒了。而且這不僅適用于最新命令:首先手動選擇任何先前命令輸出的任何部分,然后按 Cmd + Shift + A。
– khuttun
CommentedMar 1, 2021 at 9:08
@JuusoOhtonen when I tried this shortcut in iTerm, it asked me if I wanted to install some Shell Integrations and when I did that, this keyboard shortcut started working in iTerm as well.
@JuusoOhtonen 當我在 iTerm 中嘗試此快捷方式時,它問我是否要安裝一些 Shell 集成,當我安裝后,此鍵盤快捷方式也開始在 iTerm 中起作用。
– Ghos3t
CommentedDec 16, 2021 at 18:42
How to quickly get the previous line output in a terminal without using a mouse?
如何在不使用鼠標的情況下在終端中快速獲取上一行輸出?
15
Linux (e.g. Ubuntu) terminal, is there a method to get the last line? Say I am randomly typing a td command, which has not been installed on my system, so I will get a message like below. I would like to have a “shortcut” to run sudo apt-get install textdraw quickly.
Linux(例如 Ubuntu)終端,有沒有辦法獲取最后一行?假設我隨意輸入一個“td”命令,而我的系統上尚未安裝該命令,所以我會收到如下消息。我想要一個能快速運行“sudo apt-get install textdraw”的“快捷方式”。
Is there such a tool or how can I copy the last line to clipboard without using the mouse?
有沒有這樣的工具,或者我如何在不使用鼠標的情況下將最后一行復制到剪貼板?
username@WorkStation:~$ td
The program 'td' is currently not installed. You can install it by typing:
sudo apt-get install textdraw
username@WorkStation:~$
edited Dec 28, 2015 at 10:15
Chirag Bhatia - chirag64
asked Dec 28, 2015 at 2:33
Daniel
Press the up arrow? Have you tried that? Also check out the history command in Linux, that might work for you as well.
按向上箭頭呢?你試過嗎?另外,查看一下 Linux 中的“history”命令,那可能也對你有用。
– Richie086
CommentedDec 28, 2015 at 7:18
Terminal multiplexer programs, tmux and screen, provide the capability of getitng text into a clipboard. However, there might be an easier way in Ubuntu’s default GUI, so I suspect an easier answer may be available. Pressing PgUp, Shift-PgUp, or Ctrl-PgUp might allow for scrollback.
終端多路復用器程序“tmux”和“screen”提供了將文本復制到剪貼板的功能。然而,在 Ubuntu 的默認圖形用戶界面中可能有更簡單的方法,所以我懷疑可能有更簡單的答案。按 PgUp、Shift+PgUp 或 Ctrl+PgUp 可能會允許回滾。
– TOOGAM
CommentedDec 28, 2015 at 7:45
3
@Richie086 Please note, what I need is sudo apt-get install textdraw, not td. up arrow will only give me the td
@Richie086 請注意,我需要的是“sudo apt-get install textdraw”,而不是“td”。向上箭頭只會給我“td”
– Daniel
CommentedDec 28, 2015 at 8:47
Add a comment
5 Answers
7
If you don’t mind a little obscenity (I don’t), you might want to use the fuck, a tool that does exactly what you asked for.
如果你不介意有點粗俗(我不介意),你可能想使用 the fuck,一個完全能滿足你要求的工具。
Well, not exactly, but it solves the same problem. Instead of just getting the latest line, it tries to match the last command you typed.
嗯,不完全是,但它解決了同樣的問題。它不只是獲取最新一行,而是嘗試匹配你輸入的最后一個命令。
The Fuck tries to match a rule for the previous command, creates a new command using the matched rule and runs it.
“The Fuck”嘗試匹配前一個命令的規則,使用匹配的規則創建一個新命令并運行它。
The examples shown in the repository show several of the scenarios you mentioned.
存儲庫中顯示的示例展示了你提到的幾種情況。
answered Dec 29, 2015 at 1:33
Alpha
3
In tmux v2.4 and onwards (since this commit https://github.com/tmux/tmux/commit/76d6d3641f271be1756e41494960d96714e7ee58 ) with send-keys -X. It might be possible in older versions, with a different syntax.
在 tmux v2.4 及更高版本中(自從這個提交 https://github.com/tmux/tmux/commit/76d6d3641f271be1756e41494960d96714e7ee58 )使用“send-keys -X”。在舊版本中可能使用不同的語法。
In .tmux.conf:
bind ! copy-mode \;\
send-keys -X cursor-up \;\
send-keys -X select-line \;\
send-keys -X cursor-left \;\
send-keys -X copy-selection-and-cancel \;\
paste-buffer
Now, prefix+! will copy the last line at the current cursor position.
現在,“prefix+!”將復制當前光標位置的最后一行。
cursor-left can be left out if you want to execute it directly without typing return.
如果你想不輸入回車就直接執行,“cursor-left”可以省略。
Note : it won’t work if the last line is empty or if it wrapped but it’s still useful in most cases
注意:如果最后一行為空或換行,它將不起作用,但在大多數情況下它仍然有用
edited Apr 10, 2018 at 14:25
answered Mar 15, 2017 at 15:07
lbonn
Thanks. But, to prevent execution i have to use paste-buffer -s ''.
謝謝。但是,為了防止執行,我必須使用“paste-buffer -s ‘’”。
– mykhal
CommentedApr 20, 2023 at 9:15
via:
-
Automatically Capture Output of the Last Command Into a Variable Using Bash | Baeldung on Linux
https://www.baeldung.com/linux/capture-output-of-last-command-to-variable -
Recall the Previous Command or Its Arguments in Bash | Baeldung on Linux
https://www.baeldung.com/linux/bash-recall-previous-command -
macos - Copy the output of the last command in Terminal.app
https://superuser.com/questions/359256/copy-the-output-of-the-last-command-in-terminal-app -
ubuntu - How to quickly get the previous line output in a terminal without using a mouse?
https://superuser.com/questions/1018657/how-to-quickly-get-the-previous-line-output-in-a-terminal-without-using-a-mouse -
在終端快速選中上一個命令的輸出內容
https://www.kawabangga.com/posts/4256 -
N 種方式復制上一條命令的輸出 · Hanaasagi - (ゝω·)~ kira
https://blog.dreamfever.me/posts/2021-12-23-quickly-copy-the-output-of-the-last-shell-command-you-ran/


全部被“重置連接”或超時)

)


