文章目錄
- aws(學習筆記第四十一課) image-content-search
- 學習內容:
- 1. 整體架構
- 1.1 代碼鏈接
- 1.2 關鍵架構流程
- 1.3 `upload`圖像文件的動作
- 1.4 `search`圖像文件的動作
- 2. 代碼解析
- 2.1 `yml`文件配置詳細設定
- 2.1.1 `yml`文件
- 2.1.2 `yml`文件文件解析
- 2.2 創建`s3 bucket`
- 2.3 創建`API Gateway`
- 2.4 創建文件上傳的表示頁面
- 2.4.1 創建文件上傳的`api_gateway_resource`的`lambda`函數
- 2.4.2 配置文件上傳的`LambdaIntegration`
- 2.4.3 配置文件上傳的`API Gateway Method`
- 2.4.4 配置文件上傳的頁面代碼
- 2.4.4.1 `python`的`lambda handler`
- 2.4.4.2 `html`的頁面代碼
- 2.5 配置`cognito`安全認證
- 2.6 創建`signedURL`的`API Gateway`
- 2.6.1 創建`signedURL`的`API Gateway`
- 2.6.2 創建`signedURL`的`API Gateway`處理的`lambda`
- 2.7 監視`S3 bucket`的`lambda`
- 2.7.1 監視架構
- 2.7.2 創建`lmabda`
- 2.7.2 `S3 bucket`監視的`lmabda`代碼
- 2.8 創建`lambda`對圖像進行分析
- 2.8.1 圖像分析架構
- 2.8.1 圖像分析`lambda`函數
- 2.9 創建圖像分析數據保存的數據庫
- 2.9.1 創建數據庫的密碼
- 2.9.2 創建數據庫
- 2.9.3 將數據庫密碼和數據庫綁定`attachment`
- 2.10 創建數據庫的`lambda function`
- 2.10.1 創建數據庫訪問`role`
- 2.10.2 創建`image_data_function`
- 2.10.3 創建`image search function`
- 2.10.4 創建`image db`的`schema`
- 2.10.5 創建`image db`的保存`lambda`
- 3 執行`cdk`
aws(學習筆記第四十一課) image-content-search
- 使用
SQS+Lambda集成 - 數據庫(
Aurora Serverless) -
Cognito(用戶管理) -
rekognition(圖像解析)
學習內容:
- 使用
SQS+Lambda+Aurora Serverless+Cognito+rekognition
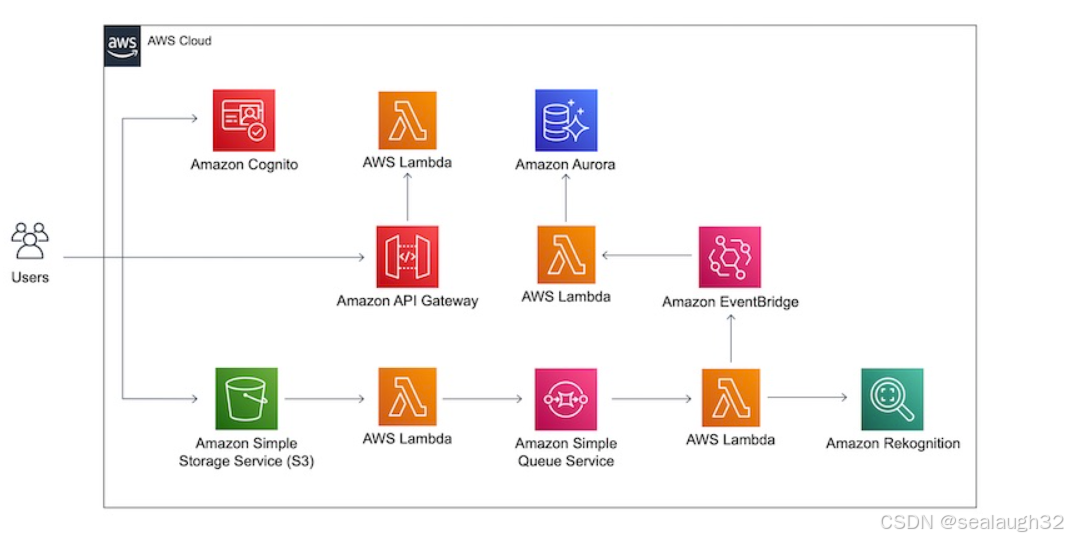
1. 整體架構
1.1 代碼鏈接
- 代碼鏈接(image-content-search)
1.2 關鍵架構流程
- 用戶上傳圖像 → S3觸發Lambda → 圖像分析 → 結果存入數據庫
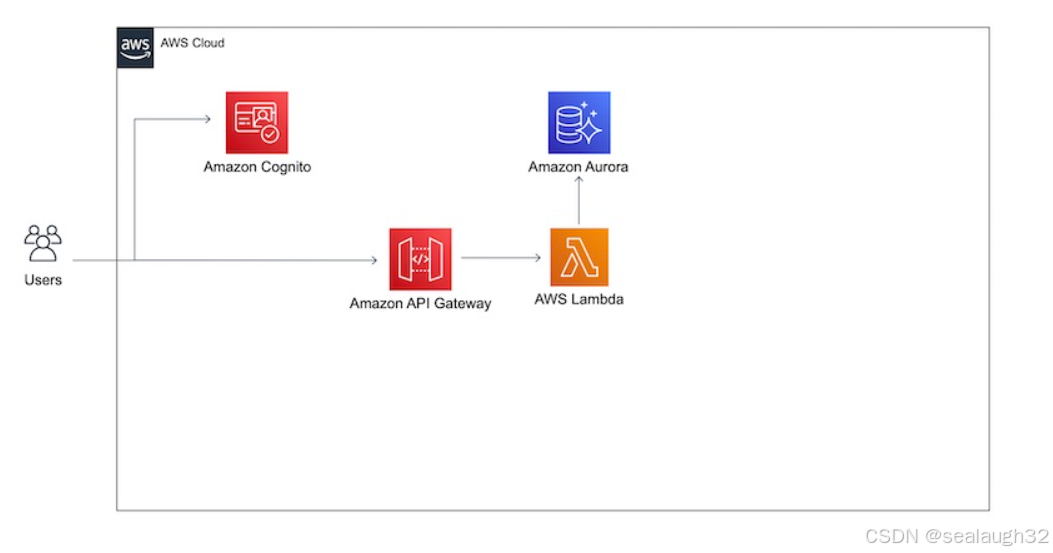
- 前端通過API Gateway查詢數據庫(需Cognito認證)
- 事件總線協調異步任務(如分析完成后觸發存儲操作)。
1.3 upload圖像文件的動作
1.4 search圖像文件的動作
2. 代碼解析
2.1 yml文件配置詳細設定
2.1.1 yml文件
這里配置了Environment,Author,Region等配置,比起寫入cdk.py的python代碼中,這里將配置數據寫入yml文件中會更加清晰。
Environment: Development
Author: Mohsen
Region: eu-central-1
ProjectName: ImageContentSearchDeadLetterQueue:MaxReceiveCount: 3Cognito:SelfSignUp: TrueDomainPrefix: image-content-searchAllowedOAuthScopes:- phone- email- openid- profileDatabase:Name: images_labelsDeletionProtection: FalseScaling:AutoPause: TrueMin: 2Max: 8SecondsToAutoPause: 1800Functions:DefaultSignedUrlExpirySeconds: "3600"DefaultMaxApiCallAttempts: "5"
2.1.2 yml文件文件解析
with open("stack/config.yml", 'r') as stream:configs = yaml.safe_load(stream)# for example, use configs in image_data_functionimage_data_function = Function(self, "ICS_IMAGE_DATA",function_name="ICS_IMAGE_DATA",runtime=Runtime.PYTHON_3_7,timeout=Duration.seconds(5),role=image_data_function_role,environment={"DEFAULT_MAX_CALL_ATTEMPTS": configs["Functions"]["DefaultMaxApiCallAttempts"],"CLUSTER_ARN": database_cluster_arn,"CREDENTIALS_ARN": database_secret.secret_arn,"DB_NAME": database.database_name,"REGION": Aws.REGION},handler="main.handler",code=Code.from_asset("./src/imageData"))
2.2 創建s3 bucket
### S3 coreimages_S3_bucket = _s3.Bucket(self, "ICS_IMAGES")images_S3_bucket.add_cors_rule(allowed_methods=[_s3.HttpMethods.POST],allowed_origins=["*"] # add API gateway web resource URL)
這里,需要從API gateway的domain進行跨域訪問S3 bucket的AWS的url,因此需要CORS Cross-Origin Resource Share,是瀏覽器的一種安全機制,用于控制不同源(協議+域名+端口)之間的資源訪問。
在之前的文章中介紹過。spring boot(學習筆記第五課) 自定義錯誤頁,CORS(跨域支持)
2.3 創建API Gateway
### api gateway coreapi_gateway = RestApi(self, 'ICS_API_GATEWAY', rest_api_name='ImageContentSearchApiGateway')api_gateway_resource = api_gateway.root.add_resource(configs["ProjectName"])api_gateway_landing_page_resource = api_gateway_resource.add_resource('web')api_gateway_get_signedurl_resource = api_gateway_resource.add_resource('signedUrl')api_gateway_image_search_resource = api_gateway_resource.add_resource('search')
api_gateway_resource作為父resouce。api_gateway_landing_page_resource作為子resource,作為文件上傳的表示頁面。api_gateway_landing_page_resource作為子resource,作為文件上傳S3 bucket的請求url。api_gateway_image_search_resource作為子resource,作為文件分析結果的頁面。
2.4 創建文件上傳的表示頁面
2.4.1 創建文件上傳的api_gateway_resource的lambda函數
### landing page functionget_landing_page_function = Function(self, "ICS_GET_LANDING_PAGE",function_name="ICS_GET_LANDING_PAGE",runtime=Runtime.PYTHON_3_7,handler="main.handler",code=Code.from_asset("./src/landingPage"))
2.4.2 配置文件上傳的LambdaIntegration
get_landing_page_integration = LambdaIntegration(get_landing_page_function,proxy=True,integration_responses=[IntegrationResponse(status_code='200',response_parameters={'method.response.header.Access-Control-Allow-Origin': "'*'"})])
注意,這里配置method.response.header.Access-Control-Allow-Origin以便允許其他domain過來的跨域的訪問。但是,如果是生產環境,需要將*換成特定的domain。
2.4.3 配置文件上傳的API Gateway Method
api_gateway_landing_page_resource.add_method('GET', get_landing_page_integration,method_responses=[MethodResponse(status_code='200',response_parameters={'method.response.header.Access-Control-Allow-Origin': True})])
2.4.4 配置文件上傳的頁面代碼
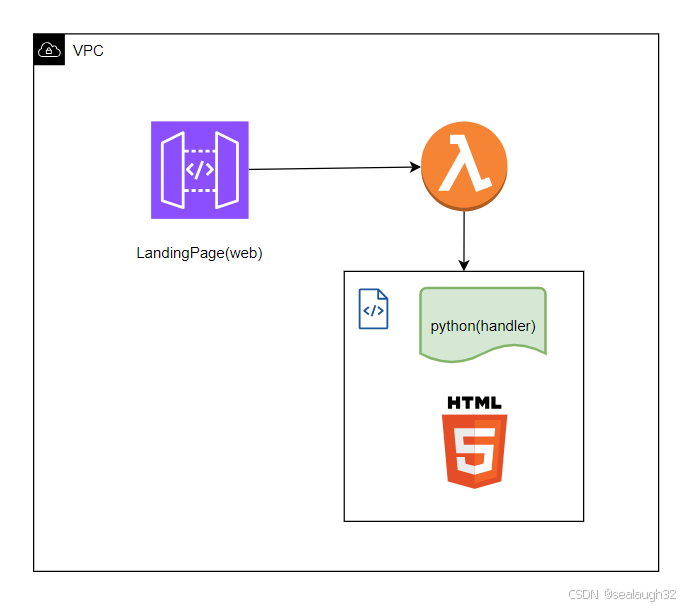
2.4.4.1 python的lambda handler
\src\landingPage\main.py
# this function
# gets the simple html page
# updates the login page and logout page address
# returns the contentdef handler(event, context):login_page = event["headers"]["Referer"]return {'statusCode': 200,'headers': {'Content-Type': 'text/html'},'body': file_get_contents("index.html").replace('###loginPage###', login_page)}def file_get_contents(filename):with open(filename) as f:return f.read()
這里,直接將html的文件打開,進行返回
2.4.4.2 html的頁面代碼
\src\landingPage\index.html
<html><head><meta http-equiv="Content-Type" content="text/html; charset=UTF-8" /><meta name="viewport" content="width=device-width, initial-scale=1"><style>body{font-family:Arial}.tab{overflow:hidden;border:1px solid #ccc;background-color:#f1f1f1}.tab button{background-color:inherit;float:left;border:none;outline:0;cursor:pointer;padding:14px 16px;transition:.3s;font-size:17px}.tab button:hover{background-color:#ddd}.tab button.active{background-color:#ccc}.tabcontent{display:none;padding:6px 12px;-webkit-animation:fadeEffect 1s;animation:fadeEffect 1s}@-webkit-keyframes fadeEffect{from{opacity:0}to{opacity:1}}@keyframes fadeEffect{from{opacity:0}to{opacity:1}}input[type=text],select{width:30%;padding:12px 20px;margin:8px 0;display:inline-block;border:1px solid #ccc;border-radius:4px;box-sizing:border-box}.submit[type=submit]{width:20%;background-color:#4caf50;color:#fff;padding:14px 20px;margin:8px 0;border:none;border-radius:4px;cursor:pointer}input[type=submit]:hover{background-color:#45a049}.div{border-radius:5px;background-color:#f2f2f2;padding:20px}table{border-collapse:collapse;table-layout: fixed;width:100%}td,th{text-align:left;padding:8px;word-wrap:break-word;}tr:nth-child(even){background-color:#f2f2f2}</style><script src="https://code.jquery.com/jquery-3.6.4.min.js"></script><script>var authData = window.location.hash.substring(1);var idToken = authData.split('&').find((rec) => rec.split('=')[0] == 'id_token').split('=')[1]var getSignedUrlEndpoint = window.location.href.split('#')[0].replace('web', 'signedUrl')var searchImageEndpoint = window.location.href.split('#')[0].replace('web', 'search')var loginPage = '###loginPage###';var logoutPage = loginPage.replace('login', 'logout');function logout() {window.location.replace(logoutPage);}function getSignedUrl() {$.ajax({url: getSignedUrlEndpoint,headers: { 'Authorization': idToken },type: "GET",contentType: 'application/json; charset=utf-8',success: function (result) {console.log(result);$("#upload_image_form").attr('action', result.url);$('input[name="key"]').val(result.fields.key);$('input[name="X-Amz-Credential"]').val(result.fields['x-amz-credential']);$('input[name="X-Amz-Algorithm"]').val(result.fields['x-amz-algorithm']);$('input[name="X-Amz-Date"]').val(result.fields['x-amz-date']);$('input[name="x-amz-security-token"]').val(result.fields['x-amz-security-token']);$('input[name="Policy"]').val(result.fields.policy);$('input[name="X-Amz-Signature"]').val(result.fields['x-amz-signature']);},error: function (error) {console.log(error);if (error.status == 401) {logout();}}});}function listImagesByLabel(outputTab, label, language, country) {console.log('Finding images with label: ' + label);var formData = language ? {label, language, country} : {label}$.ajax({url: searchImageEndpoint,headers: { 'Authorization': idToken },type: "POST",data: {...formData, 'source': 'API'},contentType: 'application/json; charset=utf-8',success: function (results) {console.log(results);$(outputTab + " tr").remove();$(outputTab + " th").remove();if (results) {$(outputTab).append( '<tr><th>Image ID</th></tr>' );results.forEach(item => {$(outputTab).append( '<tr><td>' + item.id + '</th></tr>' );});}},error: function (error) {console.log(error.responseText, error.status);if (error.status == 401) {logout();}}});}$(document).ready(function () {if (window.location.hash) {// getSignedUrl();} else {console.log('Authorization information from cognito is not found!');}});function submitSearchQuery() {event.preventDefault();var language = $('#language').val();var country = $('#country').val();var label = $('input[name=label]').val();listImagesByLabel('#search_image_result', label, language, country);}function openTab(evt, tabName) {$("#upload_result").text('');$("#upload_result").css("color", "black");$("#file_select").val('');if (tabName == 'upload') {getSignedUrl();}if (tabName == 'report') {listImagesByLabel('#report_image_result', 'offensive');}var i, tabcontent, tablinks;tabcontent = document.getElementsByClassName("tabcontent");for (i = 0; i < tabcontent.length; i++) {tabcontent[i].style.display = "none";}tablinks = document.getElementsByClassName("tablinks");for (i = 0; i < tablinks.length; i++) {tablinks[i].className = tablinks[i].className.replace(" active", "");}document.getElementById(tabName).style.display = "block";evt.currentTarget.className += " active";}function submitFileUpload() {event.preventDefault();var formData = new FormData();var selectedFile = $('input[name="file"]')[0]$('#upload_image_form *').filter(':input').filter(":hidden").each(function(k, v){formData.append(v.name, v.defaultValue);});formData.append("file", selectedFile.files[0]);$.ajax({url: $("#upload_image_form").attr('action'),type: 'POST',data: formData,success: function (data) {$("#upload_result").text('The file has been successfully uploaded!');$("#upload_result").css("color", "green");getSignedUrl();},error: function(xhr, textStatus, errorThrown){$("#upload_result").text('The file upload failed!');$("#upload_result").css("color", "red");console.log(textStatus);console.log(errorThrown);},cache: false,contentType: false,processData: false});};</script>
</head><body><div style="width: 50%; margin-left: 25%;"><div class="tab" style="margin-top: 10px;"><button class="tablinks" onclick="openTab(event, 'upload')" id="default_tab">Upload</button><button class="tablinks" onclick="openTab(event, 'search')">Search</button><button class="tablinks" onclick="openTab(event, 'report')">Report</button><button class="tablinks" onclick="logout()" style="float: right;">Logout</button></div><div id="upload" class="tabcontent"><h3>Upload Image</h3><p>Select image to upload:</p><form id="upload_image_form" method="post" enctype="multipart/form-data"><input type="hidden" name="key"/><br /><input type="hidden" name="X-Amz-Credential"/><input type="hidden" name="X-Amz-Algorithm"/><input type="hidden" name="X-Amz-Date"/><input type="hidden" name="x-amz-security-token"/><input type="hidden" name="Policy"/><input type="hidden" name="X-Amz-Signature"/><input type="file" id="file_select" name="file"/> <br /><input type="submit" class="submit" value="Upload" onclick="submitFileUpload()"/></form><p id="upload_result"></p></div><div id="search" class="tabcontent"><h3>Search Labels</h3><form id="search_image_form" method="post"><label >Language:</label><select name="language" id="language"><option value="en">English</option><option value="tr">Turkish</option><option value="nl">Dutch</option></select><br /><label >Country:</label><select name="country" id="country"><option value="nl">Netherlands</option></select><br /><label >Label to search:</label><input type="text" name="label"/><br /><input class="submit" type="submit" value="Search" onclick="submitSearchQuery()"/></form><table id="search_image_result"></table></div><div id="report" class="tabcontent"><h3>Report of offensive photos</h3><table id="report_image_result"></table></div></div><script>document.getElementById("default_tab").click();</script></body></html>
2.5 配置cognito安全認證
### cognitorequired_attribute = _cognito.StandardAttribute(required=True)users_pool = _cognito.UserPool(self, "ICS_USERS_POOL",auto_verify=_cognito.AutoVerifiedAttrs(email=True), #required for self sign-upstandard_attributes=_cognito.StandardAttributes(email=required_attribute), #required for self sign-upself_sign_up_enabled=configs["Cognito"]["SelfSignUp"])user_pool_app_client = _cognito.CfnUserPoolClient(self, "ICS_USERS_POOL_APP_CLIENT",supported_identity_providers=["COGNITO"],allowed_o_auth_flows=["implicit"],allowed_o_auth_scopes=configs["Cognito"]["AllowedOAuthScopes"],user_pool_id=users_pool.user_pool_id,callback_urls=[api_gateway.url_for_path('/web')],allowed_o_auth_flows_user_pool_client=True,explicit_auth_flows=["ALLOW_REFRESH_TOKEN_AUTH"])
這里表示/web需要認證,并且認證之后url將重定向到/web。
2.6 創建signedURL的API Gateway
2.6.1 創建signedURL的API Gateway
### get signed URL functionget_signedurl_function = Function(self, "ICS_GET_SIGNED_URL",function_name="ICS_GET_SIGNED_URL",environment={"ICS_IMAGES_BUCKET": images_S3_bucket.bucket_name,"DEFAULT_SIGNEDURL_EXPIRY_SECONDS": configs["Functions"]["DefaultSignedUrlExpirySeconds"]},runtime=Runtime.PYTHON_3_7,handler="main.handler",code=Code.from_asset("./src/getSignedUrl"))get_signedurl_integration = LambdaIntegration(get_signedurl_function,proxy=True,integration_responses=[IntegrationResponse(status_code='200',response_parameters={'method.response.header.Access-Control-Allow-Origin': "'*'",})])api_gateway_get_signedurl_authorizer = CfnAuthorizer(self, "ICS_API_GATEWAY_GET_SIGNED_URL_AUTHORIZER",rest_api_id=api_gateway_get_signedurl_resource.api.rest_api_id,name="ICS_API_GATEWAY_GET_SIGNED_URL_AUTHORIZER",type="COGNITO_USER_POOLS",identity_source="method.request.header.Authorization",provider_arns=[users_pool.user_pool_arn])get_signedurl_method = api_gateway_get_signedurl_resource.add_method('GET', get_signedurl_integration,authorization_type=AuthorizationType.COGNITO,method_responses=[MethodResponse(status_code='200',response_parameters={'method.response.header.Access-Control-Allow-Origin': True,})])signedurl_custom_resource = typing.cast("aws_cloudformation.CfnCustomResource", get_signedurl_method.node.find_child('Resource'))signedurl_custom_resource.add_property_override('AuthorizerId', api_gateway_get_signedurl_authorizer.ref)images_S3_bucket.grant_put(get_signedurl_function, objects_key_pattern="new/*")
2.6.2 創建signedURL的API Gateway處理的lambda
這里,從前端傳遞來的文件被put到S3 bucket。
import json
import boto3
import logging
import os
import time
import hashlibfrom botocore.exceptions import ClientError
images_bucket = os.environ['ICS_IMAGES_BUCKET']
default_signedurl_expiry_seconds = os.environ['DEFAULT_SIGNEDURL_EXPIRY_SECONDS']# this function
# creates a pre-sighned URL for uploading image to S3 and returns itdef handler(event, context):uniquehash = hashlib.sha1("{}".format(time.time_ns()).encode('utf-8')).hexdigest()result = create_presigned_post(images_bucket, "new/{}/{}".format(uniquehash[:2],uniquehash))return {'statusCode': 200,'headers': {'Content-Type': 'application/json; charset=UTF-8'},'body': json.dumps(result)}def create_presigned_post(bucket_name, object_name, fields=None, conditions=None, expiration=default_signedurl_expiry_seconds):s3_client = boto3.client('s3')try:response = s3_client.generate_presigned_post(bucket_name,object_name,Fields=fields,Conditions=conditions,ExpiresIn=int(expiration))except ClientError as e:logging.error(e)return Nonereturn response
2.7 監視S3 bucket的lambda
2.7.1 監視架構
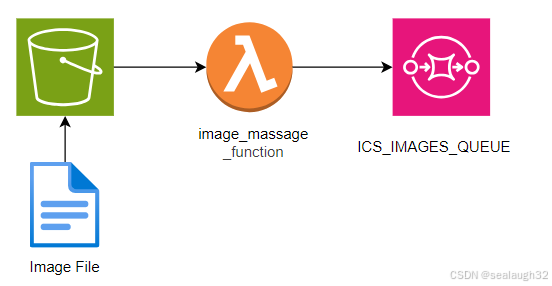
2.7.2 創建lmabda
### image massage functionimage_massage_function = Function(self, "ICS_IMAGE_MASSAGE",function_name="ICS_IMAGE_MASSAGE",timeout=Duration.seconds(6),runtime=Runtime.PYTHON_3_7,environment={"ICS_IMAGE_MASSAGE": image_queue.queue_name},handler="main.handler",code=Code.from_asset("./src/imageMassage"))images_S3_bucket.grant_write(image_massage_function, "processed/*")images_S3_bucket.grant_delete(image_massage_function, "new/*")images_S3_bucket.grant_read(image_massage_function, "new/*")new_image_added_notification = _s3notification.LambdaDestination(image_massage_function)images_S3_bucket.add_event_notification(_s3.EventType.OBJECT_CREATED,new_image_added_notification,_s3.NotificationKeyFilter(prefix="new/"))image_queue.grant_send_messages(image_massage_function)
2.7.2 S3 bucket監視的lmabda代碼
def handler(event, context):s3 = boto3.resource('s3')for record in event['Records']:newKey = record['s3']['object']['key']bucket = record['s3']['bucket']['name']name = bucket.split("/")[-1]localfile = "/tmp/{}".format(name)# download the filenew_key_obj = s3.Object(bucket, newKey)new_key_obj.download_file(localfile)# calc hashimage_SHA1 = getSha1(localfile)# check if not existprocessed_key = "processed/{}/{}".format(image_SHA1[:2], image_SHA1)key_is_processed = isS3ObjectExist(bucket, processed_key)if key_is_processed: continue# add to the queuemessage = json.dumps({"image": processed_key,"original_key": newKey,"original_last_modified": new_key_obj.last_modified,"etag": new_key_obj.e_tag}, default=str)queue = sqs.get_queue_by_name(QueueName=queue_name)response = queue.send_message(MessageBody=message)logger.info("Message {} has been sent.".format(response.get('MessageId')))#move the images3.Object(bucket, processed_key).copy_from(CopySource="{}/{}".format(bucket,newKey))new_key_obj.delete()# delete local fileos.remove(localfile)return Truedef isS3ObjectExist(bucket, key):s3 = boto3.resource('s3')try:s3.Object(bucket,key)return Falseexcept botocore.exceptions.ClientError as e:if e.response['Error']['Code'] == "404":return Trueelse:raise edef getSha1(filepath):sha1 = hashlib.sha1()with open(filepath, 'rb') as f:while True:data = f.read(65536) # read in 64kb chunksif not data: breaksha1.update(data)return sha1.hexdigest()
2.8 創建lambda對圖像進行分析
2.8.1 圖像分析架構
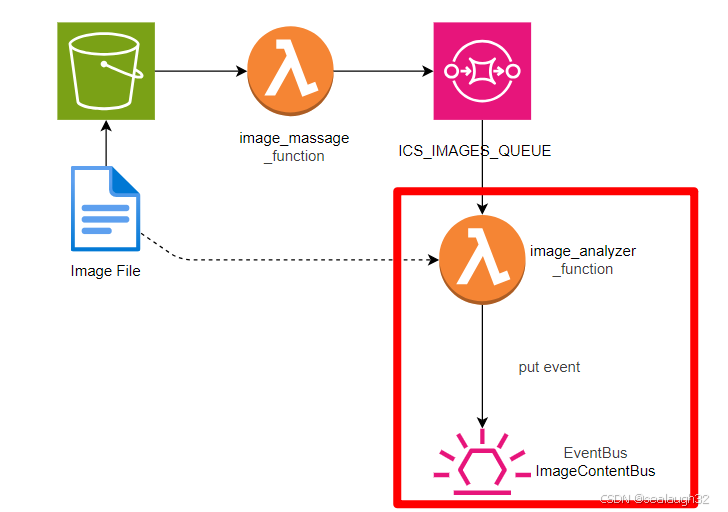
2.8.1 圖像分析lambda函數
def handler(event, context):for record in event['Records']:# receiptHandle = record['receiptHandle']body = record['body']message = json.loads(body)bucket = os.environ['ICS_IMAGES_BUCKET']key = message['image']# original_key = message['original_key']# original_last_modified = message['original_last_modified']# etag = message['etag']logger.info('Processing {}.'.format(key))detected_labels = rekognition_client.detect_labels(Image={'S3Object': {'Bucket': bucket, 'Name': key}},MaxLabels=20,MinConfidence=85)detected_unsafe_contents = rekognition_client.detect_moderation_labels(Image={'S3Object': {'Bucket': bucket, 'Name': key}})object_labels = []for l in detected_labels['Labels']:object_labels.append(l['Name'].lower()) # add objects in imagefor l in detected_unsafe_contents['ModerationLabels']:if ('offensive' not in object_labels): object_labels.append("offensive") #label image as offensiveobject_labels.append(l['Name'].lower())image_id = key.split("/")[-1]response = events_client.put_events(Entries=[{'Source': "EventBridge",'Resources': [context.invoked_function_arn,],'DetailType': 'images_labels','Detail': json.dumps({"labels": object_labels, "image_id": image_id}),'EventBusName': event_bus_name},])if response["FailedEntryCount"] == 1:raise Exception(f'Failed entry observed. Count: {response["Entries"]}')
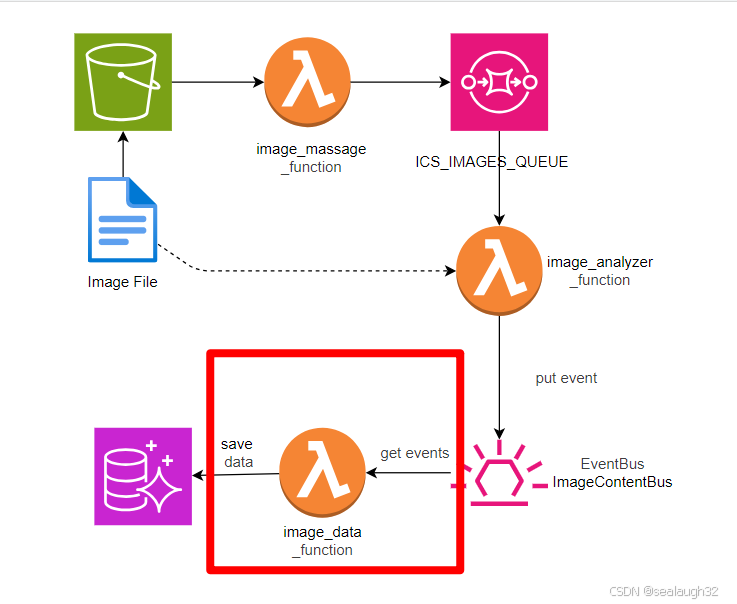
2.9 創建圖像分析數據保存的數據庫
2.9.1 創建數據庫的密碼
### databasedatabase_secret = _secrets_manager.Secret(self, "ICS_DATABASE_SECRET",secret_name="rds-db-credentials/image-content-search-rds-secret",generate_secret_string=_secrets_manager.SecretStringGenerator(generate_string_key='password',secret_string_template='{"username": "dba"}',exclude_punctuation=True,exclude_characters='/@\" \\\'',require_each_included_type=True))
2.9.2 創建數據庫
database = _rds.CfnDBCluster(self, "ICS_DATABASE",engine=_rds.DatabaseClusterEngine.aurora_mysql(version=_rds.AuroraMysqlEngineVersion.VER_5_7_12).engine_type,engine_mode="serverless",database_name=configs["Database"]["Name"],enable_http_endpoint=True,deletion_protection=configs["Database"]["DeletionProtection"],master_username=database_secret.secret_value_from_json("username").to_string(),master_user_password=database_secret.secret_value_from_json("password").to_string(),scaling_configuration=_rds.CfnDBCluster.ScalingConfigurationProperty(auto_pause=configs["Database"]["Scaling"]["AutoPause"],min_capacity=configs["Database"]["Scaling"]["Min"],max_capacity=configs["Database"]["Scaling"]["Max"],seconds_until_auto_pause=configs["Database"]["Scaling"]["SecondsToAutoPause"]),)
2.9.3 將數據庫密碼和數據庫綁定attachment
database_cluster_arn = "arn:aws:rds:{}:{}:cluster:{}".format(Aws.REGION, Aws.ACCOUNT_ID, database.ref)secret_target = _secrets_manager.CfnSecretTargetAttachment(self,"ICS_DATABASE_SECRET_TARGET",target_type="AWS::RDS::DBCluster",target_id=database.ref,secret_id=database_secret.secret_arn)secret_target.node.add_dependency(database)
2.10 創建數據庫的lambda function
2.10.1 創建數據庫訪問role
### database functionimage_data_function_role = _iam.Role(self, "ICS_IMAGE_DATA_FUNCTION_ROLE",role_name="ICS_IMAGE_DATA_FUNCTION_ROLE",assumed_by=_iam.ServicePrincipal("lambda.amazonaws.com"),managed_policies=[_iam.ManagedPolicy.from_aws_managed_policy_name("service-role/AWSLambdaVPCAccessExecutionRole"),_iam.ManagedPolicy.from_aws_managed_policy_name("service-role/AWSLambdaBasicExecutionRole"),_iam.ManagedPolicy.from_aws_managed_policy_name("AmazonRDSDataFullAccess")])
2.10.2 創建image_data_function
image_data_function = Function(self, "ICS_IMAGE_DATA",function_name="ICS_IMAGE_DATA",runtime=Runtime.PYTHON_3_7,timeout=Duration.seconds(5),role=image_data_function_role,environment={"DEFAULT_MAX_CALL_ATTEMPTS": configs["Functions"]["DefaultMaxApiCallAttempts"],"CLUSTER_ARN": database_cluster_arn,"CREDENTIALS_ARN": database_secret.secret_arn,"DB_NAME": database.database_name,"REGION": Aws.REGION},handler="main.handler",code=Code.from_asset("./src/imageData"))
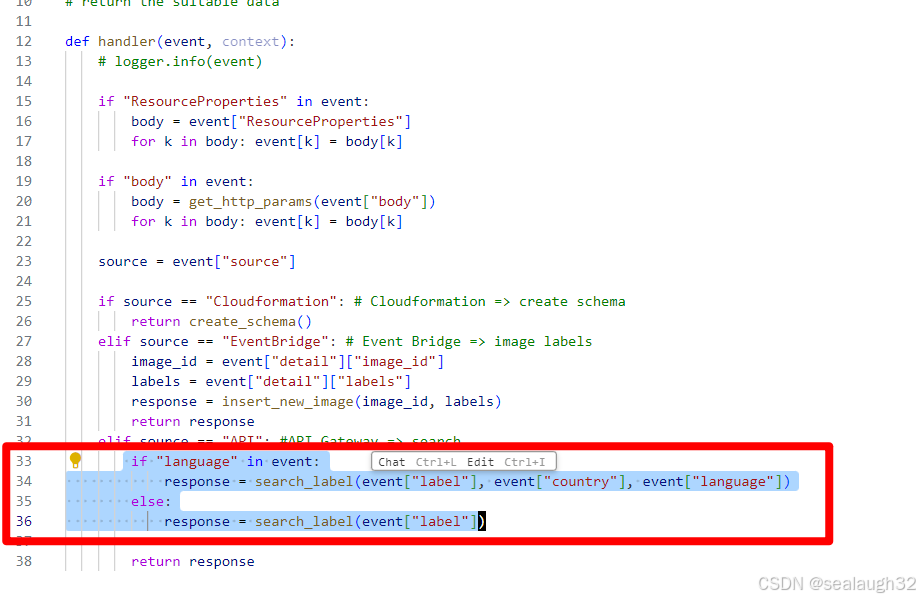
2.10.3 創建image search function
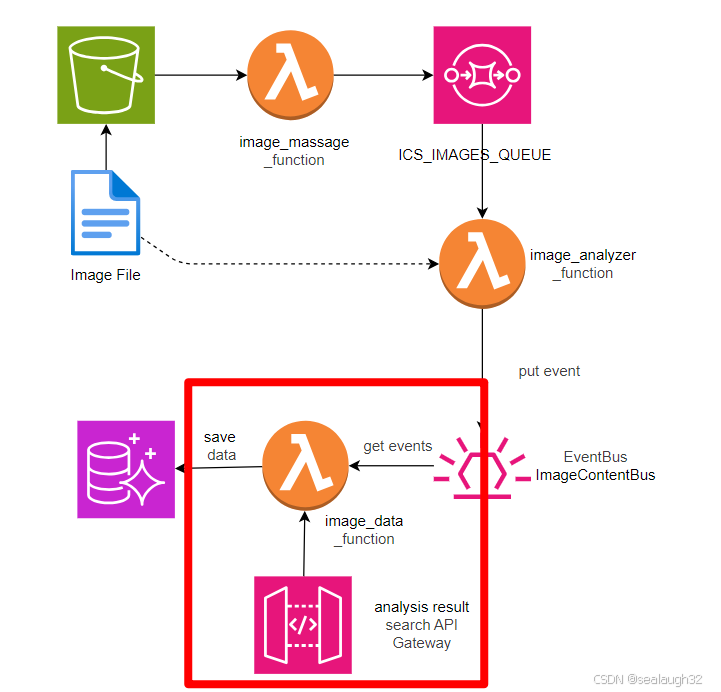
image_search_integration = LambdaIntegration(image_data_function,proxy=True,integration_responses=[IntegrationResponse(status_code='200',response_parameters={'method.response.header.Access-Control-Allow-Origin': "'*'",})])api_gateway_image_search_authorizer = CfnAuthorizer(self, "ICS_API_GATEWAY_IMAGE_SEARCH_AUTHORIZER",rest_api_id=api_gateway_image_search_resource.api.rest_api_id,name="ICS_API_GATEWAY_IMAGE_SEARCH_AUTHORIZER",type="COGNITO_USER_POOLS",identity_source="method.request.header.Authorization",provider_arns=[users_pool.user_pool_arn])search_integration_method = api_gateway_image_search_resource.add_method('POST', image_search_integration,authorization_type=AuthorizationType.COGNITO,method_responses=[MethodResponse(status_code='200',response_parameters={'method.response.header.Access-Control-Allow-Origin': True,})])search_integration_custom_resource = typing.cast("aws_cloudformation.CfnCustomResource", search_integration_method.node.find_child('Resource'))search_integration_custom_resource.add_property_override('AuthorizerId', api_gateway_image_search_authorizer.ref)
2.10.4 創建image db的schema
### custom resourcelambda_provider = Provider(self, 'ICS_IMAGE_DATA_PROVIDER',on_event_handler=image_data_function)CustomResource(self, 'ICS_IMAGE_DATA_RESOURCE',service_token=lambda_provider.service_token,pascal_case_properties=False,resource_type="Custom::SchemaCreation",properties={"source": "Cloudformation"})
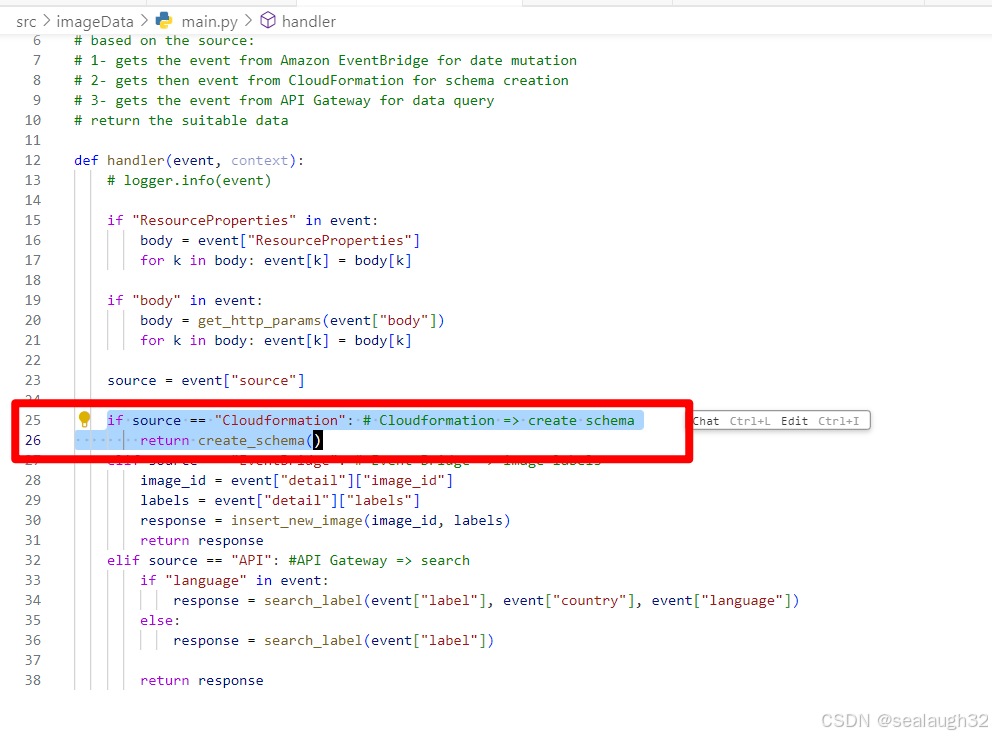
2.10.5 創建image db的保存lambda
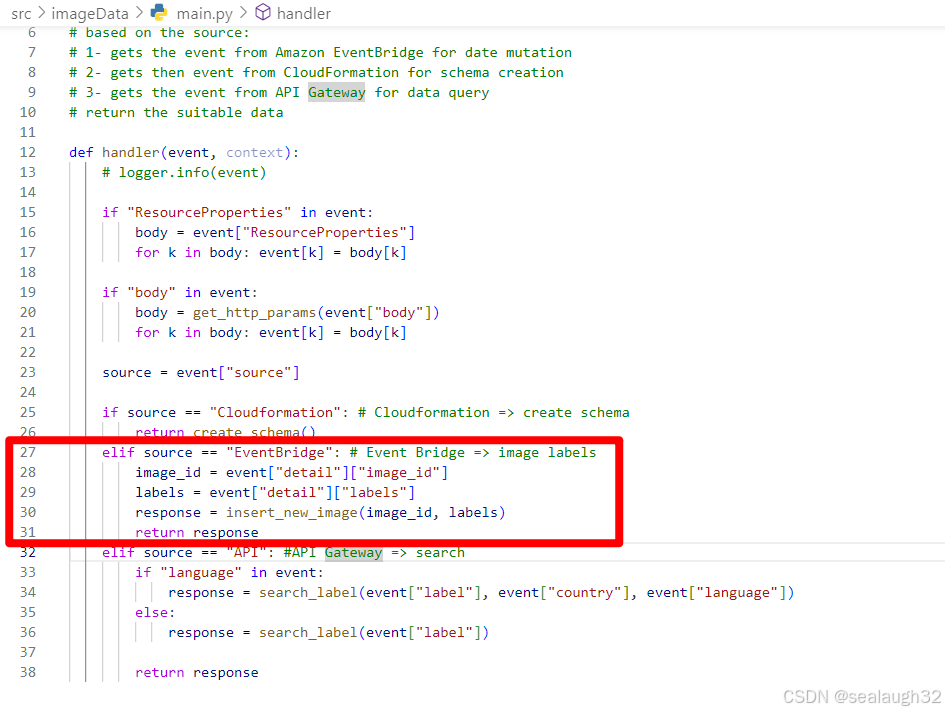
image_analyzer_function保存分析結果到event_bus之中,這里繼續將event_rule.add_target(_event_targets.LambdaFunction(image_data_function)),之后image_data_function會將數據保存到數據庫。
### event bridgeevent_bus = _events.EventBus(self, "ICS_IMAGE_CONTENT_BUS", event_bus_name="ImageContentBus")event_rule = _events.Rule(self, "ICS_IMAGE_CONTENT_RULE",rule_name="ICS_IMAGE_CONTENT_RULE",description="The event from image analyzer to store the data",event_bus=event_bus,event_pattern=_events.EventPattern(resources=[image_analyzer_function.function_arn]),)event_rule.add_target(_event_targets.LambdaFunction(image_data_function))

3 執行cdk
TODO

)
)

)
備忘錄模式)


及Excel表格列名操作詳細分享)


)


