前言:
目前java操作redis的客戶端有jedis跟Lettuce。在springboot1.x系列中,其中使用的是jedis,
但是到了springboot2.x其中使用的是Lettuce。 因為我們的版本是springboot2.x系列,所以今天使用的是Lettuce。關于jedis跟lettuce的區別:Lettuce 和 Jedis 的定位都是Redis的client,所以他們當然可以直接連接redis server。Jedis在實現上是直接連接的redis server,如果在多線程環境下是非線程安全的,這個時候只有使用連接池,
為每個Jedis實例增加物理連接Lettuce的連接是基于Netty的,連接實例(StatefulRedisConnection)可以在多個線程間并發訪問,
應為StatefulRedisConnection是線程安全的,所以一個連接實例(StatefulRedisConnection)就可以滿足多線程環境下的并發訪問,
當然這個也是可伸縮的設計,一個連接實例不夠的情況也可以按需增加連接實例。
依賴:
<dependencies><dependency><groupId>org.springframework.boot</groupId><artifactId>spring-boot-starter-web</artifactId></dependency><dependency><groupId>org.springframework.boot</groupId><artifactId>spring-boot-starter-data-redis</artifactId><version>2.1.3.RELEASE</version></dependency><!-- test單元測試用 --><dependency><groupId>org.springframework.boot</groupId><artifactId>spring-boot-starter-test</artifactId><scope>test</scope></dependency><!-- redis依賴commons-pool 這個依賴一定要添加 --><dependency><groupId>org.apache.commons</groupId><artifactId>commons-pool2</artifactId><version>2.6.2</version></dependency>
</dependencies>
application.yml配置
server:port: 8989
spring:redis:host: 127.0.0.1port: 6379# 密碼 沒有則可以不填password: 123456# 如果使用的jedis 則將lettuce改成jedis即可lettuce:pool:# 最大活躍鏈接數 默認8max-active: 8# 最大空閑連接數 默認8max-idle: 8# 最小空閑連接數 默認0min-idle: 0
redis配置
    接下來我們需要配置redis的key跟value的序列化方式,默認使用的JdkSerializationRedisSerializer 這樣的會導致我們
通過redis desktop manager顯示的我們key跟value的時候顯示不是正常字符。 所以我們需要手動配置一下序列化方式 新建一個
config包,在其下新建一個RedisConfig.java 具體代碼如下/*** @Auther: yukong* @Date: 2018/8/17 14:58* @Description: redis配置*/
@Configuration
@AutoConfigureAfter(RedisAutoConfiguration.class)
public class RedisConfig {/*** 配置自定義redisTemplate* @return*/@BeanRedisTemplate<String, Object> redisTemplate(RedisConnectionFactory redisConnectionFactory) {RedisTemplate<String, Object> template = new RedisTemplate<>();template.setConnectionFactory(redisConnectionFactory);//使用Jackson2JsonRedisSerializer來序列化和反序列化redis的value值Jackson2JsonRedisSerializer serializer = new Jackson2JsonRedisSerializer(Object.class);ObjectMapper mapper = new ObjectMapper();mapper.setVisibility(PropertyAccessor.ALL, JsonAutoDetect.Visibility.ANY);mapper.enableDefaultTyping(ObjectMapper.DefaultTyping.NON_FINAL);serializer.setObjectMapper(mapper);template.setValueSerializer(serializer);//使用StringRedisSerializer來序列化和反序列化redis的key值template.setKeySerializer(new StringRedisSerializer());template.setHashKeySerializer(new StringRedisSerializer());template.setHashValueSerializer(serializer);template.afterPropertiesSet();return template;}}其中@Configuration 代表這個類是一個配置類,然后@AutoConfigureAfter(RedisAutoConfiguration.class) 是讓我們這個配置類
在內置的配置類之后在配置,這樣就保證我們的配置類生效,并且不會被覆蓋配置。其中需要注意的就是方法名一定要
叫redisTemplate 因為@Bean注解是根據方法名配置這個bean的name的。
測試
package com.netcast.demo;import com.netcast.demo.entity.User;
import org.junit.Test;
import org.junit.runner.RunWith;
import org.springframework.beans.factory.annotation.Autowired;
import org.springframework.boot.test.context.SpringBootTest;
import org.springframework.data.redis.core.RedisTemplate;
import org.springframework.test.context.junit4.SpringRunner;/*** @program: demo* @description:* @author: dchen* @create: 2019-11-14 14:53**/
@RunWith(SpringRunner.class)
@SpringBootTest
public class RedisTest {@Autowiredprivate RedisTemplate redisTemplate;@Testpublic void redisTest() {// redis存儲數據String key = "name";redisTemplate.opsForValue().set(key, "yukong");// 獲取數據String value = (String) redisTemplate.opsForValue().get(key);System.out.println("獲取緩存中key為" + key + "的值為:" + value);User user = new User();user.setId("2");user.setName("yukong");user.setPhone("155662727272");String userKey = "yukong";redisTemplate.opsForValue().set(userKey, user);User newUser = (User) redisTemplate.opsForValue().get(userKey);System.out.println("獲取緩存中key為" + userKey + "的值為:" + newUser);}
}
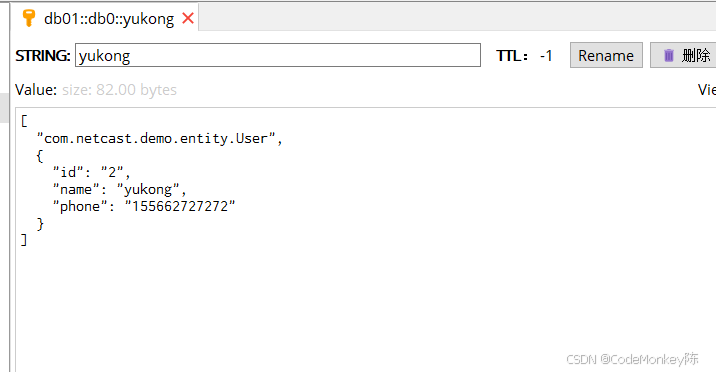
結果:
中文成功顯示,并且對象在redis以json方式存儲,代表我們配置成功。下列的就是Redis其它類型所對應的操作方式opsForValue: 對應 String(字符串)
opsForZSet: 對應 ZSet(有序集合)
opsForHash: 對應 Hash(哈希)
opsForList: 對應 List(列表)
opsForSet: 對應 Set(集合)


)


)


)


)

