python小白考后復習
- CSV格式文件
- ini格式文件
- 我們可以讀取所有節點
- 還可以輸出一個節點下所有鍵值對組成的元組
- 獲取節點下的鍵對應的值
- 判斷節點是否存在
- 添加節點
- 還可以添加鍵值
- 還可以刪除節點
- XML格式文件
- 讀取
- 若是文件格式存在的xml
- 若是以字符串形式存在的xml
- 獲取子標簽
- 還有獲取子標簽的簡單方法
- 獲取某些個標簽
- 找到所有標簽
- 修改、刪除標簽
- 構建文檔
- excel
- 獲取sheet文件中的所有sheet名字
- 基于名稱選擇sheet
- 基于索引位置選擇sheet
- 循環所有sheet
- 讀sheet中單元格的信息
- 獲取第n行所有單元格
- 獲取所有行
- 獲取所有列
- 讀合并單元格
- 寫excel
- 在原文件基礎上寫內容
- 創建新文件寫
- 具體如何寫sheet
- 修改sheet名
- 創建sheet并修改sheet顏色
- 默認打開的sheet
- 拷貝sheet
- 刪除sheet
- 具體如何寫單元格
- 樣式操作
- 壓縮文件
- 路徑相關
CSV格式文件
逗號分隔值(Comma-Separated Values,CSV,有時也稱為字符分隔值,因為分隔字符也可以不是逗號),其文件以純文本形式存儲表格數據(數字和文本)
ID,用戶名,頭像
26044585,Hush,https://hbimg.huabanimg.com/51d46dc32abe7ac7f83b94c67bb88cacc46869954f478-aP4Q3V
19318369,柒十一,https://hbimg.huabanimg.com/703fdb063bdc37b11033ef794f9b3a7adfa01fd21a6d1-wTFbnO
15529690,Law344,https://hbimg.huabanimg.com/b438d8c61ed2abf50ca94e00f257ca7a223e3b364b471-xrzoQd
18311394,Jennah·,https://hbimg.huabanimg.com/4edba1ed6a71797f52355aa1de5af961b85bf824cb71-px1nZz
18009711,可洛愛畫畫,https://hbimg.huabanimg.com/03331ef39b5c7687f5cc47dbcbafd974403c962ae88ce-Co8AUI
30574436,花姑涼~,https://hbimg.huabanimg.com/2f5b657edb9497ff8c41132e18000edb082d158c2404-8rYHbw
17740339,小巫師,https://hbimg.huabanimg.com/dbc6fd49f1915545cc42c1a1492a418dbaebd2c21bb9-9aDqgl
18741964,桐末tonmo,https://hbimg.huabanimg.com/b60cee303f62aaa592292f45a1ed8d5be9873b2ed5c-gAJehO
30535005,TANGZHIQI,https://hbimg.huabanimg.com/bbd08ee168d54665bf9b07899a5c4a4d6bc1eb8af77a4-8Gz3K1
31078743,你的老楊,https://hbimg.huabanimg.com/c46fbc3c9a01db37b8e786cbd7174bbd475e4cda220f4-F1u7MX
25519376,尺尺寸,https://hbimg.huabanimg.com/ee29ee198efb98f970e3dc2b24c40d89bfb6f911126b6-KGvKes
21113978,C-CLong,https://hbimg.huabanimg.com/7fa6b2a0d570e67246b34840a87d57c16a875dba9100-SXsSeY
24674102,szaa,https://hbimg.huabanimg.com/0716687b0df93e8c3a8e0925b6d2e4135449cd27597c4-gWdv24
30508507,愛起床的小灰灰,https://hbimg.huabanimg.com/4eafdbfa21b2f300a7becd8863f948e5e92ef789b5a5-1ozTKq
12593664,yokozen,https://hbimg.huabanimg.com/cd07bbaf052b752ed5c287602404ea719d7dd8161321b-cJtHss
16899164,一陣瘋,https://hbimg.huabanimg.com/0940b557b28892658c3bcaf52f5ba8dc8402100e130b2-G966Uz
847937,卩丬My月伴er彎,https://hbimg.huabanimg.com/e2d6bb5bc8498c6f607492a8f96164aa2366b104e7a-kWaH68
31010628,慢慢即漫漫,https://hbimg.huabanimg.com/c4fb6718907a22f202e8dd14d52f0c369685e59cfea7-82FdsK
13438168,海賊玩跑跑,https://hbimg.huabanimg.com/1edae3ce6fe0f6e95b67b4f8b57c4cebf19c501b397e-BXwiW6
28593155,源稚生,https://hbimg.huabanimg.com/626cfd89ca4c10e6f875f3dfe1005331e4c0fd7fd429-9SeJeQ
28201821,合伙哼哼,https://hbimg.huabanimg.com/f59d4780531aa1892b80e0ec94d4ec78dcba08ff18c416-769X6a
28255146,漫步AAA,https://hbimg.huabanimg.com/3c034c520594e38353a039d7e7a5fd5e74fb53eb1086-KnpLaL
30537613,配?,https://hbimg.huabanimg.com/efd81d22c1b1a2de77a0e0d8e853282b83b6bbc590fd-y3d4GJ
22665880,日后必火,https://hbimg.huabanimg.com/69f0f959979a4fada9e9e55f565989544be88164d2b-INWbaF
16748980,keer521521,https://hbimg.huabanimg.com/654953460733026a7ef6e101404055627ad51784a95c-B6OFs4
30536510,“西辭”,https://hbimg.huabanimg.com/61cfffca6b2507bf51a507e8319d68a8b8c3a96968f-6IvMSk
30986577,藝成背鍋王,https://hbimg.huabanimg.com/c381ecc43d6c69758a86a30ebf72976906ae6c53291f9-9zroHF
26409800,CsysADk7,https://hbimg.huabanimg.com/bf1d22092c2070d68ade012c588f2e410caaab1f58051-ahlgLm
30469116,18啊全阿,https://hbimg.huabanimg.com/654953460733026a7ef6e101404055627ad51784a95c-B6OFs4
15514336,W/小哥,https://hbimg.huabanimg.com/a30f5967fc0acf81421dd49650397de63c105b9ead1c-nVRrNl
17473505,椿の花,https://hbimg.huabanimg.com/0e38d810e5a24f91ebb251fd3aaaed8bb37655b14844c-pgNJBP
19165177,っ思憶゜?,https://hbimg.huabanimg.com/4815ea0e4905d0f3bb82a654b481811dadbfe5ce2673-vMVr0B
16059616,格林熊丶,https://hbimg.huabanimg.com/8760a2b08d87e6ed4b7a9715b1a668176dbf84fec5b-jx14tZ
30734152,sCWVkJDG,https://hbimg.huabanimg.com/f31a5305d1b8717bbfb897723f267d316e58e7b7dc40-GD3e22
24019677,虛無本心,https://hbimg.huabanimg.com/6fdfa9834abe362e978b517275b06e7f0d5926aa650-N1xCXE
16670283,Y-雨后天空,https://hbimg.huabanimg.com/a3bbb0045b536fc27a6d2effa64a0d43f9f5193c177f-I2vHaI
21512483,湯姆2,https://hbimg.huabanimg.com/98cc50a61a7cc9b49a8af754ffb26bd15764a82f1133-AkiU7D
16441049,笑瀟嘯逍小魚,https://hbimg.huabanimg.com/ae8a70cd85aff3a8587ff6578d5cf7620f3691df13e46-lmrIi9
24795603,?????v,https://hbimg.huabanimg.com/a7183cc3a933aa129d7b3230bf1378fd8f5857846cc5-3tDtx3
29819152,妮瑪士珍多,https://hbimg.huabanimg.com/ca4ecb573bf1ff0415c7a873d64470dedc465ea1213c6-RAkArS
19101282,陳勇敢?,https://hbimg.huabanimg.com/ab6d04ebaff3176e3570139a65155856871241b58bc6-Qklj2E
28337572,愛意隨風散,https://hbimg.huabanimg.com/117ad8b6eeda57a562ac6ab2861111a793ca3d1d5543-SjWlk2
17342758,幸運instant,https://hbimg.huabanimg.com/72b5f9042ec297ae57b83431123bc1c066cca90fa23-3MoJNj
18483372,Beau染,https://hbimg.huabanimg.com/077115cb622b1ff3907ec6932e1b575393d5aae720487-d1cdT9
22127102,栽花的小蜻蜓,https://hbimg.huabanimg.com/6c3cbf9f27e17898083186fc51985e43269018cc1e1df-QfOIBG
13802024,LoveHsu,https://hbimg.huabanimg.com/f720a15f8b49b86a7c1ee4951263a8dbecfe3e43d2d-GPEauV
22558931,白駒過隙丶梨花淚う,https://hbimg.huabanimg.com/e49e1341dfe5144da5c71bd15f1052ef07ba7a0e1296b-jfyfDJ
11762339,cojoy,https://hbimg.huabanimg.com/5b27f876d5d391e7c4889bc5e8ba214419eb72b56822-83gYmB
30711623,雪碧學長呀,https://hbimg.huabanimg.com/2c288a1535048b05537ba523b3fc9eacc1e81273212d1-nr8M4t
18906718,西霸王,https://hbimg.huabanimg.com/7b02ad5e01bd8c0a29817e362814666a7800831c154a6-AvBDaG
31037856,邵陽的小哥哥,https://hbimg.huabanimg.com/654953460733026a7ef6e101404055627ad51784a95c-B6OFs4
26830711,穩健譚,https://hbimg.huabanimg.com/51547ade3f0aef134e8d268cfd4ad61110925aefec8a-NKPEYX
# 練習題案例:下載文檔中的所有圖片且以用戶名為圖片名稱存儲。
import requests
import os
with open("mnv","r",encoding="utf-8") as csvfile:csvfile.readline()for line in csvfile:user_id,username,url=line.strip().split(",")# 1.根據URL下載圖片res = requests.get(url=url,headers={"User-Agent": "Mozilla/5.0 (Macintosh; Intel Mac OS X 10_15_7) AppleWebKit/537.36 (KHTML, like Gecko) Chrome/87.0.4280.88 Safari/537.36"})# 檢查images目錄是否存在?不存在,則創建images目錄if not os.path.exists("images"):# 創建images目錄os.makedirs("images")# 2.將圖片的內容寫入到文件with open("images/{}.png".format(username), mode='wb') as img_object:img_object.write(res.content)
ini格式文件
ini文件是Initialization File的縮寫,平時用于存儲軟件的的配置文件。例如:MySQL數據庫的配置文件
中括號括起來的叫節點
每個節點下面會有許多鍵值對和注釋
比如這樣
[mysqld]
datadir=/var/lib/mysql
socket=/var/lib/mysql/mysql.sock
log-bin=py-mysql-bin
character-set-server=utf8
collation-server=utf8_general_ci
log-error=/var/log/mysqld.log
# Disabling symbolic-links is recommended to prevent assorted security risks
symbolic-links=0[mysqld_safe]
log-error=/var/log/mariadb/mariadb.log
pid-file=/var/run/mariadb/mariadb.pid[client]
default-character-set=utf8
用open處理起來可以,但有些麻煩
python有更簡單的辦法:configparser
我們可以讀取所有節點
import configparserconfig = configparser.ConfigParser()
config.read('my.ini', encoding='utf-8')# 把文件讀到內存了ret = config.sections()
print(ret)# 輸出 ['mysqld', 'mysqld_safe', 'client']
還可以輸出一個節點下所有鍵值對組成的元組
import configparserconfig = configparser.ConfigParser()
config.read('my.ini', encoding='utf-8')result = config.items("mysqld")
print(result)#輸出 [('datadir', '/var/lib/mysql'), ('socket', '/var/lib/mysql/mysql.sock'), ('log-bin', 'py-mysql-bin'), ('character-set-server', 'utf8'), ('collation-server', 'utf8_general_ci'), ('log-error', '/var/log/mysqld.log'), ('symbolic-links', '0')]
獲取節點下的鍵對應的值
import configparserconfig = configparser.ConfigParser()
config.read('my.ini', encoding='utf-8')ret = config.sections()result = config.get("mysqld","collation-server")
print(result) # 輸出 utf8_general_ci
判斷節點是否存在
v1 = config.has_section("client")
print(v1)
添加節點
config.add_section("group")# 添加節點,但這時只是加到內存里了,還沒有寫到文件里
# 需要把內容寫到一個文件對象上,就是之前的open
config.write(open('new.ini', mode='w', encoding='utf-8'))
還可以添加鍵值
config.add_section("group")
config.set('group','name','wupeiqi')# 設置添加的節點的鍵值對也可以
config.set('client','name','wupeiqi')# 設置已有的節點的鍵值對也可以
config.write(open('files/new.ini', mode='w', encoding='utf-8'))
還可以刪除節點
config.remove_section('client')#刪除的同樣是內存里的節點,還需要把內存里的內容寫到文件里
config.remove_option("mysqld", "datadir")#刪除節點的鍵值,指定節點和鍵
config.write(open('files/new.ini', mode='w', encoding='utf-8'))
XML格式文件
可擴展標記語言,是一種簡單的數據存儲語言,XML 被設計用來傳輸和存儲數據。
- 存儲,可用來存放配置文件,例如:java的配置文件。
- 傳輸,網絡傳輸時以這種格式存在,例如:早期ajax傳輸的數據、soap協議等。
比如這樣
<data>#開頭<country name="Liechtenstein">#孩子標簽開頭<rank updated="yes">2</rank>#相當于一種字典套字典<year>2023</year><gdppc>141100</gdppc><neighbor direction="E" name="Austria" /><neighbor direction="W" name="Switzerland" /></country>#標簽結尾<country name="Singapore"><rank updated="yes">5</rank><year>2026</year><gdppc>59900</gdppc><neighbor direction="N" name="Malaysia" /></country><country name="Panama"><rank updated="yes">69</rank><year>2026</year><gdppc>13600</gdppc><neighbor direction="W" name="Costa Rica" /><neighbor direction="E" name="Colombia" /></country>
</data>#/代表結尾
同樣python提供了操作該格式文件的xml.etree.ElementTree
讀取
若是文件格式存在的xml
from xml.etree import ElementTree as ET# ET去打開xml文件
tree = ET.parse("my.xml")# 獲取根標簽
root = tree.getroot()print(root) # <Element 'data' at 0x000002C5961F7F40>
若是以字符串形式存在的xml
from xml.etree import ElementTree as ETcontent = """
<data><country name="Liechtenstein"><rank updated="yes">2</rank><year>2023</year><gdppc>141100</gdppc><neighbor direction="E" name="Austria" /><neighbor direction="W" name="Switzerland" /></country><country name="Panama"><rank updated="yes">69</rank><year>2026</year><gdppc>13600</gdppc><neighbor direction="W" name="Costa Rica" /><neighbor direction="E" name="Colombia" /></country>
</data>
"""root = ET.XML(content)
print(root)  #<Element 'data' at 0x0000028AFC6169A0>
獲取子標簽
from xml.etree import ElementTree as ETcontent = """
<data><country name="Liechtenstein"><rank updated="yes">2</rank><year>2023</year><gdppc>141100</gdppc><neighbor direction="E" name="Austria" /><neighbor direction="W" name="Switzerland" /></country><country name="Panama"><rank updated="yes">69</rank><year>2026</year><gdppc>13600</gdppc><neighbor direction="W" name="Costa Rica" /><neighbor direction="E" name="Colombia" /></country>
</data>
"""root = ET.XML(content)
for child in root:print(child.tag, child.attrib)# 獲取子標簽及其屬性for node in child:print(node.tag, node.attrib,node.text)#獲取子標簽里的子標簽及其屬性、內容
# country {'name': 'Liechtenstein'}
# rank {'updated': 'yes'} 2
# year {} 2023
# gdppc {} 141100
# neighbor {'direction': 'E', 'name': 'Austria'} None
# neighbor {'direction': 'W', 'name': 'Switzerland'} None
# country {'name': 'Panama'}
# rank {'updated': 'yes'} 69
# year {} 2026
# gdppc {} 13600
# neighbor {'direction': 'W', 'name': 'Costa Rica'} None
# neighbor {'direction': 'E', 'name': 'Colombia'} None
還有獲取子標簽的簡單方法
country_object = root.find('country')#找到根標簽下的第一個country
print(country_object.tag, country_object.attrib)#打印對應標簽即屬性
gdppc_object = country_object.find('gdppc')#還可以利用已經得到的子標簽找其中的子標簽
print(gdppc_object.tag, gdppc_object.attrib, gdppc_object.text)
# country {'name': 'Liechtenstein'}
# gdppc {} 141100
獲取某些個標簽
for child in root.iter("year"):print(child.tag, child.attrib, child.text)#輸出year {} 2023# year {} 2026
找到所有標簽
v1 = root.findall("country")
print(v1)
v2 = root.find("country").find("rank")
print(v2)
# [<Element 'country' at 0x000001EC1FBF7EF0>, <Element 'country' at 0x000001EC1FC251D0>]
# <Element 'rank' at 0x000001EC1FBF7F90>
修改、刪除標簽
修改
rank = root.find('country').find('rank')
print(rank.text)
rank.text = "999"#修改了rank標簽的內容
rank.set('update', '2020-11-11')#增加了rank標簽的屬性
print(rank.text, rank.attrib)#以上這些修改都是在內存中完成的,還需要保存到文件中
############ 保存文件 ############
tree = ET.ElementTree(root)
tree.write("new.xml", encoding='utf-8')
以下為修改后的文檔
<data><country name="Liechtenstein"><rank updated="yes" update="2020-11-11">999</rank><year>2023</year><gdppc>141100</gdppc><neighbor direction="E" name="Austria" /><neighbor direction="W" name="Switzerland" /></country><country name="Panama"><rank updated="yes">69</rank><year>2026</year><gdppc>13600</gdppc><neighbor direction="W" name="Costa Rica" /><neighbor direction="E" name="Colombia" /></country>
</data>
刪除也類似修改
# 刪除節點
root.remove( root.find('country') )
print(root.findall('country'))tree = ET.ElementTree(root)
tree.write("newnew.xml", encoding='utf-8')
刪除了country節點后的文檔
<data><country name="Panama"><rank updated="yes">69</rank><year>2026</year><gdppc>13600</gdppc><neighbor direction="W" name="Costa Rica" /><neighbor direction="E" name="Colombia" /></country>
</data>
構建文檔
方法一
from xml.etree import ElementTree as ET# 創建根標簽
root = ET.Element("home")# 創建節點大兒子
son1 = ET.Element('son', {'name': '兒1'})
# 創建小兒子
son2 = ET.Element('son', {"name": '兒2'})# 在大兒子中創建兩個孫子
grandson1 = ET.Element('grandson', {'name': '兒11'})
grandson2 = ET.Element('grandson', {'name': '兒12'})
son1.append(grandson1)
son1.append(grandson2)# 把兒子添加到根節點中
root.append(son1)
root.append(son2)tree = ET.ElementTree(root)
tree.write('abc.xml', encoding='utf-8', short_empty_elements=False)
short_empty_elements代表是否創建短標簽,比如有些標簽沒有內容,那就可以用短標簽表示,像<grandson name="兒11" />這樣
效果如下
<home><son name="兒1"><grandson name="兒11"></grandson><grandson name="兒12"></grandson></son><son name="兒2"></son>
</home>
方法二
from xml.etree import ElementTree as ET# 創建根節點
root = ET.Element("famliy")# 創建大兒子
son1 = root.makeelement('son', {'name': '兒1'})
# 創建小兒子
son2 = root.makeelement('son', {"name": '兒2'})# 在大兒子中創建兩個孫子
grandson1 = son1.makeelement('grandson', {'name': '兒11'})
grandson2 = son1.makeelement('grandson', {'name': '兒12'})son1.append(grandson1)
son1.append(grandson2)# 把兒子添加到根節點中
root.append(son1)
root.append(son2)tree = ET.ElementTree(root)
tree.write('oooo.xml',encoding='utf-8')
方法三
from xml.etree import ElementTree as ET# 創建根節點
root = ET.Element("famliy")# 創建節點大兒子
son1 = ET.SubElement(root, "son", attrib={'name': '兒1'})
# 創建小兒子
son2 = ET.SubElement(root, "son", attrib={"name": "兒2"})# 在大兒子中創建一個孫子
grandson1 = ET.SubElement(son1, "age", attrib={'name': '兒11'})
grandson1.text = '孫子'et = ET.ElementTree(root)  #生成文檔對象
et.write("test.xml", encoding="utf-8")
excel
利用第三方庫openpyxl
獲取sheet文件中的所有sheet名字
from openpyxl import load_workbook
wb = load_workbook('p1.xlsx')#讀取到excel
print(wb.sheetnames)# 輸出['數據導出', '用戶列表', 'Sheet1', 'Sheet2']
excel中sheet如下

基于名稱選擇sheet
from openpyxl import load_workbook
wb = load_workbook('p1.xlsx')sheet = wb['數據導出']#選擇具體的一個sheetcell = sheet.cell(1,1)選擇一行一列單元格
print(cell.value)#輸出該單元格的值
基于索引位置選擇sheet
from openpyxl import load_workbook
wb = load_workbook('p1.xlsx')sheet = wb.worksheets[0]#worksheets有所有sheet
cell = sheet.cell(row=1, column=2)
print(cell.value)
循環所有sheet
可以基于前兩種找sheet的方法循環,也可以默認循環
for sheet in wb:cell = sheet.cell(1, 1)print(cell.value)
讀sheet中單元格的信息
首先我們要知道一個sheet.cell里包含了很多包括字體、是否居中等信息
from openpyxl import load_workbook
wb = load_workbook('p1.xlsx')
sheet = wb.worksheets[0]
# 獲取第n行m列的單元格
cell = sheet.cell(row=1, column=1)print(cell.value)
print(cell.style)
print(cell.font)
print(cell.alignment)# 常規
# <openpyxl.styles.fonts.Font object>
# Parameters:
# name='等線', charset=None, family=2.0, b=False, i=False, strike=None, outline=None, shadow=None, condense=None, color=<openpyxl.styles.colors.Color object>
# Parameters:
# rgb=None, indexed=8, auto=None, theme=None, tint=0.0, type='indexed', extend=None, sz=11.0, u=None, vertAlign=None, scheme='minor'
# <openpyxl.styles.alignment.Alignment object>
# Parameters:
# horizontal=None, vertical='center', textRotation=0, wrapText=None, shrinkToFit=None, indent=0.0, relativeIndent=0.0, justifyLastLine=None, readingOrder=0.0
獲取某個單元格也可以利用excel的行列標志
c1 = sheet["A2"]
print(c1)
print(c1.value)
獲取第n行所有單元格
行從1開始
print(sheet[1])#(<Cell '數據導出'.A1>, <Cell '數據導出'.B1>, <Cell '數據導出'.C1>, <Cell '數據導出'.D1>, <Cell '數據導出'.E1>, <Cell '數據導出'.F1>, <Cell '數據導出'.G1>, <Cell '數據導出'.H1>, <Cell '數據導出'.I1>, <Cell '數據導出'.J1>, <Cell '數據導出'.K1>)
由于是元組存儲,故可以解包循環得到具體的值
for cell in sheet[1]:print(cell.value)
獲取所有行
for row in sheet.rows:print(row[0].value)#獲取所有行第一列
獲取所有列
for col in sheet.columns:print(col[0].value)#讀取第一行
讀合并單元格
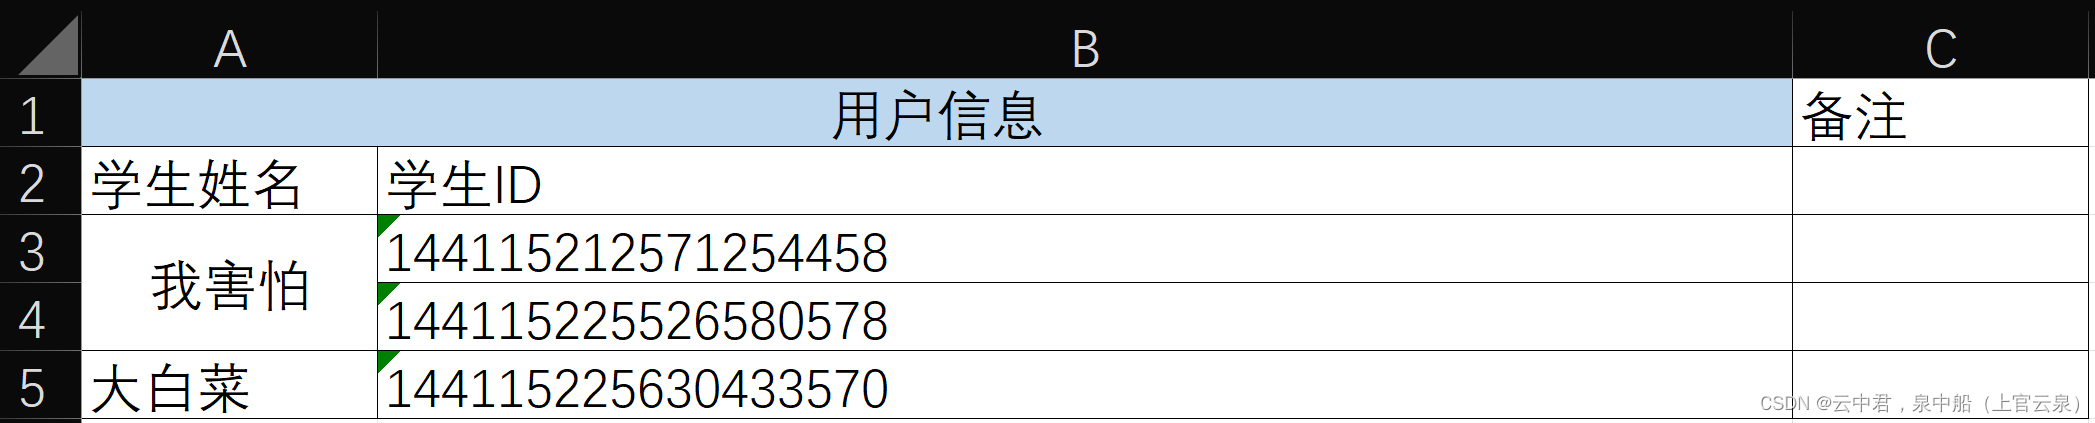
對于這樣一個excel文件
如果讀1行1列的內容,就是沒合并的信息,如果讀1行2列,就是合并的信息
sheet = wb.worksheets[2]
c1 = sheet.cell(row=1, column=1)
print(c1)#<Cell 'Sheet1'.A1>
print(c1.value)#用戶信息c2 = sheet.cell(row=1, column=2)
print(c2)#<MergedCell 'Sheet1'.B1>
print(c2.value)#None
以上這兩個單元格類型不同
對垂直方向上也如此
for row in sheet.rows:print(row)
# (<Cell 'Sheet1'.A1>, <MergedCell 'Sheet1'.B1>, <Cell 'Sheet1'.C1>)
# (<Cell 'Sheet1'.A2>, <Cell 'Sheet1'.B2>, <Cell 'Sheet1'.C2>)
# (<Cell 'Sheet1'.A3>, <Cell 'Sheet1'.B3>, <Cell 'Sheet1'.C3>)
# (<MergedCell 'Sheet1'.A4>, <Cell 'Sheet1'.B4>, <Cell 'Sheet1'.C4>)
# (<Cell 'Sheet1'.A5>, <Cell 'Sheet1'.B5>, <Cell 'Sheet1'.C5>)
寫excel
在原文件基礎上寫內容
from openpyxl import load_workbookwb = load_workbook('p1.xlsx')
sheet = wb.worksheets[0]# 找到單元格,并修改單元格的內容
cell = sheet.cell(1, 1)
cell.value = "新的開始"# 將excel文件保存到p2.xlsx文件中
wb.save("p2.xlsx")
創建新文件寫
from openpyxl import workbook# 創建excel且默認會創建一個sheet(名稱為Sheet)
wb = workbook.Workbook()sheet = wb.worksheets[0] # 或 sheet = wb["Sheet"]# 找到單元格,并修改單元格的內容
cell = sheet.cell(1, 1)
cell.value = "新的開始"# 將excel文件保存到p2.xlsx文件中
wb.save("p2.xlsx")
具體如何寫sheet
修改sheet名
from openpyxl import workbookwb = workbook.Workbook()sheet = wb.worksheets[0]sheet.title = "數據集"
wb.save("p2.xlsx")
創建sheet并修改sheet顏色
sheet = wb.create_sheet("表格", 1)
sheet.sheet_properties.tabColor = "1072BA"#從rgb顏色對照表找
wb.save("p2.xlsx")
效果如下,出現了以表格命名的在1位置的sheet
默認打開的sheet
wb.active = 0#默認打開0位置的sheet
wb.save("p2.xlsx")
拷貝sheet
from openpyxl import workbookwb = workbook.Workbook()sheet = wb.create_sheet("表格",1)
sheet.sheet_properties.tabColor = "1072BA"new_sheet = wb.copy_worksheet(wb["表格"])
new_sheet.title = "新的表格"
wb.save("p3.xlsx")
刪除sheet
del wb["新的表格"]
wb.save('files/p2.xlsx')
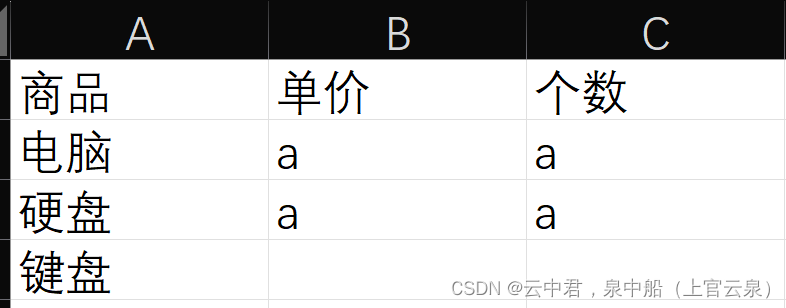
具體如何寫單元格
單個的內容操作同前
獲取某些單元格并修改如下
from openpyxl import load_workbook
wb = load_workbook('p1.xlsx')
sheet = wb.worksheets[3]
cell_list = sheet["B2":"C3"]
#實際上cell_list是這樣的:
#(
#	(單元格,單元格)#第一行
#	(單元格,單元格)#第二行
#)
for row in cell_list:for cell in row:cell.value = "a"
wb.save('p5.xlsx')
樣式操作
接下來的操作需要先導入
from openpyxl.styles import Alignment,Border,Side,Font,PatternFill,GradientFill
from openpyxl import load_workbook
from openpyxl.styles import Alignment, Border, Side, Font, PatternFill, GradientFillwb = load_workbook('files/p1.xlsx')sheet = wb.worksheets[1]# 1. 獲取某個單元格,修改值
"""
cell = sheet.cell(1, 1)
cell.value = "開始"
wb.save("p2.xlsx")
"""# 2.  獲取某個單元格,修改值
"""
sheet["B3"] = "Alex"
wb.save("p2.xlsx")
"""# 3. 獲取某些單元格,修改值
"""
cell_list = sheet["B2":"C3"]
for row in cell_list:for cell in row:cell.value = "新的值"
wb.save("p2.xlsx")
"""# 4. 對齊方式
"""
cell = sheet.cell(1, 1)# horizontal,水平方向對齊方式:"general", "left", "center", "right", "fill", "justify", "centerContinuous", "distributed"
# vertical,垂直方向對齊方式:"top", "center", "bottom", "justify", "distributed"
# text_rotation,旋轉角度。
# wrap_text,是否自動換行。
cell.alignment = Alignment(horizontal='center', vertical='distributed', text_rotation=45, wrap_text=True)
wb.save("p2.xlsx")
"""# 5. 邊框
# side的style有如下:dashDot','dashDotDot', 'dashed','dotted','double','hair', 'medium', 'mediumDashDot', 'mediumDashDotDot','mediumDashed', 'slantDashDot', 'thick', 'thin'
"""
cell = sheet.cell(9, 2)
cell.border = Border(top=Side(style="thin", color="FFB6C1"), bottom=Side(style="dashed", color="FFB6C1"),left=Side(style="dashed", color="FFB6C1"),right=Side(style="dashed", color="9932CC"),diagonal=Side(style="thin", color="483D8B"),  # 對角線diagonalUp=True,  # 左下 ~ 右上diagonalDown=True  # 左上 ~ 右下
)
wb.save("p2.xlsx")
"""# 6.字體
"""
cell = sheet.cell(5, 1)
cell.font = Font(name="微軟雅黑", size=45, color="ff0000", underline="single")
wb.save("p2.xlsx")
"""# 7.背景色
"""
cell = sheet.cell(5, 3)
cell.fill = PatternFill("solid", fgColor="99ccff")
wb.save("p2.xlsx")
"""# 8.漸變背景色
"""
cell = sheet.cell(5, 5)
cell.fill = GradientFill("linear", stop=("FFFFFF", "99ccff", "000000"))
##從左到右依次為漸變起始色,中間色,結束色
wb.save("p2.xlsx")
"""# 9.寬高(索引從1開始)
"""
sheet.row_dimensions[1].height = 50#通過行設置高度
sheet.column_dimensions["E"].width = 100#通過列設置寬度
wb.save("p2.xlsx")
"""# 10.合并單元格
"""
sheet.merge_cells("B2:D8")#合并方法一
sheet.merge_cells(start_row=15, start_column=3, end_row=18, end_column=8)#合并方法二
wb.save("p2.xlsx")
"""
"""
sheet.unmerge_cells("B2:D8")#接觸合并方法一,同上還可以有二
wb.save("p2.xlsx")
"""# 11.寫入公式
"""
sheet = wb.worksheets[3]
sheet["D1"] = "合計"
sheet["D2"] = "=B2*C2"
wb.save("p2.xlsx")
"""
"""
sheet = wb.worksheets[3]
sheet["D3"] = "=SUM(B3,C3)"
wb.save("p2.xlsx")
"""# 12.刪除
"""
# idx,要刪除的索引位置
# amount,從索引位置開始要刪除的個數(默認為1)
sheet.delete_rows(idx=1, amount=20)#從第一行開始,往后20行都刪掉
sheet.delete_cols(idx=1, amount=3)
wb.save("p2.xlsx")
"""# 13.插入
"""
sheet.insert_rows(idx=5, amount=10)
sheet.insert_cols(idx=3, amount=2)
wb.save("p2.xlsx")
"""# 14.循環寫內容
"""
sheet = wb["Sheet"]
cell_range = sheet['A1:C2']
for row in cell_range:for cell in row:cell.value = "xx"for row in sheet.iter_rows(min_row=5, min_col=1, max_col=7, max_row=10):for cell in row:cell.value = "oo"
wb.save("p2.xlsx")
"""# 15.移動
"""
# 將H2:J10范圍的數據,向右移動15個位置、向上移動1個位置
sheet.move_range("H2:J10",rows=-1, cols=15)
wb.save("p2.xlsx")
"""
"""
sheet = wb.worksheets[3]
sheet["D1"] = "合計"
sheet["D2"] = "=B2*C2"
sheet["D3"] = "=SUM(B3,C3)"
sheet.move_range("B1:D3",cols=10, translate=True) # 自動翻譯公式
wb.save("p2.xlsx")
"""# 16.打印區域
"""
sheet.print_area = "A1:D200"
wb.save("p2.xlsx")
"""# 17.打印時,每個頁面的固定表頭
"""
sheet.print_title_cols = "A:D"
sheet.print_title_rows = "1:1"
wb.save("p2.xlsx")
"""
壓縮文件
import shutil# 1. 壓縮文件
"""
# base_name,壓縮后的壓縮包文件
# format,壓縮的格式,例如:"zip", "tar", "gztar", "bztar", or "xztar".
# root_dir,要壓縮的文件夾路徑
"""
# shutil.make_archive(base_name=r'datafile',format='zip',root_dir=r'files')# 2. 解壓文件
"""
# filename,要解壓的壓縮包文件
# extract_dir,解壓的路徑
# format,壓縮文件格式
"""
# shutil.unpack_archive(filename=r'datafile.zip', extract_dir=r'xxxxxx/xo', format='zip')
路徑相關
import osabs = os.path.abspath(__file__)#獲取當前文件所在路徑
print(abs)#C:\Users\24480\AppData\Roaming\JetBrains\PyCharm2023.3\light-edit\01\luffy\fuction\路徑相關.py
path = os.path.dirname(abs)#獲取上一級路徑
print(path)#C:\Users\24480\AppData\Roaming\JetBrains\PyCharm2023.3\light-edit\01\luffy\fuction
有了上一級路徑,我們可以利用此打開同一級其他文件
import osbase_dir = os.path.dirname(os.path.abspath(__file__))
file_path = base_dir+"\天下之主.txt"f= open(file_path, "r", encoding="gbk")
print(f.read())
f.close()
但由于斜杠的原因,不同操作系統會受影響,故還要優化
把文件名拼接方法os.path.join加入
import osbase_dir = os.path.dirname(os.path.abspath(__file__))
# file_path = base_dir+"\天下之主.txt"
file_path = os.path.join(base_dir, '天下之主.txt')
print(file_path)
#C:\Users\24480\AppData\Roaming\JetBrains\PyCharm2023.3\light-edit\01\luffy\fuction\天下之主.txt
if os.path.exists(file_path):#還可以先判斷文件是否存在f= open(file_path, "r", encoding="gbk")print(f.read())f.close()
else:print("文件不存在")
import shutil
import os# 1. 獲取當前腳本絕對路徑
"""
abs_path = os.path.abspath(__file__)
print(abs_path)
"""# 2. 獲取當前文件的上級目錄
"""
base_path = os.path.dirname( os.path.dirname(路徑) )
print(base_path)
"""# 3. 路徑拼接
"""
p1 = os.path.join(base_path, 'xx')
print(p1)p2 = os.path.join(base_path, 'xx', 'oo', 'a1.png')
print(p2)
"""# 4. 判斷路徑是否存在
"""
exists = os.path.exists(p1)
print(exists)
"""# 5. 創建文件夾
"""
os.makedirs(路徑)
"""
"""
path = os.path.join(base_path, 'xx', 'oo', 'uuuu')
if not os.path.exists(path):os.makedirs(path)
"""# 6. 是否是文件夾
"""
file_path = os.path.join(base_path, 'xx', 'oo', 'uuuu.png')#有后綴名的創建文件
is_dir = os.path.isdir(file_path)
print(is_dir) # Falsefolder_path = os.path.join(base_path, 'xx', 'oo', 'uuuu')#無后綴名的創建文件夾
is_dir = os.path.isdir(folder_path)
print(is_dir) # True"""# 7. 刪除文件或文件夾
"""
os.remove("文件路徑")
"""
"""
path = os.path.join(base_path, 'xx')
shutil.rmtree(path)
"""# 8. 拷貝文件夾
"""
shutil.copytree("/Users/wupeiqi/Desktop/圖/csdn/","/Users/wupeiqi/PycharmProjects/CodeRepository/files")
"""# 9.拷貝文件
"""
shutil.copy("/Users/wupeiqi/Desktop/圖/csdn/WX20201123-112406@2x.png","/Users/wupeiqi/PycharmProjects/CodeRepository/")
shutil.copy("/Users/wupeiqi/Desktop/圖/csdn/WX20201123-112406@2x.png","/Users/wupeiqi/PycharmProjects/CodeRepository/x.png")
"""# 10.文件或文件夾重命名
"""
shutil.move("/Users/wupeiqi/PycharmProjects/CodeRepository/x.png","/Users/wupeiqi/PycharmProjects/CodeRepository/xxxx.png")
shutil.move("/Users/wupeiqi/PycharmProjects/CodeRepository/files","/Users/wupeiqi/PycharmProjects/CodeRepository/images")
"""


 變量與環境:文法結構 | 真假表達式:isZero E | let 表達式疊放 | 定義的規則 | 條件語句的使用)


macros模塊)

)


閉門峰會)


)


)
