文章目錄
- 問題描述
- 關于seed: 跟原文一致
- 補充:萬能seed
- 問題結論
- cpu和gpu差異來源分析
- 浮點數精度的差異
- 補充報錯:Expected all tensors to be on the same device!
- 常見運算上的差異
- 累加運算的差異
- exp運算的差異
- matmul運算的差異
- forward上的差異(激活函數的運算差異)
- 補充: .to(device)在普通張量和類上的差異:
- backward上的差異
- 總結或建議
- 補充:寫在后面
打假:基于pytorch的代碼在GPU和CPU上訓練時,訓練輸出結果不同問題
這里他說的話是沒錯的,但結論是錯的,訓練結果還是會不一致的。
問題描述
發現控制隨機種子和所有超參數后,以及隨機數都讓cpu來產生,但實際運行后還是發現,同樣的代碼,結果還是不一致的問題。
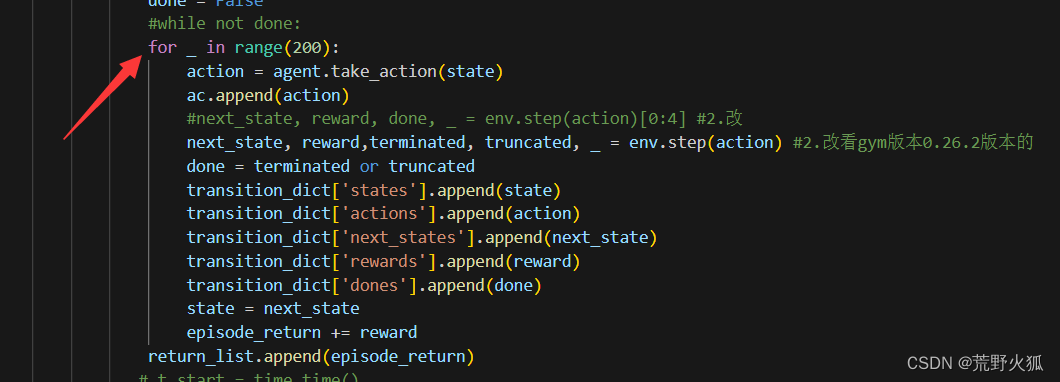
代碼:ppo代碼(原代碼為cuda版本)
動手學強化學習 github代碼
只將device修改為如下,就為cpu版本
device = torch.device("cpu")
此時上一版為cpu版本。
為了保持在環境采樣中選擇的一致性,在采樣時還是選擇了cpu來采樣,只有訓練模型時利用gpu來訓練。此時為cpu+gpu版本。
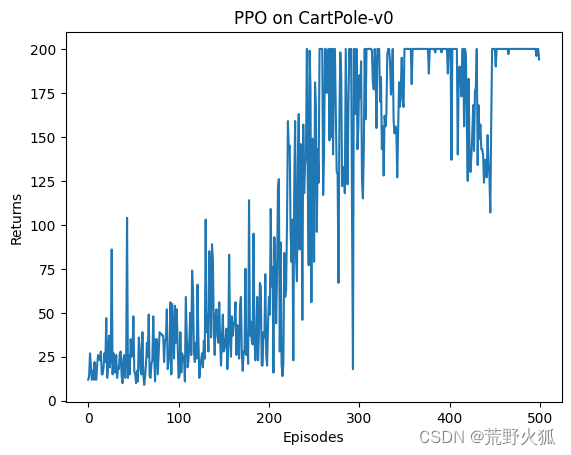
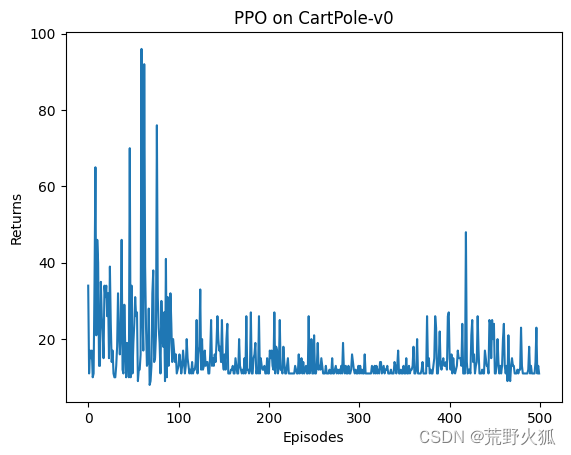
結果每輪eposide的return如下:第一行為cpu+gpu版本。第二行cpu版本。

在第56列數據時出現了數據不一樣的結果。
當然這里也驗證了cuda版本的情況:
在第一個return數據就和cpu版本的不一致了。
(action第二個就不一致了,原因:第1,選擇action時,使用forward了(即:actor(state)),利用cpu的forward 和利用cuda的forward,在結果上有細小差別(后面證明)。第2,后續更新還是利用了forward,加大了區別。)
關于seed: 跟原文一致
不考慮在不同設備上復現的話,只考慮在同一設備上復現的話:
在此代碼:只需設置
torch.manual_seed(0)
以及環境的隨機種子env.reset(seed=0)
因為使用的是to.(device)代碼,所以都是從cpu上隨機產生隨機數字,然后再移到其他設備,所以這里不需要設置cuda生成隨機數相同。
舉例:
import os
import torch
import torch.nn as nn
import torch.optim as optim
torch.manual_seed(0)# 定義一個簡單的模型
class SimpleModel(nn.Module):def __init__(self):super(SimpleModel, self).__init__()self.linear = nn.Linear(1, 1)def forward(self, x):return self.linear(x)# 創建模型和優化器
model = SimpleModel().to("cuda") #加不加to("cuda")結果一樣# 輸出模型參數
print("Model weights:", model.linear.weight.item())
### Model weights: -0.007486820220947266
補充:萬能seed
使用在cuda上生成的隨機數的情況:
需設置:
torch.cuda.manual_seed(seed)
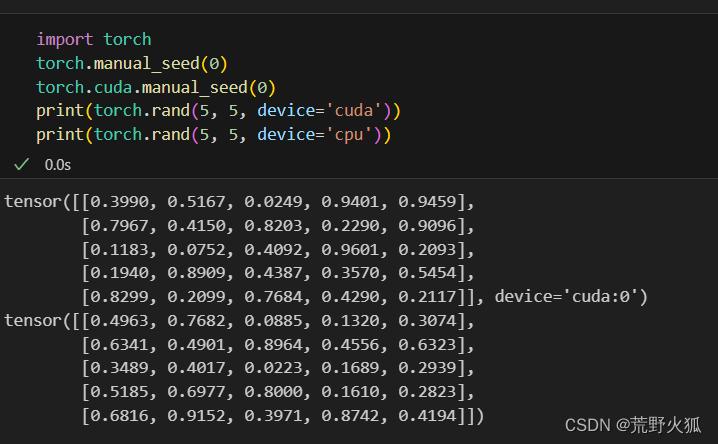
若是有多個gpu:
則需設置
torch.cuda.manual_seed_all(seed)
由于每個gpu的性能和硬件不同而導致的選擇神經網絡加速算法不同
cudnn:CUDA Deep Neural Network library(gpu加速庫)
還需設置:
torch.backends.cudnn.deterministic = Truetorch.backends.cudnn.benchmark = False torch.backends.cudnn.enabled = False
意思是不適用cudnn加速庫,使用確定性算法,且不選擇速度最快的一次。
默認為:
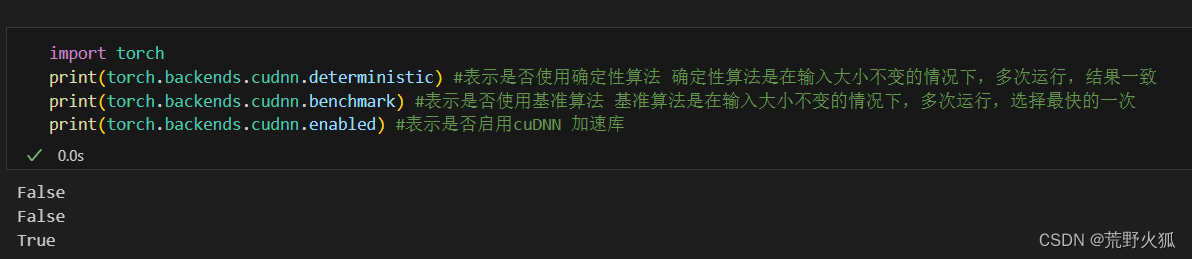
也就是說,大多數情況下,第二個基準算法為了追求快,不追求同一設備每次結果一致的話可以設置為True,當然默認我們想要同一設備上結果一致,默認為False。
如果有import random
還需設置
random.seed(seed)
另外的配置:
哈希種子(沒看出加了和沒加有什么區別)
另外這個值在環境中默認是沒有的。
os.environ['PYTHONHASHSEED'] = str(seed)
猜測:
這里是為Python腳本配置一個確定的哈希值。
就像:給一個值一個哈希數一樣
# 隨機一個hash值
print(hash('hello')) #-1149467266229358681
另外的兩個配置,詳細見:最靠譜的pytorch訓練可復現性設置方案
萬能seed:
def set_seed(seed):# seed init.random.seed(seed)np.random.seed(seed)os.environ['PYTHONHASHSEED'] = str(seed)# torch seed init.torch.manual_seed(seed)torch.cuda.manual_seed(seed)torch.cuda.manual_seed_all(seed)torch.backends.cudnn.deterministic = Truetorch.backends.cudnn.benchmark = Falsetorch.backends.cudnn.enabled = False # train speed is slower after enabling this opts.# https://pytorch.org/docs/stable/generated/torch.use_deterministic_algorithms.htmlos.environ['CUBLAS_WORKSPACE_CONFIG'] = ':16:8'# avoiding nondeterministic algorithms (see https://pytorch.org/docs/stable/notes/randomness.html)torch.use_deterministic_algorithms(True)set_seed(11)
還要加上環境里的env 的seed。env.reset(seed =0 ) #gym0.26.2版本后
問題結論
參考:cuda官方文檔
根據NVIDIA的文檔,CPU和GPU計算結果不一致的原因主要與浮點數的表示和運算方式有關。總結如下:
1、浮點數表示差異:CPU和GPU使用不同的浮點數表示標準,如IEEE
754。這些標準在處理浮點數時可能會有細微的差異,尤其是在處理極端情況或邊界值時。2、舍入誤差:在浮點數運算中,由于精度限制,舍入誤差是不可避免的。CPU和GPU可能在舍入策略上有所不同,導致結果的微小差異。
3、運算精度:CPU和GPU可能在支持的運算精度上有所不同。例如,某些GPU可能更傾向于使用單精度浮點數,而CPU可能更傾向于使用雙精度浮點數。這種差異可能導致計算結果的不同。
4、硬件架構差異:CPU和GPU的硬件架構差異可能導致它們在執行相同計算任務時的性能和準確性有所不同。GPU通常設計為并行處理大量數據,而CPU則更側重于通用計算。
5、優化和近似算法:在某些情況下,GPU可能會使用特定的優化或近似算法來提高性能,這可能會影響計算結果的準確性。
6、軟件和驅動程序差異:CPU和GPU的軟件棧和驅動程序也可能導致計算結果的差異。不同的編譯器優化、庫函數實現等都可能影響最終的計算結果。
說人話,就是這種計算結果不一致基本避免不了。
我單步調試后確實如此,兩者幾乎采取的隨機數都是一樣的
在我的兩個例子中:打印return的結果:
發現前面55個計算結果都一樣,而后面的數開始不一樣了。
cpu和gpu差異來源分析
浮點數精度的差異
先普及一下浮點數含義:
參考:
float的精度和取值范圍
import numpy as np
print(0.1 * 6)
print(6 / 10 )
a = 0.1 * 6
print(np.array([a])[0]) #默認是float64
print(np.array([a], dtype=np.float32)[0])  # 32位浮點數可以表示小數點后7位
print('{}'.format(np.array([a], dtype=np.float32)[0]))  # 32位浮點數可以表示小數點后7位
print(np.array([a], dtype=np.float64)[0])   # 64位浮點數可以表示小數點后16位
print(np.array([a], dtype=np.float32)[0]+0.0000000000000001)
print(np.array([a], dtype=np.float64)[0]+0.0000001)
print('{:.8f}'.format(1e-8))
print(0.6 - np.array([a], dtype=np.float32)[0])
'''
0.6000000000000001
0.6
0.6000000000000001
0.6
0.6000000238418579
0.6000000000000001
0.600000023841858
0.6000001
0.00000001
-2.384185793236071e-08
'''
print(0.1 *6 )   #小數后有16位,精確到15位
print(0.1 * 0.1)   #小數后有18位,精確到17位
print(0.1 * 3)  #小數后有17位,精確到16位
## 所以 float32 可以精確到小數點后7位,float64可以精確到小數點后15-17 位
'''
0.6000000000000001
0.010000000000000002
0.30000000000000004'''
結論:float32 可以精確到小數點后7位,
float64可以精確到小數點后15-17 位。
上述cuda官方上有說,cpu可能是可以精確到float80位,然后截斷到64位,所以可能會運算的比cuda更加精確。
但實際上:
兩者的在同一浮點精度下,得到的數是相等的。
為了避免這個偏差,我這里設置為相同的精度運算方法float32,且每一個數都由cpu產生。(默認cpu產生,即去掉了device=的操作)
補充報錯:Expected all tensors to be on the same device!
注意:張量的操作都只能同時在同一設備上進行,否則報錯。
這個操作往往很難發現:
比如:下面這種情況卻不會報錯。因為PyTorch 在執行這種操作時會自動處理設備不匹配。它會將所有的操作數移動到同一設備上,然后執行操作。
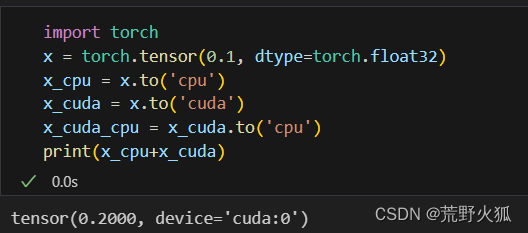
而我如果進行大量的操作時:就會出來,所以還是要分開來運算。
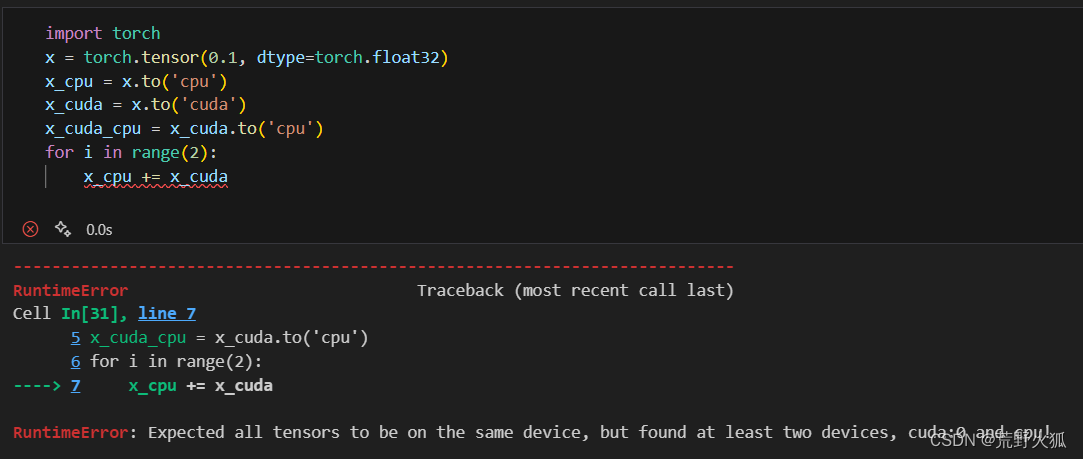
為了避免出現因為pytorch自動的處理,和為了累計誤差,我下面都會盡量使用大量的操作。
常見運算上的差異
這里看下常見的加法,冪運算exp,矩陣乘法matmul運算上的差異
import torch
import gym
torch.manual_seed(0)
env_name = 'CartPole-v1' #動作是
env = gym.make(env_name)
s = env.reset(seed=0)
# print(s)
print('原始值:',s[0]) #tensor
print('原始值的為float32,小數后7位為精確值,第8位開始亂數字,例:第一個值為{}'.format(s[0][0])) #numpy.float32
s_cpu = torch.tensor(s[0], dtype=torch.float32).to('cpu')
s_cuda = torch.tensor(s[0], dtype=torch.float32).to('cuda')for i in range(10000): #1000時沒有nn =torch.randn(4, dtype=torch.float32)s_cpu +=  torch.exp(nn.to('cpu'))s_cuda += torch.exp(nn.to('cuda'))
s_cuda_cpu = s_cuda.to('cpu')
print(s_cpu)
print(s_cuda)
print(s_cuda_cpu)
print("torch.exp累加誤差:",torch.max(torch.abs(s_cuda_cpu - s_cpu)).item())print('原始值:',s[0]) #tensor
s_cpu = torch.tensor(s[0], dtype=torch.float32).to('cpu')
s_cuda = torch.tensor(s[0], dtype=torch.float32).to('cuda')
for i in range(10000): #nn =torch.randn(4, dtype=torch.float32)s_cpu +=  nn.to('cpu')s_cuda += nn.to('cuda')
s_cuda_cpu = s_cuda.to('cpu') #將CUDA結果移回CPUprint(s_cpu)
print(s_cuda)
print(s_cuda_cpu)
print("隨機數累加誤差:",torch.max(torch.abs(s_cuda_cpu - s_cpu)).item())
#print(torch.max(torch.abs(s_cuda_cpu - s_cuda).item())) #報錯: cuda和cpu的tensor不能同時運算print('原始值:',s[0]) #tensor
s_cpu = torch.tensor(s[0], dtype=torch.float32).to('cpu')
s_cuda = torch.tensor(s[0], dtype=torch.float32).to('cuda')
for i in range(2): #1000時沒有nn =torch.randn(4, dtype=torch.float32)s_cpu +=  torch.matmul(nn.to('cpu'),nn.to('cpu').t())s_cuda += torch.matmul(nn.to('cuda'),nn.to('cuda').t())
s_cuda_cpu = s_cuda.to('cpu')
print(s_cpu)
print(s_cuda)
print(s_cuda_cpu)
print("torch.matmul累加誤差:",torch.max(torch.abs(s_cuda_cpu - s_cpu)).item())
結果為:
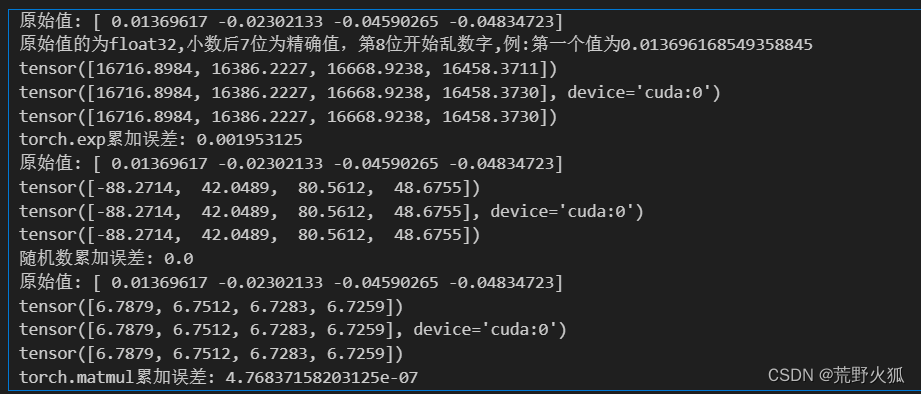
在累加的操作下,差異幾乎為0
冪運算的操作下,會出現差異
矩陣運算的操作下,會出現差異
我在實驗的時候發現,將第一個和第二個順序互換,有時會發現,exp的差異為0。
累加運算的差異
為了繼續驗證exp的運算有差異:
使隨機的數增多:
結果:有差異了。
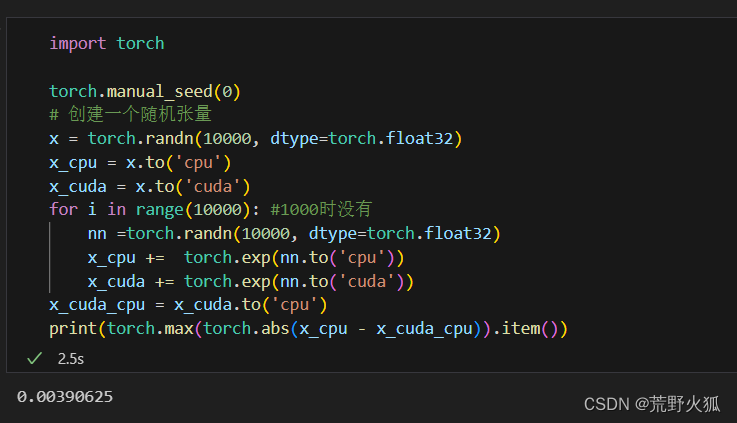
exp運算的差異
為了繼續驗證exp的運算有差異:
使隨機的數增多:
import torchtorch.manual_seed(0)
# 創建一個隨機張量
x = torch.randn(10000, dtype=torch.float32)
# 在CPU上進行累加
x_cpu = x.clone() #.clone() 復制張量
sum_cpu = torch.zeros_like(x_cpu)
#print(sum_cpu)
for _ in range(10000):sum_cpu += torch.exp(x_cpu)   #torch.mean()
# 在CUDA上進行累加
if torch.cuda.is_available():x_cuda = x.to('cuda')sum_cuda = torch.zeros_like(x_cuda).to('cuda') #zeros_like()創建一個與輸入張量相同大小的全0張量#print(sum_cuda)for _ in range(10000):sum_cuda += torch.exp(x_cuda)# 將CUDA結果移回CPUsum_cuda_cpu = sum_cuda.to('cpu')# 計算差異diff = torch.max(torch.abs(sum_cpu - sum_cuda_cpu))print(f"Max difference between CPU and CUDA: {diff.item()}")
else:print("CUDA is not available.")
結果:差異變的很明顯了。

matmul運算的差異
同理:
import torch
torch.manual_seed(0)
# 創建一個隨機張量
x = torch.randn(1000, 1000, dtype=torch.float32)
# 在CPU上計算
x_cpu = x.to('cpu')
result_cpu = torch.matmul(x_cpu, x_cpu.t()) #矩陣乘法
# 在CUDA上計算
if torch.cuda.is_available():x_cuda = x.to('cuda')result_cuda = torch.matmul(x_cuda, x_cuda.t())# 將CUDA結果移回CPUresult_cuda_cpu = result_cuda.to('cpu')# 計算差異diff = torch.max(torch.abs(result_cpu - result_cuda_cpu))print(f"Max difference between CPU and CUDA: {diff.item()}")
else:print("CUDA is not available.")
差異為:

差異也變大了。
`結論:這里僅簡單得到一些常見的運算差異,據此推測,其他的運算在大量的運算下,差異會越來越明顯。
forward上的差異(激活函數的運算差異)
這里用一個最簡單的單層qnet表示其差異,激活函數為relu。
.cuda() 和to(‘cuda’)的結果一樣,只是to(‘cuda:0’),可以指定哪個gpu,我這里單個gpu,所以兩個函數一個意思。
代碼: 因為這里沒有用到反向傳播forward,所以在第一次forward后,模型的實例沒有變。
import torch
import torch.nn.functional as F# 設置隨機種子
torch.manual_seed(0)# 定義模型
class ValueNet(torch.nn.Module):def __init__(self, state_dim, hidden_dim):super(ValueNet, self).__init__()self.fc1 = torch.nn.Linear(state_dim, hidden_dim)self.fc2 = torch.nn.Linear(hidden_dim, 1)def forward(self, x):x = F.relu(self.fc1(x))return self.fc2(x)# 設置模型和數據
state_dim = 10
hidden_dim = 20
model = ValueNet(state_dim, hidden_dim)
input_data = torch.randn(100, state_dim,dtype=torch.float32)  # 假設有100個樣本# 在CPU上運行
model.cpu()
input_data = input_data.cpu()
cpu_output = model(input_data)# 在GPU上運行
if torch.cuda.is_available():model.cuda()input_data = input_data.cuda()gpu_output = model(input_data)
else:print("No GPU available")# 比較輸出結果
if torch.cuda.is_available():# 將GPU輸出轉移到CPU上進行比較gpu_output_cpu = gpu_output.cpu()# 計算差異difference = torch.abs(cpu_output - gpu_output_cpu)print("Max difference:", difference.max().item())print("Average difference:", difference.mean().item())
else:print("No GPU available for comparison")
單次運行結果差異:

補充: .to(device)在普通張量和類上的差異:
張量的to(device):它會創建一個新的張量副本,并將這個副本移動到指定的設備上。原始張量不會被修改。
在類(模型)的to(device):修改模型實例的存儲位置(參數和緩沖區),模型實例本身并不會被重新創建。
所以上文的代碼可以寫成這樣:
## gpu 與 cpu 差異來源分析
import torch
import torch.nn.functional as F
import copy# 設置隨機種子
torch.manual_seed(0)# 定義模型
class ValueNet(torch.nn.Module):def __init__(self, state_dim, hidden_dim):super(ValueNet, self).__init__()self.fc1 = torch.nn.Linear(state_dim, hidden_dim)self.fc2 = torch.nn.Linear(hidden_dim, 1)def forward(self, x):x = F.relu(self.fc1(x))return self.fc2(x)# 設置模型和數據
state_dim = 10
hidden_dim = 20
model = ValueNet(state_dim, hidden_dim)
input_data = torch.randn(100, state_dim,dtype=torch.float32)  # 假設有100個樣本
model_cpu = copy.deepcopy(model) #復制模型
model_cuda = model.to('cuda')
print("Model_cpu weights:", model_cpu.fc1.weight[0][0])
print("Model_gpu weights:", model_cuda.fc1.weight[0][0])
# 在CPU上運行input_data_cpu = input_data.to('cpu')
input_data_cuda = input_data.to('cuda')cpu_output = model_cpu(input_data_cpu)gpu_output = model_cuda(input_data_cuda)gpu_output_cpu = gpu_output.to('cpu')
# 計算差異
difference = torch.abs(cpu_output - gpu_output_cpu)
print("Max difference:", difference.max().item())
print("Average difference:", difference.mean().item())

確實保證了模型的參數一致,有了差異。
backward上的差異
為了剔除掉forward()函數上的激活函數影響,這里使用最簡單的模型
# 定義一個簡單的線性模型
model = nn.Linear(1, 1) # 輸入維度是1,輸出維度是1
來驗證其差異性:
# 探討backward()函數的差異
import torch
import torch.nn as nn
import torch.optim as optim
import copy
#設置隨機種子
torch.manual_seed(0)# 生成一些隨機的輸入和標簽
x = torch.randn(100, 1,dtype=torch.float32) # 100個樣本,每個樣本有1個特征  randn
y = 3 * x + 5 + torch.randn(100, 1,dtype=torch.float32) # 100個樣本,每個樣本有1個標簽,服從 y = 3x + 5 + 噪聲 的分布# 定義一個簡單的模型
class SimpleModel(nn.Module):def __init__(self):super(SimpleModel, self).__init__()self.linear = nn.Linear(1, 1)def forward(self, x):return self.linear(x)
# 定義一個簡單的線性模型
model = nn.Linear(1, 1) # 輸入維度是1,輸出維度是1
#model = SimpleModel()  # 也可以使用此模型,結果一樣,但最好不要同時設置,即 model = nn.Linear(1, 1) ; model = SimpleModel()
#因為每次調用 nn.Linear 都會使用隨機數生成器來初始化權重,會使結果不一致
model_cpu = copy.deepcopy(model)
model_cuda = model.to('cuda')
# 定義一個均方誤差損失函數
criterion = nn.MSELoss()
# 定義一個隨機梯度下降優化器
optimizer_cpu = optim.SGD(model_cpu.parameters(), lr=0.01) # 學習率是0.01
optimizer_cuda = optim.SGD(model_cuda.parameters(), lr=0.01) # 學習率是0.01epochs = 1000
# 在CPU上訓練
for epoch in range(epochs):output = model_cpu(x)loss = criterion(output, y)optimizer_cpu.zero_grad()loss.backward()optimizer_cpu.step()
# 在GPU上訓練
for epoch in range(epochs):output = model_cuda(x.to('cuda'))loss = criterion(output, y.to('cuda'))optimizer_cuda.zero_grad()loss.backward()optimizer_cuda.step()
model_cuda_cpu = model_cuda.to('cpu')x_ = torch.randn(100, 1,dtype=torch.float32)
#print(x_)
cpu_output = model_cpu(x_)
gpu_output = model_cuda_cpu(x_)diff =torch.max(torch.abs(cpu_output - gpu_output)).item()
print("Max difference:{}".format(diff))
# 打印模型參數
print( 'cpu上:',model_cpu.weight.item(), model_cpu.bias.item()) #用SimpleModel()時,要改為model_cpu.linear.weight.item(), model_cpu.linear.bias.item()
print('cuda上:',model_cuda.weight.item(), model_cuda.bias.item())
結果為:
在epoch為1000時,差異還是0,在10000時就有了細小的差異。
總結或建議
1、在一般使用中,可以不必追求cpu和gpu計算的結果一致性,也也避免不了,且cpu和gpu導致的細小差別,在訓練的效果上幾乎沒有區別。
2、同時,在同一臺設備上,我們盡量要求該程序的結果能復現,是為了更好修改超參數。(見:本文萬能seed,適用于單機多卡)
3、不必追求在不同的設備上能復現一致結果,最終的效果在相同的超參數和輸入下,輸出的結果也相差無幾。
4、cpu和gpu在設計時的目的也不同,有差異理所應當,這里本文只分析了在計算上和訓練神經網絡時的出現的差異,僅作參考。
補充:寫在后面
–24.5.24
發現了一個區別:
還是此代碼:
代碼:ppo代碼(原代碼為cuda版本)
動手學強化學習 github代碼
現象:
在環境’CartPole-v0’的情況下:
我將while not done : 改成了 如下情況
發現在cpu版本的情況下,其他參數不變,依然能夠收斂;
而cuda版本下,就不收斂了。
而cpu+cuda 的版本也不收斂。
這里的情況就是在done這個狀態相當于沒有的情況下,cpu依然能夠學習到可以收斂的參數。
結論:
1、猜測cpu的計算精度確實比cuda要高的多。
2、狀態的設置對于模型的收斂至關重要。


——SprintBoot之:分層解耦)


-磁盤結構)


--vue常見面試題)


