Spring Bean的生命周期是什么樣的?
在Spring容器里一個Bean的從創建到銷毀一般都是經歷了以下幾個階段:
定義階段(Bean元信息配置)=>實例化階段(創建Bean對象)=>初始化階段(執行初始化邏輯)=>使用階段(Bean可用)=>銷毀階段(釋放資源)
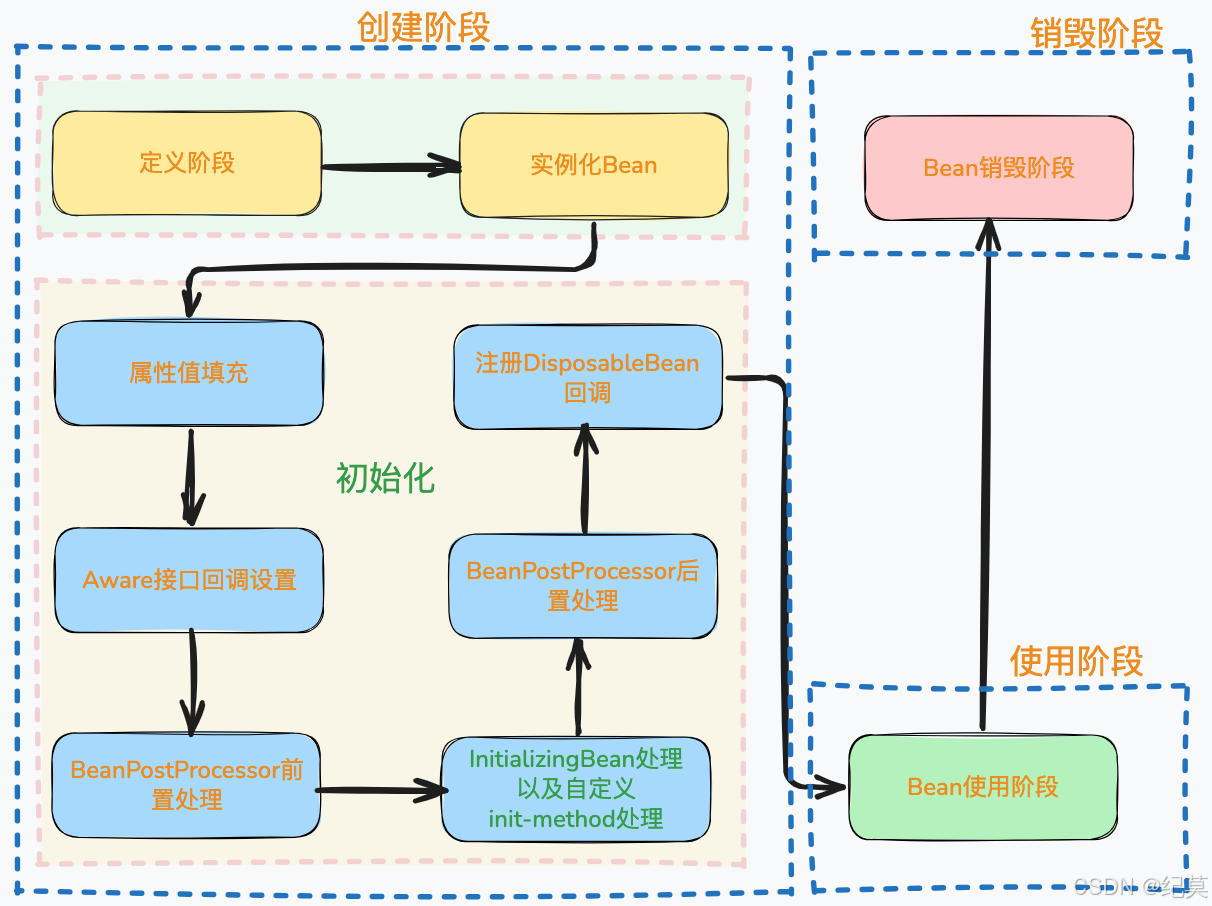
定義階段(BeanDefinition解析)
Spring通過配置(XML、注解、Java配置)解析Bean的元數據,生成BeanDefinition對象。
BeanDefinition存儲了Bean的類名、作用域(scope)、依賴項(depends-on)、初始化方法、銷毀方法等元數據。
所有BeanDefinition存儲在容器的BeanDefinitionMap(一個HashMap)中,鍵為Bean名稱,值為BeanDefinition對象。
解析器:
- XML配置:
XmlBeanDefinitionReader解析<bean>標簽。 - 注解配置:
ClassPathBeanDefinitionScanner掃描@Component等注解。 - Java配置:
ConfigurationClassPostProcessor解析@Bean方法。
實例化階段(創建Bean實例)
根據BeanDefinition通過反射或工廠方法創建Bean實例(對象),但此時屬性未注入。
默認通過無參構造方法實例化(若未指定,Spring會強制要求無參構造)。
在
AbstractAutowireCapableBeanFactory類中的createBeanInstance方法中實現。
屬性值填充(依賴注入)
為Bean的屬性設置值或注入依賴。
- 通過
@Autowired、@Value、XML的<property>等方式注入屬性。 - 若注入的依賴是其他Bean,會遞歸觸發依賴Bean的生命周期。
- 循環依賴問題:在屬性注入階段處理循環依賴(通過三級緩存解決)。
在
AbstractAutowireCapableBeanFactory的populateBean方法中處理。
Aware接口回調設置
若Bean實現了特定Aware接口,Spring會回調對應方法,注入容器相關對象。
BeanNameAware:注入Bean在容器中的名稱(setBeanName(String beanName))。BeanFactoryAware:注入當前Bean所在的BeanFactory(setBeanFactory(BeanFactory beanFactory))。ApplicationContextAware:若容器是ApplicationContext,注入應用上下文(setApplicationContext(ApplicationContext applicationContext))。
在
AbstractAutowireCapableBeanFactory的initializeBean方法中調用。
BeanPostProcessor前置處理
在Bean初始化前,允許自定義BeanPostProcessor對Bean實例進行處理。
主要是調用BeanPostProcessor的postProcessBeforeInitialization方法。
常見的實現類
ApplicationContextAwareProcessor:處理ApplicationContextAware接口。InitDestroyAnnotationBeanPostProcessor:處理@PostConstruct注解。
由
AbstractAutowireCapableBeanFactory的applyBeanPostProcessorsBeforeInitialization方法執行。
InitializingBean處理以及自定義init-method處理
執行Bean的初始化邏輯。
InitializingBean處理,在所有Bean屬性設置完成后進行初始化操作。如果Bean實現了InitializingBean接口,InitializingBean的afterPropertiesSet方法會被調用。
自定義init-method處理,如果Bean在配置文件中定義了初始化方法那么該方法會被調用。
例如:通過XML配置init-method或Java配置@Bean(initMethod=“xxx”)。
在
AbstractAutowireCapableBeanFactory的invokeInitMethods方法中調用
BeanPostProcessor后置處理
在Bean初始化后,允許自定義BeanPostProcessor對Bean實例進行處理。
BeanPostProcessor的postProcessAfterInitialization方法會被調用。
常見用途:AOP代理(如AbstractAutoProxyCreator在此階段為目標對象創建代理)。
由
AbstractAutowireCapableBeanFactory的applyBeanPostProcessorsAfterInitialization方法執行
注冊DisposableBean回調
如果Bean實現了DisposableBean接口或在Bean定義中指定了自定義的銷毀方法,Spring容器會為這些Bean注冊一個銷毀回調,確保在容器關閉時能夠正確地清理資源。
在
AbstractAutowireCapableBeanFactory類中的registerDisposableBeanlfNecessary方法中實現
Bean使用階段
**Bean已完全初始化,可被應用程序使用。**通過依賴注入獲取Bean實例(如@Autowired或ApplicationContext.getBean())。
此階段Bean處于“可用”狀態,直到容器關閉。
Bean銷毀階段
容器關閉時,釋放Bean資源。
主要步驟:
- 接口回調:若Bean實現了
DisposableBean,調用destroy方法。 - 注解:若方法標注了
@PreDestroy,Spring會調用該方法。 - 自定義銷毀方法:通過XML配置
destroy-method或Java配置@Bean(destroyMethod="xxx")。 - 資源釋放:如關閉數據庫連接、釋放文件句柄等。
在
DisposableBeanAdapter的destroy方法中實現
總結
通過代碼出處,可以觀察到整個Bean的創建的過程都依賴于AbstractAutowireCapableBeanFactory這個類,而銷毀主要依賴DisposableBeanAdapter這個類。
AbstractAutowireCapableBeanFactory 的入口處,doCreateBean的核心代碼如下,其中包含了實例化、設置屬性值、初始化Bean以及注冊銷毀回調的幾個核心方法。
這里就不貼代碼了,想更深入看細節的可以去看源碼。
Spring中創建Bean的方式有哪些?
基于注解的自動掃描
通過注解標記類,并配合組件掃描實現自動注冊。
常見的注解有
@Component, @Service, @Repository, @Controller(及其衍生注解)。
例如:當在類上添加@Component時,再在配置類或 XML 中啟用組件掃描(@ComponentScan 或 <context:component-scan>)。這個類在服務啟動時會自動被掃描到,然后注入到Spring容器。
@Configuration
@ComponentScan("com.jimoer.service")
public class BeanConfig {}
@Service
public class UserService {public void hello() {System.out.println("Hello from UserService");}
}@Component
public class UserHandler {public void hello() {System.out.println("Hello from UserHandler");}
}@Repository
public class UserRepository {public void hello() {System.out.println("Hello from UserRepository");}
}@Controller
public class UserController {public void hello() {System.out.println("Hello from UserController");}
}
使用@Configuration與@Bean 注解
通過 @Configuration 標注的配置類,顯式定義 Bean 的創建邏輯。
適用于:需要精確控制 Bean 的初始化邏輯(如依賴其他 Bean 或復雜條件)。
@Configuration
public class AppConfig {@Beanpublic UserService userService() {return new UserService();}
}
XML 配置文件
通過 xml 的方式來定義 Bean。
在SpringBoot 流行以前,這種方式挺多的, SpringBoot 流行起來之后,這么用的越來越少了。
<beans xmlns="http://www.springframework.org/schema/beans"
xmlns:xsi="http://www.w3.org/2001/XMLSchema-instance"
xsi:schemaLocation="http://www.springframework.org/schema/beans http://www.springframework.org/schema/beans/spring-beans.xsd"<bean id="userService" class="com.jimoer.demo.UserServiceImpl"><property name="message" value="Hello Spring!" /></bean>
</beans>
ApplicationContext context = new ClassPathXmlApplicationContext("applicationContext.xml");
UserService userService = context.getBean("userService");
更適用于遺留項目或需要與非注解配置兼容的場景。
使用@Import注解
@Import注解的作用是快速導入某一個或多個類,使這些類能夠被Spring加載到IOC容器中進行管理。
讓類被Spring 的 IOC 容器管理,這不也是創建 Bean 么,因此,這種方式也可以算是創建Bean的一種方式。
@Import({UserServiceImpl.class})
@Configuration
public class UserBeanConfiguration {
}
自定義注解
通過自定義一種注解,然后在 Spring 應用啟動過程中,通過自定義的 BeanDefinitionRegistryPostProcessor 和 BeanfactoryPostProcessor 來掃描配置的包路徑,識別出帶有自定義注解的類。
這些處理器解析注解中的屬性(如接口類、版本號、超時時間等),并基于這些信息創建 Spring的 BeanDefinition 。
例如:Dubbo框架使用的@DubboService注解
@DubboService("version=1.0.0")
public class UserServiceImpl implements UserFacadeService {}
動態注冊(運行時注冊)
在運行時通過 BeanDefinitionRegistry 動態注冊 Bean。
// 獲取 BeanFactory
ConfigurableListableBeanFactory beanFactory = context.getBeanFactory();// 定義 Bean 的元數據
GenericBeanDefinition userDefinition = new GenericBeanDefinition();
userDefinition.setBeanClass(UserService.class);// 注冊 Bean
beanFactory.registerBeanDefinition("userService", userDefinition);
適用于:根據運行時條件動態生成 Bean(如插件化系統、動態配置)。
Spring Bean的注入方式有哪些?
使用@Autowired注解
@Autowired注解是Spring框架提供的一個注解,支持多種方式自動將Spring的bean注入到其他Bean中。
字段注入
@Component
public class JimoerUserService {@Autowiredprivate UserRepository userRepository;
}
構造方法注入
@Component
public class JimoerUserService {private final UserRepository userRepository;// Spring 4.3+ 可省略 @Autowired(單構造器)@Autowiredpublic JimoerUserService(UserRepository userRepository) {this.userRepository = userRepository;}
}
setter注入
@Component
public class JimoerUserService {private UserRepository userRepository;@Autowiredpublic void setUserRepository(UserRepository userRepository) {this.userRepository = userRepository;}
}
使用@Resource和@Inject注解
除了Spring提供的注解,JDK也提供了可以互相注入Bean的注解,有@Resource和@Inject
@Component
public class JimoerUserService {@Resourceprivate UserRepository userRepository;
}@Component
public class JiomerUserService {@Injectprivate UserRepository userRepository;
}
使用XML配置注入
如何不使用注解注入,還可以使用XML文件的配置進行Bean的互相注入。
<bean id="userRepository" class="com.jimoer.UserRepository"/>
<!-- 構造方法注入 -->
<bean id="userService" class="com.jiomer.UserService"><constructor-arg ref="userRepository"/>
</bean>
<!-- 字段注入 -->
<bean id="jimoerUserService" class="com.jiomer.JimoerUserService"><property name="userRepository" ref="userRepository"/>
</bean>
構造方法自動注入
其實從 Spring 4.3 開始,除非一個類中聲明了至少兩個構造函數,否則不需要用 @Autowired 標注構造函數,這個構造函數也能直接注入 Bean。
@Component
public class JimoerUserService {private UserRepository userRepository;public JimoerUserService(UserRepository userRepository){this.userRepository=userRepository;}
}
Spring Bean的作用域有哪些?
Spring的Bean的作用域,就是指這個Bean在哪個范圍內可以被使用。
不同的作用域決定了Bean的創建管理和銷毀的方式。
常見的作用域有Singleton、Prototype、Request、Session、Application這五種。
在代碼中,可以在定義一個Bean的時候,通過@Scope 注解來指定他的作用域。
如果沒有指定Bean的作用域,默認是Singleton(單例)。
Singleton(單例)
- 周期:Spring 容器啟動時創建實例,容器關閉時銷毀。
- 作用域:每個Spring IOC容器,只創建一個Bean實例。
- 適用于:無狀態服務(如工具類、緩存管理器、數據庫連接池)。
- 線程安全:需注意,若 Bean 有可變狀態(即Bean中存在線程共享變量),需通過同步機制或線程安全集合處理。
- 配置方式:
@Component // 默認即為 singleton
public class SingletonBean {
}
Propertype(原型)
- 周期:每次調用
getBean()或注入時創建新實例,容器不負責銷毀。 - 適用于:有狀態 Bean(如用戶會話數據、臨時對象)。
- 線程安全:實例獨立,避免線程安全問題。
- 配置方式:
@Component
@Scope("prototype")
public class PrototypeBean {
}
Request(HTTP 請求)
- 周期:每個 HTTP 請求創建一個實例,請求結束后銷毀。
- 適用于:Web 應用中請求級別的數據共享(如請求日志、上下文信息)。
僅適用于 Web 應用環境。
- 配置方式:
@Component
@Scope("request")
public class RequestBean {
}
Session(HTTP 會話)
- 周期:每個用戶會話(
HttpSession)創建一個實例,會話結束時銷毀。 - 適用于:用戶會話數據(如購物車、用戶偏好設置)。
僅適用于 Web 應用環境。
- 配置方式:
@Component
@Scope("session")
public class SessionBean {
}
Application(應用)
- 周期:Web 應用啟動時創建實例,應用關閉時銷毀。
- 適用于:全局配置或共享資源(如應用級緩存、配置信息)。類似
singleton,但綁定到ServletContext。
僅適用于 Web 環境
- 配置方式:
@Component
@Scope("application")
public class ApplicationBean {
}
Websocket(WebSocket 會話)
- 周期:
WebSocket連接建立時創建實例,連接關閉時銷毀。 - 適用于:
WebSocket會話上下文數據(如實時通信狀態)。
僅適用于 WebSocket 應用。
- 配置方式:
@Component
@Scope("websocket")
public class WebSocketBean {
}
自定義作用域
一般情況下,在開發過程中,都是使用Singleton作用域,有時候也會用Propertype,其他幾個用的都不多。但是除了上面列舉的6個Spring提供作用域以外,還可以自己定義Bean作用域。
自定義一個Spring Bean的作用域,需要實現org.springframework.beans.factory.config.Scope接口,主要是實現如下幾個方法來管理Bean的生命周期。
package org.springframework.beans.factory.config;import org.springframework.beans.factory.ObjectFactory;public interface Scope {Object get(String var1, ObjectFactory<?> var2);Object remove(String var1);void registerDestructionCallback(String var1, Runnable var2);Object resolveContextualObject(String var1);String getConversationId();
}
自定義一個類,然后實現Scope接口,來實現我們自己的Bean作用域。
public class JimoerScope implements Scope{@Overridepublic Object get(String s, ObjectFactory<?> objectFactory) {// 獲取Bean的邏輯return objectFactory.getObject();}@Overridepublic Object remove(String s) {// 移除Bean的邏輯return null;}@Overridepublic void registerDestructionCallback(String s, Runnable runnable) {// 注冊Bean銷毀時的回調}@Overridepublic Object resolveContextualObject(String s) {// 解析上下文return null;}@Overridepublic String getConversationId() {// 獲取會話IDreturn "";}
}
接下來,我們將Spring配置中注冊這個自定義的作用域。
這可以通過ConfigurableBeanFactory.registerScope 方法實現。
import org.springframework.beans.factory.config.ConfigurableBeanFactory;
import org.springframework.context.annotation.Bean;
import org.springframework.context.annotation.Configuration;@Configuration
public class AppConfig {@Beanpublic JimoerScope jimoerScope(ConfigurableBeanFactory beanFactory) {JimoerScope jimoerScope = new JimoerScope();beanFactory.registerScope("jimoer", jimoerScope);return jimoerScope;}}
此時在Bean定義中使用自定義的作用域的名稱jimoer。
Spring 容器將會根據你的自定義邏輯來創建和管理這些 Bean。
@Component
@Scope("jimoer")
public class CustomerScopeTest {
}


生成 PPT 的完整流程)
:適合存儲對象的數據結構,優勢與坑點解析)


相關)


