文章目錄
- 一. 背景
- 二. 你的經歷
- 三. 代碼實現(龜速版——單線程)
- 3.1 梯度幅值
- 3.1.1 生成 8 個方向模板
- 3.1.2 計算梯度
- 3.1.3 顯示梯度圖像
- 3.1.4 程序運行演示
- 3.2 梯度方向 (梯度最大幅度值和方向)
- 3.3 單像素邊緣
- 3.4 梯度單像素邊緣提取 運行測試
- 四 、亞像素坐標
- 五、提取坐標
- 六、 加速版
- 6.1.龜速分析
- 6.2 加速版 亞像素邊緣提取 (多線程 + 少模板)
- 6.2 測試結果及分析
- 6.3 結論:梯度最大幅度值和方向 程序是有問題
基于多項式插值的亞像素邊緣定位算法
一. 背景
在測量或者定位的應用中會涉及到邊緣檢測, 但是像 OpenCV 這樣的開源庫中邊緣檢測算法的精度在像素級別, 比如 Canny, Sobel blablabla. 要想提高精度就需要用到 亞像素 的技術, 在不改變硬件成本的前提下提高檢測精度
二. 你的經歷
圖像的邊緣就是圖像灰度值發生突變的位置, "突變"是理想的情況, 因為一些我也講不清楚你也不愿意看的原因造成了圖像邊緣變得模糊和平滑. 如下圖, 像不像近視眼看到的圖像?
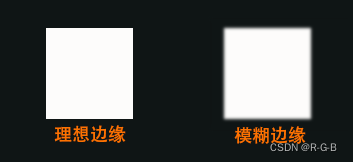
對于理想的邊緣, 就連一個簡單的二值化處理都可以得到準確的邊緣, 模糊的邊緣二值化就不這么聽話了. 二值化作為很多人入門圖像處理遇到的第一批函數, 所以肯定有同學就是用二值化來做邊緣檢測的. 要求不高還好, 光源和被檢測物體有變化的時候你就天天都在調閾值, 不要問我怎么知道的
當你進階一點, 學到了 Canny, Sobel 等待檢測方法時, 你就開始用這樣的方法做邊緣檢測, 很明顯, 效果比二值化好了很多, 此時的你小小的虛榮心得到了滿足, 得到了老板的肯定
又過了一陣, 老板接到一個活, 說要測量一個物體, 客戶要求精度(這個精度不是測量系統分析的精度, 你可以理解為分辨能力)是 ±0.01mm, 你嘴算了一下覺得相機分辨率還可行, 就拍胸脯給老板講可以做, 老板看你信心滿滿就把活接了下來. 但是當你做出來自己拿料檢測的時候, 問題來了, 精度不夠. 然后你就在網上開始找解決方法, 當看到"亞像素"時喜出望外, 感覺找到了救命稻草. 這可能是你的救命稻草, 也是你喜極而泣的原因, 因為你不知道這個亞像素的東東怎么用 C++ 寫出來. 然后就瘋狂地搜索關鍵字 “C++” “亞像素”, 看到一些所謂的源碼, 結果花了好多積分 Download. 發現不能用. 心里還不甘心. 然后一目十行地看各種論文, 其實也看不明白, 就陷入了惡性循環
不過當你看到這篇文章的時候, 真正的希望來了, 因為我會給你提供可用的源代碼

三. 代碼實現(龜速版——單線程)
本文源代碼是根據《一種基于多項式插值改進亞像素細分算法》(作者:李慶利)寫的. 要看論文的話, 可以網上搜索. 希望對你有所幫助. 不好用也沒有關系, 買賣不成仁義在
龜速版旨在說明算法的原理, 后面會有加速版
3.1 梯度幅值
3.1.1 生成 8 個方向模板
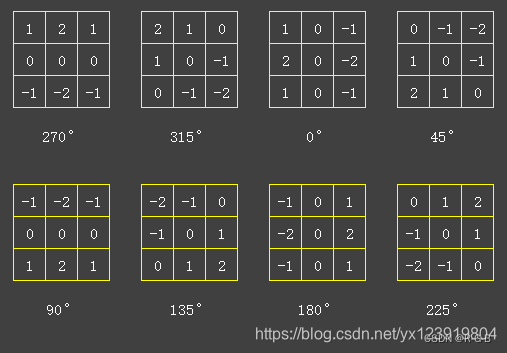
梯度檢測包含 幅值和方向, 用 8 個方向模板在檢測圖像上進行卷積運算(模板滑過的地方的像素值和模板中對應的值相乘, 最后全部加總), 得到 8 張梯度圖像, 方向模板如下. 模板的方向就是和 X 軸的夾角
矩陣的鏡像運算可以用函數flip()完成,函數flip()的原型如下:
void cv::flip(InputArray src, OutputArray dst, int flipCode)
- 水平翻轉:
cv::flip(srcImage, resultImage2, 1); - 垂直翻轉:
cv::flip(srcImage, resultImage3, 0); - 垂直和水平翻轉 :
cv::flip(srcImage, resultImage4, -1);
以下代碼生成 8 個方向模板
/*
矩陣的鏡像運算可以用函數flip()完成,函數flip()的原型如下:
void cv::flip(InputArray src, OutputArray dst, int flipCode)// 水平翻轉
cv::flip(srcImage, resultImage2, 1);
// 垂直翻轉
cv::flip(srcImage, resultImage3, 0);
// 垂直和水平翻轉
cv::flip(srcImage, resultImage4, -1);*/
//生成 8 個方向模板
void gradient_kernels(static Mat kernels[])
{//生成 8 個方向模板if (kernels[0].empty()){int k = 0;kernels[k++] = (Mat_<float>(3, 3) << 1, 2, 1, 0, 0, 0, -1, -2, -1);	// 270°kernels[k++] = (Mat_<float>(3, 3) << 2, 1, 0, 1, 0, -1, 0, -1, -2);	// 315°kernels[k++] = (Mat_<float>(3, 3) << 1, 0, -1, 2, 0, -2, 1, 0, -1);	// 0°kernels[k++] = (Mat_<float>(3, 3) << 0, -1, -2, 1, 0, -1, 2, 1, 0);	// 45°flip(kernels[0], kernels[k++], 0);	                                // 90°(270°垂直翻轉得到90°)kernels[k++] = (Mat_<float>(3, 3) << -2, -1, 0, -1, 0, 1, 0, 1, 2);	// 135°flip(kernels[2], kernels[k++], 1);									// 180°(0°水平翻轉得到90°)kernels[k++] = (Mat_<float>(3, 3) << 0, 1, 2, -1, 0, 1, -2, -1, 0);	// 225°}
}
3.1.2 計算梯度
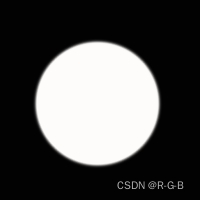
接下來利用模板卷積生成梯度圖像, 假設要檢測的圖像長下面這個樣, 邊緣是模糊的
利用 filter2D 函數計算梯度
OpenCV提供了函數filter2D()作圖像(矩陣)的相關運算,注意是相關運算,而不是卷積運算。
卷積運算的定義,將核旋轉180度再做相關運算就是卷積運算了。
所以我們在使用filter2D卷積運算時,如果模板數據不是中心對稱的,需先將卷積核旋轉180°(若對稱,無需旋轉)
將矩陣旋轉180度等效于先作一個水平鏡像,再作一個垂直鏡像,
矩陣的鏡像運算可以用函數flip()完成,函數flip()的原型如下:
void cv::flip(InputArray src, OutputArray dst, int flipCode)
- 水平翻轉:
cv::flip(srcImage, resultImage2, 1); - 垂直翻轉:
cv::flip(srcImage, resultImage3, 0); - 垂直和水平翻轉 :
cv::flip(srcImage, resultImage4, -1);
利用 filter2D 函數計算梯度
//利用 filter2D 函數計算梯度
void gradient_generate(Mat imgsrc, Mat gradients[], Mat kernels[])
{// 梯度圖像for (int k = 0; k < KERNEL_SUM; k++){filter2D(imgsrc, gradients[k], CV_16S, kernels[k]);}}
3.1.3 顯示梯度圖像
在cpp開頭 定義全局變量 角度列表
// 角度列表
static const short angle_list[] = { 270, 315, 0, 45, 90, 135, 180, 225 };
顯示梯度圖像
//顯示梯度圖像
void show_gradient(Mat gradients[])
{//顯示梯度圖Mat imgshow;char gradientImg[50];char strName[50] = "gradient-%d";for (int k = 0; k < KERNEL_SUM; k++){// 因為梯度有可能是負值, 所以要做歸一化和類型轉換才可以正常顯示normalize(gradients[k], imgshow, 0, 255, NORM_MINMAX);//OpenCV老版本 用 CV_MINMAX,新版用NORM_MINMAX imgshow.convertTo(imgshow, CV_8UC1);putText(imgshow, to_string(angle_list[k]), Point(70, 110), FONT_HERSHEY_COMPLEX, 1, cv::Scalar(0, 255, 255), 3, 8, 0);sprintf_s(gradientImg, strName, angle_list[k]);namedWindow(gradientImg, WINDOW_NORMAL);imshow(gradientImg, imgshow);}waitKey(0);
}
3.1.4 程序運行演示
#include <random>
#include <ctime>
#include <vector>
#include <opencv2/opencv.hpp>
#include <opencv2/features2d.hpp>
#include <windows.h>using namespace cv;
using namespace std;#define KERNEL_SUM	8 //8 個方向卷積模板(卷積核)
#define KERNEL_HALF	4 //4 個卷積模板(270°和90°, 315°和135°是相反的, 其他類推)//卷積核模板
static Mat kernels[KERNEL_SUM];
// 梯度圖像
Mat gradients[KERNEL_SUM];
// 檢測圖像, 路徑自己更改, 注意要是單通道圖像
Mat imgsrc = imread("1.jpg", IMREAD_UNCHANGED);
// 角度列表
static const short angle_list[] = { 270, 315, 0, 45, 90, 135, 180, 225 };//生成 8 個方向模板
void gradient_kernels(static Mat kernels[]);
//利用 filter2D 函數計算梯度
void gradient_generate(Mat imgsrc, Mat gradients[], Mat kernels[]);
//顯示梯度圖像
void  show_gradient(Mat gradients[]);void main()
{gradient_kernels(kernels);gradient_generate(imgsrc,gradients,kernels);//顯示梯度圖像show_gradient(gradients);
}
顯示 8個方向的梯度圖像
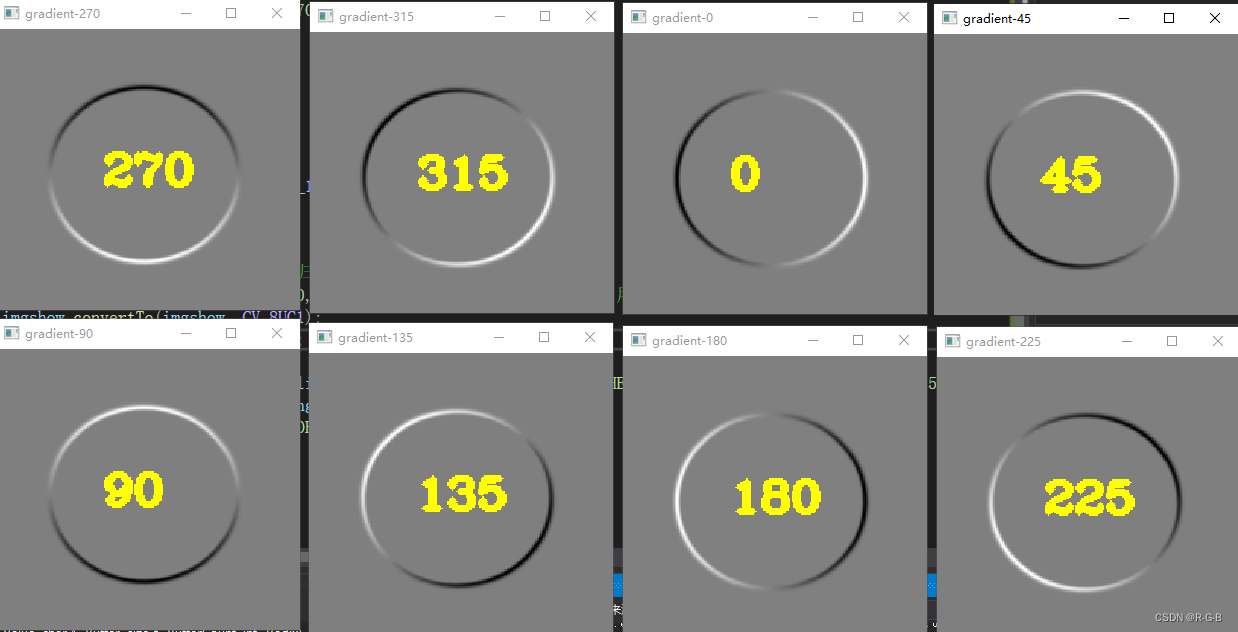
從圖中可以看出各模板可以檢測出指定方向的邊緣, 其中白色表示該方向最大梯度值, 黑色表示反向最大梯度值
梯度幅值最大值處的點就是邊緣的整數坐標
3.2 梯度方向 (梯度最大幅度值和方向)
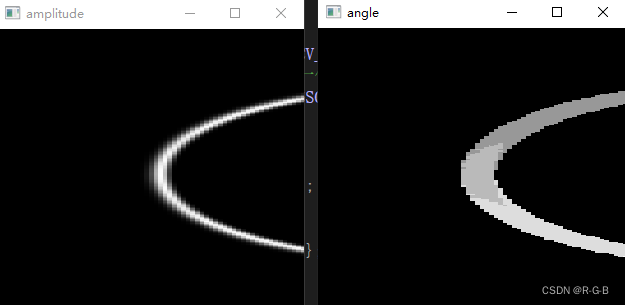
梯度方向指向梯度幅值最大的方向, 現在已經有 8 張幅值圖像, 只要比較其中最大的幅值即可得到其方向, 例如第 0 張梯度圖像在 (i, j) 處的幅值比其他圖像都大, 則 (i, j) 點的梯度方向是 270°. 下面我們用代碼求出最大幅度值和方向
在cpp開頭 定義全局變量
// 總幅值矩陣
Mat amplitude(imgsrc.rows, imgsrc.cols, CV_16SC1, Scalar::all(0));
// 角度矩陣, 后面初始化成 -64 只是為了歸一化之后能顯示角度 0
Mat angle(imgsrc.rows, imgsrc.cols, CV_16SC1, Scalar::all(-64));
梯度最大幅度值和方向
//梯度最大幅度值和方向
void gradient_amplitude_angle(Mat imgsrc, Mat gradients[], Mat amplitude, Mat angle)
{for (int r = 0; r < imgsrc.rows; r++){short* pAmp = amplitude.ptr<short>(r);short* pAng = angle.ptr<short>(r);short* pGrad[KERNEL_SUM] = { nullptr };for (int i = 0; i < KERNEL_SUM; i++){pGrad[i] = gradients[i].ptr<short>(r);}for (int c = 0; c < imgsrc.cols; c++){// 找出最大值for (int i = 0; i < KERNEL_SUM; i++){if (pAmp[c] < pGrad[i][c]){pAmp[c] = pGrad[i][c];pAng[c] = angle_list[i];}}}}
}
顯示 最大幅度值和方向
//顯示 最大幅度值和方向
void show_amplitude_angle(Mat amplitude,Mat angle)
{//顯示梯度圖Mat imgshow;// 顯示幅值圖像和角度圖像normalize(amplitude, imgshow, 0, 255, NORM_MINMAX);imgshow.convertTo(imgshow, CV_8UC1);namedWindow("amplitude", WINDOW_NORMAL);imshow("amplitude", imgshow);cout << "amplitude.size : " << amplitude.size()<< "    imgshow.size :"<< imgshow.size()<<endl;normalize(angle, imgshow, 0, 255, NORM_MINMAX);imgshow.convertTo(imgshow, CV_8UC1);namedWindow("angle", WINDOW_NORMAL);imshow("angle", imgshow);cout << "angle.size : " << angle.size() << "    imgshow.size :" << imgshow.size() << endl;waitKey(0);
}
原教程 最大幅度值和方向
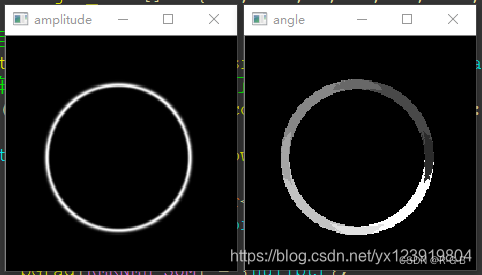
本文運行結果: 最大幅度值和方向
3.3 單像素邊緣
到這里有同學可能有疑問, 既然幅值最大處是邊緣, 我們也把幅值最大的地方找出來了, 但是這個邊緣怎么這么粗?
首先要說明的是這不是邊緣, 只是 8 個梯度圖中幅值比較大的地方, 幅值圖中最亮的點才是邊緣. 那如何能找出圖中最亮的點呢? 這個也比較簡單, 只要在 3 × 3 的鄰域中根據梯度的方向比較中心點 “左右” 的兩個點幅值就可以知道了. 左右我打了引號, 有可能是在對角方向和上下方向. 如果不能理解的話, 把幅值圖放大如下, 仿佛看到了馬賽克
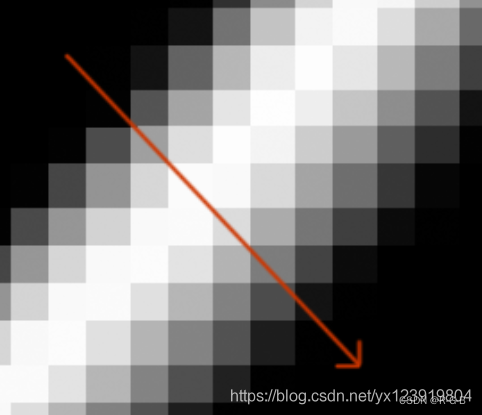
有沒有發現在梯度方向幅值從小到大, 再變小, 我們只需要判斷中間是否大于兩邊(“左右”)的幅值, 如果同時大于兩邊, 則是邊緣點, 如果不是同時大于兩邊, 則不是邊緣點, 下面用代碼實現此判斷
注: BYTE 為 unsigned char 類型, 有的新手同學可能不知道, 特別在這里注明
void get_singlePix_edges(Mat imgsrc,Mat amplitude, Mat angle)
{// 整數坐標邊緣圖像Mat edge(imgsrc.rows, imgsrc.cols, CV_8UC1, Scalar::all(0));for (int r = 1; r < imgsrc.rows - 1; r++){// 3 * 3 鄰域, 所以用 3 個指針, 一個指針指一行const short* pAmp1 = amplitude.ptr<short>(r - 1);const short* pAmp2 = amplitude.ptr<short>(r);const short* pAmp3 = amplitude.ptr<short>(r + 1);const short* pAng = angle.ptr<short>(r);//BYTE 為 unsigned char 類型,包含#include <windows.h>BYTE* pEdge = edge.ptr<BYTE>(r);for (int c = 1; c < imgsrc.cols - 1; c++){switch (pAng[c]){case 270:if (pAmp2[c] > pAmp1[c] && pAmp2[c] >= pAmp3[c]){pEdge[c] = 255;}break;case 90:if (pAmp2[c] >= pAmp1[c] && pAmp2[c] > pAmp3[c]){pEdge[c] = 255;}break;case 315:if (pAmp2[c] > pAmp1[c - 1] && pAmp2[c] >= pAmp3[c + 1]){pEdge[c] = 255;}break;case 135:if (pAmp2[c] >= pAmp1[c - 1] && pAmp2[c] > pAmp3[c + 1]){pEdge[c] = 255;}break;case 0:if (pAmp2[c] > pAmp2[c - 1] && pAmp2[c] >= pAmp2[c + 1]){pEdge[c] = 255;}break;case 180:if (pAmp2[c] >= pAmp2[c - 1] && pAmp2[c] > pAmp2[c + 1]){pEdge[c] = 255;}break;case 45:if (pAmp2[c] >= pAmp1[c + 1] && pAmp2[c] > pAmp3[c - 1]){pEdge[c] = 255;}break;case 225:if (pAmp2[c] > pAmp1[c + 1] && pAmp2[c] >= pAmp3[c - 1]){pEdge[c] = 255;}break;default:break;}}}namedWindow("edge", WINDOW_NORMAL);imshow("edge", edge);waitKey(0);
}
原教程 最大幅度值和方向
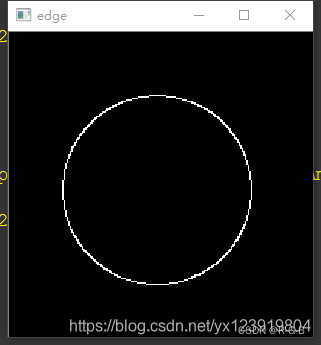
本文運行結果: 最大幅度值和方向
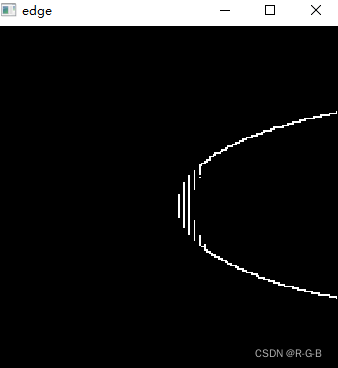
現在的邊緣是不是只有一個像素寬了, 到這里可以算是完成了 50% 工作了,
還有兩個問題需要解決, 一是如何求出亞像素坐標, 二是怎樣表示亞像素坐標
3.4 梯度單像素邊緣提取 運行測試
以lena為例,檢測輪廓

#include <random>
#include <ctime>
#include <vector>
#include <opencv2/opencv.hpp>
#include <opencv2/features2d.hpp>
#include <windows.h>using namespace cv;
using namespace std;#define KERNEL_SUM	8 //8 個方向卷積模板(卷積核)
#define KERNEL_HALF	4 //4 個卷積模板(270°和90°, 315°和135°是相反的, 其他類推)/*OpenCV提供了函數filter2D()作圖像(矩陣)的相關運算,注意是相關運算,而不是卷積運算。
卷積運算的定義,將核旋轉180度再做相關運算就是卷積運算了。
所以我們在使用filter2D卷積運算時,如果模板數據不是中心對稱的,需先將卷積核旋轉180°(若對稱,無需旋轉)
將矩陣旋轉180度等效于先作一個水平鏡像,再作一個垂直鏡像,矩陣的鏡像運算可以用函數flip()完成,函數flip()的原型如下:
void cv::flip(InputArray src, OutputArray dst, int flipCode)// 水平翻轉
cv::flip(srcImage, resultImage2, 1);
// 垂直翻轉
cv::flip(srcImage, resultImage3, 0);
// 垂直和水平翻轉
cv::flip(srcImage, resultImage4, -1);*///卷積核模板
static Mat kernels[KERNEL_SUM];
// 梯度圖像
Mat gradients[KERNEL_SUM];
// 檢測圖像, 路徑自己更改, 注意要是單通道圖像
Mat imgsrc = imread("2.jpg", IMREAD_GRAYSCALE);
// 總幅值矩陣
Mat amplitude(imgsrc.rows, imgsrc.cols, CV_16SC1, Scalar::all(0));
// 角度矩陣, 后面初始化成 -64 只是為了歸一化之后能顯示角度 0
Mat angle(imgsrc.rows, imgsrc.cols, CV_16SC1, Scalar::all(-64));
// 角度列表
static const short angle_list[] = { 270, 315, 0, 45, 90, 135, 180, 225 };// 整數坐標邊緣圖像
Mat edge(imgsrc.rows, imgsrc.cols, CV_8UC1, Scalar::all(0));//生成 8 個方向模板
void gradient_kernels(static Mat kernels[]);
//利用 filter2D 函數計算梯度
void gradient_generate(Mat imgsrc, Mat gradients[], Mat kernels[]);
//顯示梯度圖像
void  show_gradient(Mat gradients[]);
//梯度最大幅度值和方向
void gradient_amplitude_angle(Mat imgsrc, Mat gradients[],Mat amplitude,Mat angle);
//顯示 最大幅度值和方向
void show_amplitude_angle(Mat amplitude, Mat angle);
void get_singlePix_edges(Mat imgsrc, Mat amplitude, Mat angle);void main()
{gradient_kernels(kernels);gradient_generate(imgsrc,gradients,kernels);//顯示梯度圖像//show_gradient(gradients);gradient_amplitude_angle(imgsrc,gradients, amplitude, angle);//顯示 最大幅度值和方向show_amplitude_angle(amplitude, angle);get_singlePix_edges(imgsrc,amplitude,angle);}//生成 8 個方向模板
void gradient_kernels(static Mat kernels[])
{//生成 8 個方向模板if (kernels[0].empty()){int k = 0;kernels[k++] = (Mat_<float>(3, 3) << 1, 2, 1, 0, 0, 0, -1, -2, -1);	// 270°kernels[k++] = (Mat_<float>(3, 3) << 2, 1, 0, 1, 0, -1, 0, -1, -2);	// 315°kernels[k++] = (Mat_<float>(3, 3) << 1, 0, -1, 2, 0, -2, 1, 0, -1);	// 0°kernels[k++] = (Mat_<float>(3, 3) << 0, -1, -2, 1, 0, -1, 2, 1, 0);	// 45°flip(kernels[0], kernels[k++], 0);	                                // 90°(270°垂直翻轉得到90°)kernels[k++] = (Mat_<float>(3, 3) << -2, -1, 0, -1, 0, 1, 0, 1, 2);	// 135°flip(kernels[2], kernels[k++], 1);									// 180°(0°水平翻轉得到90°)kernels[k++] = (Mat_<float>(3, 3) << 0, 1, 2, -1, 0, 1, -2, -1, 0);	// 225°}
}//利用 filter2D 函數計算梯度
void gradient_generate(Mat imgsrc, Mat gradients[], Mat kernels[])
{// 梯度圖像for (int k = 0; k < KERNEL_SUM; k++){filter2D(imgsrc, gradients[k], CV_16S, kernels[k]);}}//顯示梯度圖像
void show_gradient(Mat gradients[])
{//顯示梯度圖Mat imgshow;char gradientImg[50];char strName[50] = "gradient-%d";for (int k = 0; k < KERNEL_SUM; k++){// 因為梯度有可能是負值, 所以要做歸一化和類型轉換才可以正常顯示normalize(gradients[k], imgshow, 0, 255, NORM_MINMAX);//OpenCV老版本 用 CV_MINMAX,新版用NORM_MINMAX imgshow.convertTo(imgshow, CV_8UC1);putText(imgshow, to_string(angle_list[k]), Point(70, 110), FONT_HERSHEY_COMPLEX, 1, cv::Scalar(0, 255, 255), 3, 8, 0);sprintf_s(gradientImg, strName, angle_list[k]);namedWindow(gradientImg, WINDOW_NORMAL);imshow(gradientImg, imgshow);}waitKey(0);
}//梯度最大幅度值和方向
void gradient_amplitude_angle(Mat imgsrc, Mat gradients[], Mat amplitude, Mat angle)
{for (int r = 0; r < imgsrc.rows; r++){short* pAmp = amplitude.ptr<short>(r);short* pAng = angle.ptr<short>(r);short* pGrad[KERNEL_SUM] = { nullptr };for (int i = 0; i < KERNEL_SUM; i++){pGrad[i] = gradients[i].ptr<short>(r);}for (int c = 0; c < imgsrc.cols; c++){// 找出最大值for (int i = 0; i < KERNEL_SUM; i++){if (pAmp[c] < pGrad[i][c]){pAmp[c] = pGrad[i][c];pAng[c] = angle_list[i];}}}}
}//顯示 最大幅度值和方向
void show_amplitude_angle(Mat amplitude,Mat angle)
{//顯示梯度圖Mat imgshow;// 顯示幅值圖像和角度圖像normalize(amplitude, imgshow, 0, 255, NORM_MINMAX);imgshow.convertTo(imgshow, CV_8UC1);namedWindow("amplitude", WINDOW_NORMAL);imshow("amplitude", imgshow);cout << "amplitude.size : " << amplitude.size()<< "    imgshow.size :"<< imgshow.size()<<endl;normalize(angle, imgshow, 0, 255, NORM_MINMAX);imgshow.convertTo(imgshow, CV_8UC1);namedWindow("angle", WINDOW_NORMAL);imshow("angle", imgshow);cout << "angle.size : " << angle.size() << "    imgshow.size :" << imgshow.size() << endl;waitKey(0);
}void get_singlePix_edges(Mat imgsrc, Mat amplitude, Mat angle)
{// 整數坐標邊緣圖像Mat edge(imgsrc.rows, imgsrc.cols, CV_8UC1, Scalar::all(0));for (int r = 1; r < imgsrc.rows - 1; r++){// 3 * 3 鄰域, 所以用 3 個指針, 一個指針指一行const short* pAmp1 = amplitude.ptr<short>(r - 1);const short* pAmp2 = amplitude.ptr<short>(r);const short* pAmp3 = amplitude.ptr<short>(r + 1);const short* pAng = angle.ptr<short>(r);//BYTE 為 unsigned char 類型,包含#include <windows.h>BYTE* pEdge = edge.ptr<BYTE>(r);for (int c = 1; c < imgsrc.cols - 1; c++){switch (pAng[c]){case 270:if (pAmp2[c] > pAmp1[c] && pAmp2[c] >= pAmp3[c]){pEdge[c] = 255;}break;case 90:if (pAmp2[c] >= pAmp1[c] && pAmp2[c] > pAmp3[c]){pEdge[c] = 255;}break;case 315:if (pAmp2[c] > pAmp1[c - 1] && pAmp2[c] >= pAmp3[c + 1]){pEdge[c] = 255;}break;case 135:if (pAmp2[c] >= pAmp1[c - 1] && pAmp2[c] > pAmp3[c + 1]){pEdge[c] = 255;}break;case 0:if (pAmp2[c] > pAmp2[c - 1] && pAmp2[c] >= pAmp2[c + 1]){pEdge[c] = 255;}break;case 180:if (pAmp2[c] >= pAmp2[c - 1] && pAmp2[c] > pAmp2[c + 1]){pEdge[c] = 255;}break;case 45:if (pAmp2[c] >= pAmp1[c + 1] && pAmp2[c] > pAmp3[c - 1]){pEdge[c] = 255;}break;case 225:if (pAmp2[c] > pAmp1[c + 1] && pAmp2[c] >= pAmp3[c - 1]){pEdge[c] = 255;}break;default:break;}}}namedWindow("edge", WINDOW_NORMAL);imshow("edge", edge);waitKey(0);
}
本文運行結果
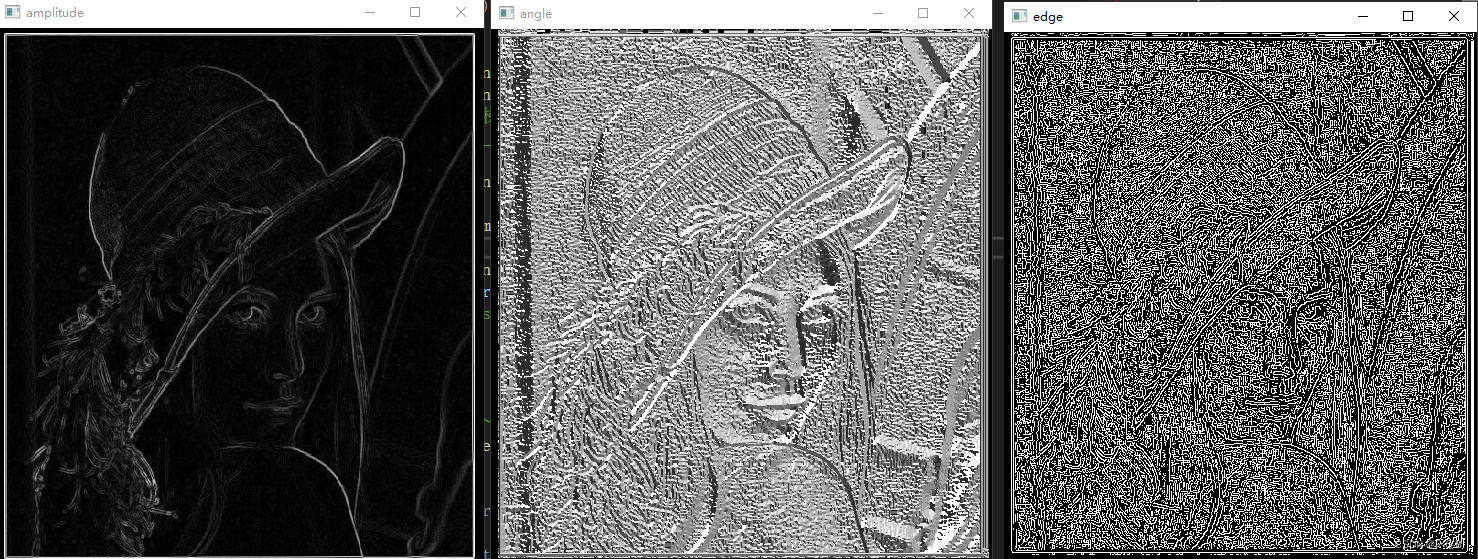
原教程結果
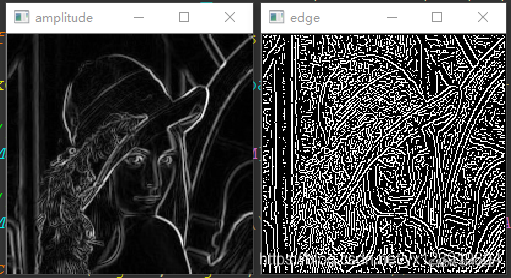
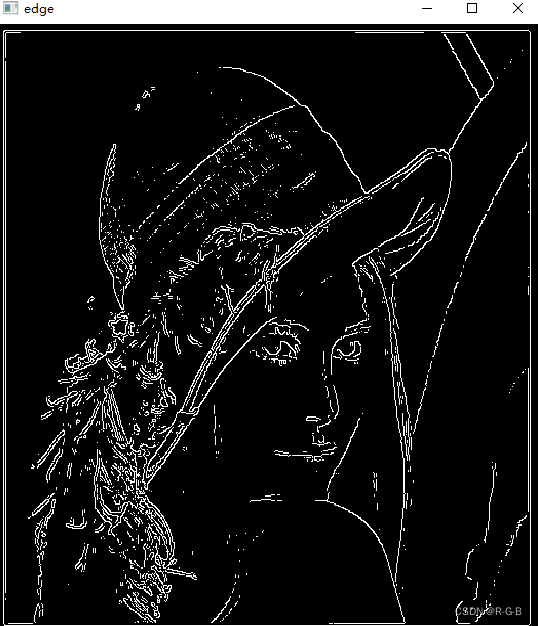
看到邊緣圖像有的同學可能要傷心了, 女神怎么變成這樣了, 那么多邊緣被檢測出來了, 我們不需要那么多邊緣啊. 同學別急, 檢測出來那么多邊緣是因為我們沒有對梯度幅度進行篩選, 你想一下, 我們在計算單像素邊緣的時候只要滿足中間大于兩邊就算邊緣, 女神圖像中有一些中間只比兩邊大了一點點, 所以這種邊緣可以去除, 我們想要的是比較強烈的邊緣. 解決辦法就是設定一個閾值, 當梯度值大于閾值是才算真正的邊緣
將單像素邊緣檢測修改如下
void get_singlePix_edges2(Mat imgsrc, Mat edge, Mat amplitude, Mat angle, int threshVal)
{// 增加threshVal, 設定一個閾值, 當梯度值大于閾值是才算真正的邊緣for (int r = 1; r < imgsrc.rows - 1; r++){// 3 * 3 鄰域, 所以用 3 個指針, 一個指針指一行const short* pAmp1 = amplitude.ptr<short>(r - 1);const short* pAmp2 = amplitude.ptr<short>(r);const short* pAmp3 = amplitude.ptr<short>(r + 1);const short* pAng = angle.ptr<short>(r);BYTE* pEdge = edge.ptr<BYTE>(r);for (int c = 1; c < imgsrc.cols - 1; c++){// 以下判斷為增加部分if (pAmp2[c] < threshVal){continue;}//switch (pAng[c]){case 270:if (pAmp2[c] > pAmp1[c] && pAmp2[c] >= pAmp3[c]){pEdge[c] = 255;}break;case 90:if (pAmp2[c] >= pAmp1[c] && pAmp2[c] > pAmp3[c]){pEdge[c] = 255;}break;case 315:if (pAmp2[c] > pAmp1[c - 1] && pAmp2[c] >= pAmp3[c + 1]){pEdge[c] = 255;}break;case 135:if (pAmp2[c] >= pAmp1[c - 1] && pAmp2[c] > pAmp3[c + 1]){pEdge[c] = 255;}break;case 0:if (pAmp2[c] > pAmp2[c - 1] && pAmp2[c] >= pAmp2[c + 1]){pEdge[c] = 255;}break;case 180:if (pAmp2[c] >= pAmp2[c - 1] && pAmp2[c] > pAmp2[c + 1]){pEdge[c] = 255;}break;case 45:if (pAmp2[c] >= pAmp1[c + 1] && pAmp2[c] > pAmp3[c - 1]){pEdge[c] = 255;}break;case 225:if (pAmp2[c] > pAmp1[c + 1] && pAmp2[c] >= pAmp3[c - 1]){pEdge[c] = 255;}break;default:break;}}}cout << "edge.size :" << edge.size() << endl;namedWindow("edge", WINDOW_NORMAL);imshow("edge", edge);waitKey(0);
本文運行效果:
以下是閾值分別為 64, 128 的效果
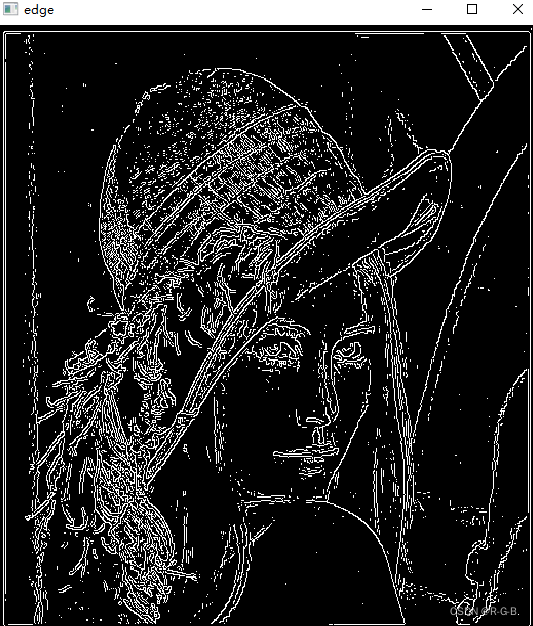
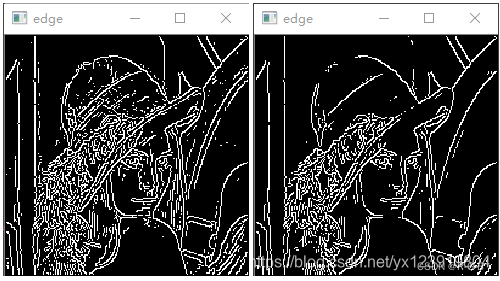
以下是原教程結果:
以下是閾值分別為 64, 128 的效果
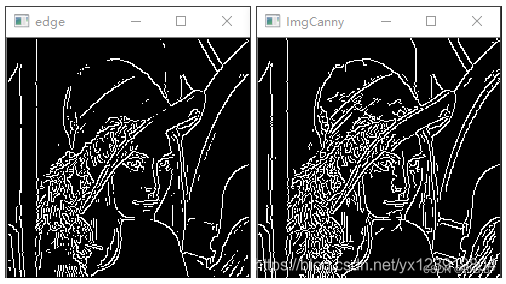
下面是閾值為 128 和 Canny 參數為 64, 128, 3, false 的對比圖
原教程數據:
時間測試:
CPU: I9 9900K
OpenCV: 2413
圖像分辯率: 2592 * 1944,邊緣閾值 128
Debug模式: 406mS
Release模式: 125mS
四 、亞像素坐標
根據以下公式可計算亞像素坐標, 其實這個公式是二次多項式擬合
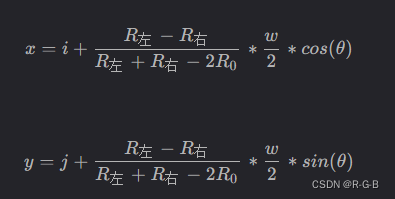
i: 當前整數坐標邊緣點橫坐標
j: 當前整數坐標邊緣點縱坐標
R左: 邊緣點左邊梯度值
R0: 邊緣點梯度值
R右: 邊緣點右邊梯度值
w: 相鄰像素到邊緣點的距離(梯度方向為 0°, 90°, 180°, 270° 時等于 1, 其他角度為sqrt(2)(根號2)
計算式是有了, 但是怎么在圖像上表示小數坐標? 有兩種方法
- 使用 vector 或其他容器把計算好的小數坐標保存起來, 這種方式可以直接操作數據
- 創建兩個通道的圖像, 第一個通道表示 x, 第二個通道表示 y, 這樣裝有值的像素點就表示在整數坐標的這個點的實際小數坐標, 要用的時候, 直接在這個坐標點取值就可以了, 這種方式還保持和圖像相關聯的狀態
兩種方式你選喜歡的就好
下面代碼中, sin 前面的負號非常關鍵, 因為圖像的 y 方向和直角坐標系的 y 方向相反
vector<Point2f> subPixPoint2f(Mat edge)
{// 根號2const double root2 = sqrt(2.0);// 三角函數表double tri_list[2][KERNEL_SUM] = { 0 };for (int i = 0; i < KERNEL_SUM; i++){tri_list[0][i] = cos(angle_list[i] * CV_PI / 180.0);// sin前面的負號非常關鍵, 因為圖像的y方向和直角坐標系的y方向相反tri_list[1][i] = -sin(angle_list[i] * CV_PI / 180.0);}// vector 方式記錄小數坐標vector<Point2f> vPts;// Mat 方式記錄小數坐標, 注意這里是雙通道Mat coordinate(imgsrc.rows, imgsrc.cols, CV_32FC2, Scalar::all(0));for (int r = 1; r < imgsrc.rows - 1; r++){// 3 * 3 鄰域, 所以用3個指針, 一個指針指一行const short* pAmp1 = amplitude.ptr<short>(r - 1);const short* pAmp2 = amplitude.ptr<short>(r);const short* pAmp3 = amplitude.ptr<short>(r + 1);const short* pAng = angle.ptr<short>(r);const BYTE* pEdge = edge.ptr<BYTE>(r);float* pCoordinate = coordinate.ptr<float>(r);for (int c = 1; c < imgsrc.cols - 1; c++){if (pEdge[c]){int nAngTmp = 0;double dTmp = 0;switch (pAng[c]){case 270:nAngTmp = 0;dTmp = ((double)pAmp1[c] - pAmp3[c]) / (pAmp1[c] + pAmp3[c] - 2 * pAmp2[c]) * 0.5;break;case 90:nAngTmp = 4;dTmp = -((double)pAmp1[c] - pAmp3[c]) / (pAmp1[c] + pAmp3[c] - 2 * pAmp2[c]) * 0.5;break;case 315:nAngTmp = 1;dTmp = ((double)pAmp1[c - 1] - pAmp3[c + 1]) / (pAmp1[c - 1] + pAmp3[c + 1] - 2 * pAmp2[c]) * root2 * 0.5;break;case 135:nAngTmp = 5;dTmp = -((double)pAmp1[c - 1] - pAmp3[c + 1]) / (pAmp1[c - 1] + pAmp3[c + 1] - 2 * pAmp2[c]) * root2 * 0.5;break;case 0:nAngTmp = 2;dTmp = ((double)pAmp2[c - 1] - pAmp2[c + 1]) / (pAmp2[c - 1] + pAmp2[c + 1] - 2 * pAmp2[c]) * 0.5;break;case 180:nAngTmp = 6;dTmp = -((double)pAmp2[c - 1] - pAmp2[c + 1]) / (pAmp2[c - 1] + pAmp2[c + 1] - 2 * pAmp2[c]) * 0.5;break;case 45:nAngTmp = 3;dTmp = ((double)pAmp3[c - 1] - pAmp1[c + 1]) / (pAmp1[c + 1] + pAmp3[c - 1] - 2 * pAmp2[c]) * root2 * 0.5;break;case 225:nAngTmp = 7;dTmp = -((double)pAmp3[c - 1] - pAmp1[c + 1]) / (pAmp1[c + 1] + pAmp3[c - 1] - 2 * pAmp2[c]) * root2 * 0.5;break;default:break;}const double x = c + dTmp * tri_list[0][nAngTmp];const double y = r + dTmp * tri_list[1][nAngTmp];// vector方式vPts.push_back(Point2f((float)x, (float)y));// Mat 方式pCoordinate[c << 1] = (float)x;pCoordinate[(c << 1) + 1] = (float)y;}}}return vPts;
}
打印坐標函數
template<typename T>
void display(vector<T> pts)
{int num = 0;for (auto iter = pts.begin(); iter != pts.end(); iter++){num++;if(num%10 == 0)cout << "\n";cout << *iter << "  ";}cout << "\n";
}
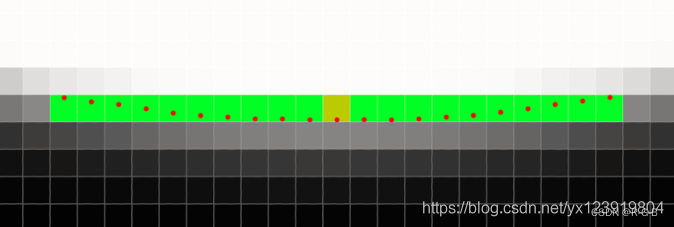
下面是原始圖像的底部放大圖, 綠色部分是整數坐標, 由 270° 模板檢測出來的邊緣, 黃色是最低點, 可以看出圓的底部變成了一條直線, 這是我們不能接受的, 根據檢測出來的小數坐標用紅色標記出來, 可以看到底部的小數坐標為邊弧形邊緣, 精度提升了不少.
五、提取坐標
假定在 edge 圖像的 (10, 20) (10 為行, 20 為列) 處不為 0, 則這點是邊緣, coordinate 圖像 (10, 20) 處通道 1 的值為 10.1234, 通道 2 的值為 20.2345, 則小數坐標 x = 20.2345, y = 10.1234
六、 加速版
6.1.龜速分析
卷積模板耗時, 在做圖像卷積時有 8 個模板, 卷積這個操作相對比較耗時, 可以改進為多線程 + 少模板方式
-
多線程: 這不用講吧, 一個模板一個線程
-
少模板: 其實模板沒有少, 只是 270° 和 90° 是相反的, 315° 和 135° 是相反的, 其他類推, 只需要卷積 4 個模板就好了, 剩下的4個模板把前面卷積好的梯度圖像乘以 -1
逐個像素點訪問耗時, 每個像素點的操作都是一樣的, 所以可以把圖像分塊, 然后用多線程對各塊單獨操作
角度和三角函數計算重復, 用 0~7 替換各個角度表示方便查表操作
6.2 加速版 亞像素邊緣提取 (多線程 + 少模板)
注意: 函數只能輸入單通道圖像, 三通道的 RGB 圖像計算會有問題
時間測試:
CPU: I9 9900K
OpenCV: 2413
圖像分辯率: 2592 * 1944,邊緣閾值 128圖像分塊數: 1
Debug模式: 203mS
Release模式: 103mS圖像分塊數: 8
Debug模式: 125mS
Release模式: 63mS
其實大多數實際應用中處理的不會是整張圖像, 所以可以只處理目標區域來減少計算時間
修改后的代碼最耗時的部分在梯度方向的判斷, 大約占了整個處理過程的 80% 時間, 所以這個地方有待優化,
void SubPixelEdge(Mat& imgsrc, Mat& edge, vector<Point2f>& vPts, int thres, int parts);
void SubPixelEdge2(Mat& imgsrc, Mat& edge, Mat& coordinate, int thres, int parts);
#include <random>
#include <ctime>
#include <vector>
#include <opencv2\\opencv.hpp>
#include <opencv2\\features2d.hpp>
#include <windows.h>using namespace cv;
using namespace std;#define KERNEL_SUM 8 //8 個方向卷積模板(卷積核)
#define KERNEL_HALF 4 //4 個卷積模板(270°和90°, 315°和135°是相反的, 其他類推)/*OpenCV提供了函數filter2D()作圖像(矩陣)的相關運算,注意是相關運算,而不是卷積運算。
卷積運算的定義,將核旋轉180度再做相關運算就是卷積運算了。
所以我們在使用filter2D卷積運算時,如果模板數據不是中心對稱的,需先將卷積核旋轉180°(若對稱,無需旋轉)
將矩陣旋轉180度等效于先作一個水平鏡像,再作一個垂直鏡像,矩陣的鏡像運算可以用函數flip()完成,函數flip()的原型如下:
void cv::flip(InputArray src, OutputArray dst, int flipCode)// 水平翻轉
cv::flip(srcImage, resultImage2, 1);
// 垂直翻轉
cv::flip(srcImage, resultImage3, 0);
// 垂直和水平翻轉
cv::flip(srcImage, resultImage4, -1);*/typedef struct _tagEdgeParam
{int filter_count;int thres;//梯度閾值int parts;//圖像分塊數, 當圖像比較小時, 就沒有分塊的必要了std::mutex mtx;
} EDGE_PARAM;// imgsrc: 檢測圖像, CV_8UC1
// edge: 整數坐標邊緣圖像
// vPts: 坐標記錄 vector
// thres: 梯度閾值
// parts: 圖像分塊數, 當圖像比較小時, 就沒有分塊的必要了
void SubPixelEdge(Mat& imgsrc, Mat& edge, vector<Point2f>& vPts, int thres, int parts);// imgsrc: 檢測圖像, CV_8UC1
// edge: 整數坐標邊緣圖像
// coordinate: 小數坐標記錄矩陣
// thres: 梯度閾值
// parts: 圖像分塊數, 當圖像比較小時, 就沒有分塊的必要了
void SubPixelEdge2(Mat& imgsrc, Mat& edge, Mat& coordinate, int thres, int parts);void main()
{// 檢測圖像, 路徑自己更改, 注意要是單通道圖像Mat imgsrc = imread("1.jpg", IMREAD_UNCHANGED);// 整數坐標邊緣圖像Mat edge(imgsrc.rows, imgsrc.cols, CV_8UC1, Scalar::all(0));vector<Point2f> vPts;Mat coordinate;int thres = 100;int parts = 10;SubPixelEdge2(imgsrc, edge, coordinate, thres,parts);
}// imgsrc: 檢測圖像, CV_8UC1
// edge: 整數坐標邊緣圖像
// vPts: 坐標記錄 vector
// thres: 梯度閾值
// parts: 圖像分塊數, 當圖像比較小時, 就沒有分塊的必要了
void SubPixelEdge(Mat& imgsrc, Mat& edge, vector<Point2f>& vPts, int thres, int parts)
{static Mat kernels[KERNEL_SUM];if (kernels[0].empty()){int k = 0;kernels[k++] = (Mat_<float>(3, 3) << 1, 2, 1, 0, 0, 0, -1, -2, -1); // 270°kernels[k++] = (Mat_<float>(3, 3) << 2, 1, 0, 1, 0, -1, 0, -1, -2); // 315°kernels[k++] = (Mat_<float>(3, 3) << 1, 0, -1, 2, 0, -2, 1, 0, -1); // 0°kernels[k++] = (Mat_<float>(3, 3) << 0, -1, -2, 1, 0, -1, 2, 1, 0); // 45°flip(kernels[0], kernels[k++], 0); // 90°kernels[k++] = (Mat_<float>(3, 3) << -2, -1, 0, -1, 0, 1, 0, 1, 2); // 135°flip(kernels[2], kernels[k++], 1); // 180°kernels[k++] = (Mat_<float>(3, 3) << 0, 1, 2, -1, 0, 1, -2, -1, 0); // 225°}// 梯度圖像Mat gradients[KERNEL_SUM];EDGE_PARAM edge_param;edge_param.filter_count = 0;edge_param.thres = thres;for (int i = 0; i < KERNEL_HALF; i++){std::thread f([](Mat* src, Mat* grad, Mat* ker, EDGE_PARAM* param){filter2D(*src, *grad, CV_16S, *ker);*(grad + KERNEL_HALF) = -(*grad);param->mtx.lock();param->filter_count++;param->mtx.unlock();}, &imgsrc, &gradients[i], &kernels[i], &edge_param);f.detach();}while (edge_param.filter_count < KERNEL_HALF){std::this_thread::sleep_for(std::chrono::milliseconds(1));}// 幅值和角度矩陣合并成一個矩陣// 新創建的圖像總是連續的, 所以可以按行來操作提高效率Mat amp_ang(imgsrc.rows, imgsrc.cols, CV_16SC2, Scalar::all(0));edge_param.filter_count = 0;edge_param.parts = parts;//assert用來檢測程序運行時的一些錯誤情況,比如數組越界、指針為空等。當程序發現錯誤時,assert會使程序崩潰,并輸出錯誤信息。assert的使用可以提高代碼的魯棒性及可靠性。assert(parts >= 1 && parts < (amp_ang.rows >> 1));for (int i = 0; i < parts; i++){std::thread f([](Mat* amp_ang, Mat* grad, int cur_part, EDGE_PARAM* param){const int length = amp_ang->rows * amp_ang->cols;const int step = length / param->parts;const int start = cur_part * step;int end = start + step;if (cur_part >= param->parts - 1){end = length;}short* amp_ang_ptr = (short*)amp_ang->data + (start << 1);short* grad_ptr[KERNEL_SUM] = { nullptr };for (int k = 0; k < KERNEL_SUM; k++){grad_ptr[k] = (short*)grad[k].data + start;}for (int j = start; j < end; j++){// 找出最大值來判斷方向for (int k = 0; k < KERNEL_SUM; k++){if (*amp_ang_ptr < *grad_ptr[k]){*amp_ang_ptr = *grad_ptr[k];*(amp_ang_ptr + 1) = k;}grad_ptr[k]++;}amp_ang_ptr += 2;}param->mtx.lock();param->filter_count++;param->mtx.unlock();}, &_ang, gradients, i, &edge_param);f.detach();}while (edge_param.filter_count < parts){std::this_thread::sleep_for(std::chrono::milliseconds(1));}edge_param.filter_count = 0;edge_param.thres = thres;edge = Mat::zeros(amp_ang.rows, amp_ang.cols, CV_8UC1);vector<vector<Point2f>> vvtmp(parts);for (int i = 0; i < parts; i++){std::thread f([](Mat* amp_ang, Mat* edge, vector<Point2f>* v, int cur_part, EDGE_PARAM* param){static const float root2 = (float)sqrt(2.0);static const float a2r = (float)(CV_PI / 180.0);static const short angle_list[] = { 270, 315, 0, 45, 90, 135, 180, 225 };// 三角函數表float tri_list[2][KERNEL_SUM] = { 0 };float tri_list_root2[2][KERNEL_SUM] = { 0 };for (int j = 0; j < KERNEL_SUM; j++){tri_list[0][j] = (float)(0.5f * cos(angle_list[j] * a2r));// 0.5 前面的負號非常關鍵, 因為圖像的 y 方向和直角坐標系的 y 方向相反tri_list[1][j] = (float)(-0.5f * sin(angle_list[j] * a2r));tri_list_root2[0][j] = tri_list[0][j] * root2;tri_list_root2[1][j] = tri_list[1][j] * root2;}const int thres = param->thres;const int end_x = amp_ang->cols - 1;const int rows = amp_ang->rows / param->parts;int start_y = rows * cur_part;int end_y = start_y + rows;if (cur_part){start_y -= 2;}if (cur_part >= param->parts - 1){end_y = amp_ang->rows;}v->reserve((end_y - start_y) * amp_ang->cols);start_y++;end_y--;for (int r = start_y; r < end_y; r++){// 3 * 3 鄰域, 所以用 3 個指針, 一個指針指一行const short* pAmpang1 = amp_ang->ptr<short>(r - 1);const short* pAmpang2 = amp_ang->ptr<short>(r);const short* pAmpang3 = amp_ang->ptr<short>(r + 1);BYTE* pEdge = edge->ptr<BYTE>(r);for (int c = 1; c < end_x; c++){const int j = c << 1;if (pAmpang2[j] >= thres){switch (pAmpang2[j + 1]){case 0:if (pAmpang2[j] > pAmpang1[j] && pAmpang2[j] >= pAmpang3[j]){pEdge[c] = 255;v->push_back(Point2f((float)c, r + tri_list[1][pAmpang2[j + 1]] * (pAmpang1[j] - pAmpang3[j]) /(pAmpang1[j] + pAmpang3[j] - (pAmpang2[j] << 1))));}break;case 4:if (pAmpang2[j] >= pAmpang1[j] && pAmpang2[j] > pAmpang3[j]){pEdge[c] = 255;v->push_back(Point2f((float)c, r - tri_list[1][pAmpang2[j + 1]] * (pAmpang1[j] - pAmpang3[j]) /(pAmpang1[j] + pAmpang3[j] - (pAmpang2[j] << 1))));}break;case 1:if (pAmpang2[j] > pAmpang1[j - 2] && pAmpang2[j] >= pAmpang3[j + 2]){pEdge[c] = 255;const float tmp = (float)(pAmpang1[j - 2] - pAmpang3[j + 2]) /(pAmpang1[j - 2] + pAmpang3[j + 2] - (pAmpang2[j] << 1));v->push_back(Point2f(c + tmp * tri_list_root2[0][pAmpang2[j + 1]],r + tmp * tri_list_root2[1][pAmpang2[j + 1]]));}break;case 5:if (pAmpang2[j] >= pAmpang1[j - 2] && pAmpang2[j] > pAmpang3[j + 2]){pEdge[c] = 255;const float tmp = (float)(pAmpang1[j - 2] - pAmpang3[j + 2]) /(pAmpang1[j - 2] + pAmpang3[j + 2] - (pAmpang2[j] << 1));v->push_back(Point2f(c - tmp * tri_list_root2[0][pAmpang2[j + 1]],r - tmp * tri_list_root2[1][pAmpang2[j + 1]]));}break;case 2:if (pAmpang2[j] > pAmpang2[j - 2] && pAmpang2[j] >= pAmpang2[j + 2]){pEdge[c] = 255;v->push_back(Point2f(c + tri_list[0][pAmpang2[j + 1]] * (pAmpang2[j - 2] - pAmpang2[j + 2]) /(pAmpang2[j - 2] + pAmpang2[j + 2] - (pAmpang2[j] << 1)), (float)r));}break;case 6:if (pAmpang2[j] >= pAmpang2[j - 2] && pAmpang2[j] > pAmpang2[j + 2]){pEdge[c] = 255;v->push_back(Point2f(c - tri_list[0][pAmpang2[j + 1]] * (pAmpang2[j - 2] - pAmpang2[j + 2]) /(pAmpang2[j - 2] + pAmpang2[j + 2] - (pAmpang2[j] << 1)), (float)r));}break;case 3:if (pAmpang2[j] >= pAmpang1[j + 2] && pAmpang2[j] > pAmpang3[j - 2]){pEdge[c] = 255;const float tmp = (float)(pAmpang3[j - 2] - pAmpang1[j + 2]) /(pAmpang1[j + 2] + pAmpang3[j - 2] - (pAmpang2[j] << 1));v->push_back(Point2f(c + tmp * tri_list_root2[0][pAmpang2[j + 1]],r + tmp * tri_list_root2[1][pAmpang2[j + 1]]));}break;case 7:if (pAmpang2[j] > pAmpang1[j + 2] && pAmpang2[j] >= pAmpang3[j - 2]){pEdge[c] = 255;const float tmp = (float)(pAmpang3[j - 2] - pAmpang1[j + 2]) /(pAmpang1[j + 2] + pAmpang3[j - 2] - (pAmpang2[j] << 1));v->push_back(Point2f(c - tmp * tri_list_root2[0][pAmpang2[j + 1]],r - tmp * tri_list_root2[1][pAmpang2[j + 1]]));}break;default:break;}}}}param->mtx.lock();param->filter_count++;param->mtx.unlock();}, &_ang, &edge, &vvtmp[i], i, &edge_param);f.detach();}while (edge_param.filter_count < parts){std::this_thread::sleep_for(std::chrono::milliseconds(1));}for (int i = 0; i < parts; i++){vPts.insert(vPts.end(), vvtmp[i].begin(), vvtmp[i].end());cout << vPts[i] << endl;}}// imgsrc: 檢測圖像, CV_8UC1
// edge: 整數坐標邊緣圖像
// coordinate: 小數坐標記錄矩陣
// thres: 梯度閾值
// parts: 圖像分塊數, 當圖像比較小時, 就沒有分塊的必要了
void SubPixelEdge2(Mat& imgsrc, Mat& edge, Mat& coordinate, int thres, int parts)
{static Mat kernels[KERNEL_SUM];if (kernels[0].empty()){int k = 0;kernels[k++] = (Mat_<float>(3, 3) << 1, 2, 1, 0, 0, 0, -1, -2, -1); // 270°kernels[k++] = (Mat_<float>(3, 3) << 2, 1, 0, 1, 0, -1, 0, -1, -2); // 315°kernels[k++] = (Mat_<float>(3, 3) << 1, 0, -1, 2, 0, -2, 1, 0, -1); // 0°kernels[k++] = (Mat_<float>(3, 3) << 0, -1, -2, 1, 0, -1, 2, 1, 0); // 45°flip(kernels[0], kernels[k++], 0); // 90°kernels[k++] = (Mat_<float>(3, 3) << -2, -1, 0, -1, 0, 1, 0, 1, 2); // 135°flip(kernels[2], kernels[k++], 1); // 180°kernels[k++] = (Mat_<float>(3, 3) << 0, 1, 2, -1, 0, 1, -2, -1, 0); // 225°}// 梯度圖像Mat gradients[KERNEL_SUM];EDGE_PARAM edge_param;edge_param.filter_count = 0;edge_param.thres = thres;for (int i = 0; i < KERNEL_HALF; i++){std::thread f([](Mat* src, Mat* grad, Mat* ker, EDGE_PARAM* param){filter2D(*src, *grad, CV_16S, *ker);*(grad + KERNEL_HALF) = -(*grad);param->mtx.lock();param->filter_count++;param->mtx.unlock();}, &imgsrc, &gradients[i], &kernels[i], &edge_param);f.detach();}while (edge_param.filter_count < KERNEL_HALF){std::this_thread::sleep_for(std::chrono::milliseconds(1));}// 幅值和角度矩陣合并成一個矩陣// 新創建的圖像總是連續的, 所以可以按行來操作提高效率Mat amp_ang(imgsrc.rows, imgsrc.cols, CV_16SC2, Scalar::all(0));edge_param.filter_count = 0;edge_param.parts = parts;assert(parts >= 1 && parts < (amp_ang.rows >> 1));for (int i = 0; i < parts; i++){std::thread f([](Mat* amp_ang, Mat* grad, int cur_part, EDGE_PARAM* param){const int length = amp_ang->rows * amp_ang->cols;const int step = length / param->parts;const int start = cur_part * step;int end = start + step;if (cur_part >= param->parts - 1){end = length;}short* amp_ang_ptr = (short*)amp_ang->data + (start << 1);short* grad_ptr[KERNEL_SUM] = { nullptr };for (int k = 0; k < KERNEL_SUM; k++){grad_ptr[k] = (short*)grad[k].data + start;}for (int j = start; j < end; j++){// 找出最大值來判斷方向for (int k = 0; k < KERNEL_SUM; k++){if (*amp_ang_ptr < *grad_ptr[k]){*amp_ang_ptr = *grad_ptr[k];*(amp_ang_ptr + 1) = k;}grad_ptr[k]++;}amp_ang_ptr += 2;}param->mtx.lock();param->filter_count++;param->mtx.unlock();}, &_ang, gradients, i, &edge_param);f.detach();}while (edge_param.filter_count < parts){std::this_thread::sleep_for(std::chrono::milliseconds(1));}edge_param.filter_count = 0;edge_param.thres = thres;edge = Mat::zeros(amp_ang.rows, amp_ang.cols, CV_8UC1);coordinate = Mat::zeros(amp_ang.rows, amp_ang.cols, CV_32FC2);for (int i = 0; i < parts; i++){std::thread f([](Mat* amp_ang, Mat* edge, Mat* coordinate, int cur_part, EDGE_PARAM* param){static const float root2 = (float)sqrt(2.0);static const float a2r = (float)(CV_PI / 180.0);static const short angle_list[] = { 270, 315, 0, 45, 90, 135, 180, 225 };// 三角函數表float tri_list[2][KERNEL_SUM] = { 0 };float tri_list_root2[2][KERNEL_SUM] = { 0 };for (int j = 0; j < KERNEL_SUM; j++){tri_list[0][j] = (float)(0.5f * cos(angle_list[j] * a2r));// 0.5 前面的負號非常關鍵, 因為圖像的 y 方向和直角坐標系的 y 方向相反tri_list[1][j] = (float)(-0.5f * sin(angle_list[j] * a2r));tri_list_root2[0][j] = tri_list[0][j] * root2;tri_list_root2[1][j] = tri_list[1][j] * root2;}const int thres = param->thres;const int end_x = amp_ang->cols - 1;const int rows = amp_ang->rows / param->parts;int start_y = rows * cur_part;int end_y = start_y + rows;if (cur_part){start_y -= 2;}if (cur_part >= param->parts - 1){end_y = amp_ang->rows;}start_y++;end_y--;for (int r = start_y; r < end_y; r++){// 3 * 3 鄰域, 所以用 3 個指針, 一個指針指一行const short* pAmpang1 = amp_ang->ptr<short>(r - 1);const short* pAmpang2 = amp_ang->ptr<short>(r);const short* pAmpang3 = amp_ang->ptr<short>(r + 1);BYTE* pEdge = edge->ptr<BYTE>(r);float* pCoord = coordinate->ptr<float>(r);for (int c = 1; c < end_x; c++){const int j = c << 1;if (pAmpang2[j] >= thres){switch (pAmpang2[j + 1]){case 0:if (pAmpang2[j] > pAmpang1[j] && pAmpang2[j] >= pAmpang3[j]){pEdge[c] = 255;pCoord[j] = (float)c;pCoord[j + 1] = r + tri_list[1][pAmpang2[j + 1]] * (pAmpang1[j] - pAmpang3[j]) /(pAmpang1[j] + pAmpang3[j] - (pAmpang2[j] << 1));}break;case 4:if (pAmpang2[j] >= pAmpang1[j] && pAmpang2[j] > pAmpang3[j]){pEdge[c] = 255;pCoord[j] = (float)c;pCoord[j + 1] = r - tri_list[1][pAmpang2[j + 1]] * (pAmpang1[j] - pAmpang3[j]) /(pAmpang1[j] + pAmpang3[j] - (pAmpang2[j] << 1));}break;case 1:if (pAmpang2[j] > pAmpang1[j - 2] && pAmpang2[j] >= pAmpang3[j + 2]){pEdge[c] = 255;const float tmp = (float)(pAmpang1[j - 2] - pAmpang3[j + 2]) /(pAmpang1[j - 2] + pAmpang3[j + 2] - (pAmpang2[j] << 1));pCoord[j] = c + tmp * tri_list_root2[0][pAmpang2[j + 1]];pCoord[j + 1] = r + tmp * tri_list_root2[1][pAmpang2[j + 1]];}break;case 5:if (pAmpang2[j] >= pAmpang1[j - 2] && pAmpang2[j] > pAmpang3[j + 2]){pEdge[c] = 255;const float tmp = (float)(pAmpang1[j - 2] - pAmpang3[j + 2]) /(pAmpang1[j - 2] + pAmpang3[j + 2] - (pAmpang2[j] << 1));pCoord[j] = c - tmp * tri_list_root2[0][pAmpang2[j + 1]];pCoord[j + 1] = r - tmp * tri_list_root2[1][pAmpang2[j + 1]];}break;case 2:if (pAmpang2[j] > pAmpang2[j - 2] && pAmpang2[j] >= pAmpang2[j + 2]){pEdge[c] = 255;pCoord[j] = c + tri_list[0][pAmpang2[j + 1]] * (pAmpang2[j - 2] - pAmpang2[j + 2]) /(pAmpang2[j - 2] + pAmpang2[j + 2] - (pAmpang2[j] << 1));pCoord[j + 1] = (float)r;}break;case 6:if (pAmpang2[j] >= pAmpang2[j - 2] && pAmpang2[j] > pAmpang2[j + 2]){pEdge[c] = 255;pCoord[j] = c - tri_list[0][pAmpang2[j + 1]] * (pAmpang2[j - 2] - pAmpang2[j + 2]) /(pAmpang2[j - 2] + pAmpang2[j + 2] - (pAmpang2[j] << 1));pCoord[j + 1] = (float)r;}break;case 3:if (pAmpang2[j] >= pAmpang1[j + 2] && pAmpang2[j] > pAmpang3[j - 2]){pEdge[c] = 255;const float tmp = (float)(pAmpang3[j - 2] - pAmpang1[j + 2]) /(pAmpang1[j + 2] + pAmpang3[j - 2] - (pAmpang2[j] << 1));pCoord[j] = c + tmp * tri_list_root2[0][pAmpang2[j + 1]];pCoord[j + 1] = r + tmp * tri_list_root2[1][pAmpang2[j + 1]];}break;case 7:if (pAmpang2[j] > pAmpang1[j + 2] && pAmpang2[j] >= pAmpang3[j - 2]){pEdge[c] = 255;const float tmp = (float)(pAmpang3[j - 2] - pAmpang1[j + 2]) /(pAmpang1[j + 2] + pAmpang3[j - 2] - (pAmpang2[j] << 1));pCoord[j] = c - tmp * tri_list_root2[0][pAmpang2[j + 1]];pCoord[j + 1] = r - tmp * tri_list_root2[1][pAmpang2[j + 1]];}break;default:break;}}}}param->mtx.lock();param->filter_count++;param->mtx.unlock();}, &_ang, &edge, &coordinate, i, &edge_param);f.detach();}while (edge_param.filter_count < parts){std::this_thread::sleep_for(std::chrono::milliseconds(1));}waitKey(0);
}加速版原文沒有給出顯示圖像,只保存了最后 亞像素邊緣點集;
//顯示 最大幅度值和方向
void show_amplitude_angle(Mat amp_ang)
{//顯示梯度圖Mat imgshow;// 顯示幅值圖像和角度圖像normalize(amp_ang, imgshow, 0, 255, NORM_MINMAX);imgshow.convertTo(imgshow, CV_8UC2);namedWindow("amp_ang", WINDOW_NORMAL);imshow("amp_ang", imgshow);cout << "amp_ang : " << amp_ang.size() << "    imgshow.size :" << imgshow.size() << endl;waitKey(0);
}
6.2 測試結果及分析
測試圖片
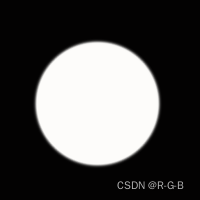
parts: 圖像分塊數,>1 時報錯

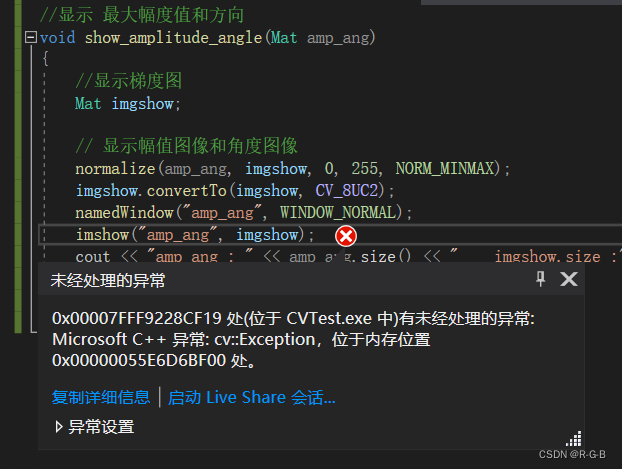
原文沒有顯示圖像,自己增加了 最大幅度值和方向、edge 的顯示,都報錯
顯示最大幅度值和方向,報錯
edge 的顯示啥也沒有
namedWindow("edge", WINDOW_NORMAL);
imshow("edge", edge);
于是,斷點調試,image watch 查看
SubPixelEdge(imgsrc, edge, vPts, thres, parts);
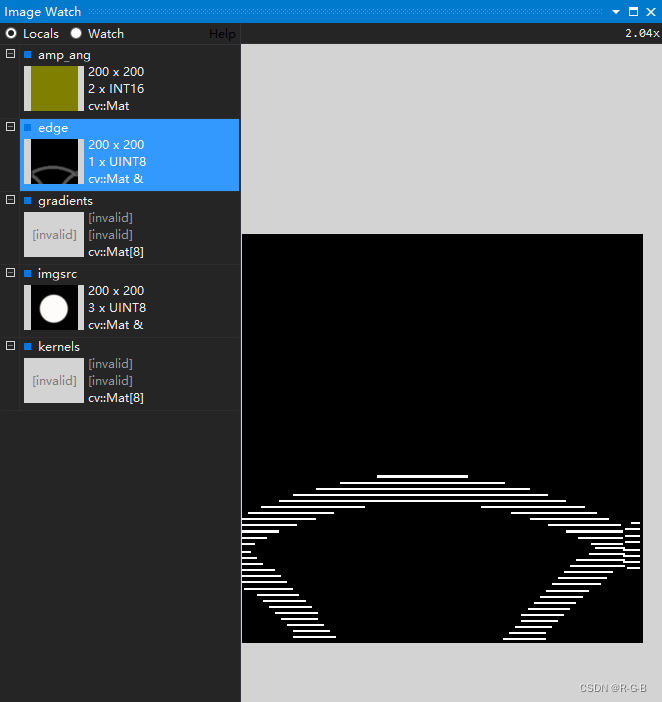
SubPixelEdge2(imgsrc, edge, coordinate, thres,parts);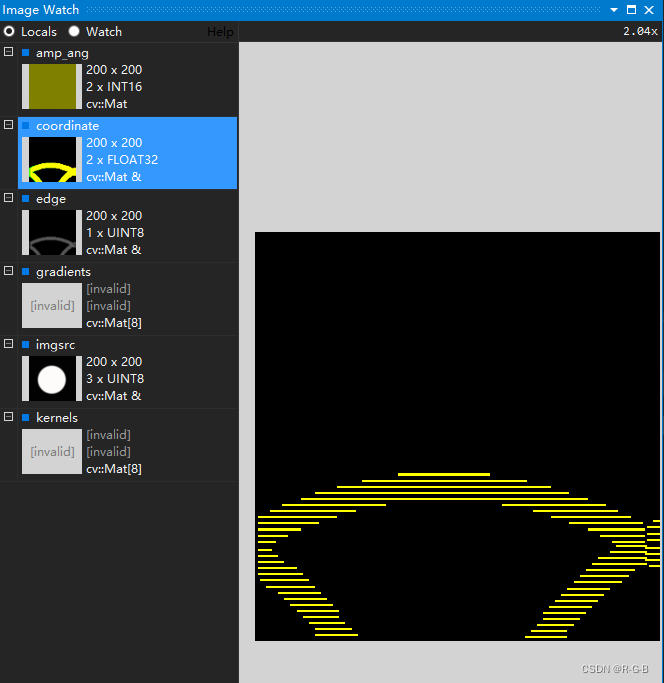
6.3 結論:梯度最大幅度值和方向 程序是有問題
結論:圓邊緣檢測成了這樣,說明3.2 梯度方向 (梯度最大幅度值和方向)程序是有問題的


)


docker 安裝 /客戶端(win)分離部署)


:回調機制、通用排序與數組指針邏輯)


