環境準備
1 安裝nvm
nvm 即 (node version manager),好處是方便切換 node.js 版本
安裝注意事項
- 要卸載掉現有的 nodejs
- 提示選擇 nvm 和 nodejs 目錄時,一定要避免目錄中出現空格
- 選用【以管理員身份運行】cmd 程序來執行 nvm 命令
- 首次運行前設置好國內鏡像地址
nvm npm_mirror https://npmmirror.com/mirrors/npm/
nvm node_mirror https://npmmirror.com/mirrors/node/
首先查看有哪些可用版本
nvm list available
建議安裝 LTS(長期支持版)
nvm install 16.16.0
nvm install 14.20.0
執行 nvm list 會列出已安裝版本
切換到 16.16.0
nvm use 16.16.0
安裝后 nvm 自己的環境變量會自動添加,但可能需要手工添加 nodejs 的 PATH 環境變量
2 檢查npm
npm 是 js 的包管理器,就類似于 java 界的 maven,要確保它使用的是國內鏡像
檢查鏡像
npm get registry
3 搭建前端服務器
新建一個保存項目的 client 文件夾,進入文件夾執行
npm install express --save-dev
修改 package.json 文件
{"type": "module","devDependencies": {"express": "^4.18.1"}
}
- 其中 devDependencies 是 npm install --save-dev 添加的
編寫 main.js 代碼
import express from 'express'
const app = express()app.use(express.static('./'))
app.listen(7070)
執行 js 代碼(運行前端服務器)
node main.js
前端案例

- 前端只有靜態頁面,使用 Express 服務器
- 后端使用 Tomcat 服務器,通過 SpringBoot、MyBatis 等框架獲取數據庫數據
1 查找元素
- document.getElementById - 根據 id 值查找一個元素
- [document|元素].querySelector - 根據選擇器查找第一個匹配元素
- [document|元素].querySelectorAll - 根據選擇器查找所有匹配元素
例如,有下面的 html 代碼
<div><div class="title">學生列表</div><div class="thead"><div class="row bold"><div class="col">編號</div><div class="col">姓名</div><div class="col">性別</div><div class="col">年齡</div></div></div><div class="tbody"><div class="row"><div class="col">1</div><div class="col">張三</div><div class="col">男</div><div class="col">18</div></div></div>
</div>
執行
document.querySelector('.title'); // 找到 <div class="title">學生列表</div>
執行
document.querySelector('.col'); // 找到 <div class="col">編號</div>
執行
document.querySelectorAll('.col');/*找到的是一個集合<div class="col">編號</div><div class="col">姓名</div><div class="col">性別</div><div class="col">年齡</div><div class="col">1</div><div class="col">張三</div><div class="col">男</div><div class="col">18</div>
*/
執行
const thead = document.querySelector('.thead');// 只在 thead 元素范圍內找
thead.querySelectorAll('.col');/*找到的是一個集合<div class="col">編號</div><div class="col">姓名</div><div class="col">性別</div><div class="col">年齡</div>
*/
根據 id 屬性查找既可以用
document.getElementById("id值")
也可以用
document.querySelector("#id值")
2) 修改元素內容
- 元素.innerHTML
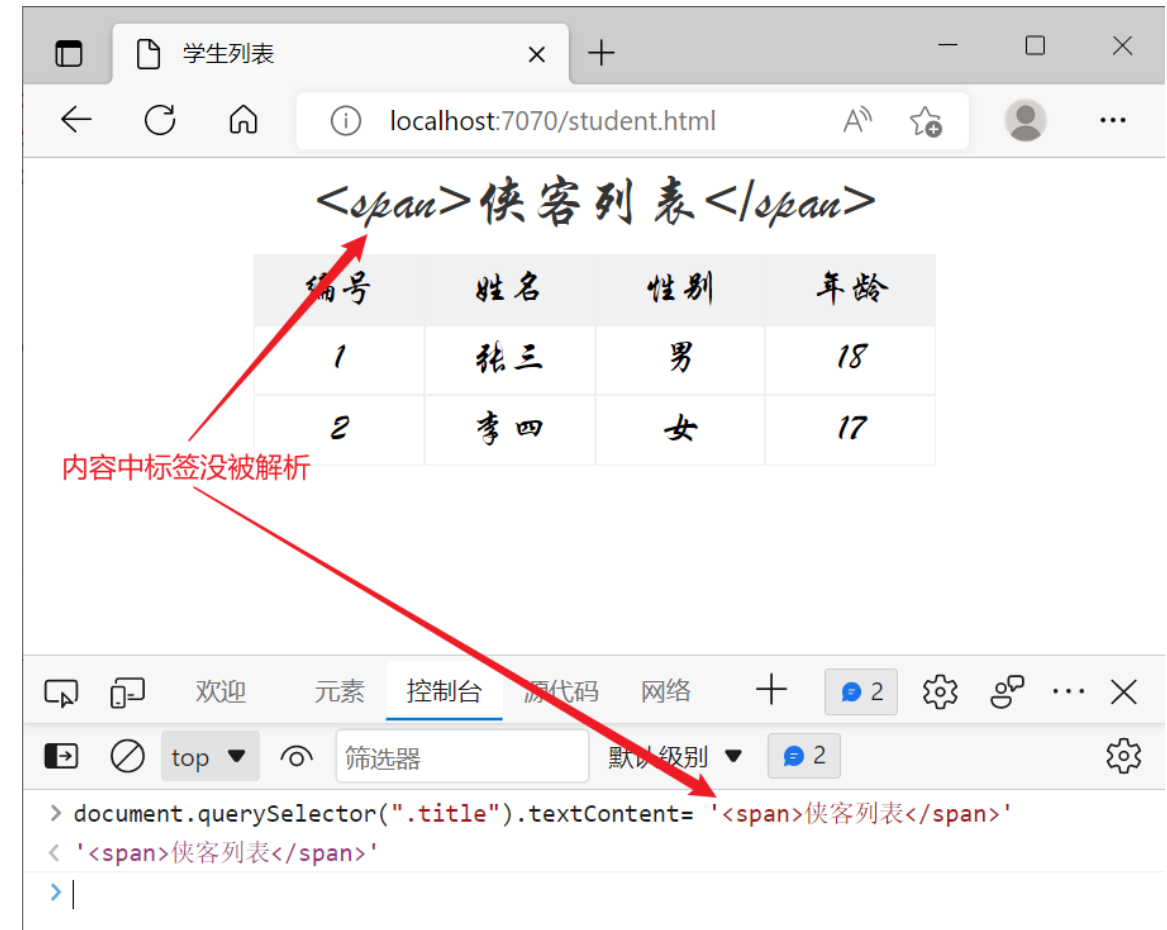
- 元素.textContent
例如
document.querySelector('.title').innerHTML = '俠客列表'
innerHTML 會解析內容中的標簽
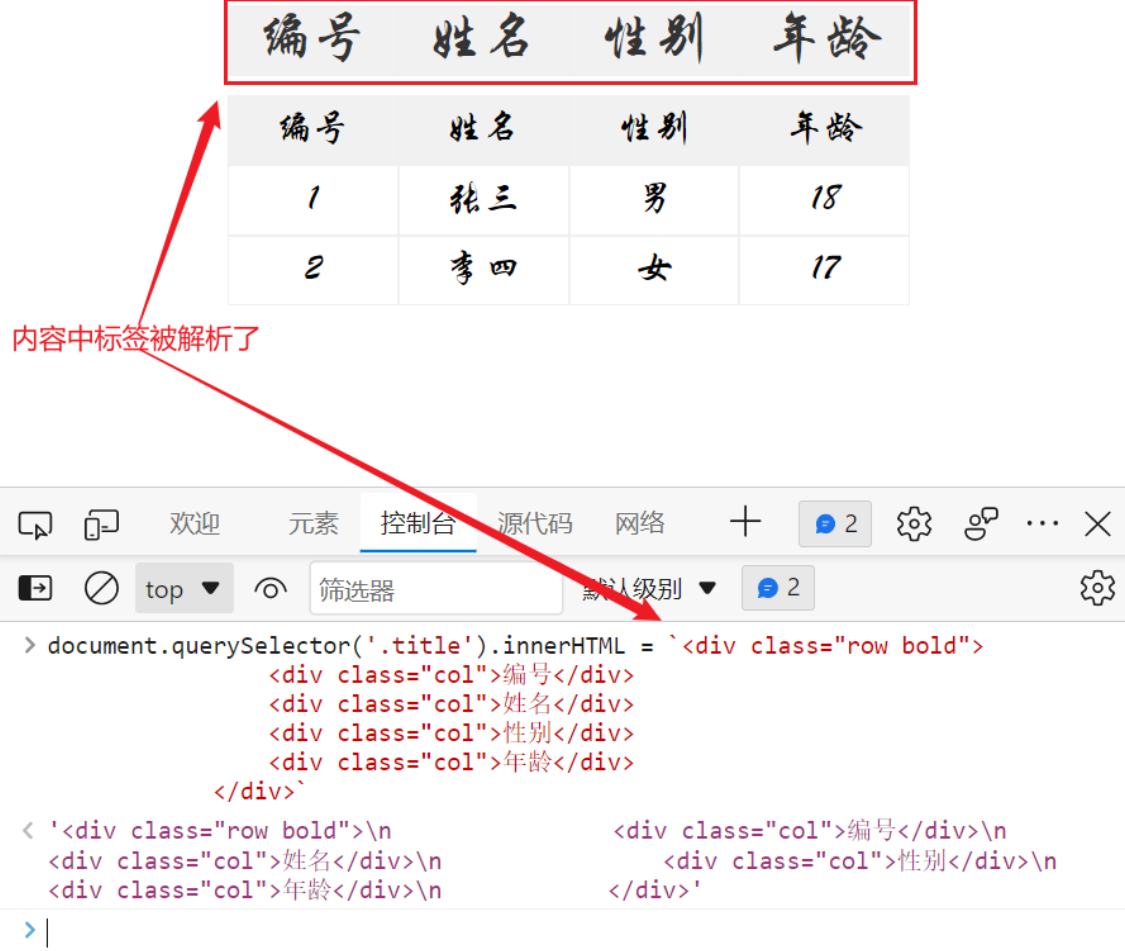
textContext 不會解析內容中的標簽
給 innerHTML 或 textContent 賦值空串,可以實現清空標簽內容的效果
3 利用模版
<div><div class="title">學生列表</div><div class="thead"><div class="row bold"><div class="col">編號</div><div class="col">姓名</div><div class="col">性別</div><div class="col">年齡</div></div></div><div class="tbody"></div>
</div><template id="tp"><div class="row"><div class="col">xx</div><div class="col">xx</div><div class="col">xx</div><div class="col">xx</div></div>
</template><script>// 將來這些數據從 java 端返回let array = [{ id: 1, name: '張三', sex: '男', age: 18 },{ id: 2, name: '李四', sex: '女', age: 17 }];const tp = document.getElementById("tp");const row = tp.content;const [c1,c2,c3,c4] = row.querySelectorAll(".col");const tbody = document.querySelector('.tbody');for(const {id,name,sex,age} of array) {c1.textContent = id;c2.textContent = name;c3.textContent = sex;c4.textContent = age;// 復制元素const newRow = document.importNode(row, true);// 建立父子關系,左邊父,右邊子tbody.appendChild(newRow);}
</script>
4 Fetch API
Fetch API 可以用來獲取遠程數據,它有兩種方式接收結果,同步方式與異步方式
格式
fetch(url, options) // 返回 Promise
同步方式
const 結果 = await Promise
// 后續代碼
- await 關鍵字必須在一個標記了 async 的 function 內來使用
- 后續代碼不會在結果返回前執行
異步方式
Promise.then(結果 => { ... })
// 后續代碼
- 后續代碼不必等待結果返回就可以執行
例:
在 express 服務器上有 students.json 文件
[{ "id": 1, "name": "張三", "sex": "男", "age": 18 },{ "id": 2, "name": "李四", "sex": "女", "age": 17 }
]
現在用 fetch api 獲取這些數據,并展示
同步方式
<script>async function findStudents() {try {// 獲取響應對象const resp = await fetch('students.json')// 獲取響應體, 按json格式轉換為js數組const array = await resp.json();// 顯示數據const tp = document.getElementById("tp");const row = tp.content;const [c1,c2,c3,c4] = row.querySelectorAll(".col");const tbody = document.querySelector('.tbody');for(const {id,name,sex,age} of array) {c1.textContent = id;c2.textContent = name;c3.textContent = sex;c4.textContent = age;// 復制元素const newRow = document.importNode(row, true);// 建立父子關系tbody.appendChild(newRow);}} catch (e) {console.log(e);}}findStudents()
</script>
- fetch(‘students.json’) 內部會發送請求,但響應結果不能立刻返回,因此 await 就是等待響應結果返回
- 其中 resp.json() 也不是立刻能返回結果,它返回的也是 Promise 對象,也要配合 await 取結果
異步方式
<script>fetch('students.json').then( resp => resp.json() ).then( array => {// 顯示數據const tp = document.getElementById("tp");const row = tp.content;const [c1,c2,c3,c4] = row.querySelectorAll(".col");const tbody = document.querySelector('.tbody');for(const {id,name,sex,age} of array) {c1.textContent = id;c2.textContent = name;c3.textContent = sex;c4.textContent = age;// 復制元素const newRow = document.importNode(row, true);// 建立父子關系tbody.appendChild(newRow);}}).catch( e => console.log(e) )</script>
- 第一個 then 是在響應返回后,才會調用它里面的箭頭函數,箭頭函數參數即 resp 響應對象
- 第二個 then 是在 json 解析完成后,才會調用它里面的箭頭函數,箭頭函數參數即解析結果(本例是 array 數組)
- 上一個 then 返回的是 Promise 對象時,才能鏈式調用下一個 then
跨域問題
- 只要協議、主機、端口之一不同,就不同源,例如
- http://localhost:7070/a 和 https://localhost:7070/b 就不同源
- 同源檢查是瀏覽器的行為,而且只針對 fetch、xhr 請求
- 如果是其它客戶端,例如 java http client,postman,它們是不做同源檢查的
- 通過表單提交、瀏覽器直接輸入 url 地址這些方式發送的請求,也不會做同源檢查
請求響應頭解決
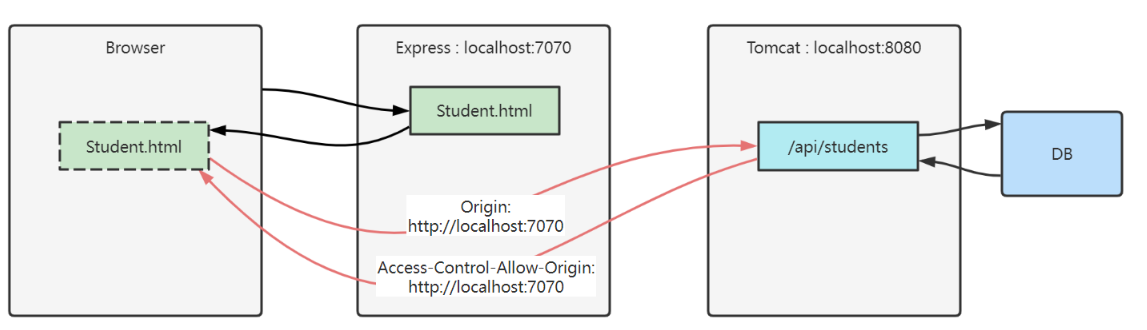
- fetch 請求跨域,會攜帶一個 Origin 頭,代表【發請求的資源源自何處】,目標通過它就能辨別是否發生跨域
- 我們的例子中:student.html 發送 fetch 請求,告訴 tomcat,我源自 localhost:7070
- 目標資源通過返回 Access-Control-Allow-Origin 頭,告訴瀏覽器【允許哪些源使用此響應】
- 我們的例子中:tomcat 返回 fetch 響應,告訴瀏覽器,這個響應允許源自 localhost:7070 的資源使用
代理解決
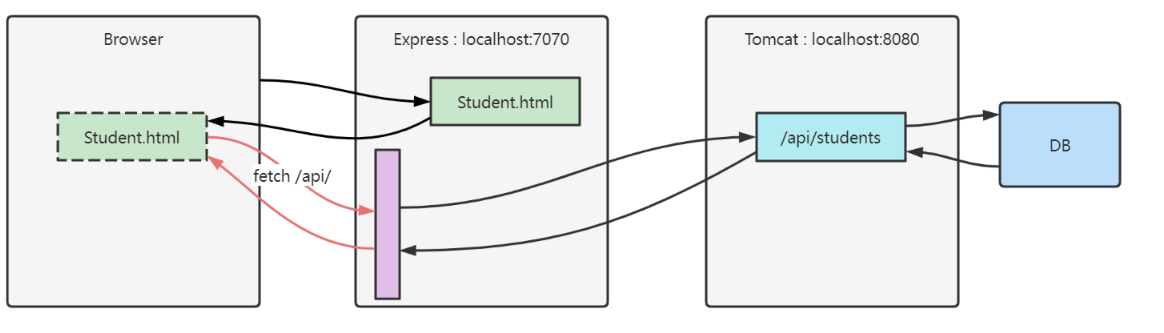
npm install http-proxy-middleware --save-dev
在 express 服務器啟動代碼中加入
import {createProxyMiddleware} from 'http-proxy-middleware'// ...app.use('/api', createProxyMiddleware({ target: 'http://localhost:8080', changeOrigin: true }));
fetch 代碼改為
const resp = await fetch('http://localhost:7070/api/students')
或
const resp = await fetch('/api/students')
5 模塊化
單個導出 const、let、function
export const a = 10;
export let b = 20;
export function c() {console.log('c');
}
一齊導出
const a = 10;
let b = 20;
function c() {console.log('c')
}export {a,b,c}
導出 default,只能有一個
export const a = 10;
export let b = 20;
export function c() {console.log('c')
}export default b;
import 語法
<script type="module">import 語句
</script>
- import 需要遵循同源策略
整個導入
import * as module from '/1.js'
console.log(module.a)		// 輸出10
console.log(module.b)		// 輸出20
module.c()					// 輸出c
單個導入
import {a,c} from '/1.js'
console.log(a)				// 輸出10
c()							// 輸出c
導入默認
import x from '/1.js'
console.log(x)				// 輸出20


)


)
