什么是mcp
MCP 是一個開放協議,它為應用程序向 LLM 提供上下文的方式進行了標準化。你可以將 MCP 想象成 AI 應用程序的 USB-C 接口。就像 USB-C 為設備連接各種外設和配件提供了標準化的方式一樣,MCP 為 AI 模型連接各種數據源和工具提供了標準化的接口。
MCP 核心采用客戶端-服務器架構,主機應用可以連接多個服務器:
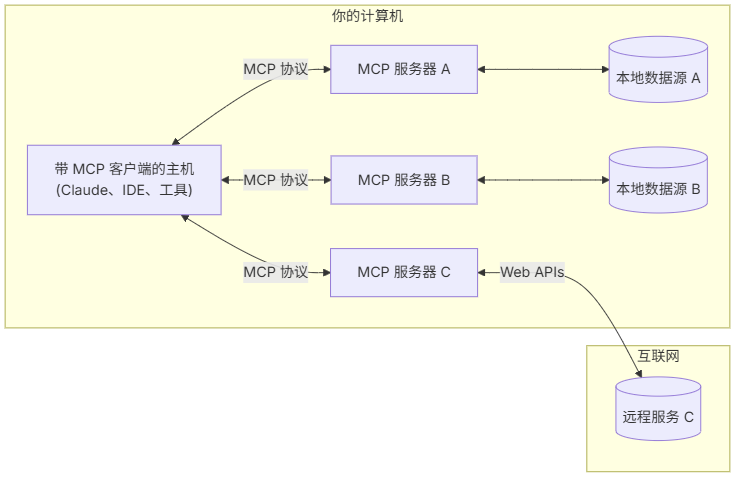
- MCP Hosts: 如 Claude Desktop、IDE 或 AI 工具,希望通過 MCP 訪問數據的程序
- MCP Clients: 維護與服務器一對一連接的協議客戶端
- MCP Servers: 輕量級程序,通過標準的 Model Context Protocol 提供特定能力
- 本地數據源: MCP 服務器可安全訪問的計算機文件、數據庫和服務
- 遠程服務: MCP 服務器可連接的互聯網上的外部系統(如通過 APIs)
初始化環境
Python 需要是 3.11+ 版本
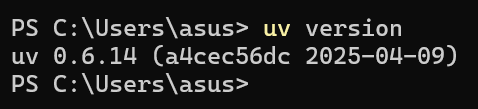
安裝uv
mcp默認使用uv作為第三方庫管理工具,如果還沒有安裝,執行如下命令安裝即可
pip install uv
執行命令 uv version 查看是否成功安裝
使用 uv 創建項目
uv init mcp-server-demo
cd mcp-server-demo
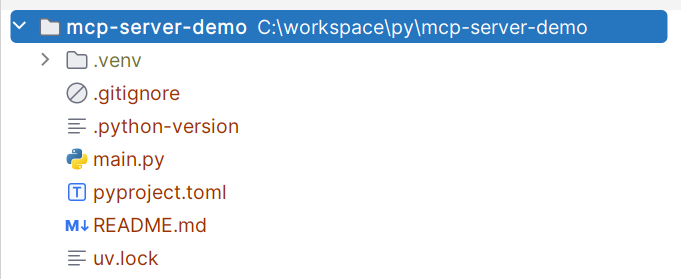
執行 uv add "mcp[cli]" 添加mcp依賴到項目中

創建 MCP server
編寫server端代碼
from pathlib import Path
from mcp.server import FastMCPmcp = FastMCP(name="demo1", log_level='ERROR')# 添加一個工具
@mcp.tool()
def list_file(path: str):"""列出指定目錄的所有文件和子目錄參數:path:  根目錄返回:文件列表"""try:path = Path(path)if not path.exists():print(f"錯誤:目錄 '{path}' 不存在")return []contents = []for item in path.iterdir():contents.append({'name': item.name,'type': 'file' if item.is_file() else 'directory','size': item.stat().st_size if item.is_file() else 0,'modified': item.stat().st_mtime})return contentsexcept PermissionError:print(f"錯誤:沒有權限訪問目錄 '{path}'")return []if __name__ == '__main__':mcp.run(transport='stdio')
創建 MCP client
編寫client代碼
import asynciofrom dotenv import load_dotenv
from mcp import StdioServerParameters, ClientSession, stdio_clientload_dotenv()  # 從.env加載環境變量# Client 會使用這里的配置來啟動本地MCP Serverserver_params = StdioServerParameters(command='python',args=["./server_demo.py"],env=None
)async def main():async with stdio_client(server_params) as (read, write):async with ClientSession(read, write, sampling_callback=None) as session:await session.initialize()print('\n 正在調用工具...')result = await session.call_tool("list_file", {"path": "D:/pic"})print(result.content)asyncio.run(main())
測試使用
1、直接運行client_demo.py代碼
正在調用工具...
[TextContent(type='text', text='{"name": "01.jpg", "type": "file", "size": 192323, "modified": 1697902736.3849685}', annotations=None), TextContent(type='text', text='{"name": "05.jpg", "type": "file", "size": 379369, "modified": 1697819759.6860936}', annotations=None), TextContent(type='text', text='{"name": "22.jpg", "type": "file", "size": 249651, "modified": 1698055119.5418005}', annotations=None), TextContent(type='text', text='{"name": "cheetah.jpg", "type": "file", "size": 20552, "modified": 1717745181.0207932}', annotations=None), TextContent(type='text', text='{"name": "dog", "type": "directory", "size": 0, "modified": 1718097770.096676}', annotations=None), TextContent(type='text', text='{"name": "dog.jpg", "type": "file", "size": 44733, "modified": 1711027923.611414}', annotations=None), TextContent(type='text', text='{"name": "dog.png", "type": "file", "size": 351610, "modified": 1711027861.5564046}', annotations=None), TextContent(type='text', text='{"name": "\\u5b81\\u6ce2\\u56db\\u660e\\u5c71", "type": "directory", "size": 0, "modified": 1696489530.0600708}', annotations=None)]
2、啟動 mcp server 在瀏覽器端使用
uv run mcp dev server_demo.py
出現如下日志,代表正常啟動
Starting MCP inspector...
?? Proxy server listening on port 6277
🔍 MCP Inspector is up and running at http://127.0.0.1:6274 🚀
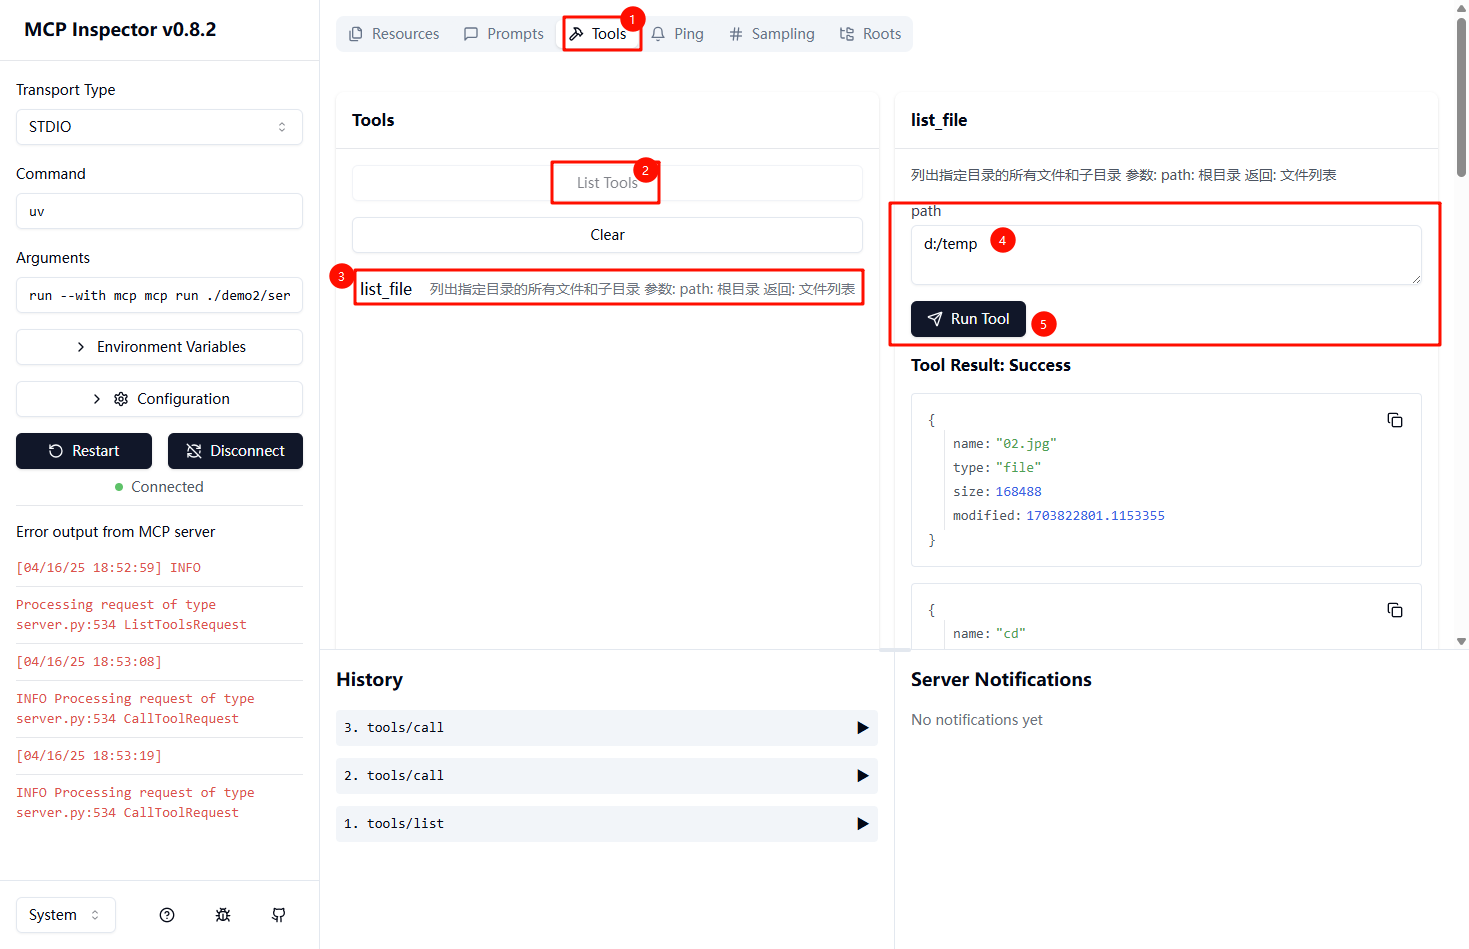
瀏覽器中打開 http://127.0.0.1:6274,可以看見如下頁面:
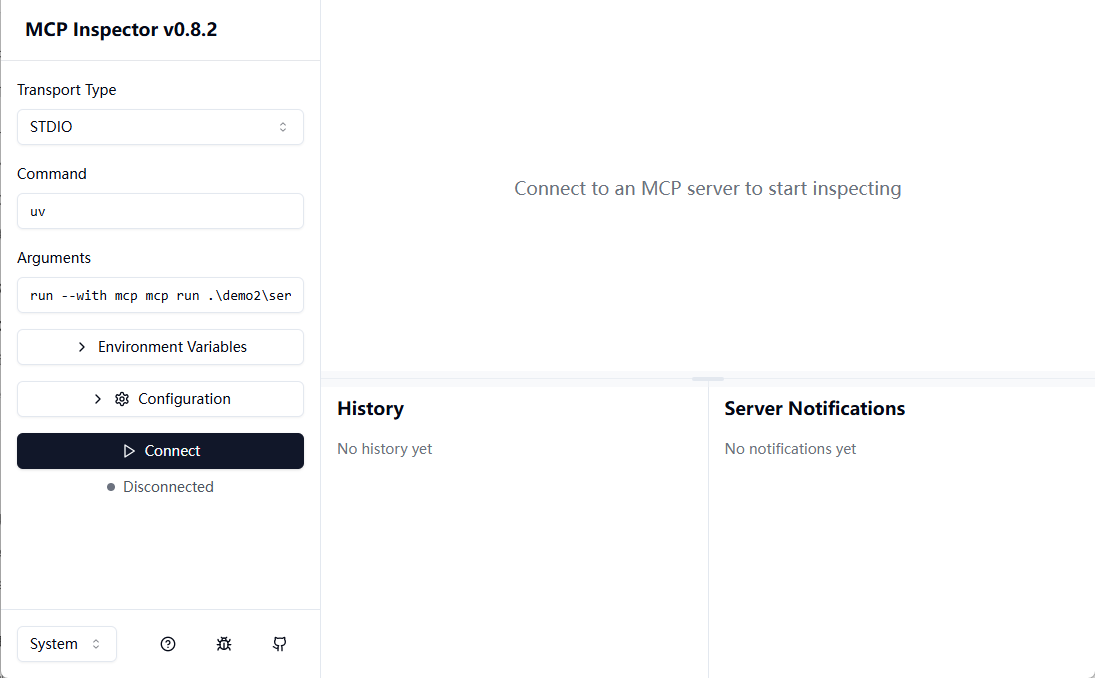
然后點擊 “Connect” 按鈕,點擊“Tools - List Tools”,可以看見后臺MCP Server提供的服務,在右邊輸入參數后,點擊“Run Tool”可以看見正常調用的后端接口
3、在VS code插件“Cline”中使用
打開插件 Cline ,點擊頂部的 “MCP Servers” 按鈕,
打開配置文件 “cline_mcp_settings.json”,輸入如下配置,出現綠燈代表配置成功
{"mcpServers": {"myMcpDemo1": {"disabled": false,"timeout": 60,"command": "cmd","args": ["/c","python","C:/workspace/py/mcp-demo/demo2/server_demo.py"],"env": {},"transportType": "stdio"}}
}
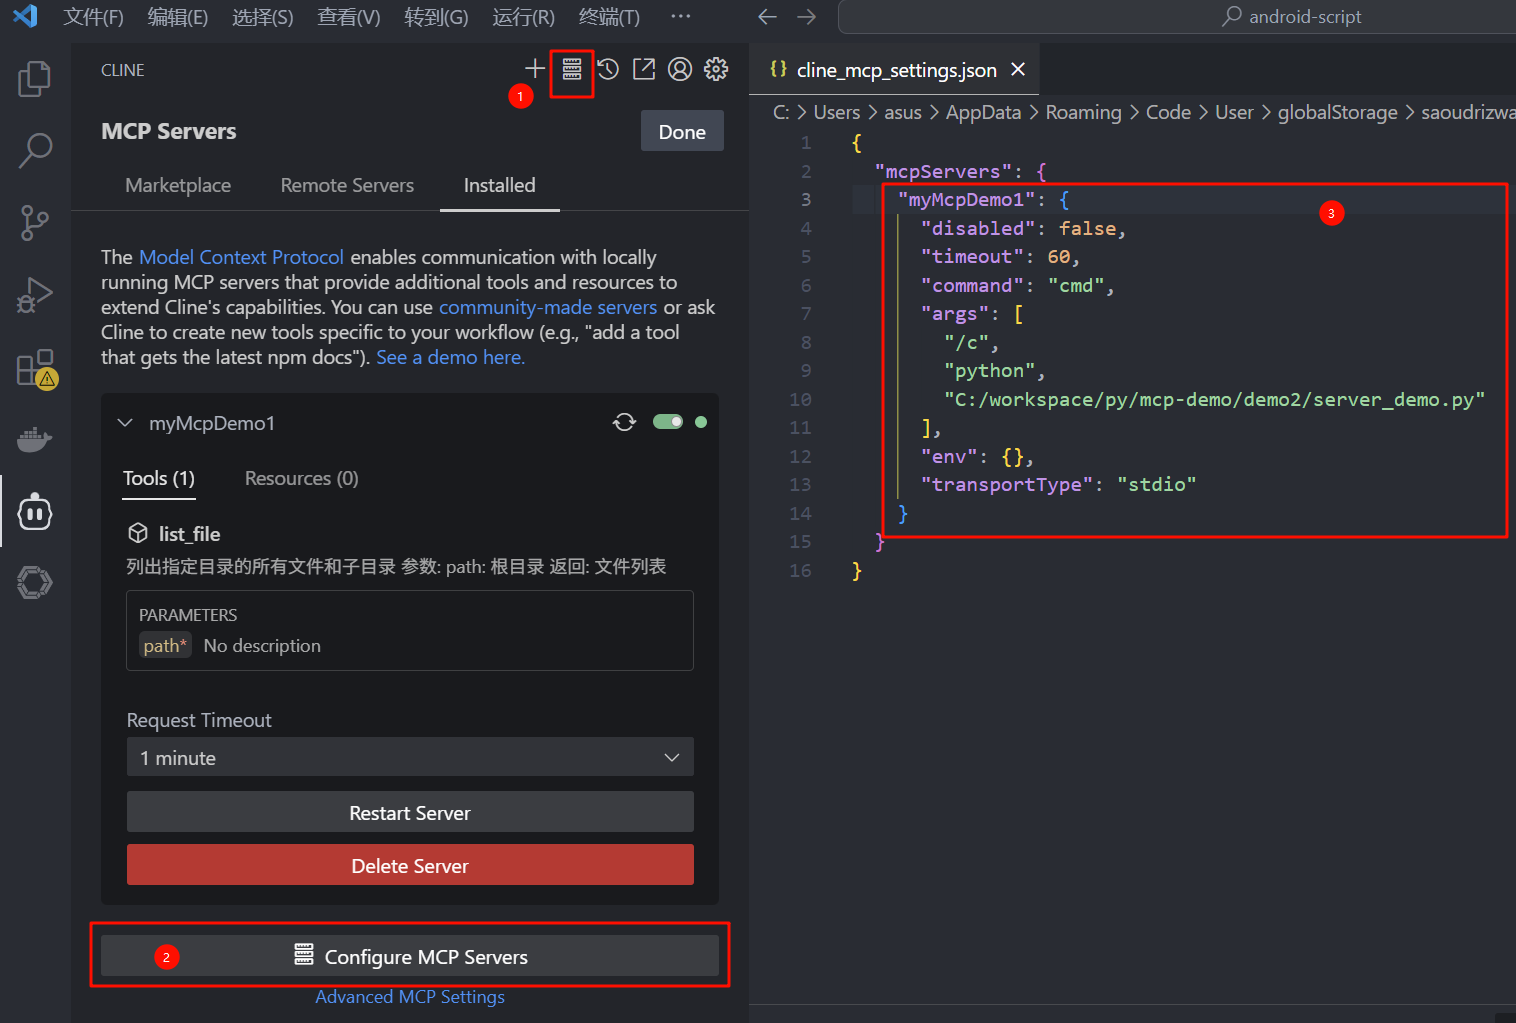
注意:如果出現錯誤“Processing request of type server.py:534 ListToolsRequest 534 ListResourcesRequest ListResourceTemplatesRequest”,則需要調整日志輸出級別 log_level='ERROR'
mcp = FastMCP(name="demo1", log_level='ERROR')
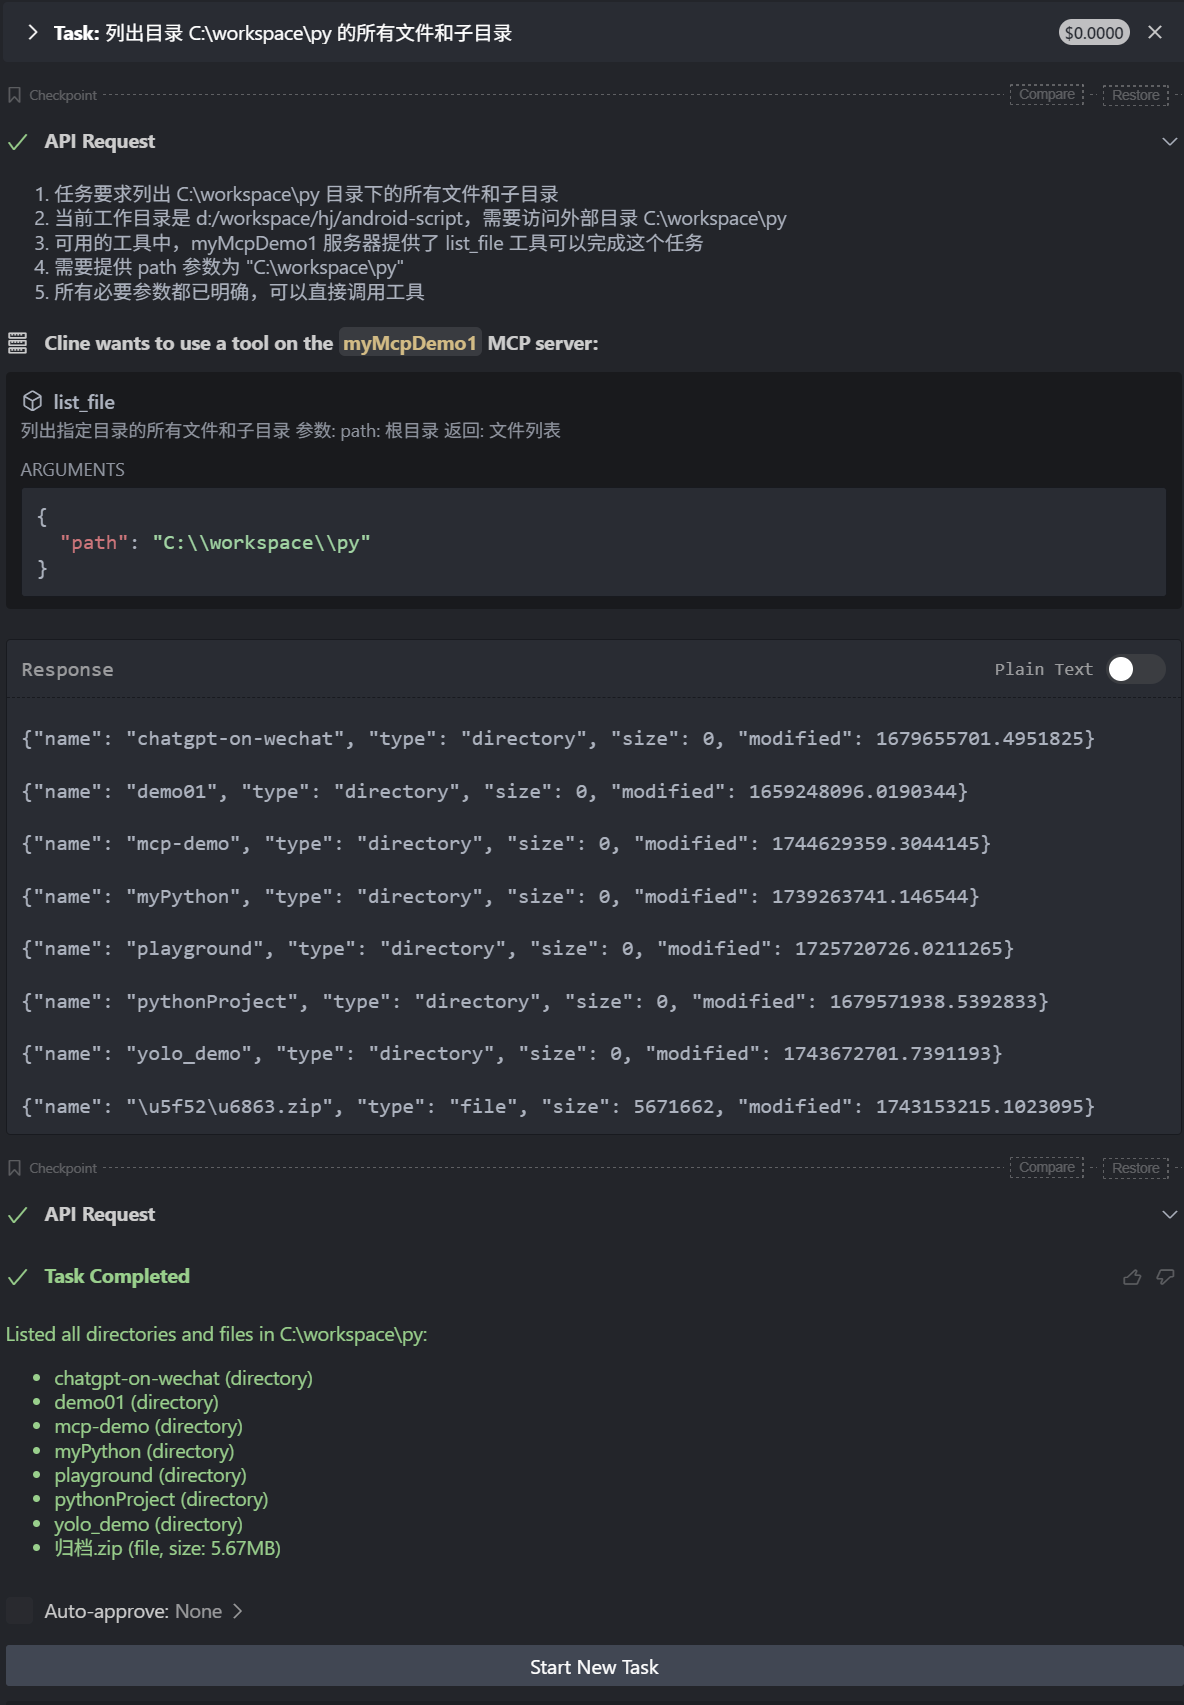
接下來就可以在對話框中直接對話使用了,列入我輸入“列出目錄 C:\workspace\py 的所有文件和子目錄”,效果如下:
參考
- https://mcpservers.org/
- https://docs.anthropic.com/en/home
- https://modelcontextprotocol.io/introduction
- https://mcp-docs.cn/introduction
- https://github.com/modelcontextprotocol/python-sdk
的使用介紹)


 的工作原理和優勢)


)