貓狗數據大戰
- 1 數據集的準備以及處理操作
- 1.1 數據集
- 1.2 文件解壓操作(python)
- 1.3 數據的分類
- 1.4 創建訓練集和測試集
- 2 網絡構建
- CNN版本--
- DeepID 人臉識別網絡結構
- DeepID 與 CNN 網絡結構的差異
- 3 深度學習模型訓練和推理的核心設置
- 4 制圖
- 5 訓練
- 6 預測+結果
1 數據集的準備以及處理操作
1.1 數據集
在訓練模型之前的時候我們需要提前準備數據集
數據集下載鏈接
1.2 文件解壓操作(python)
# 第一步,把原數據解壓
import zipfile
import os
import shutildef unzipFile(source_file, target_dir):''' 解壓單個文件到目標文件夾。'''zf = zipfile.ZipFile(source_file)try:zf.extractall(path=target_dir)except RuntimeError as e:print(e)zf.close()sour = 'data/data20541/dogs-vs-cats.zip'
targ = ''
if not os.path.exists('data/dogCat/dog'):   #用os.path.exists來判斷'data/dogCat/dog'路徑存不存在unzipFile(source_file = sour, target_dir = targ)os.remove('sample_submission.csv')
首先:我們需要制定一個函數來解壓zip文件。
然后:通過python中的庫中的文件操作函數ZipFile()來解壓
最后:把解壓好的文件在通過extractall()函數放在target_dir目錄下
第二步:原數據解壓之后是 形成 train.zip 和 test.zip 文件還需要解壓一遍,讓他們解壓之后形成訓練集和測試集。
if not os.path.exists('data/dogCat/dog'):# 先解壓訓練集train_file = 'train.zip'train_targetdir = 'data'unzipFile(source_file = train_file, target_dir = train_targetdir)os.remove(train_file)# 再解壓測試集test_file = 'test.zip'test_targetdir = 'data'unzipFile(source_file = test_file, target_dir = test_targetdir)os.remove(test_file)
1.3 數據的分類
在訓練計算機識別動物之前,我們需要進行區分,比如:你要讓計算機進行貓狗的區分那么你的數據集中有其他的動物的圖片,這樣的話在訓練過程中在識別關鍵信息的時候就出錯!!!。因此我們需要排除干擾選項。
排除干擾項思路:把文件的所有圖片都遍歷一遍然后進行篩選出貓和狗的圖片。
執行代碼:
dataRootPath = 'data/dogCat'def copyFiles(fileDirs, targetDir):for fileDir in fileDirs:shutil.copy(fileDir, targetDir)def divideData():global dataRootPathclassDirs = os.listdir('data/train')dogDirs = [os.path.join('data/train',x) for x in classDirs if x.find('dog')>=0]catDirs = [os.path.join('data/train',x) for x in classDirs if x.find('cat')>=0]print('總圖片數量為:%d'%len(classDirs))print('\t貓的圖片數量為:%d'%len(catDirs))print('\t狗的圖片數量為:%d'%len(dogDirs))# 遍歷圖片,轉移數據集dogPath = os.path.join(dataRootPath, 'dog')if not os.path.exists(dogPath):os.makedirs(dogPath)copyFiles(dogDirs, dogPath)catPath = os.path.join(dataRootPath, 'cat')if not os.path.exists(catPath):os.makedirs(catPath)copyFiles(catDirs, catPath)if not os.path.exists('data/dogCat/dog'):divideData()
接下來我們來介紹以上提到的函數:
1 os.listdir(路徑) ==== 這是把路徑中的目錄展開 。就是把目錄展開了,然后就是目錄中的子文件或者文件了。這里就是指的是圖片!!!
2 os.path.join(路徑,路徑1)==== 這里就是列表的初始化 ,先是判斷你的x有沒有dog或者cat的文字(這一步就是先篩選圖片名稱為dog和cat)。 如果符合那么就把路徑1鏈接到路勁之后。 如:os.path.join(‘data/dogcat/’,dog1.jpg) -> 結果:data/dogcat/dog1.jpg
3 os.path.exists(路徑) 就是判斷路徑存不存在
4 os.mkdir(名稱) 就是創建名稱目錄
5 shutil.copy(dest,source) 就是把文件進行復制
總結:以上代碼就是為了把干擾選項給去掉,為了更好的訓練出大模型!!!
1.4 創建訓練集和測試集
在經過以上操作后:我們就可以開始進行對數據進行劃分和創建數據集合測試集了
#Python   os標準庫,用于文件操作、  random隨機數生成、 JSON解析和系統參數訪問。
import os
import random
import json
import sys
#Paddle.fluid,paddle框架的核心模塊,用于構建和訓練深度學習模型。
import paddle
import paddle.fluid as fluid
#數值計算庫,用于處理數組和矩陣.
import numpyfrom multiprocessing import cpu_count
from visualdl import LogWriter
#matplotlib.pyplot用于繪圖和數據可視化
import matplotlib.pyplot as plt
import numpy as np#PIL 用于打開和處理圖像
from PIL import Imageimport paddle
paddle.enable_static()#定義長度,和寬度
IMG_H =64
IMG_W =64#緩沖區大小,用來讀取數據處理和預處理
BUFFER_SIZE = 1024#一次批量處理的個數
BATCH_SIZE =64#是否使用gpu
USE_CUDA = True
#訓練次數
TRAIN_NUM = 150
#學習率
LEARNING_RATE = 0.005DATA_TRAIN = 0.75 #訓練集在數據集中占多少數據  # 表示在訓練模型時,使用多大規模的數據#每執行玩一個模型就放在work/model 中,這樣方便模型的拿取
model_save_dir = "work/model"def genDataList(dataRootPath, trainPercent=0.8):# 函數會自動檢測dataRootPath下的所有文件夾,每一個文件夾為1個類別的圖片# 然后生成圖片的list,即paddlepaddle能獲取信息的形式# 默認隨機抽取20%作為測試集(驗證集)# random.seed(42)  #設置隨機種子。classDirs = os.listdir(dataRootPath)#os.listdir用來獲取dataRootPath的所有文件和文件夾#os.isdir 判斷是否為目錄  #os.path.join 拼接classDirs = [x for x in classDirs if os.path.isdir(os.path.join(dataRootPath,x))]listDirTest = os.path.join(dataRootPath, "test.list")listDirTrain = os.path.join(dataRootPath, "train.list")# 清空原來的數據,當一‘w’模式打開文件夾時,1:文件已存在,那么就會清空數據 2:文件不存在,就會新建一個文件#避免舊數據干擾# with open(listDirTest, 'w') as f:#     pass# with open(listDirTrain, 'w') as f:#     passwith open(listDirTest, 'w') as f:pass  # 清空測試集文件with open(listDirTrain, 'w') as f:pass  # 清空訓練集文件# 隨機劃分訓練集與測試集classLabel = 0              # 初始化類別標簽,從0開始class_detail = []           # 記錄每個類別的描述classList = []              # 記錄所有的類別名num_images = 0              # 統計圖片的總數量for classDir in classDirs:classPath = os.path.join(dataRootPath,classDir)     # 獲取類別為classDir的圖片所在的目錄,拼接子目錄 如:data/DogCat/dogimgPaths = os.listdir(classPath)                    # 獲取類別為classDir的所有圖片名# 從中取trainPercent(默認80%)作為訓練集imgIndex = list(range(len(imgPaths)))               #生成圖片索引列表random.shuffle(imgIndex)                            #打亂圖片索引imgIndexTrain = imgIndex[:int(len(imgIndex)*trainPercent)]#劃分訓練集與測試集imgIndexTest = imgIndex[int(len(imgIndex)*trainPercent):]#把代碼追加到listDirTest 與 listDirTrain 目錄下with open(listDirTest,'a') as f:for i in imgIndexTest:imgPath = os.path.join(classPath,imgPaths[i]) #打開目錄listDirTest  把剛剛定義的imgIndexTest寫入到該目錄下 路勁大致如:data/DogCat/dog/dog.1jpg  f.write(imgPath + '\t%d' % classLabel + '\n') # 寫入格式圖片路勁\t類別標簽\nwith open(listDirTrain,'a') as f:for i in imgIndexTrain:imgPath = os.path.join(classPath,imgPaths[i])f.write(imgPath + '\t%d' % classLabel + '\n')        num_images += len(imgPaths)classList.append(classDir) #將類別名稱添加到classList中class_detail_list = {}   #記錄該類別的名稱、標簽、測試集圖片數量和訓練集圖片數量class_detail_list['class_name'] = classDir             #類別名稱,如dogclass_detail_list['class_label'] = classLabel          #類別標簽,如cat 的標簽是 0     dog的標簽是 1class_detail_list['class_test_images'] = len(imgIndexTest)       #該類數據的測試集數目class_detail_list['class_trainer_images'] = len(imgIndexTrain)   #該類數據的訓練集數目class_detail.append(class_detail_list)     classLabel += 1# 說明的json文件信息readjson = {} #包含所有類別的名稱、總類別數量、總圖片數量以及每個類別的詳細信息。readjson['all_class_name'] = classList                      # 文件父目錄readjson['all_class_sum'] = len(classDirs)                  # 總類別數量readjson['all_class_images'] = num_images                   # 總圖片數量readjson['class_detail'] = class_detail                     # 每種類別的情況jsons = json.dumps(readjson, sort_keys=True, indent=4, separators=(',', ': '))#json.dumps的作用是將Python對象轉換成JSON格式的字符串。這里的參數看起來是用于格式化輸出的。#sort_keys對字典的鍵(Key)按字母順序排序。設置縮進為4個空格,使JSON字符串具有層次結構with open(os.path.join(dataRootPath,"readme.json"),'w') as f:#把jsons字符串寫入到dataRootPath/readme.json中用于保存數據集的元信息(如類別名稱、標簽、圖片數量等)f.write(jsons)print ('生成數據列表完成!')return readjson['all_class_sum']classNumber = genDataList(dataRootPath)#返回類別數量
print(classNumber)
我們還是一步一步來:
1 變量:
#定義長度,和寬度
IMG_H =64
IMG_W =64
#緩沖區大小,用來讀取數據處理和預處理
BUFFER_SIZE = 1024
#一次批量處理的個數
BATCH_SIZE =64
#是否使用gpu
USE_CUDA = True
#訓練次數
TRAIN_NUM = 150
#學習率
LEARNING_RATE = 0.005
DATA_TRAIN = 0.75 #訓練集在數據集中占多少數據  # 表示在訓練模型時,使用多大規模的數據
#每執行玩一個模型就放在work/model 中,這樣方便模型的拿取
model_save_dir = "work/model"
這是我們在訓練時進行定義的全局變量:
IMG_H IMG_W 定義的輸出圖像的長寬高度
BUFFER_SIZE 就是緩沖區的大小用于讀取數據處理和預處理
BATCH_SIZE 就是在訓練時一次讀取的個數
USE_CUDA = True 這是使用GPU來進行訓練,因為你使用CPU的話這個程序會訓練的很慢或者訓練不出來。
TRAIN_NUM 訓練次數
LEARNING_RATE 學習率
DATA_TRAIN 訓練集在數據集中占多少數據 表示在訓練模型時,使用多大規模的數據
model_save_dir 每執行玩一個模型就放在work/model 中,這樣方便模型的拿取
然后就是我們的genDataList函數:
def genDataList(dataRootPath, trainPercent=0.8):# 函數會自動檢測dataRootPath下的所有文件夾,每一個文件夾為1個類別的圖片# 然后生成圖片的list,即paddlepaddle能獲取信息的形式# 默認隨機抽取20%作為測試集(驗證集)# random.seed(42) #設置隨機種子。classDirs = os.listdir(dataRootPath)#os.listdir用來獲取dataRootPath的所有文件和文件夾#os.isdir 判斷是否為目錄 #os.path.join 拼接classDirs = [x for x in classDirs if os.path.isdir(os.path.join(dataRootPath,x))]listDirTest = os.path.join(dataRootPath, "test.list")listDirTrain = os.path.join(dataRootPath, "train.list")# 清空原來的數據,當一‘w’模式打開文件夾時,1:文件已存在,那么就會清空數據 2:文件不存在,就會新建一個文件#避免舊數據干擾# with open(listDirTest, 'w') as f:# pass# with open(listDirTrain, 'w') as f:# passwith open(listDirTest, 'w') as f:pass # 清空測試集文件with open(listDirTrain, 'w') as f:pass # 清空訓練集文件# 隨機劃分訓練集與測試集classLabel = 0 # 初始化類別標簽,從0開始class_detail = [] # 記錄每個類別的描述classList = [] # 記錄所有的類別名num_images = 0 # 統計圖片的總數量for classDir in classDirs:classPath = os.path.join(dataRootPath,classDir) # 獲取類別為classDir的圖片所在的目錄,拼接子目錄 如:data/DogCat/dogimgPaths = os.listdir(classPath) # 獲取類別為classDir的所有圖片名# 從中取trainPercent(默認80%)作為訓練集imgIndex = list(range(len(imgPaths))) #生成圖片索引列表random.shuffle(imgIndex) #打亂圖片索引imgIndexTrain = imgIndex[:int(len(imgIndex)*trainPercent)]#劃分訓練集與測試集imgIndexTest = imgIndex[int(len(imgIndex)*trainPercent):]#把代碼追加到listDirTest 與 listDirTrain 目錄下with open(listDirTest,'a') as f:for i in imgIndexTest:imgPath = os.path.join(classPath,imgPaths[i]) #打開目錄listDirTest 把剛剛定義的imgIndexTest寫入到該目錄下 路勁大致如:data/DogCat/dog/dog.1jpg f.write(imgPath + '\t%d' % classLabel + '\n') # 寫入格式圖片路勁\t類別標簽\nwith open(listDirTrain,'a') as f:for i in imgIndexTrain:imgPath = os.path.join(classPath,imgPaths[i])f.write(imgPath + '\t%d' % classLabel + '\n') num_images += len(imgPaths)classList.append(classDir) #將類別名稱添加到classList中class_detail_list = {} #記錄該類別的名稱、標簽、測試集圖片數量和訓練集圖片數量class_detail_list['class_name'] = classDir #類別名稱,如dogclass_detail_list['class_label'] = classLabel #類別標簽,如cat 的標簽是 0 dog的標簽是 1class_detail_list['class_test_images'] = len(imgIndexTest) #該類數據的測試集數目class_detail_list['class_trainer_images'] = len(imgIndexTrain) #該類數據的訓練集數目class_detail.append(class_detail_list) classLabel += 1
根據我的注釋可以得出:
這個函數第一步就是創建出數據集和測試集:
imgIndex = list(range(len(imgPaths))) #生成圖片索引列表random.shuffle(imgIndex) #打亂圖片索引imgIndexTrain = imgIndex[:int(len(imgIndex)*trainPercent)]#劃分訓練集與測試集imgIndexTest = imgIndex[int(len(imgIndex)*trainPercent):]......之后就是把文件寫入操作第二步就是記錄屬性
classLabel = 0 # 初始化類別標簽,從0開始class_detail = [] # 記錄每個類別的描述classList = [] # 記錄所有的類別名num_images = 0 # 統計圖片的總數量
他們把記錄出來的這些屬性,用json進行連接。
得出:
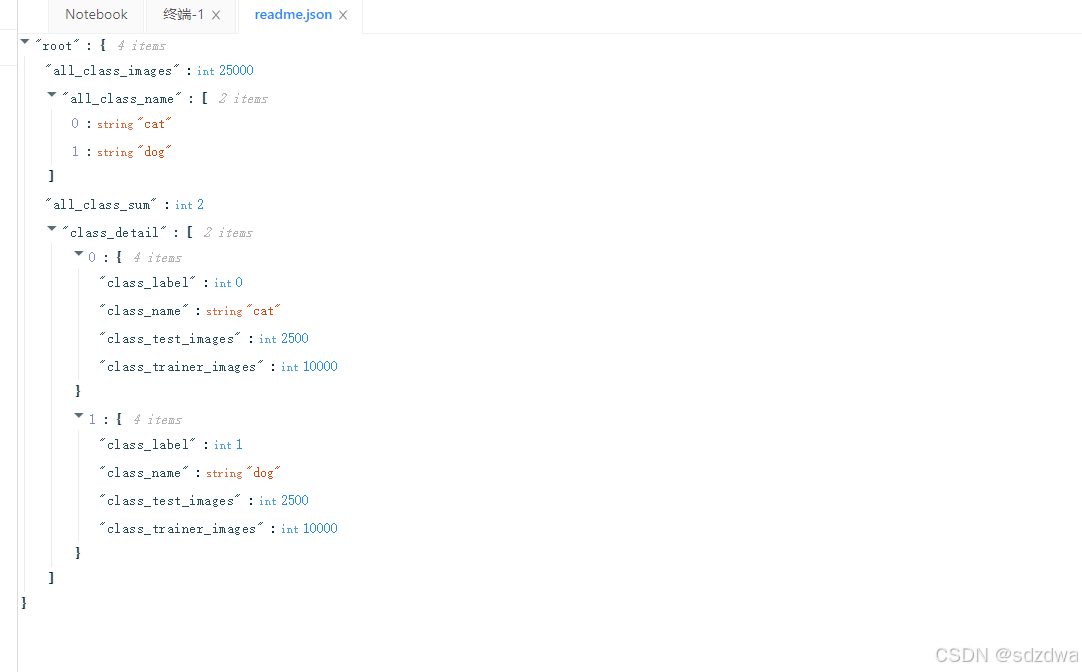
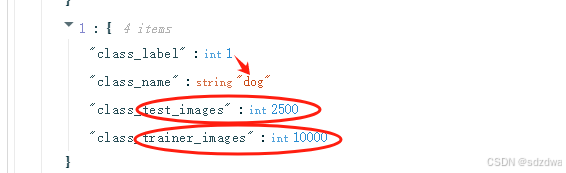
把狗做標記:為1 (class_label= 1)
然后圈紅圈的分別是訓練集的個數,和測試集的個數
貓同理。
1.5 數據處理和創建數據處理器
def trainMapper(sample):global IMG_H, IMG_Wimg, label = sample# 圖像加載(兼容老版本)img = paddle.dataset.image.load_image(img)  # 所有版本通用# 圖像變換(老版本無水平翻轉,需手動添加)img = paddle.dataset.image.simple_transform(im=img, resize_size=IMG_H, crop_size=IMG_W, is_color=True, is_train=True  # 在1.x版本中此參數可能不觸發翻轉)img = img.flatten().astype('float32') / 255.0return img, label# 對自定義數據集創建訓練集train的reader
def trainReader(train_list, buffered_size=1024):global DATA_TRAINdef reader():with open(train_list, 'r') as f:# 將train.list里面的標簽和圖片的地址放在一個list列表里面,中間用\t隔開'# 如data/dogCat/Cat_/1.jpg\t0'lines = [line.strip() for line in f]# 讀取所有行并去除首尾空格np.random.shuffle(lines)#打亂數據順序增強隨機性lines = lines[:int(len(lines)*DATA_TRAIN)]for line in lines:# 圖像的路徑和標簽是以\t來分割的,所以我們在生成這個列表的時候,使用\t就可以了img_path, lab = line.strip().split('\t')# 分割路徑與標簽yield img_path, int(lab) # 生成數據元組(路徑, 標簽)# 創建自定義數據訓練集的train_readerreturn paddle.reader.xmap_readers(trainMapper, reader, cpu_count(), buffered_size)def testMapper(sample):global IMG_Hglobal IMG_Wimg, label = sampleimg = paddle.dataset.image.load_image(img)img = paddle.dataset.image.simple_transform(im=img, resize_size=IMG_H, crop_size=IMG_W, is_color=True, is_train=False)img= img.flatten().astype('float32')/255.0return img, label# 對自定義數據集創建驗證集test的reader
def testReader(test_list, buffered_size=1024):global DATA_TRAINdef reader():with open(test_list, 'r') as f:lines = [line.strip() for line in f]np.random.shuffle(lines)lines = lines[int(len(lines)*DATA_TRAIN):]for line in lines:#圖像的路徑和標簽是以\t來分割的,所以我們在生成這個列表的時候,使用\t就可以了img_path, lab = line.strip().split('\t')yield img_path, int(lab)return paddle.reader.xmap_readers(testMapper, reader, cpu_count(), buffered_size)
在這里呢,我們就講解一下怎么處理數據的:
img = paddle.dataset.image.simple_transform(im=img, resize_size=IMG_H, crop_size=IMG_W, is_color=True, is_train=True # 在1.x版本中此參數可能不觸發翻轉)img = img.flatten().astype('float32') / 255.0
通過simple_transform 這個類成員函數進行處理數據:
resize_size=IMG_H 這里代表的是縮放,就比如:原本3232的照片 縮放成1616。
crop_size=IMG_W 這里代表著中心裁剪
is_color = True 這里就是代表有顏色額圖片
is_train=True 如果是True的話,這里的函數有可能對圖片進行隨機裁剪(增強數據)
最后img = img.flatten().astype(‘float32’) / 255.0 代表這歸一化 按(0,1)處理
而在測試的時候is_train=False 這就是不采用隨機裁剪
創建數據集Reader
def createDataReader(BatchSize = 128):global BUFFER_SIZE# 把圖片數據生成readertrainer_reader = trainReader(train_list = os.path.join(dataRootPath,"train.list"))train_reader = paddle.batch(paddle.reader.shuffle(reader=trainer_reader, buf_size=BUFFER_SIZE),batch_size=BatchSize)tester_reader = testReader(test_list = os.path.join(dataRootPath,"test.list"))test_reader = paddle.batch(tester_reader, batch_size=BatchSize)print('train_reader, test_reader創建完成!')return train_reader, test_reader
這里不做解釋
2 網絡構建
CNN版本–
def convolutional_neural_network(image, classNumber):# 第一個卷積-池化層 #修改第一步就是先是卷積池化->bn->激活 查找論文中 可以得出BN在激活前:在激活函數前進行 BN,能更有效地約束激活前的輸入分布,#使網絡更容易學習到合適的參數,ReLU 對負值輸入會直接截斷(輸出0),如果激活后再 BN,可能丟失部分信息;而先 BN 再激活,可以確保激活函數的輸入是歸一化的正值,梯度更穩定。#論文《Batch Normalization: Accelerating Deep Network Training by Reducing Internal Covariate Shift》建議將 BN 放在激活前,以最大化其規范化效果。conv_pool_1 = fluid.nets.simple_img_conv_pool(input=image, # 輸入圖像filter_size=5, # 濾波器的大小num_filters=20, # filter 的數量pool_size=2, # 池化核大小pool_stride=2, # 池化步長act=None # 先不激活)conv_pool_1 = fluid.layers.batch_norm(conv_pool_1) # BNconv_pool_1 = fluid.layers.relu(conv_pool_1) # 激活# 第二個卷積-池化層conv_pool_2 = fluid.nets.simple_img_conv_pool(input=conv_pool_1,filter_size=5,num_filters=50,pool_size=2,pool_stride=2,act=None)conv_pool_2 = fluid.layers.batch_norm(conv_pool_2) # BNconv_pool_2 = fluid.layers.relu(conv_pool_2) # 激活# 第三個卷積-池化層conv_pool_3 = fluid.nets.simple_img_conv_pool(input=conv_pool_2,filter_size=5,num_filters=50,pool_size=2,pool_stride=2,act=None)conv_pool_3 = fluid.layers.batch_norm(conv_pool_3) # BNconv_pool_3 = fluid.layers.relu(conv_pool_3) # 激活# 全連接輸出層prediction = fluid.layers.fc(input=conv_pool_3, size=classNumber, act='softmax')print('神經網絡創建完成!')return prediction
~卷積層:nn.Conv2d用于提取特征,參數包括輸入通道數、輸出通道數、卷積核大小等。
?~池化層:nn.MaxPool2d用于降維,通常使用最大池化。
~?全連接層:nn.Linear用于將特征映射到最終輸出空間。
?~激活函數:F.relu是ReLU激活函數,增加非線性。
?~展平操作:x.view將特征圖展平為一維向量,以便輸入全連接層。
這里就需要我們進行深度學習了!!!
如果是網絡構建的話選擇CNN就OK了!!!
DeepID 人臉識別網絡結構
def DeepID(images, classNumber):# 第一個卷積-池化層conv_pool_1 = fluid.nets.simple_img_conv_pool(input=images,filter_size=5,num_filters=32,pool_size=2,pool_stride=2,act=None # 先不激活)conv_pool_1 = fluid.layers.batch_norm(conv_pool_1) # BNconv_pool_1 = fluid.layers.relu(conv_pool_1) # 激活# 第二個卷積-池化層conv_pool_2 = fluid.nets.simple_img_conv_pool(input=conv_pool_1,filter_size=3,num_filters=40,pool_size=2,pool_stride=1,act=None)conv_pool_2 = fluid.layers.batch_norm(conv_pool_2) # BNconv_pool_2 = fluid.layers.relu(conv_pool_2) # 激活# 第三個卷積-池化層conv_pool_3 = fluid.nets.simple_img_conv_pool(input=conv_pool_2,filter_size=3,num_filters=60,pool_size=2,pool_stride=2,act=None)conv_pool_3 = fluid.layers.batch_norm(conv_pool_3) # BNconv_pool_3 = fluid.layers.relu(conv_pool_3) # 激活# 全連接層 fc160_1fc160_1 = fluid.layers.fc(input=conv_pool_3, size=160)# 第四個卷積層(無池化)conv_4 = fluid.layers.conv2d(input=conv_pool_3,num_filters=128,filter_size=3,act=None # 先不激活)conv_4 = fluid.layers.batch_norm(conv_4) # BNconv_4 = fluid.layers.relu(conv_4) # 激活# 全連接層 fc160_2fc160_2 = fluid.layers.fc(input=conv_4, size=160)# 合并全連接層fc160 = fluid.layers.elementwise_add(fc160_1, fc160_2, act="relu") # 必須保留# 全連接輸出層prediction = fluid.layers.fc(input=fc160, size=classNumber, act='softmax')return prediction
卷積層:提取人臉的局部特征。
?池化層:降維并增強特征的魯棒性。
?全連接層:將高維特征映射到類別空間。
?最后一層無激活函數:輸出的是人臉特征向量,而不是直接的分類結果。
DeepID 與 CNN 網絡結構的差異
| 特性 | CNN | ?DeepID |
|---|---|---|
| ?網絡結構 | 通用結構,適用于多種視覺任務 | 專為人臉識別設計,提取高維特征 |
| ?輸入數據 | 通用圖像數據(如分類任務中的物體圖像) | 固定大小的人臉圖像(如 112x112 或 128x128) |
| ?輸出 | 類別概率(分類任務) | 高維特征向量(用于相似性計算) |
| 訓練目標 | 最大化正確類別的概率(交叉熵損失等) | 學習高維、判別性強的人臉特征,結合聯合貝葉斯模型優化特征空間 |
| 后續處理 | 直接輸出結果(如分類標簽) | 特征向量用于人臉驗證或聚類,通常結合聯合貝葉斯模型 |
| ?應用場景 | 圖像分類、目標檢測、語義分割等 | 人臉識別、人臉驗證、人臉聚類等 |
總結:
?CNN 是一種通用框架,適用于多種視覺任務,網絡結構和訓練目標靈活多樣。
?DeepID 是一種專用網絡,專注于人臉識別任務,通過網絡提取高維特征并結合聯合貝葉斯模型優化特征空間。
3 深度學習模型訓練和推理的核心設置
def setPredictor(learning_rate =0.0001):image = fluid.layers.data(name='image', shape=[3, IMG_H, IMG_W], dtype='float32')#接收形狀為 【3,H,W】 的輸入圖像label = fluid.layers.data(name='label', shape=[1], dtype='int64')#接收形狀為 1 的標簽# 建立網絡# predict = convolutional_neural_network(image, classNumber)predict = DeepID(image, classNumber)#################################################################################### 獲取損失函數和準確率cost = fluid.layers.cross_entropy(input=predict, label=label) # 交叉熵avg_cost = fluid.layers.mean(cost) # 計算cost中所有元素的平均值acc = fluid.layers.accuracy(input=predict, label=label) #使用輸入和標簽計算準確率# 定義優化方法# optimizer =fluid.optimizer.Adam(learning_rate=learning_rate)# optimizer.minimize(avg_cost)# 定義帶動量的 SGD 優化器optimizer = fluid.optimizer.Momentum(learning_rate=learning_rate,momentum=0.9,regularization=fluid.regularizer.L2Decay(regularization_coeff=1e-4))optimizer.minimize(avg_cost)# 定義優化器時添加梯度裁剪 正則:原le-4 改成 le-3# optimizer = fluid.optimizer.Momentum(# learning_rate=learning_rate,# momentum=0.9,# regularization=fluid.regularizer.L2Decay(1e-4),# grad_clip=fluid.clip.GradientClipByGlobalNorm(clip_norm=5.0) # 全局范數裁剪# )# optimizer.minimize(avg_cost)# 定義使用CPU還是GPU,使用CPU時USE_CUDA = False,使用GPU時USE_CUDA = Trueplace = fluid.CUDAPlace(0) if USE_CUDA else fluid.CPUPlace()# 創建執行器,初始化參數exe = fluid.Executor(place) #就像請一個廚師(執行器)按照菜譜(模型結構)在指定的廚房(CPU或GPU)里做菜。exe.run(fluid.default_startup_program()) #運行模型的“啟動程序”,初始化所有參數(比如神經網絡的權重和偏置)feeder = fluid.DataFeeder( feed_list=[image, label],place=place)#創建一個“數據喂入器”,負責將輸入數據(如圖像和標簽)傳遞給模型# 獲取測試程序test_program = fluid.default_main_program().clone(for_test=True)return image, label, predict, avg_cost, acc, exe, feeder, test_program################################################################################### image, label, predict, avg_cost, acc, exe, feeder, test_program = setPredictor(LEARNING_RATE)
4 制圖
import matplotlib.pyplot as plt
import numpy as npdef draw_figure(dictCostAccdictCostAcc, xlabel, ylabel_1, ylabel_2):plt.xlabel(xlabel, fontsize=20)plt.plot(dictCostAcc[xlabel], dictCostAcc[ylabel_1],color='red',label=ylabel_1) plt.plot(dictCostAcc[xlabel], dictCostAcc[ylabel_2],color='green',label=ylabel_2) plt.legend()plt.grid()def draw_train_process(epoch, dictCostAcc):# train的cost與accuray的變化plt.figure(figsize=(10, 3))plt.title('epoch - ' + str(epoch), fontsize=24)plt.subplot(1,3,1)draw_figure(dictCostAcc, 'iteration', 'iter_cost', 'iter_acc')plt.subplot(1,3,2)draw_figure(dictCostAcc, 'epoch', 'cost_train', 'cost_test')plt.subplot(1,3,3)draw_figure(dictCostAcc, 'epoch', 'acc_train', 'acc_test')plt.show()
draw_figure() 功能:
繪制單個子圖,展示兩個指標的變化曲線。
通過 dictCostAcc 提供的數據繪制曲線,dictCostAcc 是一個字典,包含訓練過程中的各種指標(如損失和準確率)
參數:
dictCostAcc
一個字典,包含訓練過程中的數據。
鍵是指標名稱(如 ‘iteration’、‘iter_cost’ 等),值是對應的數值列表
xlabel
X 軸的標簽(如 ‘iteration’ 或 ‘epoch’)。
兩個 Y 軸的指標名稱(如 ‘iter_cost’ 和 ‘iter_acc’)。
draw_train_process()
功能
繪制整個訓練過程的指標變化,包括:
每個迭代的損失和準確率。
每個 epoch 的訓練和測試損失。
每個 epoch 的訓練和測試準確率。
使用 matplotlib 的子圖功能,將三個指標繪制在同一張圖中。
5 訓練
all_train_iter=0
all_train_iters=[]
all_train_costs=[]
all_train_accs=[]
# 記錄迭代過程中,每一個epoch的平均cost與accuracy
epoch_train_costs = []
epoch_test_costs = []
epoch_train_accs = []
epoch_test_accs = []train_reader, test_reader = createDataReader(BATCH_SIZE)if not os.path.exists(model_save_dir):os.makedirs(model_save_dir)print('開始訓練...')
for pass_id in range(TRAIN_NUM):# train_reader, test_reader = createDataReader(BATCH_SIZE)print("epoch %d -------------" % pass_id)train_accs = []                                                          #訓練的損失值train_costs = []                                                          #訓練的準確率for batch_id, data in enumerate(train_reader()):                         #遍歷train_reader的迭代器,并為數據加上索引batch_idtrain_cost, train_acc = exe.run(program=fluid.default_main_program(),                            #運行主程序feed=feeder.feed(data),                                          #喂入一個batch的數據fetch_list=[avg_cost, acc])                                      #fetch均方誤差和準確率all_train_iter=all_train_iter+BATCH_SIZEall_train_iters.append(all_train_iter)all_train_costs.append(train_cost[0])all_train_accs.append(train_acc[0])train_costs.append(train_cost[0])train_accs.append(train_acc[0])if batch_id % 50 == 0:                                               #每10次batch打印一次訓練、進行一次測試print("\tPass %d, Step %d, Cost %f, Acc %f" % (pass_id, batch_id, train_cost[0], train_acc[0]))epoch_train_costs.append(sum(train_costs) / len(train_costs))            #每個epoch的costepoch_train_accs.append(sum(train_accs)/len(train_accs))                 #每個epoch的accprint('\t\tTrain:%d, Cost:%0.5f, ACC:%0.5f' % (pass_id, epoch_train_costs[-1], epoch_train_accs[-1]))# 開始測試test_accs = []                                                            #測試的損失值test_costs = []                                                           #測試的準確率# 每訓練一輪 進行一次測試for batch_id, data in enumerate(test_reader()):                           # 遍歷test_readertest_cost, test_acc = exe.run(program=test_program,  # #運行測試主程序feed=feeder.feed(data),                #喂入一個batch的數據fetch_list=[avg_cost, acc])            #fetch均方誤差、準確率test_accs.append(test_acc[0])                                        #記錄每個batch的誤差test_costs.append(test_cost[0])                                      #記錄每個batch的準確率epoch_test_costs.append(sum(test_costs) / len(test_costs))epoch_test_accs.append(sum(test_accs) / len(test_accs))print('\t\tTest:%d, Cost:%0.5f, ACC:%0.5f' % (pass_id, epoch_test_costs[-1], epoch_test_accs[-1]))if pass_id < 3:continueelse:dictCostAcc = {}dictCostAcc['iteration'] = all_train_itersdictCostAcc['iter_cost'] = all_train_costsdictCostAcc['iter_acc'] = all_train_accsdictCostAcc['epoch'] = list(range(pass_id+1))dictCostAcc['cost_train'] = epoch_train_costsdictCostAcc['cost_test'] = epoch_test_costsdictCostAcc['acc_train'] = epoch_train_accsdictCostAcc['acc_test'] = epoch_test_accsdraw_train_process(pass_id, dictCostAcc)# draw_train_process("training",all_train_iters,all_train_costs,all_train_accs,"trainning cost","trainning acc","iter",'cost/acc')print('\n')if pass_id % 5 == 0:# 每5個epoch保存一個模型model_dir = os.path.join(model_save_dir,str(pass_id))if not os.path.exists(model_dir):os.makedirs(model_dir)fluid.io.save_inference_model(model_dir, ['image'], [predict], exe)print('第%d個epoch的訓練模型保存完成!'%pass_id)
1 變量初始化
all_train_iter = 0
all_train_iters = []
all_train_costs = []
all_train_accs = []
epoch_train_costs = []
epoch_test_costs = []
epoch_train_accs = []
epoch_test_accs = []
?功能:初始化變量,用于記錄訓練和測試過程中的損失和準確率。
?變量說明:
all_train_iter:記錄總的迭代次數。
all_train_iters:記錄所有訓練迭代的索引(累積的 batch 數)。
all_train_costs:記錄每個 batch 的訓練損失。
all_train_accs:記錄每個 batch 的訓練準確率。
epoch_train_costs:記錄每個 epoch 的平均訓練損失。
epoch_test_costs:記錄每個 epoch 的平均測試損失。
epoch_train_accs:記錄每個 epoch 的平均訓練準確率。
epoch_test_accs:記錄每個 epoch 的平均測試準確率。
2 數據讀取器
train_reader, test_reader = createDataReader(BATCH_SIZE)
?功能:創建訓練和測試數據讀取器。
?createDataReader(BATCH_SIZE):
自定義函數,返回訓練和測試數據的迭代器。
?BATCH_SIZE:每個 batch 的樣本數量。
3. 模型保存目錄
if not os.path.exists(model_save_dir):os.makedirs(model_save_dir)?功能:檢查模型保存目錄是否存在,如果不存在則創建。 ?model_save_dir:模型保存的路徑。
4. 訓練過程
for pass_id in range(TRAIN_NUM):print("epoch %d -------------" % pass_id)train_accs = []train_costs = []
功能:開始訓練過程,TRAIN_NUM 是總的訓練輪數(epoch)。
變量說明:
pass_id:當前是第幾個 epoch。
train_accs:記錄當前 epoch 的所有 batch 的訓練準確率。
train_costs:記錄當前 epoch 的所有 batch 的訓練損失。
4.1 遍歷訓練數據
for batch_id, data in enumerate(train_reader()):train_cost, train_acc = exe.run(program=fluid.default_main_program(),feed=feeder.feed(data),fetch_list=[avg_cost, acc])
功能:遍歷訓練數據讀取器,逐 batch 進行訓練。
?train_reader():
返回訓練數據的迭代器,每次迭代返回一個 batch 的數據。
?exe.run:
運行主程序,執行前向傳播和反向傳播。
?program=fluid.default_main_program():指定運行的程序。
?feed=feeder.feed(data):將當前 batch 的數據喂入模型。
?fetch_list=[avg_cost, acc]:獲取訓練的損失和準確率。
?train_cost 和 train_acc:
train_cost:當前 batch 的訓練損失。
train_acc:當前 batch 的訓練準確率。
4.2 記錄訓練數據
all_train_iter += BATCH_SIZE
all_train_iters.append(all_train_iter)
all_train_costs.append(train_cost[0])
all_train_accs.append(train_acc[0])
train_costs.append(train_cost[0])
train_accs.append(train_acc[0])
功能:記錄每個 batch 的訓練數據。
?all_train_iter:累積迭代次數,每次增加一個 batch 的樣本數(BATCH_SIZE)。
?all_train_iters:記錄總的迭代次數。
?all_train_costs 和 all_train_accs:記錄所有 batch 的訓練損失和準確率。
?train_costs 和 train_accs:記錄當前 epoch 的所有 batch 的訓練損失和準確率。
4.3 打印訓練信息
if batch_id % 50 == 0:print("\tPass %d, Step %d, Cost %f, Acc %f" % (pass_id, batch_id, train_cost[0], train_acc[0]))
?功能:每 50 個 batch 打印一次訓練信息。
?打印內容:
當前 epoch (pass_id)。
當前 batch 的索引 (batch_id)。
當前 batch 的訓練損失 (train_cost[0])。
當前 batch 的訓練準確率 (train_acc[0])。
4.4 計算并記錄每個 epoch 的平均損失和準確率
epoch_train_costs.append(sum(train_costs) / len(train_costs))
epoch_train_accs.append(sum(train_accs) / len(train_accs))
?功能:計算當前 epoch 的平均訓練損失和準確率,并記錄下來。
5. 測試過程
for batch_id, data in enumerate(test_reader()):test_cost, test_acc = exe.run(program=test_program,feed=feeder.feed(data),fetch_list=[avg_cost, acc])test_accs.append(test_acc[0])test_costs.append(test_cost[0])
功能:遍歷測試數據讀取器,逐 batch 進行測試。
?test_reader():返回測試數據的迭代器,每次迭代返回一個 batch 的數據。
?exe.run:運行測試程序,獲取測試的損失和準確率。
?test_cost 和 test_acc:當前 batch 的測試損失和準確率。
?test_costs 和 test_accs:記錄所有 batch 的測試損失和準確率。
5.1 計算并記錄每個 epoch 的平均測試損失和準確率
epoch_test_costs.append(sum(test_costs) / len(test_costs))
epoch_test_accs.append(sum(test_accs) / len(test_accs))
功能:計算當前 epoch 的平均測試損失和準確率,并記錄下來。
6 打印訓練和測試信息
print('\t\tTrain:%d, Cost:%0.5f, ACC:%0.5f' % (pass_id, epoch_train_costs[-1], epoch_train_accs[-1]))
print('\t\tTest:%d, Cost:%0.5f, ACC:%0.5f' % (pass_id, epoch_test_costs[-1], epoch_test_accs[-1]))
?功能:打印當前 epoch 的平均訓練損失和準確率,以及測試損失和準確率。
7. 可視化訓練過程
if pass_id < 3:continue
else:dictCostAcc = {'iteration': all_train_iters,'iter_cost': all_train_costs,'iter_acc': all_train_accs,'epoch': list(range(pass_id+1)),'cost_train': epoch_train_costs,'cost_test': epoch_test_costs,'acc_train': epoch_train_accs,'acc_test': epoch_test_accs}draw_train_process(pass_id, dictCostAcc)
?功能:從第 4 個 epoch 開始,定期可視化訓練過程。
dictCostAcc:
構造一個字典,包含訓練和測試的所有數據。
?鍵值對:
‘iteration’:總的迭代次數。
‘iter_cost’:每個 batch 的訓練損失。
‘iter_acc’:每個 batch 的訓練準確率。
‘epoch’:當前的 epoch 數。
‘cost_train’:每個 epoch 的平均訓練損失。
‘cost_test’:每個 epoch 的平均測試損失。
‘acc_train’:每個 epoch 的平均訓練準確率。
‘acc_test’:每個 epoch 的平均測試準確率。
?
2.draw_train_process:
調用可視化函數,繪制訓練過程的曲線。
8. 定期保存模型
if pass_id % 5 == 0:model_dir = os.path.join(model_save_dir, str(pass_id))if not os.path.exists(model_dir):os.makedirs(model_dir)fluid.io.save_inference_model(model_dir, ['image'], [predict], exe)print('第%d個epoch的訓練模型保存完成!' % pass_id)
?功能:每 5 個 epoch 保存一次模型。
?model_dir:
模型保存的路徑,包含當前 epoch 的編號。
?fluid.io.save_inference_model:
保存推理模型,供后續推理使用。
?參數:
model_dir:模型保存的路徑。
[‘image’]:輸入數據的名稱。
[predict]:需要保存的模型變量。
exe:執行器。
?打印信息:
打印模型保存完成的提示。
6 預測+結果
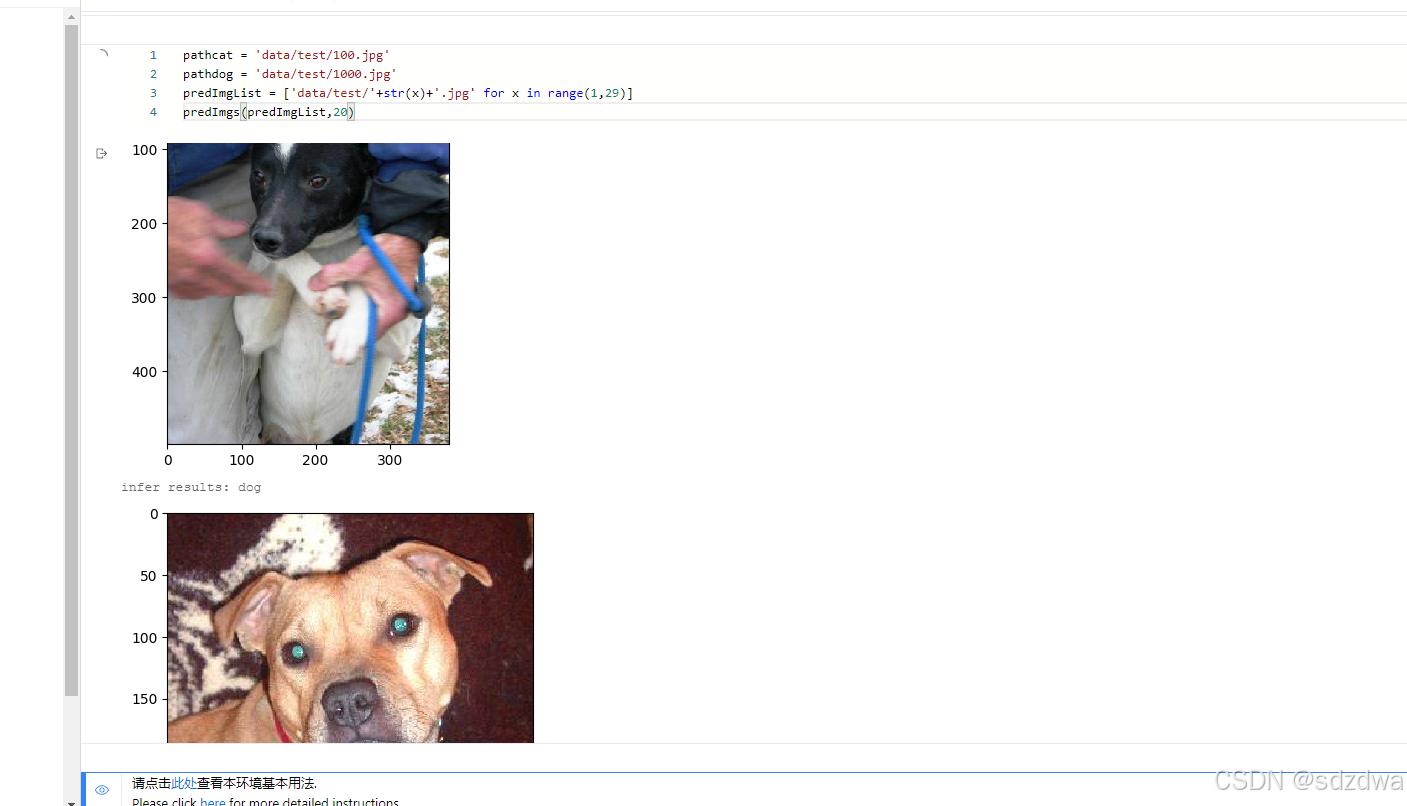
def createInfer():global USE_CUDAplace = fluid.CUDAPlace(0) if USE_CUDA else fluid.CPUPlace()infer_exe = fluid.Executor(place)inference_scope = fluid.core.Scope()return infer_exe, inference_scopedef load_image(path):global IMG_H, IMG_Wimg = paddle.dataset.image.load_and_transform(path,IMG_H,IMG_W, False).astype('float32')img = img / 255.0 img = np.expand_dims(img, axis=0)return imgdef getClassList(path):with open(path,'r') as load_f:new_dict = json.load(load_f)return new_dict['all_class_name']def predImgs(pathImgList, optimalEpoch):pred_label_list = []pred_class_list = []modelpath = os.path.join(model_save_dir, str(optimalEpoch))for pathImg in pathImgList:infer_exe, inference_scope = createInfer()with fluid.scope_guard(inference_scope):#從指定目錄中加載 推理model(inference model)[inference_program, # 預測用的programfeed_target_names, # 是一個str列表,它包含需要在推理 Program 中提供數據的變量的名稱。 fetch_targets] = fluid.io.load_inference_model(modelpath,#fetch_targets:是一個 Variable 列表,從中我們可以得到推斷結果。infer_exe)     #infer_exe: 運行 inference model的 executorimg = Image.open(pathImg)plt.imshow(img)   plt.show()    img = load_image(pathImg)results = infer_exe.run(inference_program,                 #運行預測程序feed={feed_target_names[0]: img},  #喂入要預測的imgfetch_list=fetch_targets)          #得到推測結果# print('results',results)# print('results[0]',np.argmax(results[0]))label_list = getClassList(os.path.join(dataRootPath,'readme.json'))pred_label = np.argmax(results[0])pred_class = label_list[np.argmax(results[0])]print("infer results: %s" % label_list[np.argmax(results[0])])pred_label_list.append(pred_label)pred_class_list.append(pred_class)return pred_label_list, pred_class_listpathcat = 'data/test/100.jpg'
pathdog = 'data/test/1000.jpg'
predImgList = ['data/test/'+str(x)+'.jpg' for x in range(1,29)]
predImgs(predImgList,95)
訓練時候的圖像:


好啦基本的就介紹到這里啦!!!


)


)


)