YOLOv8目標檢測 om 模型推理
本篇博客將手把手教你如何將 YOLOv8 目標檢測模型部署到華為昇騰 310B4 開發板上進行高效推理(其他昇騰開發版也可參考此流程)。
整個流程包括:
- 模型格式轉換(ONNX → OM)
- 昇騰推理環境配置
- 推理代碼實現(圖片推理為例)
- 結果可視化與效果展示
一、前置知識與準備
我們基于 YOLOv8 ONNX 模型,使用華為昇騰 CANN 提供的推理工具鏈完成模型轉換與部署。
項目所需環境如下:
| 組件 | 版本/建議 |
|---|---|
| Python | 3.9+ |
| numpy | 1.24.4 |
| opencv-python | 4.7.0.72 |
| CANN Toolkit | ≥ 6.0(需含 atc, ais_bench, infer 等,開發板一般自帶) |
| Ascend310B4 驅動 | 安裝并配置環境變量(開發板一般自帶) |
建議使用以下命令安裝依賴:
pip install numpy==1.24.4 opencv-python==4.7.0.72
二、模型轉換:ONNX → OM
在昇騰上推理,首先需將 .onnx 模型轉換為 .om 格式。使用 CANN 提供的 atc 工具即可完成轉換,轉換過程較長。
模型轉換命令如下:
atc --model=yolov8s.onnx \--framework=5 \--output=yolov8s \--input_format=NCHW \--input_shape="images:1,3,640,640" \--log=error \--soc_version=Ascend310B4
下圖為轉換過程:

📌 注意事項:
input_shape必須與你模型實際輸入一致soc_version必須與開發板匹配,例如 Ascend310B1、 Ascend310B4等
查看自己的昇騰開發板型號(310B1、310B4等):

轉換成功后,將生成 yolov8s.om 文件用于后續推理。
三、模型文件下載
如果你沒有合適的 YOLOv8 ONNX 模型文件,可以通過以下鏈接下載我準備好的模型文件包括 om 文件:
百度網盤鏈接: https://pan.baidu.com/s/1xpAdN7C9CS-L4XBLgBG8Kw
提取碼: 8dm8
建議選擇以下模型文件之一進行實驗:
yolov8n.onnx:輕量快速,適合測試yolov8s.onnx:兼顧精度和速度,適合部署
你也可以使用 Ultralytics 官方提供的 YOLOv8 PyTorch 模型導出 ONNX 文件(model.export(format="onnx"))。
四、YOLOv8 OM模型推理流程
我們將使用 python + ais_bench 接口構建推理流程。推理步驟包括:
- 加載圖像與模型
- 預處理圖像(尺寸調整、歸一化等)
- 執行模型推理
- 后處理(提取框、置信度、NMS過濾)
- 繪制檢測結果并保存
👇 以下為推理代碼示例部分(infer_yolov8_ascend.py):
推理代碼
# -*- coding: utf-8 -*-
import cv2
import numpy as np
from ais_bench.infer.interface import InferSession# 類別定義
CLASSES = {0: 'person', 1: 'bicycle', 2: 'car', 3: 'motorcycle', 4: 'airplane', 5: 'bus', 6: 'train', 7: 'truck',8: 'boat', 9: 'traffic light', 10: 'fire hydrant', 11: 'stop sign', 12: 'parking meter', 13: 'bench',14: 'bird', 15: 'cat', 16: 'dog', 17: 'horse', 18: 'sheep', 19: 'cow', 20: 'elephant', 21: 'bear',22: 'zebra', 23: 'giraffe', 24: 'backpack', 25: 'umbrella', 26: 'handbag', 27: 'tie', 28: 'suitcase',29: 'frisbee', 30: 'skis', 31: 'snowboard', 32: 'sports ball', 33: 'kite', 34: 'baseball bat',35: 'baseball glove', 36: 'skateboard', 37: 'surfboard', 38: 'tennis racket', 39: 'bottle',40: 'wine glass', 41: 'cup', 42: 'fork', 43: 'knife', 44: 'spoon', 45: 'bowl', 46: 'banana', 47: 'apple',48: 'sandwich', 49: 'orange', 50: 'broccoli', 51: 'carrot', 52: 'hot dog', 53: 'pizza', 54: 'donut',55: 'cake', 56: 'chair', 57: 'couch', 58: 'potted plant', 59: 'bed', 60: 'dining table', 61: 'toilet',62: 'tv', 63: 'laptop', 64: 'mouse', 65: 'remote', 66: 'keyboard', 67: 'cell phone', 68: 'microwave',69: 'oven', 70: 'toaster', 71: 'sink', 72: 'refrigerator', 73: 'book', 74: 'clock', 75: 'vase',76: 'scissors', 77: 'teddy bear', 78: 'hair drier', 79: 'toothbrush'
}# 置信度閾值
CONFIDENCE = 0.4
# NMS 的 IoU 閾值
IOU = 0.45# 為每個類別分配隨機顏色
colors = np.random.uniform(0, 255, size=(len(CLASSES), 3))def draw_bounding_box(img, class_id, confidence, x, y, x_plus_w, y_plus_h):"""在圖像上繪制邊界框和類別標簽參數:img - 原始圖像class_id - 類別IDconfidence - 置信度x, y - 左上角坐標x_plus_w, y_plus_h - 右下角坐標"""label = "{} {:.2f}".format(CLASSES[class_id], confidence)color = colors[class_id]# 畫框cv2.rectangle(img, (x, y), (x_plus_w, y_plus_h), color, 2)# 獲取文本大小label_size, _ = cv2.getTextSize(label, cv2.FONT_HERSHEY_SIMPLEX, 0.5, 1)label_width, label_height = label_sizelabel_x = xlabel_y = y - 10 if y - 10 > label_height else y + 10# 背景框cv2.rectangle(img, (label_x, label_y - label_height),(label_x + label_width, label_y + label_height), color, cv2.FILLED)# 文字cv2.putText(img, label, (label_x, label_y), cv2.FONT_HERSHEY_SIMPLEX,0.5, (0, 0, 0), 1, cv2.LINE_AA)def main(session, original_image):"""加載模型,執行推理,繪制檢測框并保存結果圖像參數:session - 模型original_image - 圖片值返回:original_image - 畫框的圖片detections - 包含每個目標信息的列表"""height, width, _ = original_image.shape# 變為正方形圖像用于推理length = max(height, width)image = np.zeros((length, length, 3), np.uint8)image[0:height, 0:width] = original_image# 縮放因子scale = length / 640# 預處理圖像blob = cv2.dnn.blobFromImage(image, scalefactor=1.0 / 255, size=(640, 640), swapRB=True)# 模型推理outputs = session.infer(feeds=blob, mode="static")# 轉換輸出維度:從 (1, 84, 8400) -> (8400, 84)outputs = np.array([cv2.transpose(outputs[0][0])])rows = outputs.shape[1]boxes = []scores = []class_ids = []# 解析輸出for i in range(rows):classes_scores = outputs[0][i][4:](minScore, maxScore, minClassLoc, (x, maxClassIndex)) = cv2.minMaxLoc(classes_scores)if maxScore >= CONFIDENCE:box = [(outputs[0][i][0] - outputs[0][i][2] / 2) * scale,  # x 左上角(outputs[0][i][1] - outputs[0][i][3] / 2) * scale,  # y 左上角outputs[0][i][2] * scale,  # 寬outputs[0][i][3] * scale   # 高]boxes.append(box)scores.append(maxScore)class_ids.append(maxClassIndex)# 非極大值抑制result_boxes = cv2.dnn.NMSBoxes(boxes, scores, CONFIDENCE, IOU, 0.5)detections = []# 繪制邊界框for i in range(len(result_boxes)):index = result_boxes[i]box = boxes[index]detection = {"class_id": class_ids[index],"class_name": CLASSES[class_ids[index]],"confidence": scores[index],"box": box,"scale": scale,}detections.append(detection)draw_bounding_box(original_image,class_ids[index],scores[index],round(box[0]),round(box[1]),round(box[0] + box[2]),round(box[1] + box[3]))return original_image, detectionsif __name__ == "__main__":model_path = "yolov8s.om"# 創建推理會話session = InferSession(device_id=0, model_path=model_path)# 圖片推理input_image_path = "street.jpg"image = cv2.imread(input_image_path)draw_image, _ = main(session, image)# cv2.imshow("Image Detection", draw_image)cv2.imwrite("output_image.jpg", draw_image)cv2.waitKey(0)cv2.destroyAllWindows()
五、推理結果展示
完成推理后,程序會將檢測結果繪制在圖像上并保存,如下所示:
| 原圖 | 檢測后 |
|---|---|
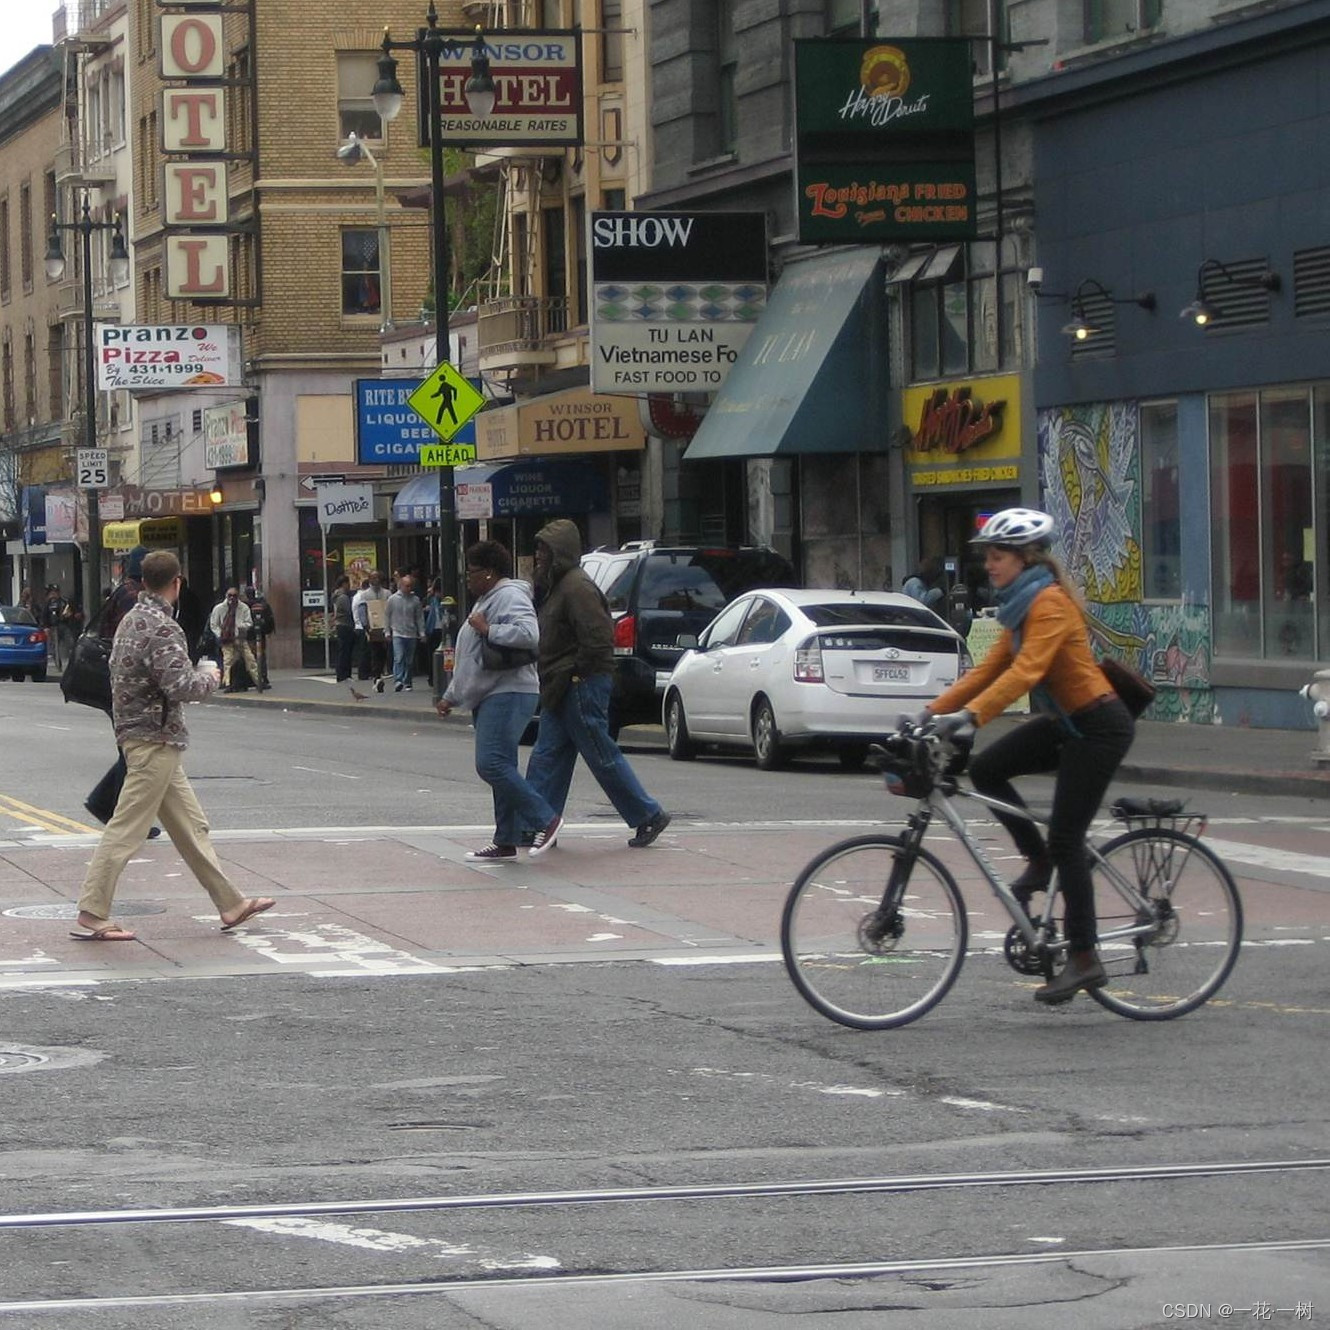 |  |
你可以替換為自己的圖像文件進行體驗。
六、運行方法與注意事項
- 將
.om模型與推理腳本放于同一目錄 - 準備一張待檢測圖片
- 執行命令:
python infer_yolov8_ascend.py
- 成功運行后,將在當前目錄輸出檢測結果圖
output_image.jpg,并彈出窗口展示檢測框。
🧯 若
cv2.imshow()報錯,請確保本地圖形界面環境正常或注釋相關代碼,非圖形界面系統不支持顯示。
總結
本文完整介紹了基于昇騰310B4的 YOLOv8 推理部署流程,該流程也適用于視頻流檢測或攝像頭實時檢測,僅需在代碼中擴展對應輸入源即可。
延伸方向
- 🎥 攝像頭實時檢測
- 🎬 視頻流批量檢測
如有需要完整代碼、轉換腳本或模型下載支持,歡迎在評論區留言,我會盡快回復!

![[ linux-系統 ] 軟硬鏈接與動靜態庫](http://pic.xiahunao.cn/[ linux-系統 ] 軟硬鏈接與動靜態庫)


)


-01)


)