文章目錄
- 一、概述
- 1.1 Nginx 特點
- 1.2 Nginx 作用
- 1.3Nginx工作原理
- 二、Nginx服務搭建
- 2.1安裝
- 2.2 目錄結構
- 2.3 配置文件作用
- 2.4 nginx,conf配置文件詳解
- 2.5 核心命令
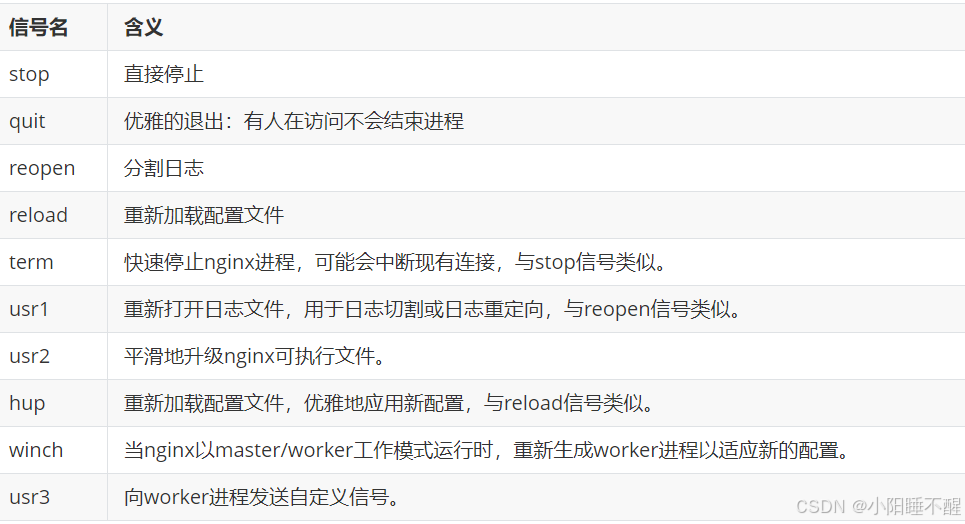
- 2.6 Nginx信號
- 三.Nginx
- 3.1啟動
- 總結
一、概述
Nginx 是開源、高性能、高可靠的 Web服務器 和反向代理服務器,而且支持熱部署,幾乎可以做到 7 * 24 小時不間斷運行,即使運行幾個月也不需要重新啟動,還能在不間斷服務的情況下對軟件版本進行熱更新。性能是 Nginx 最重要的考量,其占用內存少、并發能力強、能支持高達 5w 個并發連接數,最重要的是, Nginx 是免費的并可以商業化,配置使用也比較簡單。
1.1 Nginx 特點
- 高并發、高性能;
- 模塊化架構使得它的擴展性非常好;
- 異步非阻塞的事件驅動模型(epoll)這點和 Node.js 相似;
- 相對于其它服務器來說它可以連續幾個月甚至更長而不需要重啟服務器使得它具有高可靠性;
- 熱部署、平滑升級;
- 完全開源,生態繁榮。
1.2 Nginx 作用
- http服務器。Nginx可以獨立提供http服務。可做網頁靜態服務器。
- 虛擬主機。可以實現在一臺服務器虛擬出多個虛擬服務器。
- 反向代理,負載均衡。當網站的訪問量達到一定程度后,單臺服務器不能滿足用戶的請求時,需要用多臺服務器集群可以使用nginx做反向代理。并且多臺服務器可以平均分擔負載,不會應為某臺服務器負載高宕機而某臺服務器閑置的情況。
- nginx 中也可以配置安全管理、比如可以使用Nginx搭建API接口網關,對每個接口服務進行攔截。
1.3Nginx工作原理

二、Nginx服務搭建
2.1安裝
yum install -y nginx
編譯安裝:
tar xf nginx-1.18.0.tar.gz
yum install -y pcre-devel
yum install -y zlib-devel
cd nginx-1.18.0/
./configure --prefix=/usr/local/nginx1.8 && make && make install
啟動: nginx
停止: nginx -s stop
重啟 : nginx -s reload

2.2 目錄結構

2.3 配置文件作用

2.4 nginx,conf配置文件詳解
##全局配置,對全局生效##
user  nobody nobody;  # 指定運行 Nginx 進程的用戶為 nobody,組為nobody
pid /var/run/nginx.pid # master主進程的的pid存放在nginx.pid的文件
worker_processes  1;  # 指定 Nginx 啟動的 worker 子進程數量。
#worker_processes auto; # 與當前cpu物理核心數一致
worker_rlimit_nofile 20480; # 指定 worker 子進程可以打開的最大文件句柄數。
worker_rlimit_core 50M; # 指定 worker 子進程異常終止后的 core 文件,用于記錄分析問題。
working_directory /opt/nginx/tmp; # 存放目錄
worker_priority -10; # 指定 worker 子進程的 nice 值,以調整運行 Nginx 的優先級,通常設定為負值,以優先調用 Nginx。
#Linux 默認進程的優先級值是120,值越小越優先;nice 定范圍為 -20 到 +19 。
#應用的默認優先級值是120加上 nice 值等于它最終的值,這個值越小,優先級越高。
worker_shutdown_timeout 5s; #指定 worker 子進程優雅退出時的超時時間。
timer_resolution 100ms; #worker 子進程內部使用的計時器精度,調整時間間隔越大,系統調用越少,有利于性能提升;反之,系統調用越多,性能下降。
daemon on; # 指定 Nginx 的運行方式,前臺還是后臺,前臺用于調試,后臺用于生產。默認是on,后臺運行模式。
error_log  logs/error.log;  # 錯誤日志文件路徑##events:配置影響 Nginx 服務器與用戶的網絡連接;##
events {use epoll;     # 使用epoll的I/O模型(如果你不知道Nginx該使用哪種輪詢方法,會自動選擇一個最適合你操作系統的)worker_connections  1024;  # 允許的最大并發連接數accept_mutex on; # 是否打開負載均衡互斥鎖,默認是off關閉的,這里推薦打開
}
##http:配置代理,緩存,日志定義等絕大多數功能和第三方模塊的配置;##
http {include       mime.types;  # 包含 MIME 類型的定義,文件擴展名與類型映射表default_type  application/octet-stream;   # 默認文件類型default_type  application/octet-stream;  # 默認的 MIME 類型log_format  main  '$remote_addr - $remote_user [$time_local] "$request" '  # 日志格式定義'$status $body_bytes_sent "$http_referer" ''"$http_user_agent" "$http_x_forwarded_for"';access_log  logs/access.log  main;  # 訪問日志文件及使用的日志格式sendfile       on;  # 啟用零拷貝傳輸,高效傳輸模式tcp_nopush     on;  # 啟用 TCP nopush 選項,減少網絡報文段的數量keepalive_timeout  0;  # 禁用持久連接的超時時間keepalive_timeout  65;  # 保持存活連接的超時時間gzip  on;  # 開啟 Gzip 壓縮include /etc/nginx/conf.d/*.conf;   # 加載自定義配置項##upstream:配置后端服務器具體地址,負載均衡配置不可或缺的部分。##upstream back_end_server{server 192.168.100.33:8081 #定義后端web服務器節點}##server:配置虛擬主機的相關參數,一個 http 塊中可以有多個 server 塊;每個nginx相當于一個虛擬服務器的地位。##server {listen       80;  # 監聽端口 80server_name  localhost;  # 服務器名為 localhostcharset koi8-r;  # 字符集設置為 koi8-raccess_log  logs/host.access.log  main;  # 主機訪問日志文件及使用的日志格式##location:用于配置匹配的 uri ;##location / {root   html;  # 指定靜態資源目錄位置,它可以寫在 http 、 server 、 location 等配置中。index  index.html index.htm;  # 默認的索引文件deny 172.168.22.11;   # 禁止訪問的ip地址,可以為allallow 172.168.33.44;# 允許訪問的ip地址,可以為all}location /image {alias /opt/nginx/static/image/;#它也是指定靜態資源目錄位置,使用alias末尾一定要添加 / ,只能寫在 location 中。}
#當用戶訪問 www.jx.com/image/1.png 時,實際在服務器找的路徑是 /opt/nginx/static/image/1.pngerror_page  404              /404.html;  # 設置 404 錯誤頁面的位置為 /404.htmlerror_page   500 502 503 504  /50x.html;  # 將服務器錯誤頁面重定向到 /50x.htmllocation = /50x.html {root   html;}location ~ \.php$ {proxy_pass   http://127.0.0.1;  # 將 PHP 腳本代理到監聽在 127.0.0.1:80 上的 Apache 服務器}location ~ \.php$ {root           html;  # PHP 腳本位置fastcgi_pass   127.0.0.1:9000;  # 向 FastCGI 服務器傳遞 PHP 腳本fastcgi_index  index.php;  # 指定 FastCGI 服務器默認的腳本文件名fastcgi_param  SCRIPT_FILENAME  /scripts$fastcgi_script_name;  # FastCGI 參數配置include        fastcgi_params;  # 包含 FastCGI 相關的參數配置}location ~ /\.ht {deny  all;  # 阻止訪問 .htaccess 文件}}server {listen       8000;  # 監聽端口 8000listen       somename:8080;  # 監聽 somename:8080server_name  somename  alias  another.alias;  # 服務器名設置location / {root   html;  # 根目錄位置為 html 文件夾index  index.html index.htm;  # 默認的索引文件}}server {listen       443 ssl;  # 啟動在 443 端口,并開啟 SSLserver_name  localhost;  # 服務器名為 localhostssl_certificate      cert.pem;  # SSL 證書文件ssl_certificate_key  cert.key;  # SSL 證書的私鑰文件ssl_session_cache    shared:SSL:1m;  # 配置 SSL 會話緩存ssl_session_timeout  5m;  # SSL 會話緩存的超時時間設置為 5 分鐘ssl_ciphers  HIGH:!aNULL:!MD5;  # 配置 SSL 加密算法ssl_prefer_server_ciphers  on;  # 優先使用服務器端的加密套件location / {root   html;  # 根目錄位置為 html 文件夾index  index.html index.htm;  # 默認的索引文件}}
}
2.5 核心命令

2.6 Nginx信號
三.Nginx
3.1啟動

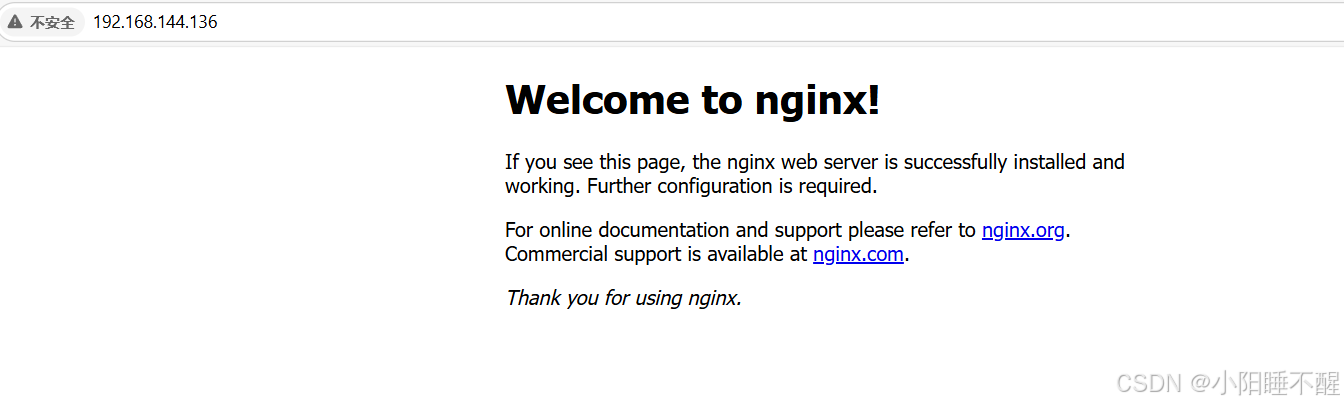
訪問當前ip地址
我們可以在html目錄下新創建一個html,里面寫內容在訪問

注:為了保持主文件nginx.conf整潔,可以創建多個子文件,然后再主文件使用include即可

拷貝如下內容到剛才創建的目錄下的文件中

基于端口號配置
server {
listen 803;
server_name localhost;
    #charset koi8-r;#access_log  logs/host.access.log  main;location / {root  html/web1; //這里要去html目錄下創建對應的文件index  index.html index.htm;}#error_page  404              /404.html;# redirect server error pages to the static page /50x.html#error_page   500 502 503 504  /50x.html;location = /50x.html {root   html;}# proxy the PHP scripts to Apache listening on 127.0.0.1:80##location ~ \.php$ {#    proxy_pass   http://127.0.0.1;#}# pass the PHP scripts to FastCGI server listening on 127.0.0.1:9000##location ~ \.php$ {#    root           html;#    fastcgi_pass   127.0.0.1:9000;#    fastcgi_index  index.php;#    fastcgi_param  SCRIPT_FILENAME  /scripts$fastcgi_script_name;#    include        fastcgi_params;#}# deny access to .htaccess files, if Apache's document root# concurs with nginx's one##location ~ /\.ht {#    deny  all;#}
}
訪問時帶上剛才配置的端口號

基于ip地址配置
ifconfig ens33:0 192.168.144.10/24


基于域名配置
conf.d下的配置

conf下的配置

去另一臺主機的/etc/hosts添加


總結
今天就先學習下Nginx基于ip地址,端口號,域名的簡單配置
希望可以幫助到小伙伴們


全生態接入系統技術白皮書)


)


