一、多級緩存
1. 傳統緩存的問題
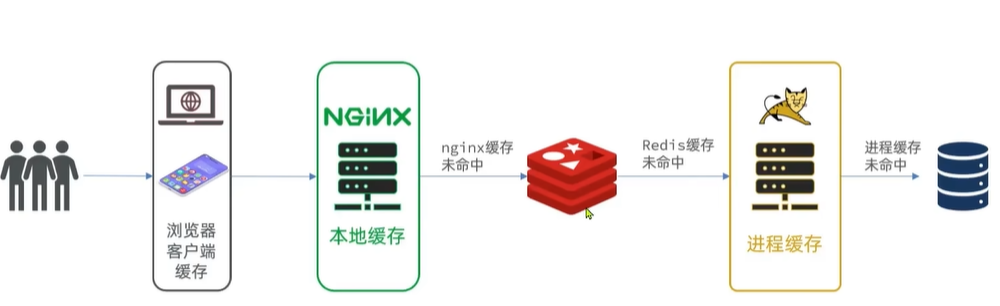
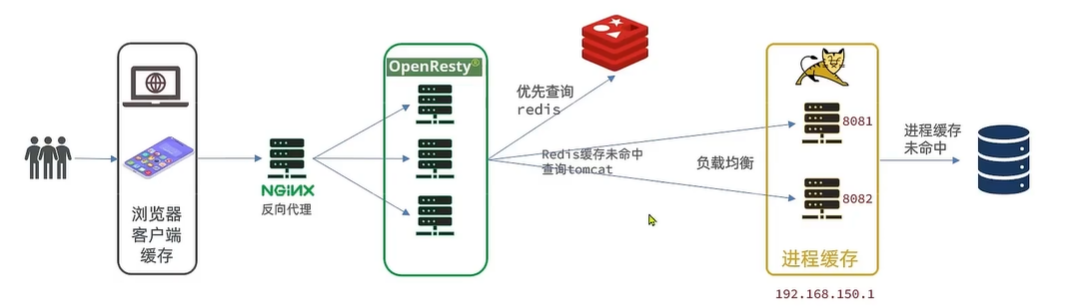
傳統的緩存策略一般是請求到達Tomcat后,先查詢Redis,如果未命中則查詢數據庫,存在下面的問題:
- 請求要經過Tomcat處理,Tomcat的性能成為整個系統的瓶頸
- Redis緩存失效時,會對數據庫產生沖擊

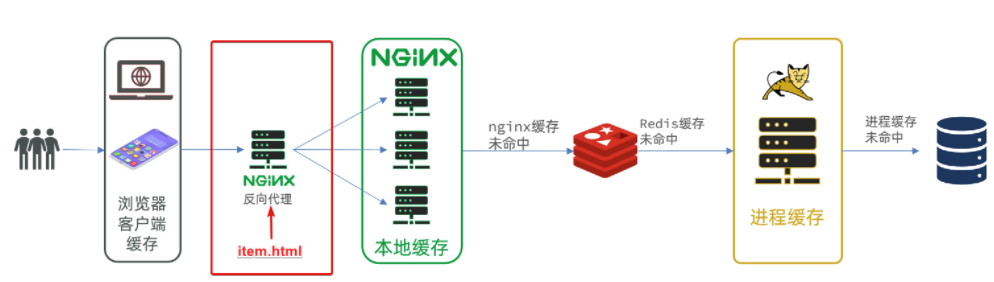
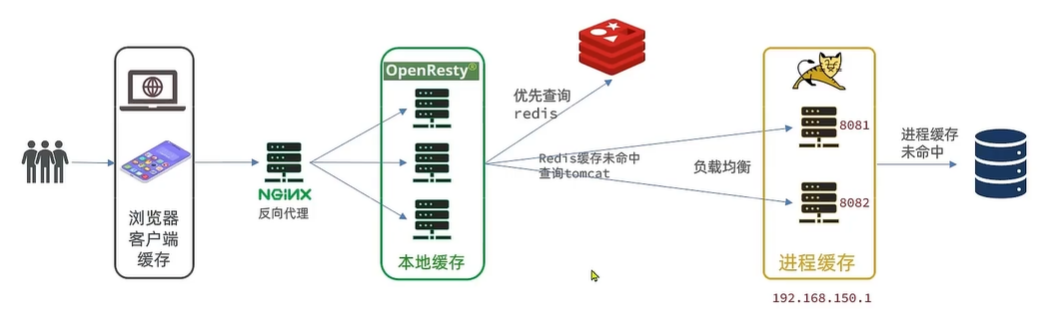
2. 多級緩存方案
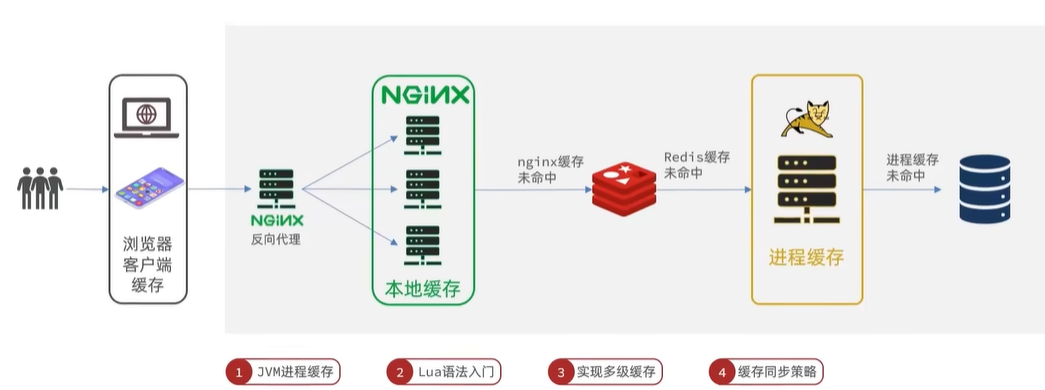
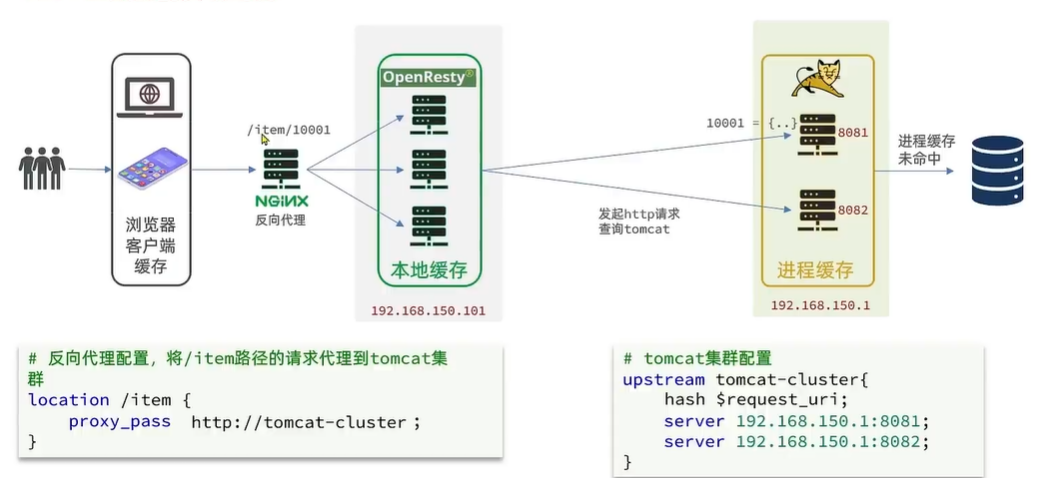
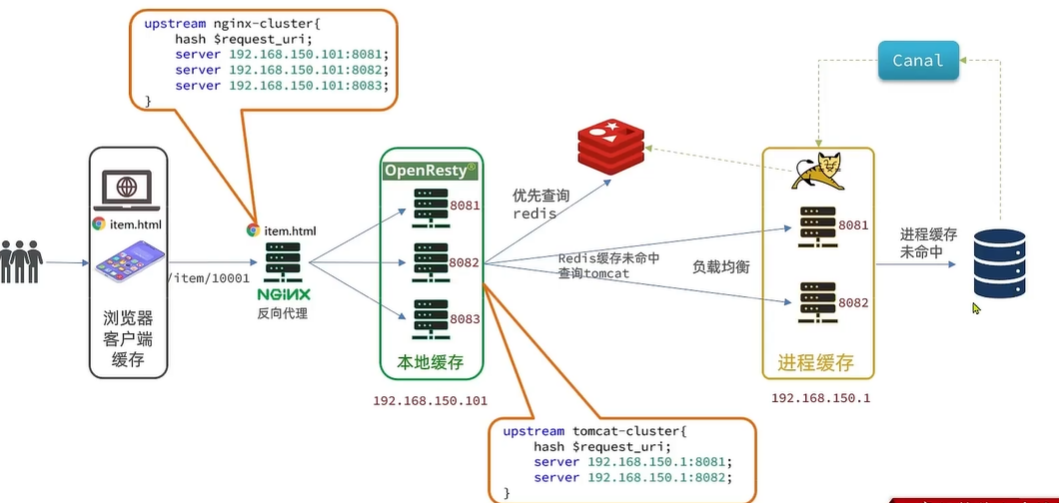
多級緩存就是充分利用請求處理的每個環節,分別添加緩存,減輕Tomcat壓力,提升服務性能:
用作緩存的Nginx是業務Nginx,需要部署為集群,再由專門的Nginx用來做反向代理:
3. JVM進程緩存
3.1 導入商品案例
(1)安裝MySQL
后期做數據同步需要用到MySQL的主從功能,所以需要在虛擬機中利用Docker來運行一個MySQL容器。
①為了方便后期配置MySQL,先準備兩個目錄,用于掛載容器的數據和配置文件目錄:
# 進入/tmp目錄
cd /tmp
# 創建文件夾
mkdir mysql
# 進入mysql目錄
cd mysql
②進入mysql目錄后,執行下面的Docker命令:
docker run \-p 3306:3306 \--name mysql \-v $PWD/conf:/etc/mysql/conf.d \-v $PWD/logs:/logs \-v $PWD/data:/var/lib/mysql \-e MYSQL_ROOT_PASSWORD=123 \--privileged \-d \mysql:5.7③在/tmp/mysql/conf目錄下添加一個my.cnf文件,作為mysql的配置文件:
# 創建文件
touch /tmp/mysql/conf/my.cnf
文件內容如下:
[mysqld]
skip-name-resolve
character_set_server=utf8
datadir=/var/lib/mysql
server-id=1000
④重啟容器
docker restart mysql(2)導入SQL
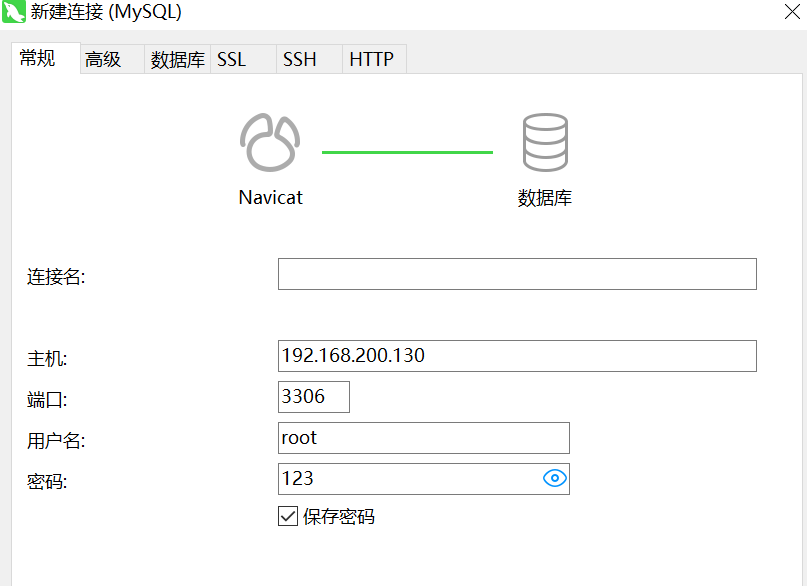
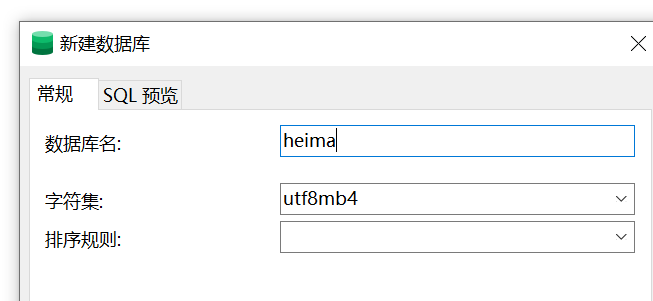
①利用Navicat客戶端連接MySQL,導入課前資料提供的sql文件:
新建數據庫:
運行SQL文件:
其中包含兩張表:
- tb_item:商品表,包含商品的基本信息
- tb_item_stock:商品庫存表,包含商品的庫存信息
之所以將庫存分離出來,是因為庫存是更新比較頻繁的信息,寫操作比較多,而其他信息的修改頻率非常低。
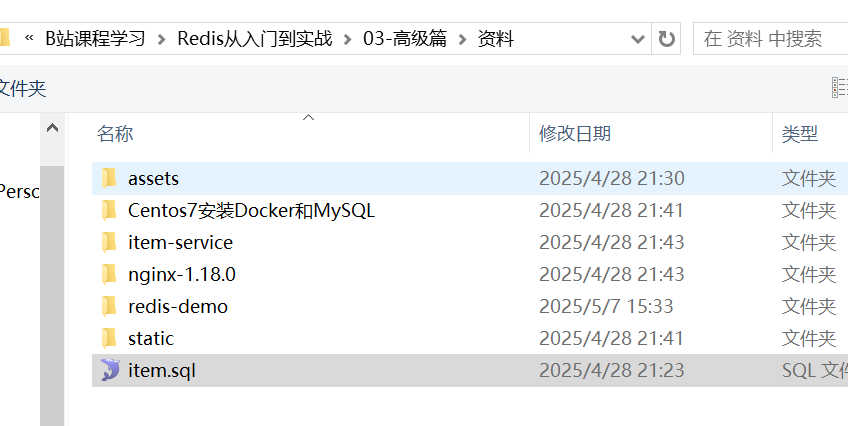
(3)導入Demo工程
①導入課前資料提供的工程
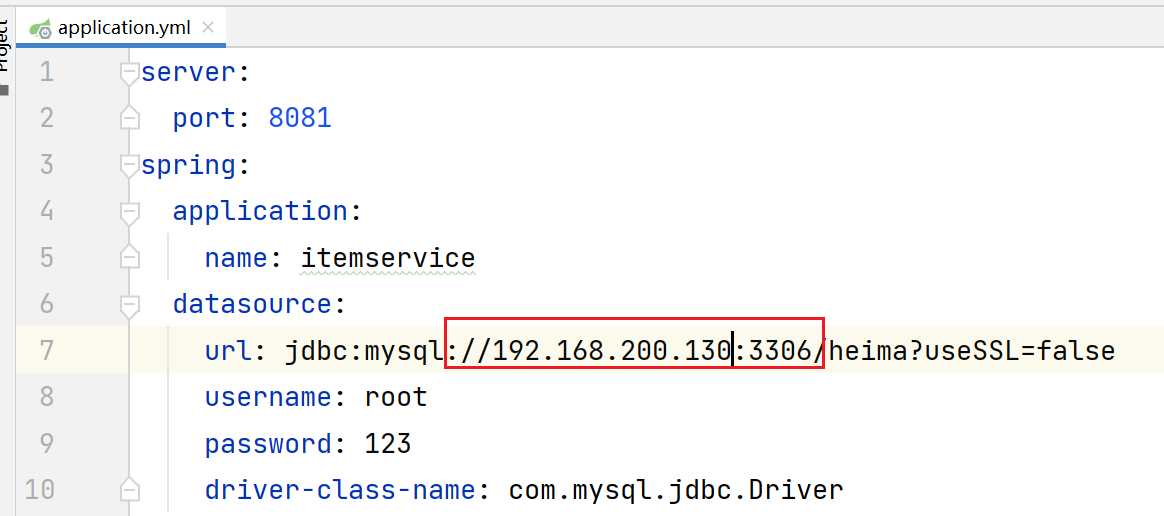
修改數據庫連接地址:
修改配置文件中lombok的版本:
<dependency><groupId>org.projectlombok</groupId><artifactId>lombok</artifactId><version>1.18.30</version></dependency>啟動項目,進行測試:
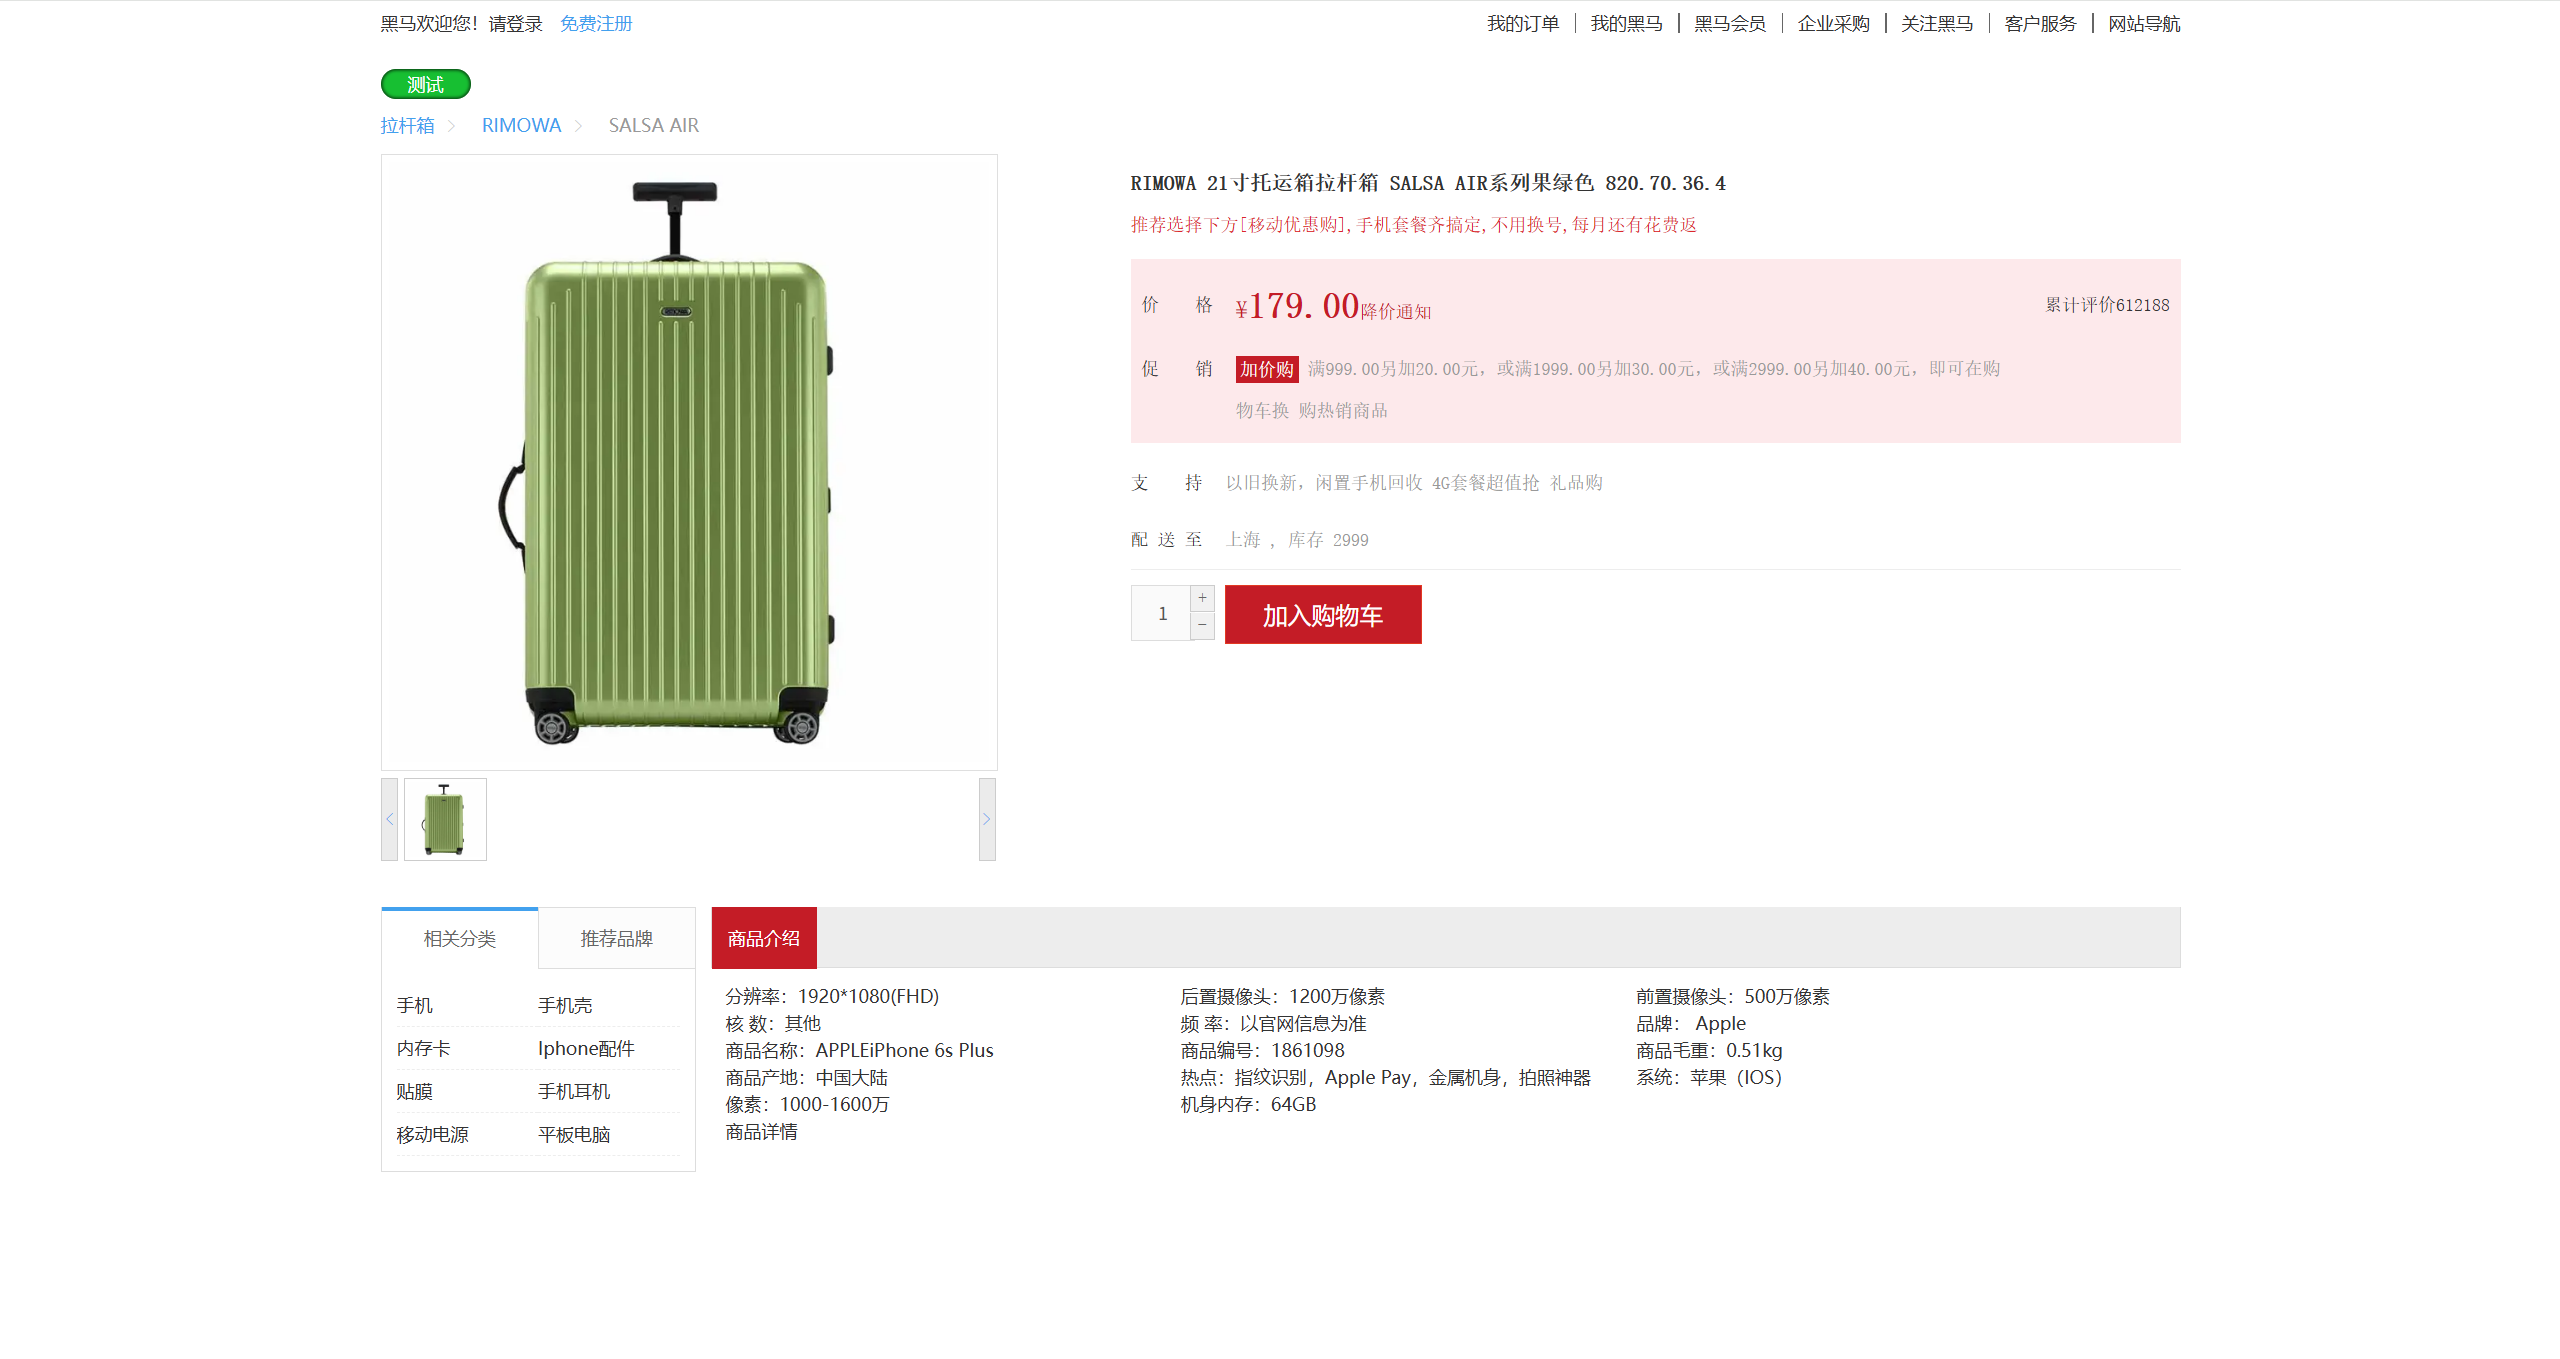
(4)導入商品查詢頁面
商品查詢是購物頁面,與商品管理的頁面是分離的。
部署方式如圖:
我們需要準備一個反向代理的nginx服務器,如上圖紅框所示,將靜態的商品頁面存放到nginx目錄中。頁面需要的數據通過ajax向服務端(nginx業務集群)查詢。
①找到課前資料中的nginx目錄,放到一個非中文的目錄下,運行這個nginx服務


若存在下面的問題:
2025/05/18 20:54:22 [notice] 19076#7520: signal process started
2025/05/18 20:55:27 [emerg] 22404#14572: bind() to 0.0.0.0:80 failed (10013: An attempt was made to access a socket in a way forbidden by its access permissions)
修改nginx的監聽端口
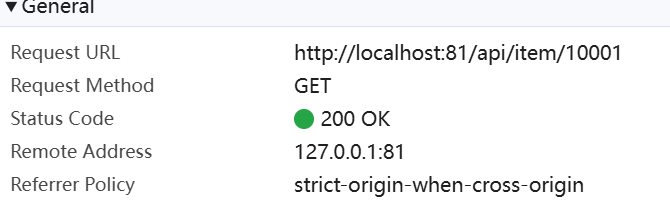
②訪問http://localhost:81/item.html?id=10001
(5)反向代理
現在,頁面是假數據展示的。我們需要向服務器發送ajax請求,查詢商品數據。
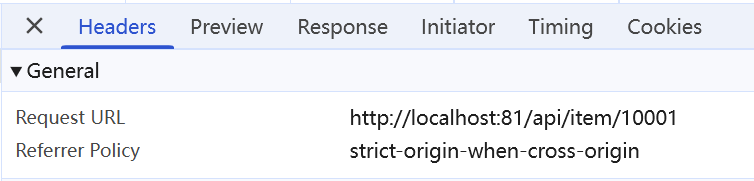
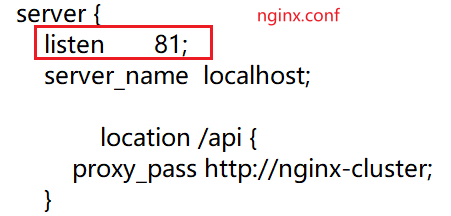
這個請求地址是81端口,所以被當前的nginx反向代理了。
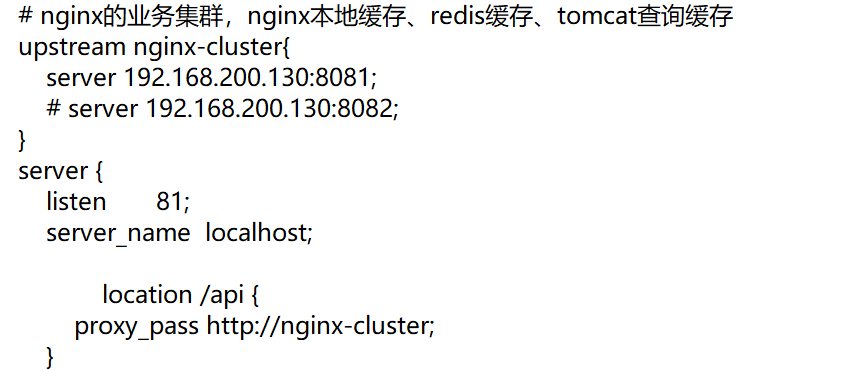
查看nginx的conf目錄下的nginx.conf文件,其中的關鍵配置如下:
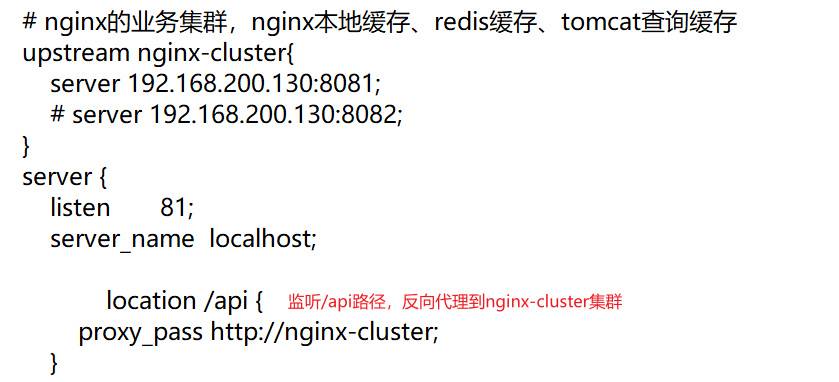
其中,192.168.200.130是虛擬機的IP地址,也就是nginx業務集群部署的地方

3.2 初始Caffeine
本地進程緩存
緩存在日常開發中起著至關重要的作用,由于是存儲在內存中,數據的讀取速度非常快,能大量減少對數據庫的訪問,減少數據庫的壓力。我們把緩存分為兩類:
分布式緩存,例如Redis:
- 優點:存儲容量大、可靠性更好、可以在集群間共享
- 缺點:訪問緩存有網絡開銷
- 場景:緩存數據量較大、可靠性要求高、需要在集群間共享
進程本地緩存,例如HashMap、GuavaCache:
- 優點:讀取本地內存,沒有網絡開銷,速度更快
- 缺點:存儲容量有限、可靠性較低、無法共享
- 場景:性能要求較高,緩存數據量較小
Caffeine
Caffeine是一個基于Java8開發的,提供了近乎最佳命中率的高性能的本地緩存庫。目前Spring內部的緩存使用的就是Caffeine。Github地址:GitHub - ben-manes/caffeine: A high performance caching library for Java
Caffeine示例
可以通過item-service項目中的單元測試來學習Caffine的使用:
@Testvoid testBasicOps() {// 創建緩存對象Cache<String, String> cache = Caffeine.newBuilder().build();// 存數據cache.put("gf", "迪麗熱巴");// 取數據,不存在則返回nullString gf = cache.getIfPresent("gf");System.out.println("gf = " + gf);// 取數據,不存在則去數據庫查詢String defaultGF = cache.get("defaultGF", key -> {// 這里可以去數據庫根據 key查詢valuereturn "柳巖";});System.out.println("defaultGF = " + defaultGF);}Caffeine提供了三種緩存驅逐策略:
- 基于容量:設置緩存的數量上限
// 創建緩存對象Cache<String, String> cache = Caffeine.newBuilder()// 設置緩存大小上限為 1.maximumSize(1).build();- 基于時間:設置緩存的有效時間
// 創建緩存對象Cache<String, String> cache = Caffeine.newBuilder()// 設置緩存有效期為10秒,從最后一次寫入開始計時.expireAfterWrite(Duration.ofSeconds(10)).build();- 基于引用:設置緩存為軟引用或弱引用,利用GC來回收緩存數據。性能較差,不建議使用
在默認情況下,當一個緩存元素過期時,Caffeine不會自動立即將其清理和驅逐。而是在一次讀或寫操作后,或者在空閑時間完成對失效數據的驅逐。
/*基于大小設置驅逐策略:*/@Testvoid testEvictByNum() throws InterruptedException {// 創建緩存對象Cache<String, String> cache = Caffeine.newBuilder()// 設置緩存大小上限為 1.maximumSize(1).build();// 存數據cache.put("gf1", "柳巖");cache.put("gf2", "范冰冰");cache.put("gf3", "迪麗熱巴");// 延遲10ms,給清理線程一點時間Thread.sleep(10L);// 獲取數據System.out.println("gf1: " + cache.getIfPresent("gf1"));System.out.println("gf2: " + cache.getIfPresent("gf2"));System.out.println("gf3: " + cache.getIfPresent("gf3"));}/*基于時間設置驅逐策略:*/@Testvoid testEvictByTime() throws InterruptedException {// 創建緩存對象Cache<String, String> cache = Caffeine.newBuilder().expireAfterWrite(Duration.ofSeconds(1)) // 設置緩存有效期為 10 秒.build();// 存數據cache.put("gf", "柳巖");// 獲取數據System.out.println("gf: " + cache.getIfPresent("gf"));// 休眠一會兒Thread.sleep(1200L);System.out.println("gf: " + cache.getIfPresent("gf"));}3.3 實現進程緩存
案例:實現商品的查詢的本地進程緩存
利用Caffeine實現下列需求:
- 給根據id查詢商品的業務添加緩存,緩存未命中時查詢數據庫
- 給根據id查詢商品庫存的業務添加緩存,緩存未命中時查詢數據庫
- 緩存初始大小為100
- 緩存上限為10000
①添加配置類CaffeineConfig
package com.heima.item.config;import com.github.benmanes.caffeine.cache.Cache;
import com.github.benmanes.caffeine.cache.Caffeine;
import com.heima.item.pojo.Item;
import com.heima.item.pojo.ItemStock;
import org.springframework.context.annotation.Bean;
import org.springframework.context.annotation.Configuration;@Configuration
public class CaffeineConfig {/*** 商品緩存* @return*/@Beanpublic Cache<Long, Item> itemCache() {return Caffeine.newBuilder().initialCapacity(100).maximumSize(10_000).build();}/*** 商品庫存緩存* @return*/@Beanpublic Cache<Long, ItemStock> stockCache() {return Caffeine.newBuilder().initialCapacity(100).maximumSize(10_000).build();}
}
②改造itemController
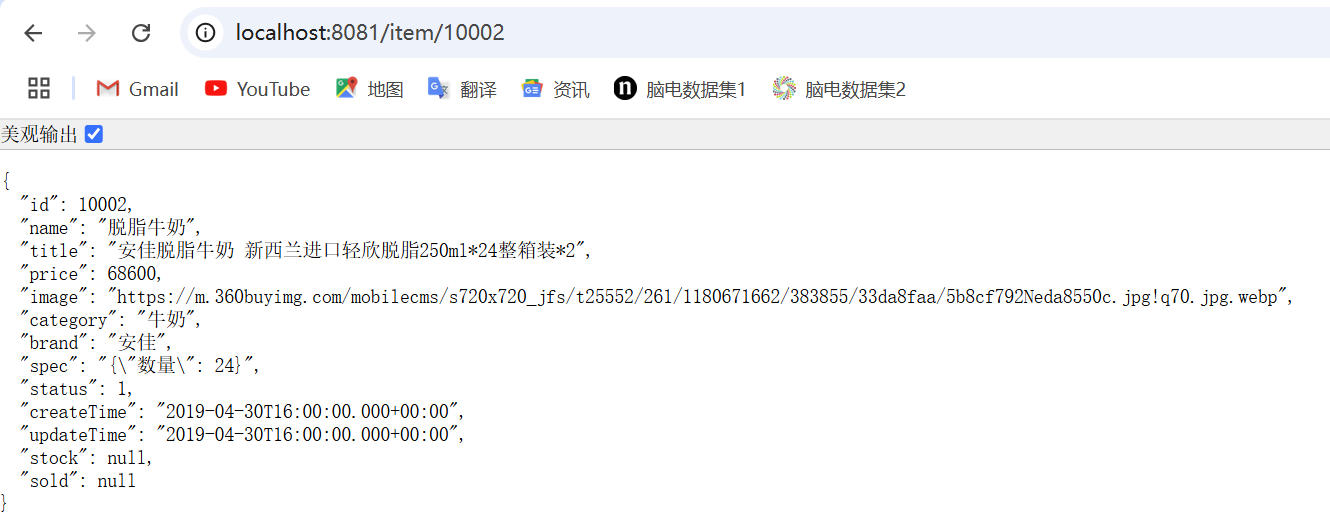
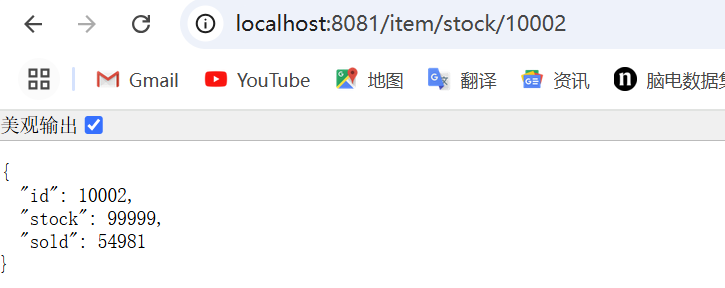
@GetMapping("/{id}")public Item findById(@PathVariable("id") Long id){return itemCache.get(id, key -> itemService.query().ne("status", 3).eq("id", key).one());}@GetMapping("/stock/{id}")public ItemStock findStockById(@PathVariable("id") Long id){return stockCache.get(id, key -> stockService.getById(key));}③啟動項目進行測試,各請求兩次(第二次請求走進程本地緩存)
http://localhost:8081/item/10002
http://localhost:8081/item/stock/10002

4. Lua語法入門
4.1 初識Lua
Lua是一種輕量小巧的腳本語言,用標準C語言編寫并以源代碼形式開放,其設計目的是為了嵌入應用程序中,從而為應用程序提供靈活的擴展和定制功能。
官網:The Programming Language Lua

HelloWorld
1. 在Linux虛擬機的任意目錄下,新建一個hello.lua文件
touch hello.lua2. 添加下面的內容
print("Hello World!")3. 運行
lua hello.lua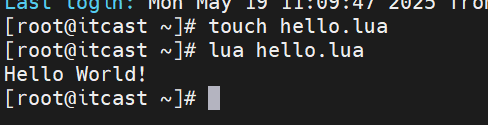
4.2 變量和循環
數據類型
| 數據類型 | 描述 |
| nil | 這個最簡單,只有值nil屬于該類,表示一個無效值(在條件表達式中相當于false) |
| boolean | 包含兩個值:false和true |
| number | 表示雙精度類型的實浮點數 |
| string | 字符串由一對雙引號或單引號來表示 |
| function | 由 C 或 Lua 編寫的函數 |
| table | Lua中的表(table)其實是一個“關聯數組”(associative arrays),數組的索引可以是數字、字符串或表類型。在Lua里,table的創建是通過“構造表達式”來完成,最簡單構造表達式是{},用來創建一個空表 |
可以利用type函數測試給定變量或值的類型:

變量
Lua聲明變量的時候,并不需要指定數據類型:
-- 聲明字符串
local str = 'hello'
-- 聲明數字
local num = 21
-- 聲明布爾類型
local flag = true
-- 聲明數組 key為索引的table
local arr = {'java', 'python', 'lua'}
-- 聲明table,類似java的map
local map = {name='Jack', age=21}
訪問table:
-- 訪問數組,lua數組的角標從1開始
print(arr[1])
-- 訪問table
print(map['name'])
print(map.name)
循環
數組、table都可以利用for循環來遍歷:
遍歷數組:
-- 聲明數組 key為索引的table
local arr = {'java', 'python', 'lua'}
-- 遍歷數組
for index,value in ipairs(arr) doprint(index, value)
end
遍歷table:
-- 聲明map,也就是table
local map = {name='Jack', age=21}
-- 遍歷table
for key, value in pairs(map) doprint(key, value)
end
4.3 條件控制、函數
函數
定義函數的語法:
function 函數名(argument1, argument2, ..., argumentn)-- 函數體return 返回值
end
例如,定義一個函數,用來打印數組:
function printArr(arr)for index, value in ipairs(arr) doprint(value)end
end
條件控制
類似Java的條件控制,例如if、else語法:
if(布爾表達式)
then-- [布爾表達式 為true時 執行該語句塊 --]
else--[布爾表達式 為false時 執行該語句塊 --]
end
與java不同,布爾表達式中的邏輯運算是基于英文單詞:
| 操作符 | 描述 | 實例 |
| and | 邏輯與操作符。若A為false,則返回A,否則返回B | (A and B)為false |
| or | 邏輯或操作符。若A為true,則返回A,否則返回B | (A or B)為true |
| not | 邏輯非操作符。與邏輯運算結果相反,如果條件為true,邏輯非為false | not(A and B)為true |
案例:自定義函數,打印table
需求:自定義一個函數,可以打印table,當參數為nil時,打印錯誤信息
local function printArr(arr)if (not arr) thenprint('數組不能為空!')return nilendfor index, value ipairs(arr) doprint(value)end
end
5. 多級緩存
5.1 安裝OpenResty
①安裝OpenResty的依賴開發庫,執行命令
yum install -y pcre-devel openssl-devel gcc --skip-broken
②安裝OpenResty倉庫,這樣就可以便于未來安裝或更新我們的軟件包(通過yum check-update命令)
yum-config-manager --add-repo https://openresty.org/package/centos/openresty.repo
如果提示說命令不存在,則運行:
yum install -y yum-utils 然后再重復上面的命令
③安裝OpenResty
yum install -y openresty
④安裝opm工具。opm是OpenResty的一個管理工具,可以幫助我們安裝一個第三方的Lua模塊。如果你想安裝命令行工具opm,那么可以像下面這樣安裝openresty-opm包
yum install -y openresty-opm
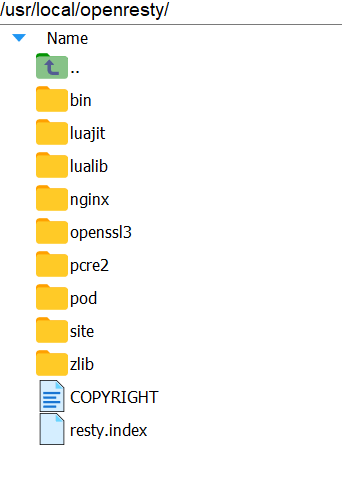
⑤目錄結構。默認情況下,OpenResty安裝的目錄是:/usr/local/openresty。OpenResty就是再Nginx基礎上繼承了一些Lua模塊
⑥配置nginx的環境變量
打開配置文件
vi /etc/profile在最下面加入兩行
export NGINX_HOME=/usr/local/openresty/nginx
export PATH=${NGINX_HOME}/sbin:$PATH
NGINX_HOME:后面是OpenResty安裝目錄下的nginx的目錄
然后讓配置生效
source /etc/profile⑦修改nginx的配置文件。修改 /usr/local/openresty/nginx/conf/nginx.conf 文件,內容如下:(注釋太多,影響后續編輯)
#user  nobody;
worker_processes  1;
error_log  logs/error.log;events {worker_connections  1024;
}http {include       mime.types;default_type  application/octet-stream;sendfile        on;keepalive_timeout  65;server {listen       8081;server_name  localhost;location / {root   html;index  index.html index.htm;}error_page   500 502 503 504  /50x.html;location = /50x.html {root   html;}}
}
⑧在Linux的控制臺輸入命令以啟動nginx
nginx訪問頁面:http://192.168.200.130:8081,注意ip地址換為你自己的虛擬機IP
5.2 OpenResty快速入門
初識OpenResty
OpenResty是一個基于Nginx的高性能Web平臺,用于方便地搭建能夠處理高并發、擴展性極高的動態Web應用、Web服務和動態網關。具備下列特點:
- 具備Nginx的完整功能
- 基于Lua語言進行擴展,集成了大量精良的Lua庫、第三方模塊
- 允許使用Lua自定義業務邏輯、自定義庫
官方網站:OpenResty? - 開源官方站
案例:OpenResty快速入門,實現商品詳情頁數據查詢
商品詳情頁面目前展示的是假數據,在瀏覽器的控制臺可以看到查詢商品信息的請求:
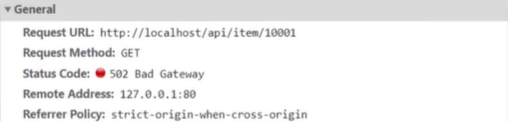
而這個請求最終被反向代理到虛擬機的OpenResty集群:
需求:在OpenResty中接收這個請求,并返回一段商品的假數據
步驟①:在nginx.conf的http下面,添加對OpenResty的Lua模塊的加載:
# 加載lua 模塊
lua_package_path "/usr/local/openresty/lualib/?.lua;;";
# 加載c模塊
lua_package_cpath "/usr/local/openresty/lualib/?.so;;";
②在nginx.conf的server下面,添加對/api/item這個路徑的監聽
location /api/item {# 響應類型,這里返回jsondefault_type application/json;# 響應數據由 lua/item.lua這個文件來決定content_by_lua_file lua/item.lua;}
#user  nobody;
worker_processes  1;
error_log  logs/error.log;events {worker_connections  1024;
}http {include       mime.types;default_type  application/octet-stream;sendfile        on;keepalive_timeout  65;# 加載lua 模塊lua_package_path "/usr/local/openresty/lualib/?.lua;;";# 加載c模塊     lua_package_cpath "/usr/local/openresty/lualib/?.so;;";  server {listen       8081;server_name  localhost;location /api/item {# 響應類型,這里返回jsondefault_type application/json;# 響應數據由 lua/item.lua這個文件來決定content_by_lua_file lua/item.lua;}location / {root   html;index  index.html index.htm;}error_page   500 502 503 504  /50x.html;location = /50x.html {root   html;}}
}
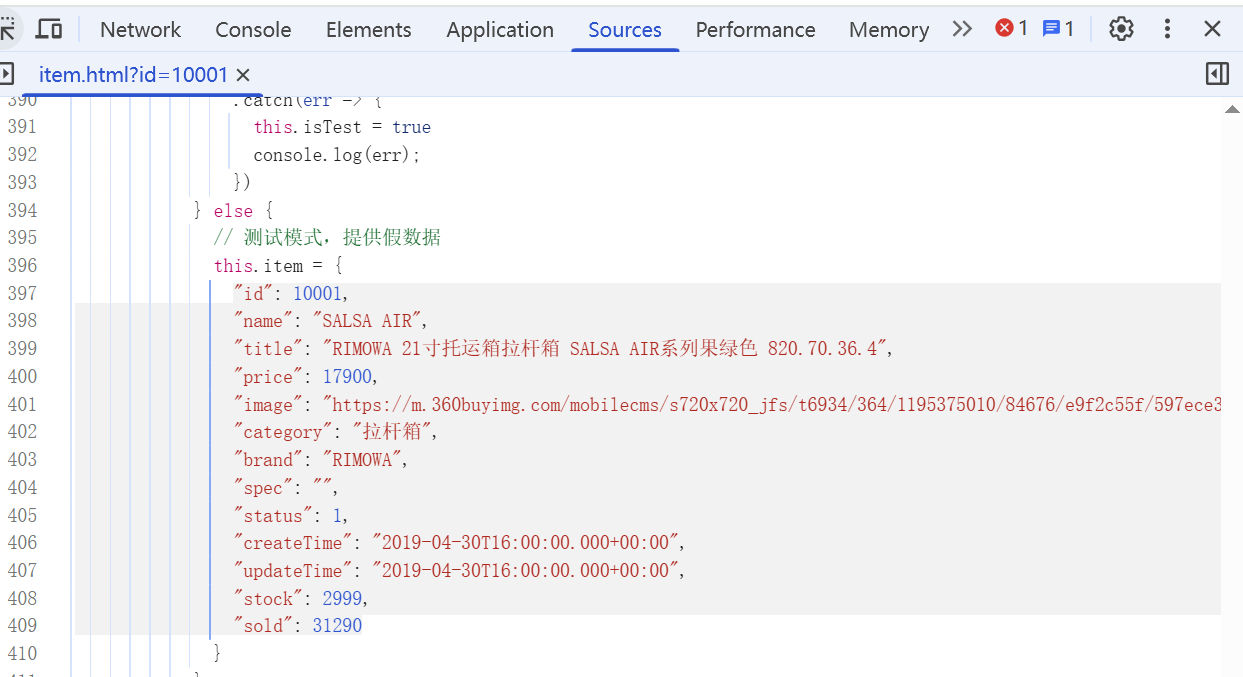
②新建/lua/item.lua文件
![]()
內容如下:注意不能換行
-- 返回假數據,這里的ngx.say()函數,就是寫數據到Response中
ngx.say('{"id": 10001,"name": "SALSA AIR","title": "RIMOWA 26寸托運箱拉桿箱 SALSA AIR系列果綠色 820.70.36.4","price": 21900,"image": "https://m.360buyimg.com/mobilecms/s720x720_jfs/t6934/364/1195375010/84676/e9f2c55f/597ece38N0ddcbc77.jpg!q70.jpg.webp","category": "拉桿箱","brand": "RIMOWA","spec": "","status": 1,"createTime": "2019-04-30T16:00:00.000+00:00","updateTime": "2019-04-30T16:00:00.000+00:00","stock": 2999,"sold": 31290}')
Vue打不開的可以在這里copy:
③重新加載配置
nginx -s reload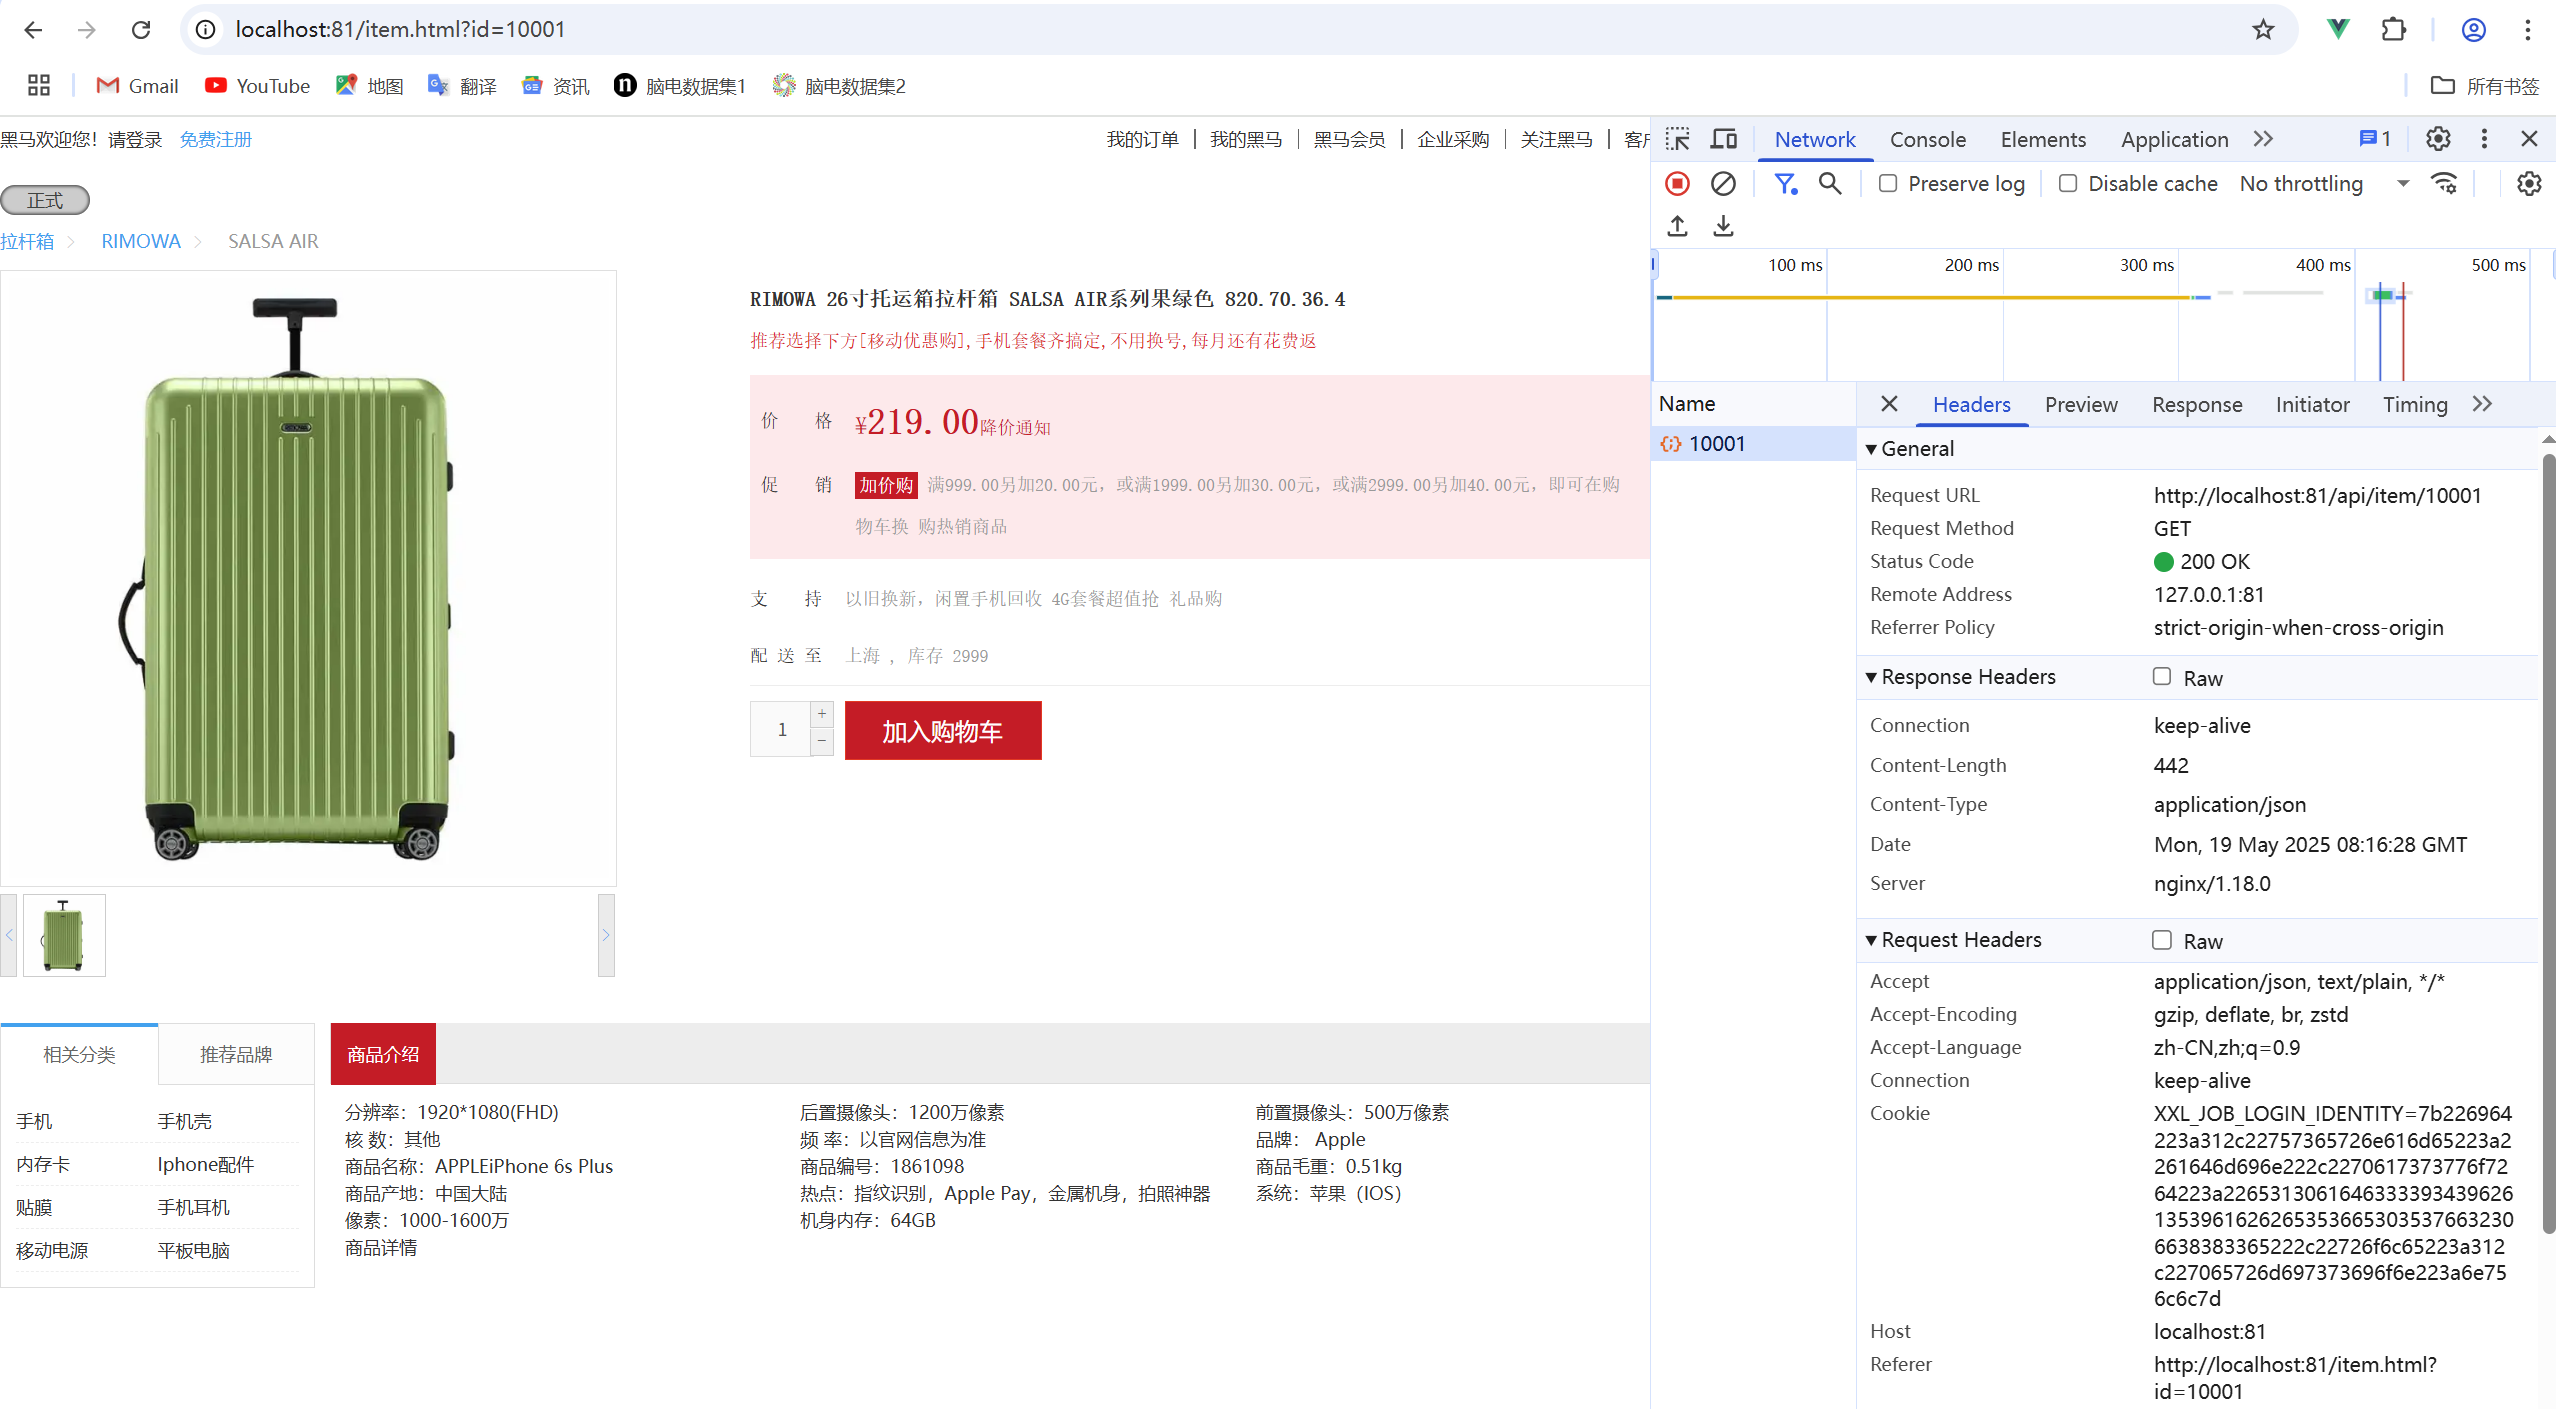
5.3 請求參數處理
OpenResty獲取請求參數
OpenResty提供了各種API用來獲取不同類型的請求參數:
| 參數個數 | 參數示例 | 參數解析代碼示例 |
| 路徑占位符 | /item/1001 | 1. 正則表達式匹配 location ~?/item/(\d+) { ? ? ? ? content_by_lua_file lua/item.lua } 2. 匹配到的參數會存入ngx.var數組中 -- 可以用角標獲取 local id = ngx.var[1] |
| 請求頭 | id:1001 | -- 獲取請求頭,返回值是table類型 local headers = ngx.get_headers() |
| Get請求參數 | ?id=1001 | -- 獲取GET請求參數,返回值是table類型 local getParams = ngx.req.get_uri_args() |
| Post表單參數 | id=1001 | -- 讀取請求體 ngx.req.read_body() -- 獲取POST表單參數,返回值是table類型 local postParams = ngx.req.get_pos_args() |
| JSON參數 | {"id": 1001} | -- 讀取請求體 ngx.req.read_body() -- 獲取body中的json參數,返回值是string類型 local josnBody = ngx.req.get_body_data() |
案例:獲取請求路徑中的商品id信息,拼接到json結果中返回
在查詢商品信息的請求中,通過路徑占位符的方式,傳遞了商品id到后臺:
需求:在OpenResty中接收這個請求,并獲取路徑中的id信息,拼接到結果的json字符串中返回
①修改nginx.conf
#user  nobody;
worker_processes  1;
error_log  logs/error.log;events {worker_connections  1024;
}http {include       mime.types;default_type  application/octet-stream;sendfile        on;keepalive_timeout  65;# 加載lua 模塊lua_package_path "/usr/local/openresty/lualib/?.lua;;";# 加載c模塊     lua_package_cpath "/usr/local/openresty/lualib/?.so;;";  server {listen       8081;server_name  localhost;location ~ /api/item/(\d+) {# 響應類型,這里返回jsondefault_type application/json;# 響應數據由 lua/item.lua這個文件來決定content_by_lua_file lua/item.lua;}location / {root   html;index  index.html index.htm;}error_page   500 502 503 504  /50x.html;location = /50x.html {root   html;}}
}
②修改item.lua
-- 獲取路徑參數
local id = ngx.var[1]
-- 返回假數據,這里的ngx.say()函數,就是寫數據到Response中
ngx.say('{"id": ' .. id .. ',"name": "SALSA AIR","title": "RIMOWA 26寸托運箱拉桿箱 SALSA AIR系列果綠色 820.70.36.4","price": 21900,"image": "https://m.360buyimg.com/mobilecms/s720x720_jfs/t6934/364/1195375010/84676/e9f2c55f/597ece38N0ddcbc77.jpg!q70.jpg.webp","category": "拉桿箱","brand": "RIMOWA","spec": "","status": 1,"createTime": "2019-04-30T16:00:00.000+00:00","updateTime": "2019-04-30T16:00:00.000+00:00","stock": 2999,"sold": 31290}')
③重新加載配置文件,發起請求
nginx -s reload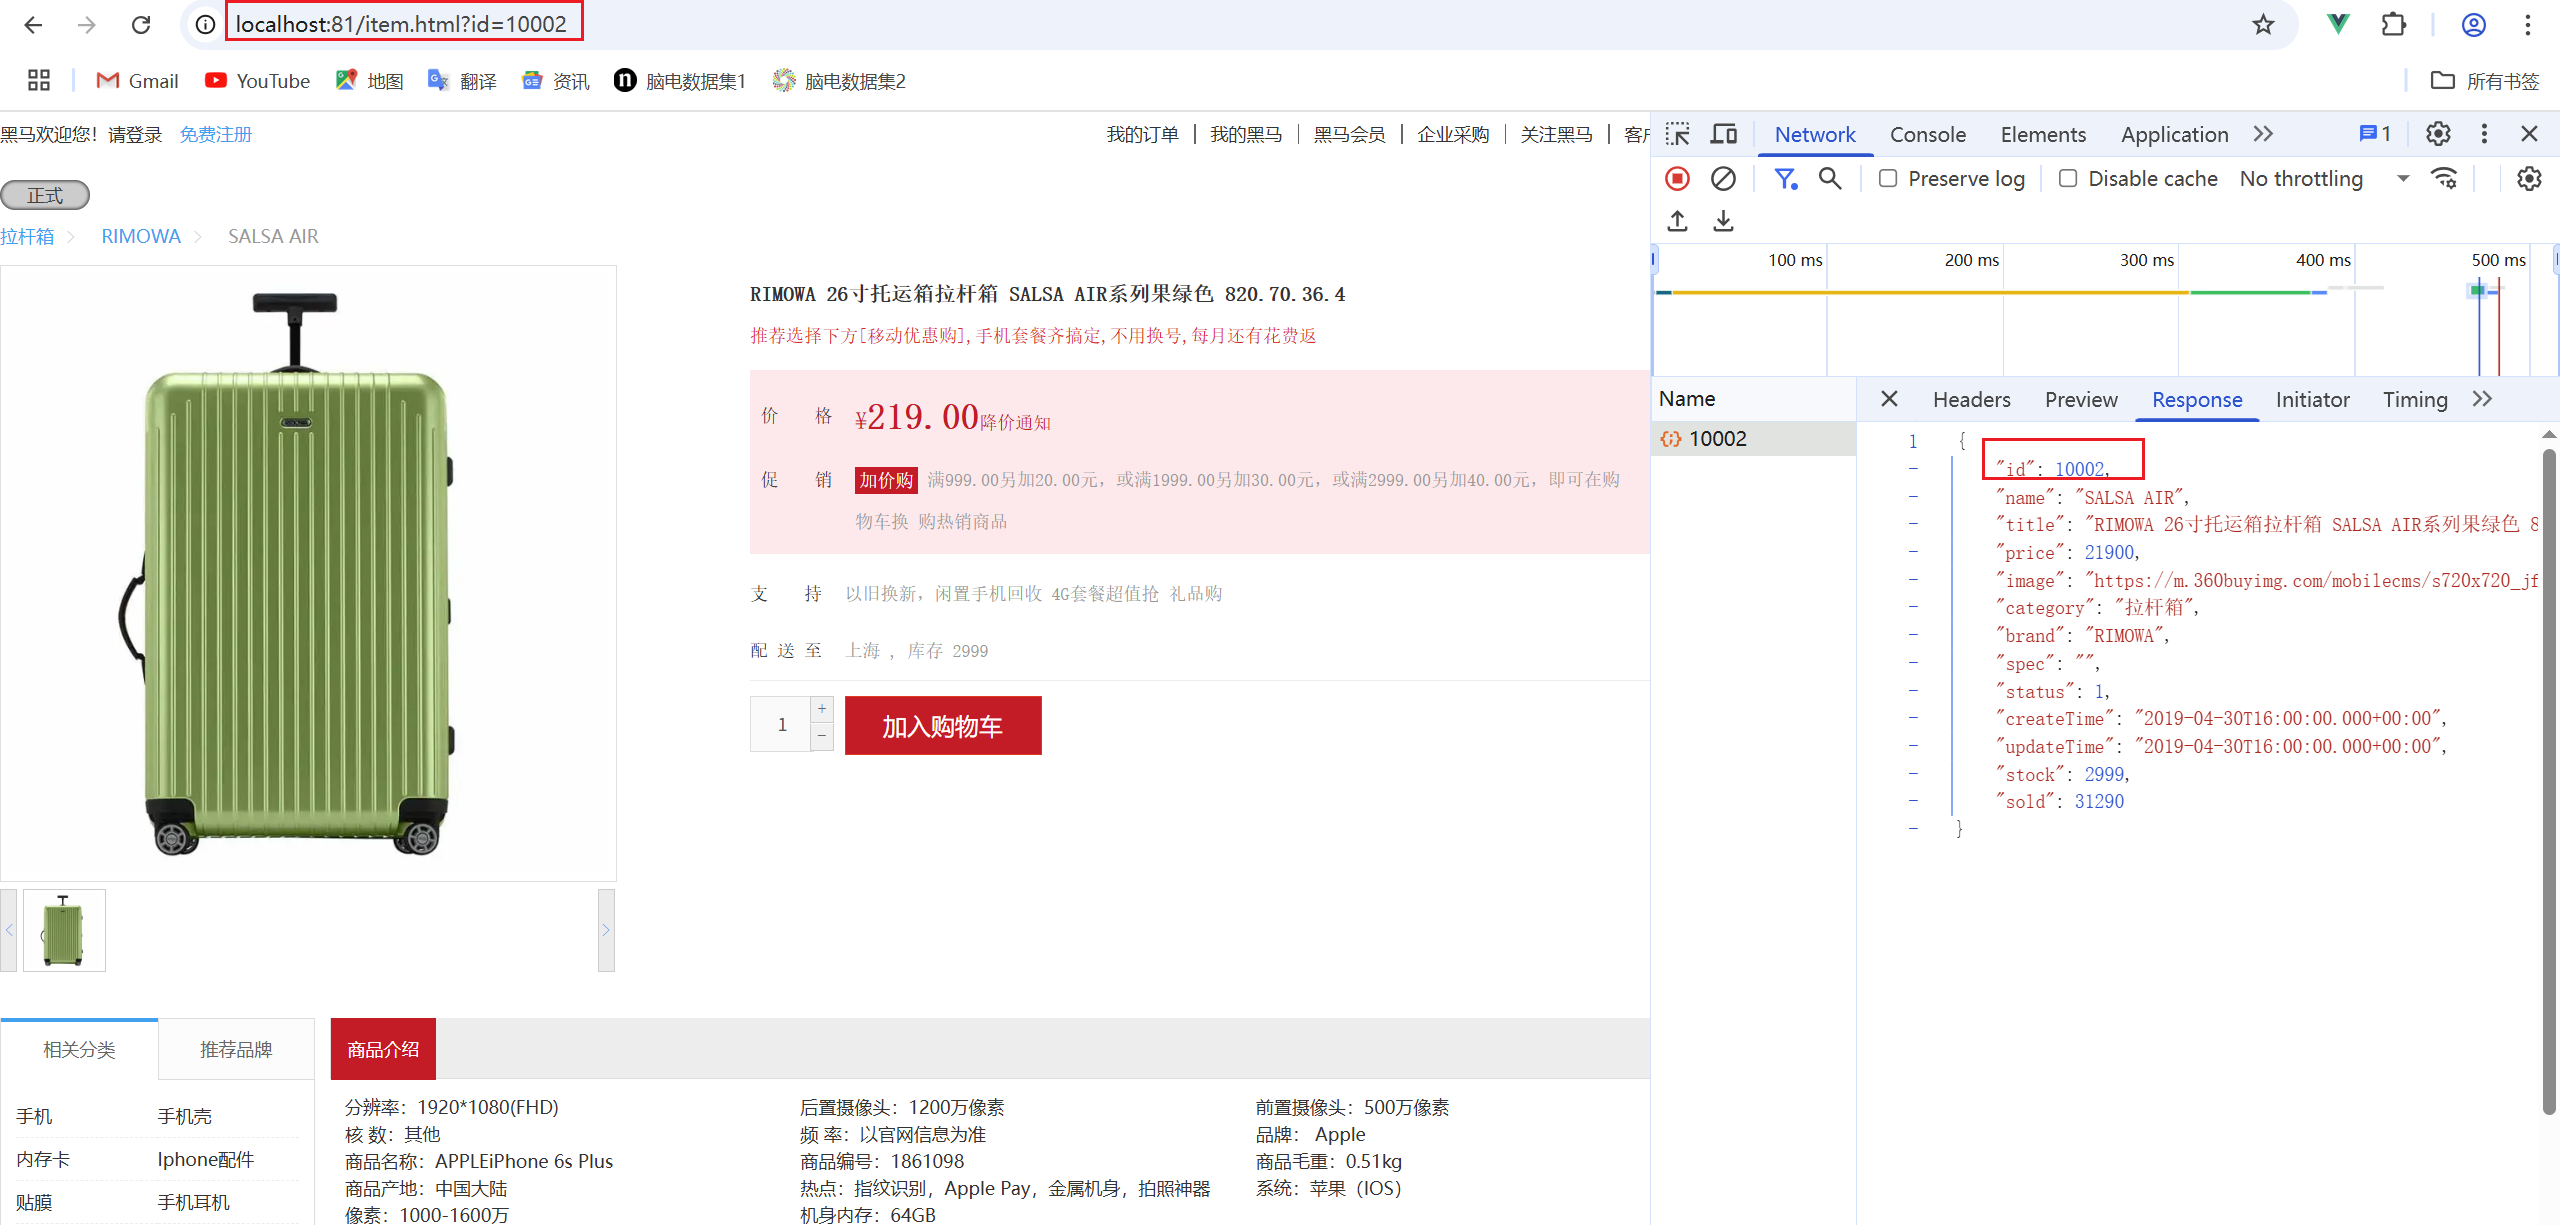
5.4 查詢Tomcat
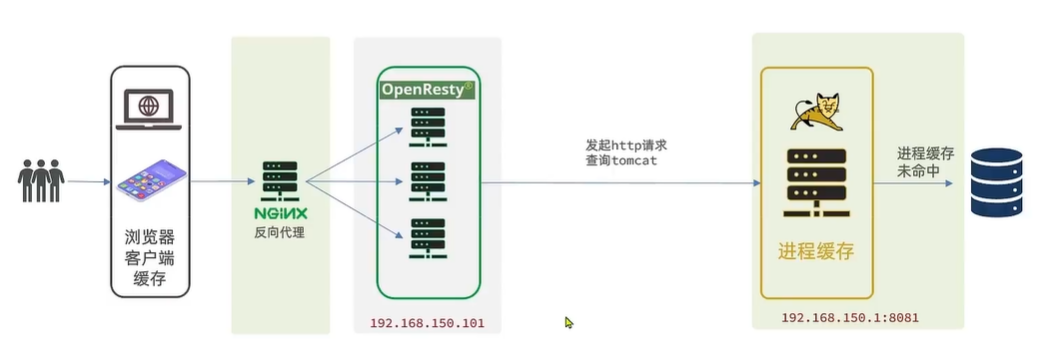
案例:獲取請求路徑中的商品id信息,根據id向Tomcat查詢商品信息
這里要修改item.lua,滿足下面的需求:
- 獲取請求參數中的id
- 根據id向Tomcat服務發送請求,查詢商品信息
- 根據id向Tomcat服務發送請求,查詢庫存信息
- 組裝商品信息、庫存信息,序列化為JSON格式并返回
nginx內部發送http請求
nginx提供了內部API用于發送http請求:
local resp = ngx.location.capture("/path", {method = ngx.HTTP_GET, -- 請求方式args = {a=1,b=2}, -- get方式傳參數body="c=3&d=4" -- post方式傳參數
})
返回的響應內容包括:
- resp.status:響應狀態碼
- resp.header:響應頭,是一個table
- resp.body:響應體,就是響應數據
注意:這里的path是路徑,并不包含IP和端口。這個請求會被nginx內部的server監聽并處理。
但是我們希望這個請求發送到Tomcat服務器,所以需要編寫一個server來對這個路徑做反向代理:
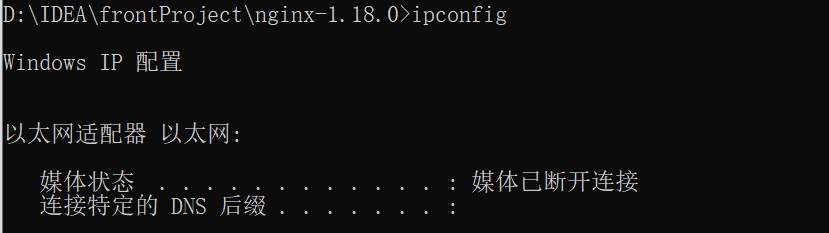
location /path {# 這里是windows電腦的ip和Java服務端口,需要確保windows防火墻處于關閉狀態proxy_pass http://192.168.200.1:8081;windows的IPv4地址可以通過ipconfig命令來查看(如192.168.200.1)
封裝http查詢的函數
我們可以把http查詢的請求封裝為一個函數,放到OpenResty函數庫中,方便后期使用。
①在/usr/local/openresty/lualib目錄下創建common.lua文件:

②在common.lua中封裝http查詢的函數
-- 封裝函數,發送http請求,并解析響應
local function read_http(path, params)local resp = ngx.location.capture(path,{method = ngx.HTTP_GET,args = params,})if not resp then-- 記錄錯誤信息,返回404ngx.log(ngx.ERR, "http not found, path: ", path , ", args: ", args)ngx.exit(404)endreturn resp.body
end
-- 將方法導出
local _M = {  read_http = read_http
}
return _M
JSON結果處理
OpenResty提供了一個cjson的模塊用來處理JSON的序列化和反序列化
官方地址:https://github.com/openresty/lua-cjson/
①引入cjson模塊:
local cjson = require('cjson')②序列化:
local obj = {name = 'jack',age = 21
}
local json = cjson.encode(obj)
③反序列化:
local json = '{"name": "jack", "age": 21}'
-- 反序列化
local obj = cjson.decode(json)
print(obj.name)
③改造item.lua
-- 導入common函數庫
local common = require('common')
local read_http = common.read_http-- 導入cjson庫
local cjson = require('cjson')-- 獲取路徑參數
local id = ngx.var[1]-- 查詢商品信息
local itemJson = read_http("/item/" .. id, nil)-- 查詢庫存信息
local stockJson = read_http("/item/stock/" .. id, nil)-- JSON轉化為lua的table
local item = cjson.decode(itemJson)
local stock = cjson.decode(stockJson)
-- 組合數據
item.stock = stock.stock
item.sold = stock.sold-- 返回假數據,這里的ngx.say()函數,就是寫數據到Response中
ngx.say(cjson.encode(item))
④重新加載配置
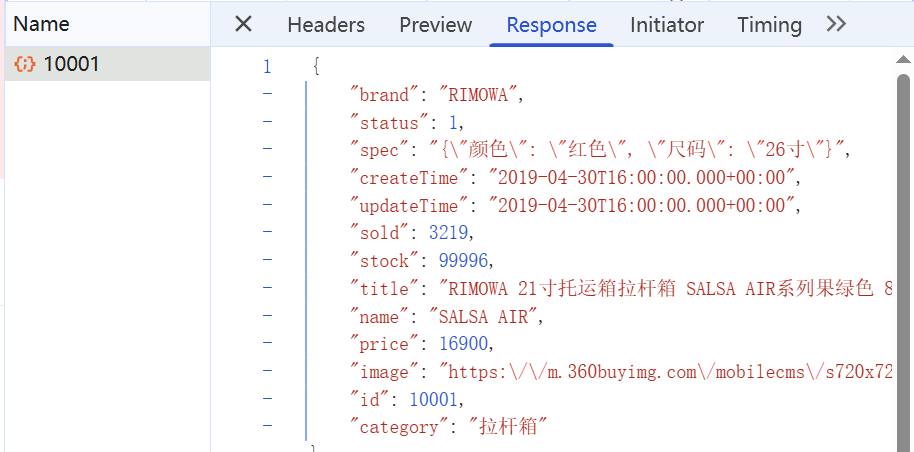
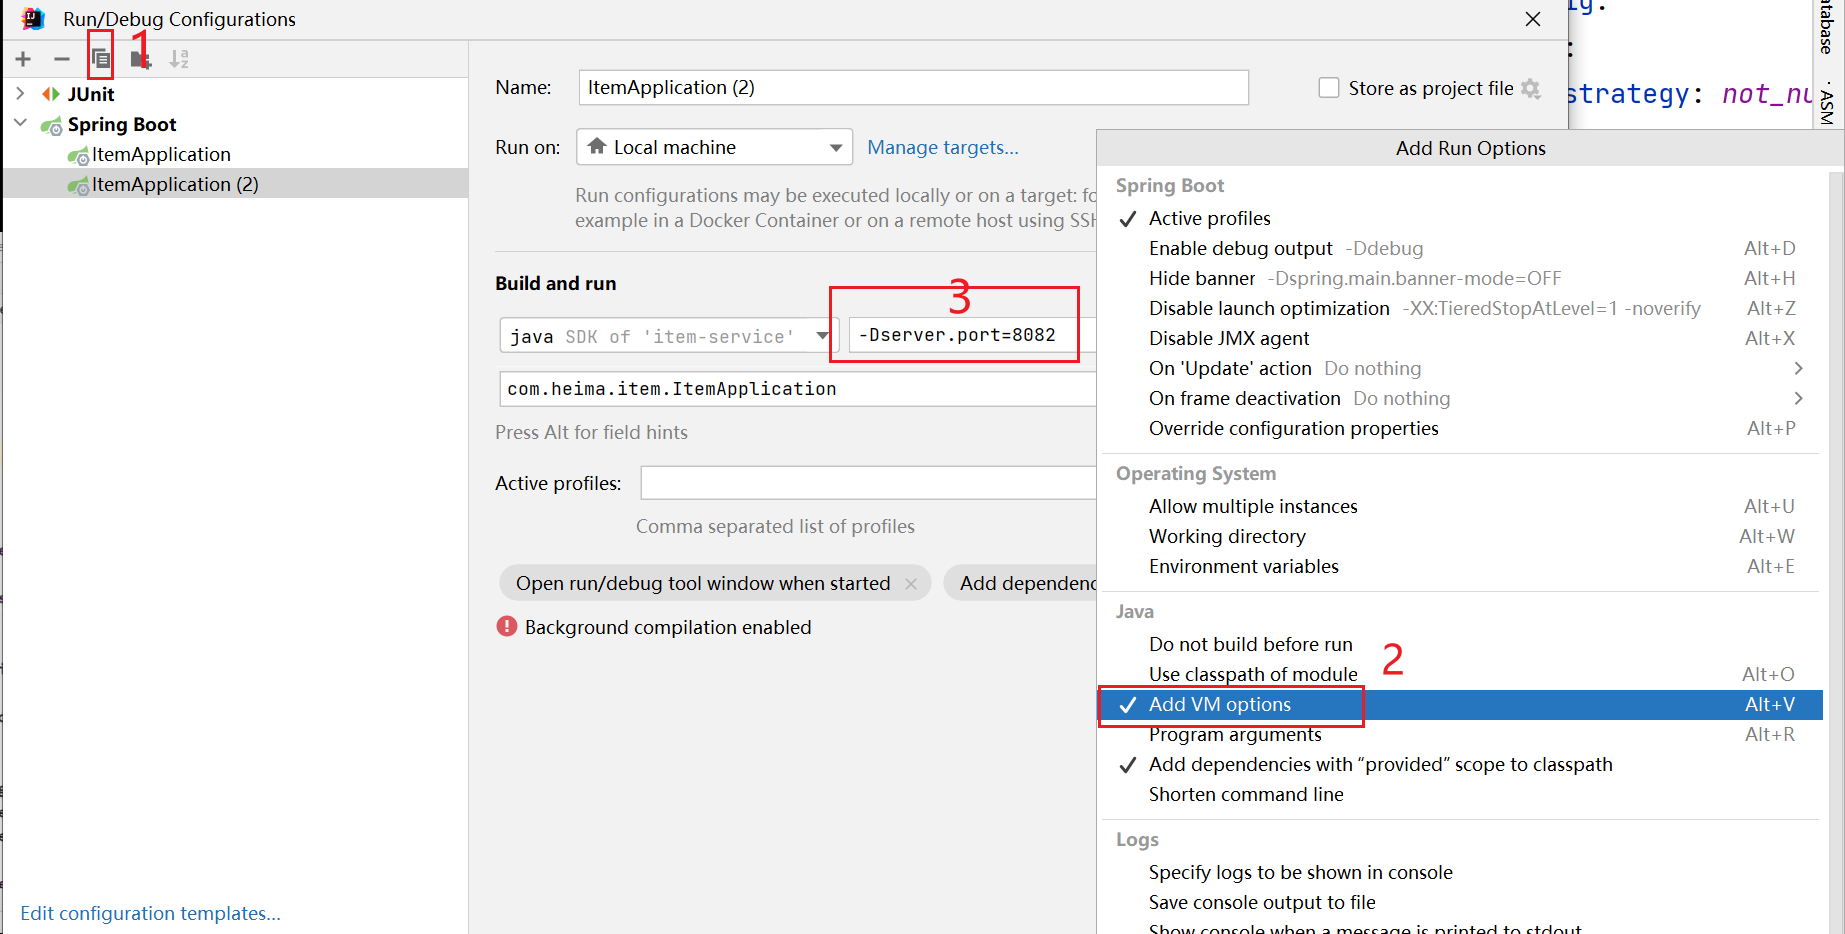
nginx -s reload⑤啟動itemApplication進行測試
Tomcat集群的負載均衡
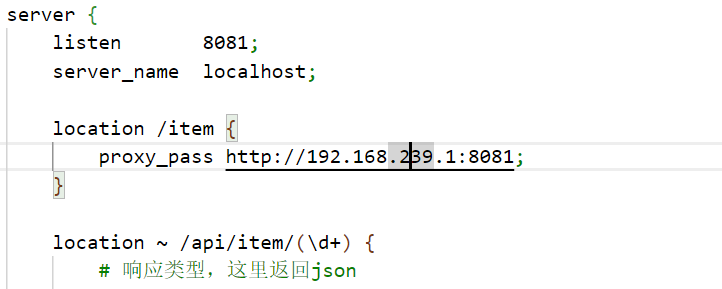
步驟①:修改nginx.conf
#user  nobody;
worker_processes  1;
error_log  logs/error.log;events {worker_connections  1024;
}http {include       mime.types;default_type  application/octet-stream;sendfile        on;keepalive_timeout  65;# 加載lua 模塊lua_package_path "/usr/local/openresty/lualib/?.lua;;";# 加載c模塊     lua_package_cpath "/usr/local/openresty/lualib/?.so;;";  upstream tomcat-cluster {hash $request_uri;server 192.168.239.1:8081;server 192.168.239.1:8081;}server {listen       8081;server_name  localhost;location /item {proxy_pass http://tomcat-cluster;}location ~ /api/item/(\d+) {# 響應類型,這里返回jsondefault_type application/json;# 響應數據由 lua/item.lua這個文件來決定content_by_lua_file lua/item.lua;}location / {root   html;index  index.html index.htm;}error_page   500 502 503 504  /50x.html;location = /50x.html {root   html;}}
}
②重新加載nginx配置
nginx -s reload③啟動兩臺Tomcat進行測試

5.5 Redis緩存預熱
冷啟動與緩存預熱
- 冷啟動:服務剛剛啟動時,Redis中并沒有緩存,如果所有商品數據都在第一次查詢時添加緩存,可能會給數據庫帶來較大壓力
- 緩存預熱:在實際開發中,我們可以利用大數據統計用戶訪問的熱點數據,在項目啟動時將這些熱點數據提前查詢并保存到redis中。
我們數據量較少,可以在啟動時將所有數據都放入緩存中
緩存預熱
步驟①:利用Docker安裝redis
docker run --name redis -p 6379:6379 -d redis redis-server --appendonly yes②在item-service服務中引入Redis依賴 pom.xml
<dependency><groupId>org.springframework.boot</groupId><artifactId>spring-boot-starter-data-redis</artifactId></dependency>③配置Redis地址 application.yml
spring:redis:host: 192.168.200.130④編寫初始化類
package com.heima.item.config;import com.fasterxml.jackson.databind.ObjectMapper;
import com.heima.item.pojo.Item;
import com.heima.item.pojo.ItemStock;
import com.heima.item.service.IItemService;
import com.heima.item.service.IItemStockService;
import org.springframework.beans.factory.InitializingBean;
import org.springframework.beans.factory.annotation.Autowired;
import org.springframework.data.redis.core.StringRedisTemplate;
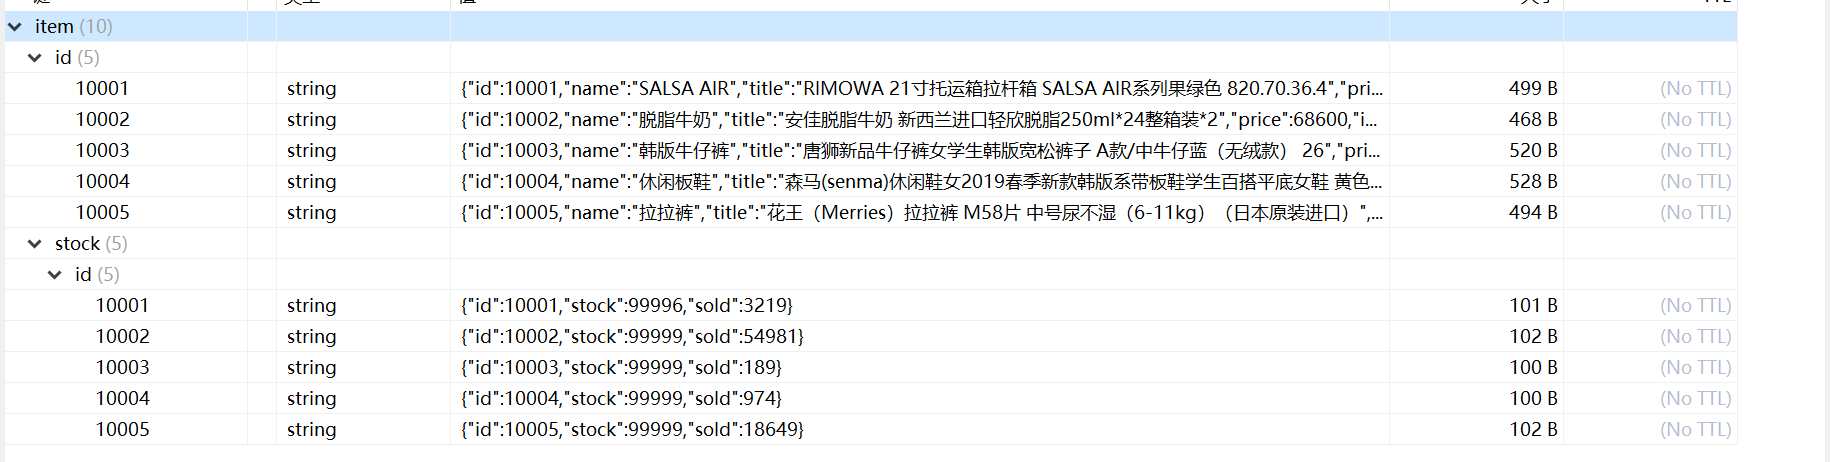
import org.springframework.stereotype.Component;import java.util.List;@Component
public class RedisHandler implements InitializingBean {@Autowiredprivate StringRedisTemplate redisTemplate;@Autowiredprivate IItemService itemService;@Autowiredprivate IItemStockService stockService;private static final ObjectMapper MAPPER = new ObjectMapper();@Overridepublic void afterPropertiesSet() throws Exception {// 初始化緩存// 1. 查詢商品信息List<Item> itemList = itemService.list();// 2. 放入緩存for (Item item : itemList) {// 2.1 item序列化為JSONString json = MAPPER.writeValueAsString(item);// 2.2 存入redisredisTemplate.opsForValue().set("item:id:" + item.getId(), json);}// 3. 查詢商品庫存List<ItemStock> itemStockList = stockService.list();// 4. 放入緩存for (ItemStock stock : itemStockList) {// 4.1 stock序列化為JSONString json = MAPPER.writeValueAsString(stock);// 4.2 存入redisredisTemplate.opsForValue().set("item:stock:id:" + stock.getId(), json);}}
}
⑤啟動ItemApplication

5.6 查詢Redis緩存
OpenResty提供了操作Redis的模塊,我們只要引入該模塊就能直接使用:
①引入Redis模塊,并初始化Redis對象(common.lua)
-- 引入redis模塊
local redis = require("resty.redis")
-- 初始化Redis對象
local red = redis:new()
-- 設置Redis超時時間
red:set_timeouts(1000, 1000, 1000)
②封裝函數,用來釋放Redis連接,其實就是放入連接池
-- 關閉redis連接的工具方法,其實是放入連接池
local function close_redis(red)local pool_max_idle_time = 10000 -- 連接的空閑時間,單位是毫秒local pool_size = 100 --連接池大小local ok, err = red:set_keepalive(pool_max_idle_time, pool_size)if not ok thenngx.log(ngx.ERR, "放入redis連接池失敗: ", err)end
end
③封裝函數,從Redis讀取數據并返回
-- 查詢redis的方法 ip和port是redis地址,key是查詢的key
local function read_redis(ip, port, key)-- 獲取一個連接local ok, err = red:connect(ip, port)if not ok thenngx.log(ngx.ERR, "連接redis失敗 : ", err)return nilend-- 查詢redislocal resp, err = red:get(key)-- 查詢失敗處理if not resp thenngx.log(ngx.ERR, "查詢Redis失敗: ", err, ", key = " , key)end--得到的數據為空處理if resp == ngx.null thenresp = nilngx.log(ngx.ERR, "查詢Redis數據為空, key = ", key)endclose_redis(red)return resp
end
common.lua完整代碼:
-- 封裝函數,發送http請求,并解析響應
local function read_http(path, params)local resp = ngx.location.capture(path,{method = ngx.HTTP_GET,args = params,})if not resp then-- 記錄錯誤信息,返回404ngx.log(ngx.ERR, "http not found, path: ", path , ", args: ", args)ngx.exit(404)endreturn resp.body
end-- 引入redis模塊
local redis = require("resty.redis")
-- 初始化Redis對象
local red = redis:new()
-- 設置Redis超時時間
red:set_timeouts(1000, 1000, 1000)-- 關閉redis連接的工具方法,其實是放入連接池
local function close_redis(red)local pool_max_idle_time = 10000 -- 連接的空閑時間,單位是毫秒local pool_size = 100 --連接池大小local ok, err = red:set_keepalive(pool_max_idle_time, pool_size)if not ok thenngx.log(ngx.ERR, "放入redis連接池失敗: ", err)end
end-- 查詢redis的方法 ip和port是redis地址,key是查詢的key
local function read_redis(ip, port, key)-- 獲取一個連接local ok, err = red:connect(ip, port)if not ok thenngx.log(ngx.ERR, "連接redis失敗 : ", err)return nilend-- 密碼認證(新增部分)local auth_ok, auth_err = red:auth("leadnews")  -- 你的redis密碼if not auth_ok thenngx.log(ngx.ERR, "Redis認證失敗: ", auth_err)return nilend-- 查詢redislocal resp, err = red:get(key)-- 查詢失敗處理if not resp thenngx.log(ngx.ERR, "查詢Redis失敗: ", err, ", key = " , key)end--得到的數據為空處理if resp == ngx.null thenresp = nilngx.log(ngx.ERR, "查詢Redis數據為空, key = ", key)endclose_redis(red)return resp
end-- 將方法導出
local _M = {  read_http = read_http,read_redis = read_redis
}
return _M
案例:查詢商品時,優先Redis緩存查詢
需求:
- 修改item.lua,封裝一個函數read_data,實現先查詢Redis,如果未命中,再查詢tomcat
- 修改item.lua,查詢商品和庫存時都調用read_data這個函數
①修改item.lua
-- 導入common函數庫
local common = require('common')
local read_http = common.read_http
local read_redis = common.read_redis-- 導入cjson庫
local cjson = require('cjson')-- 封裝函數,先查詢redis,再查詢tomcat
function read_data(key, path, params) -- 查詢redislocal resp = read_redis("127.0.0.1", 6379, key)-- 判斷redis是否命中if not resp thenngx.log(ngx.ERR, "redis查詢失敗,嘗試查詢tomcat,key: ", key)-- redis查詢失敗,查詢tomcatresp = read_http(path, params)endreturn resp
end-- 獲取路徑參數
local id = ngx.var[1]-- 查詢商品信息
local itemJson = read_data("item:id:" .. id, "/item/" .. id, nil)-- 查詢庫存信息
local stockJson = read_data("item:stock:id:" .. id, "/item/stock/" .. id, nil)-- JSON轉化為lua的table
local item = cjson.decode(itemJson)
local stock = cjson.decode(stockJson)
-- 組合數據
item.stock = stock.stock
item.sold = stock.sold-- 返回假數據,這里的ngx.say()函數,就是寫數據到Response中
ngx.say(cjson.encode(item))
重新加載nginx配置
nginx -s reload②停掉ItemApplication和ItemApplication(2),測試還能訪問到數據
5.7 Nginx本地緩存
案例:在查詢商品時,優先查詢OpenResty的本地緩存
需求:
- 修改item.lua中的read_data函數,優先查詢本地緩存,未命中時再查詢Redis、Tomcat
- 查詢Redis或Tomcat成功后,將數據寫入本地緩存,并設置有效期
- 商品基本信息,有效期30分鐘
- 庫存信息,有效期1分鐘
OpenResty為nginx提供了shard dict的功能,可以在nginx的多個worker之間共享數據,實現緩存功能。
①開啟共享字典,在nginx.conf的http下添加配置:
# 共享字典,也就是本地緩存,名稱叫做:item_cache,大小150m
lua_shared_dict item_cache 150m;?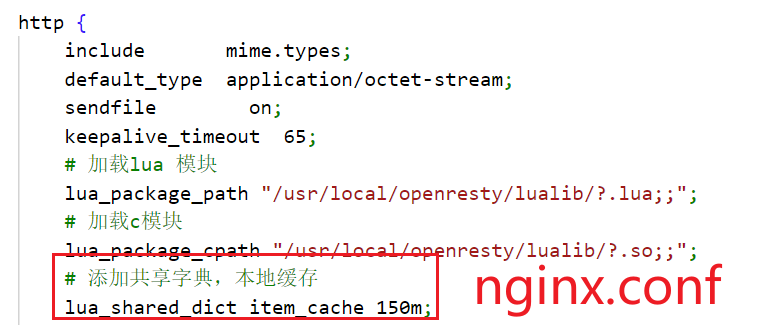
②操作共享字典:item.lua
-- 導入common函數庫
local common = require('common')
local read_http = common.read_http
local read_redis = common.read_redis-- 導入cjson庫
local cjson = require('cjson')
-- 導入共享字典,本地緩存
local item_cache = ngx.shared.item_cache-- 封裝函數,先查詢redis,再查詢tomcat
function read_data(key, expire, path, params) -- 查詢本地緩存local val = item_cache:get(key)if not val thenngx.log(ngx.ERR, "本地緩存查詢失敗,嘗試查詢redis,key: ", key)-- 查詢redisval = read_redis("127.0.0.1", 6379, key)-- 判斷redis是否命中if not val thenngx.log(ngx.ERR, "redis查詢失敗,嘗試查詢tomcat,key: ", key)-- redis查詢失敗,查詢tomcatval = read_http(path, params)endend-- 查詢成功,把數據寫入本地緩存item_cache:set(key, val, expire)-- 返回數據return val
end-- 獲取路徑參數
local id = ngx.var[1]-- 查詢商品信息
local itemJson = read_data("item:id:" .. id, 1800, "/item/" .. id, nil)-- 查詢庫存信息
local stockJson = read_data("item:stock:id:" .. id, 60, "/item/stock/" .. id, nil)-- JSON轉化為lua的table
local item = cjson.decode(itemJson)
local stock = cjson.decode(stockJson)
-- 組合數據
item.stock = stock.stock
item.sold = stock.sold-- 返回假數據,這里的ngx.say()函數,就是寫數據到Response中
ngx.say(cjson.encode(item))
③重新加載配置,進行測試
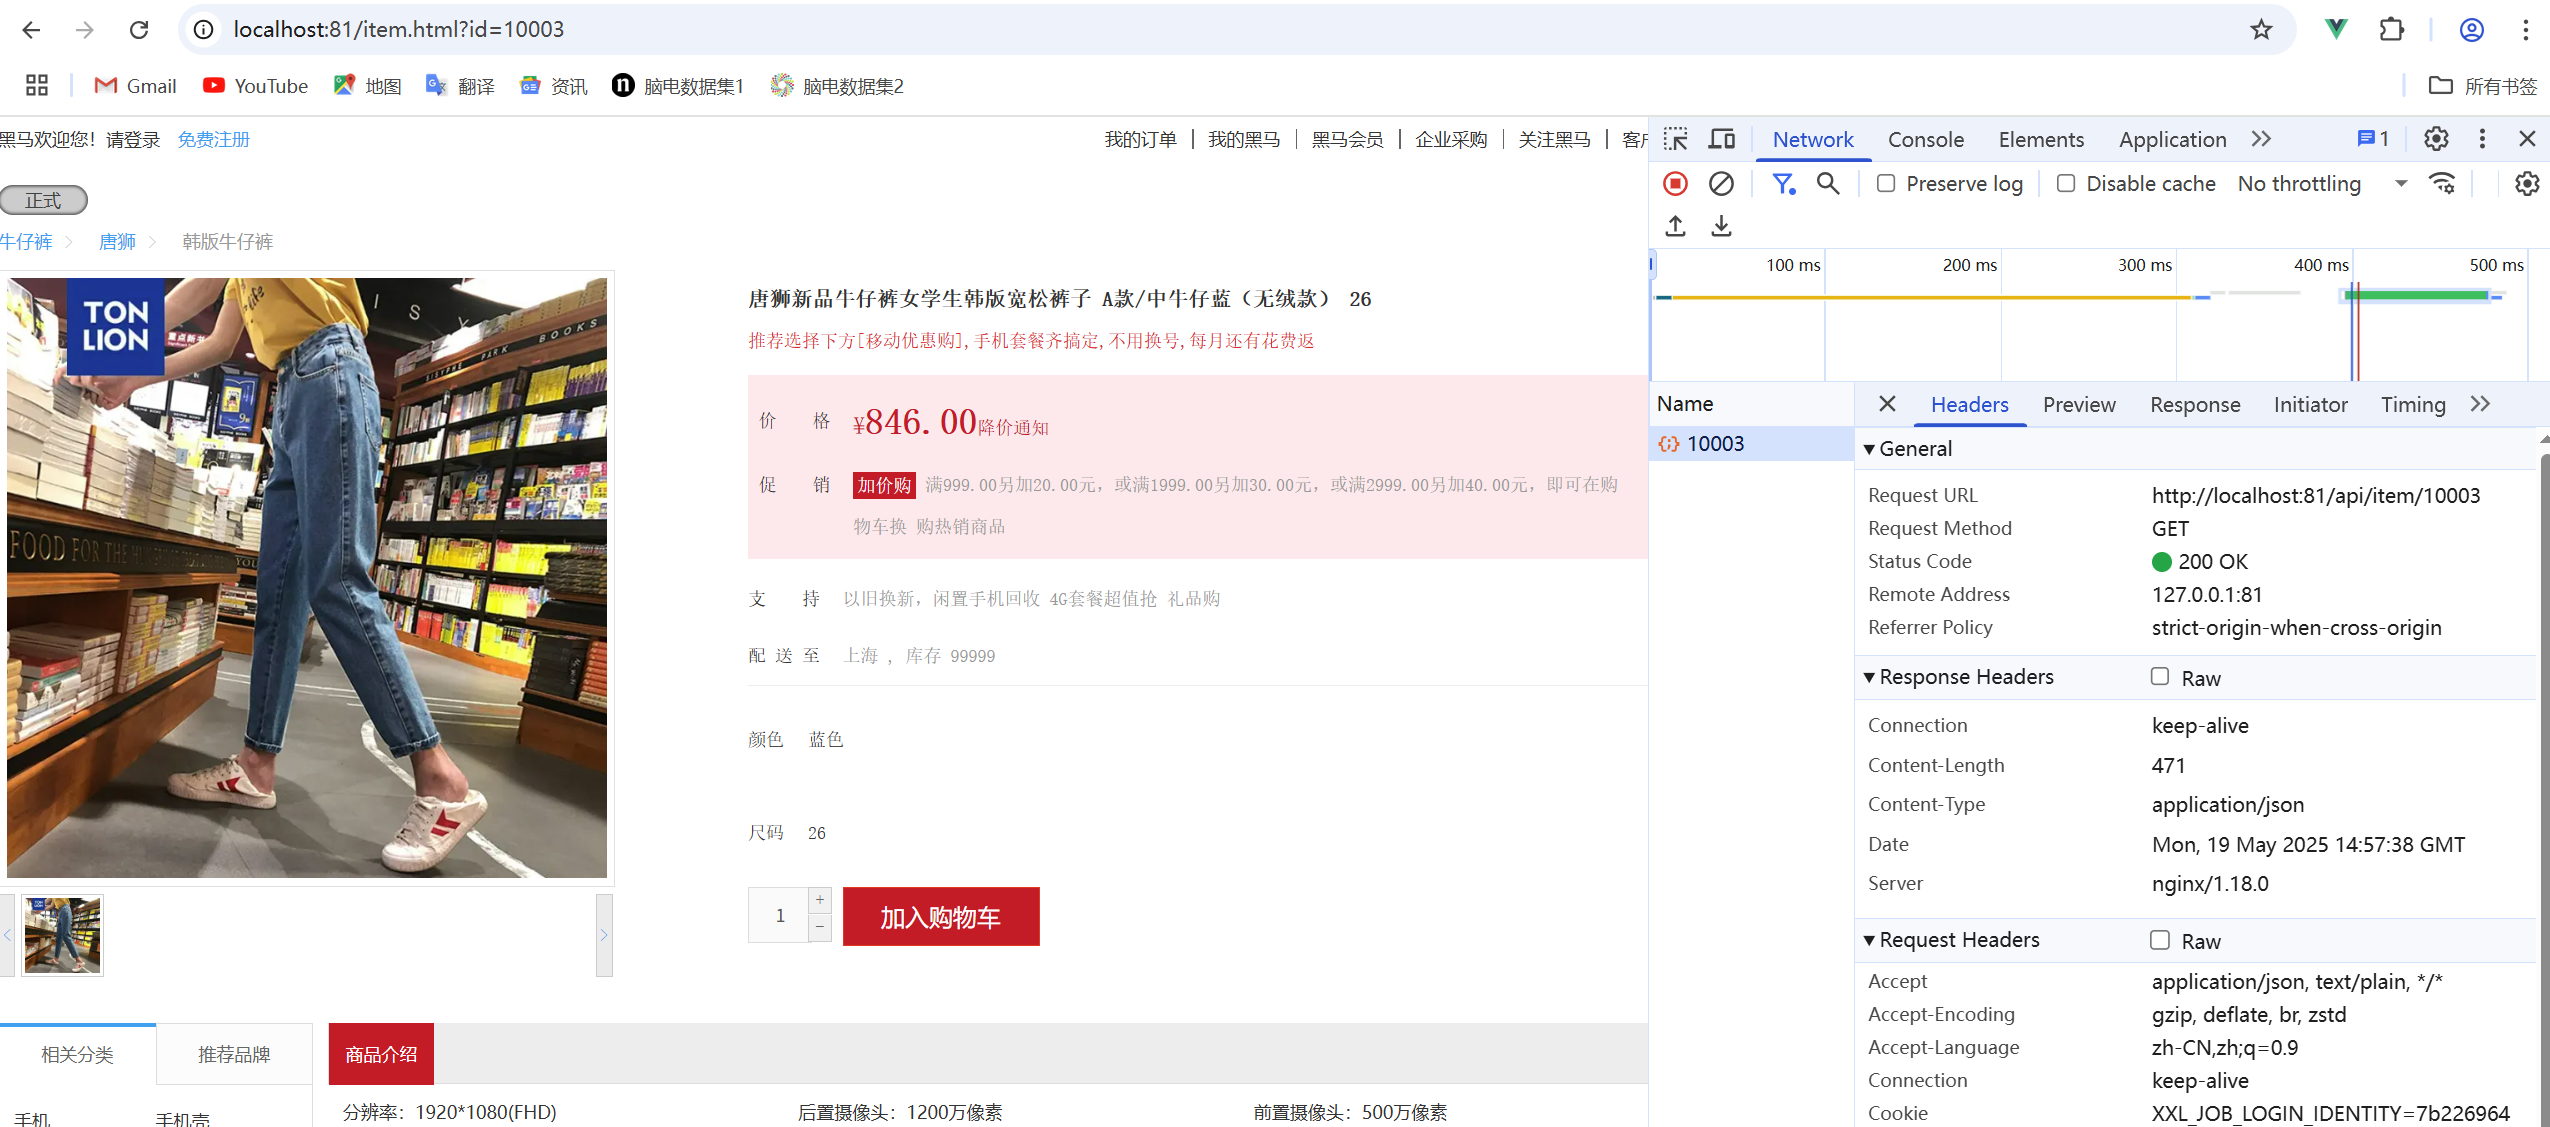
nginx -s reload查看日志
[root@itcast ~]# cd /usr/local/openresty/nginx/logs/
[root@itcast logs]# tail -f error.log
訪問:http://localhost:81/item.html?id=10003

6. 緩存同步
6.1 數據同步策略
緩存數據同步的常見方式有三種:
- 設置有效期:給緩存設置有效期,到期后自動刪除。再次查詢時更新緩存
- 優勢:簡單、方便
- 缺點:時效性差,緩存過期之前可能不一致
- 場景:更新頻率較低,時效性要求低的業務
- 同步雙寫:在修改數據庫的同時,直接修改緩存
- 優勢:時效性強,緩存與數據庫強一致
- 缺點:有代碼侵入,耦合度高
- 場景:對一致性、時效性要求較高的緩存數據
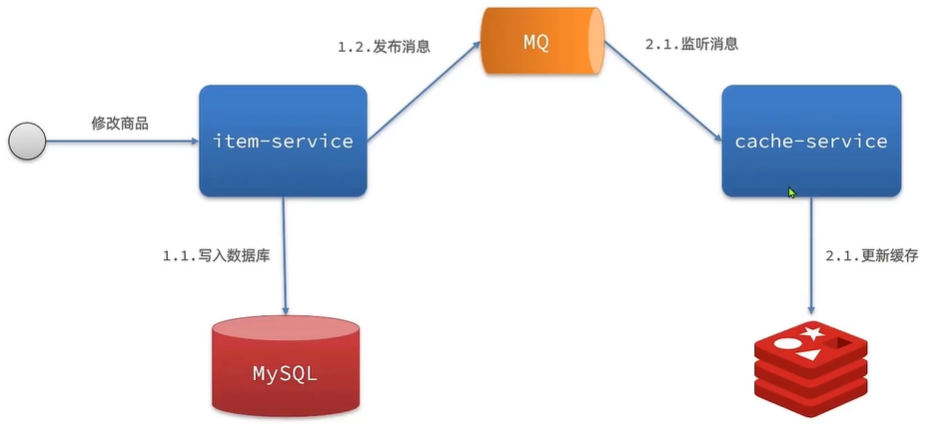
- 異步通知:修改數據庫時發送事件通知,相關服務監聽到通知后修改緩存數據
- 優勢:低耦合,可以同時通知多個緩存服務
- 缺點:時效性一般,可能存在中間不一致狀態
- 場景:時效性要求一般,有多個服務需要同步
基于MQ的異步通知
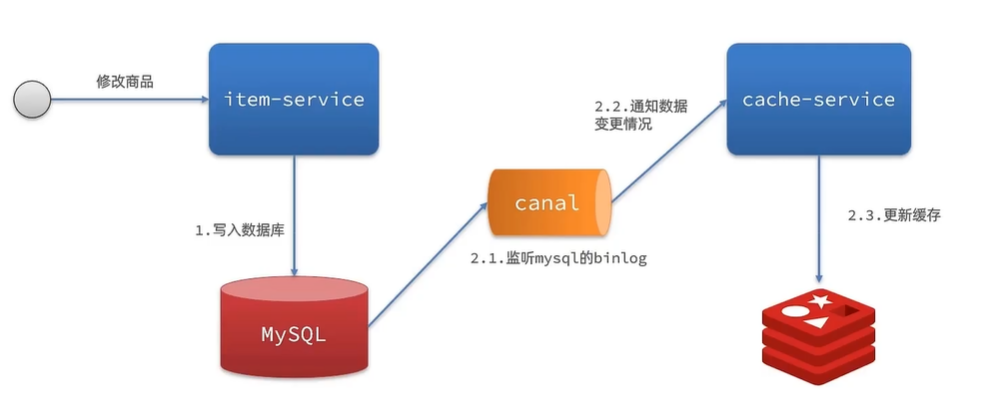
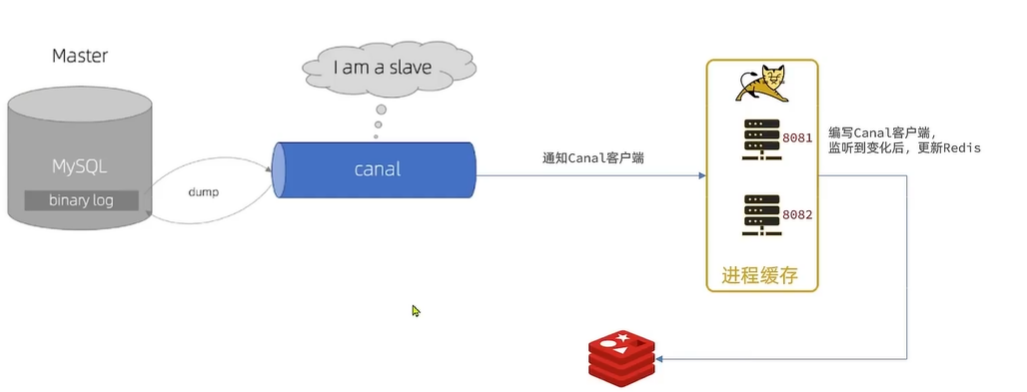
基于Canal的異步通知
6.2 安裝Canal
初識Canal
Canal,譯意為管道/水道/溝渠,是阿里巴巴旗下的一款開源項目,基于Java開發。基于數據庫增量日志解析,提供增量數據訂閱&消費。
Github的地址:GitHub - alibaba/canal: 阿里巴巴 MySQL binlog 增量訂閱&消費組件
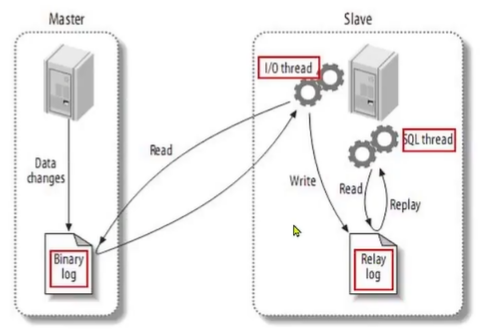
Canal是基于mysql的主從同步來實現的,MySQL主從同步的原理如下:
- MySQL master將數據變更寫入二進制日志(binary log),其中記錄的數據叫作binary log events
- MySQL slave將master的binary log events拷貝到它的中繼日志(relay log)
- MySQL slave重放relay log中事件,將數據變更反映它自己的數據
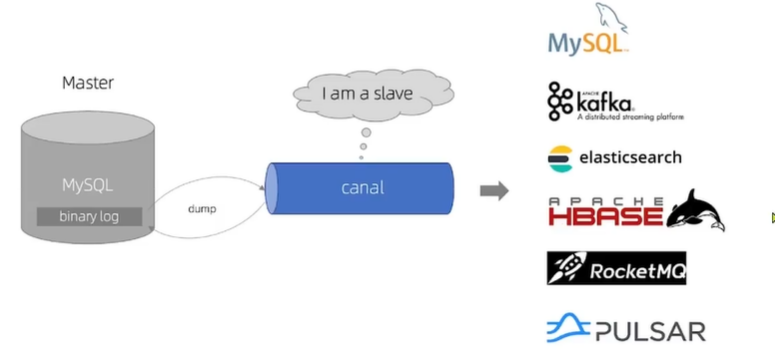
Canal就是把自己偽裝成MySQL的一個slave節點,從而監聽master的binary log變化。再把得到的變化信息通知給Canal的客戶端,進而完成對其他數據庫的同步。
安裝和配置Canal
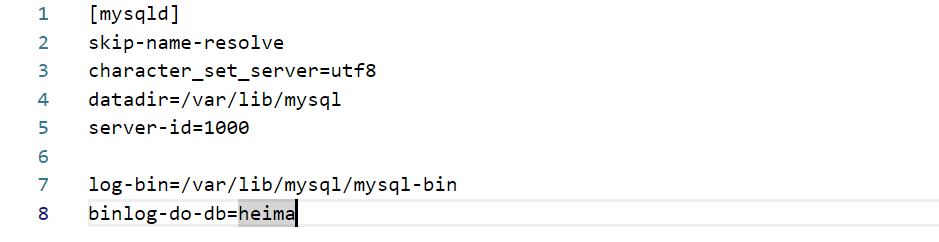
步驟①:打開mysql容器掛載的日志文件,我的在/tmp/mysql/conf目錄下,修改my.cnf文件,添加如下內容
log-bin=/var/lib/mysql/mysql-bin
binlog-do-db=heima- log-bin=/var/lib/mysql/mysql-bin:設置binary log文件的存放地址和文件名,叫作mysql-bin
- binlog-do-db=heima:指定對哪個database記錄binary log events,這里記錄heima這個庫
②設置用戶權限
添加一個僅用于數據同步的賬戶,出于安全考慮,僅提供對heima這個庫的操作權限:
create user canal@'%' IDENTIFIED by 'canal';
GRANT SELECT, REPLICATION SLAVE, REPLICATION CLIENT,SUPER ON *.* TO 'canal'@'%' identified by 'canal';
FLUSH PRIVILEGES;
重啟mysql容器
docker restart mysql測試設置是否成功:在mysql控制臺或者Navicat中,輸入命令:
show master status;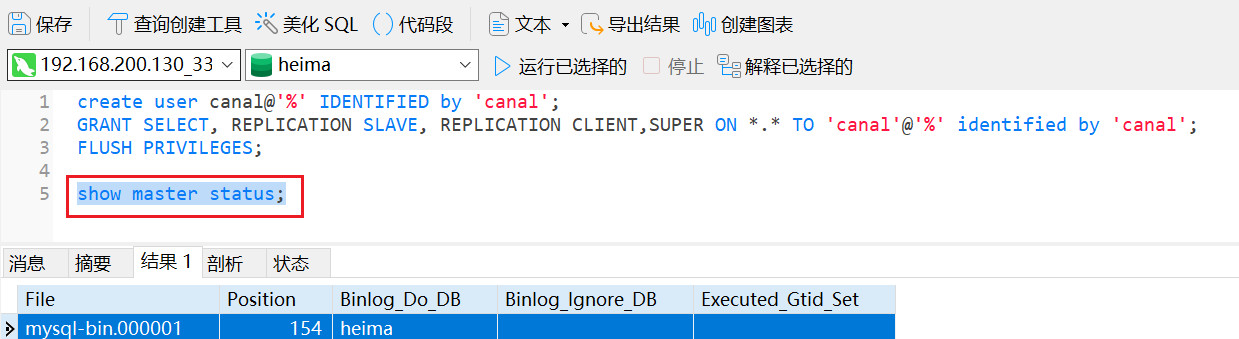
③安裝Canal
創建一個網絡,將MySQL、Canal、MQ放到同一個Docker網絡中:
docker network create heima
讓mysql加入這個網絡:
docker network connect heima mysql④安裝Canal
將課前資料提供的Canal鏡像壓縮包上傳至虛擬機:
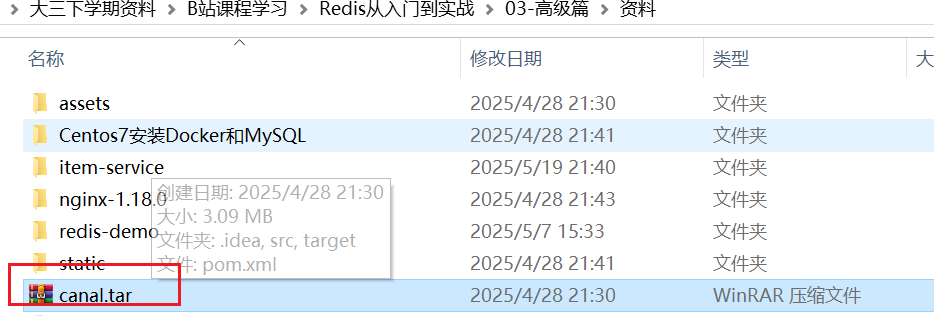
通過下面的命令導入:
docker load -i canal.tar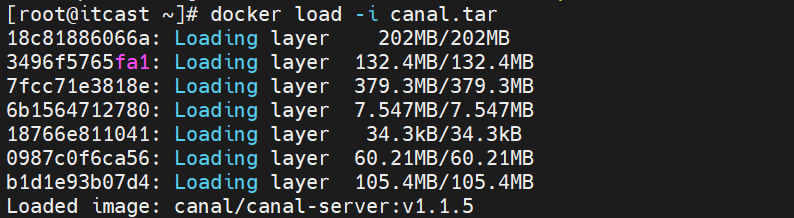
然后運行命令創建Canal容器:
docker run -p 11111:11111 --name canal \
-e canal.destinations=heima \
-e canal.instance.master.address=mysql:3306  \
-e canal.instance.dbUsername=canal  \
-e canal.instance.dbPassword=canal  \
-e canal.instance.connectionCharset=UTF-8 \
-e canal.instance.tsdb.enable=true \
-e canal.instance.gtidon=false  \
-e canal.instance.filter.regex=heima\\..* \
--network heima \
-d canal/canal-server:v1.1.5
說明:
- -p 11111:11111:這是canal的默認監聽端口
- -e canal.instance.master.address=mysql:3306:數據庫地址和端口,如果不知道mysql容器地址,可以通過docker inspect 容器id來查看
- -e canal.instance.dbUsername=canal:數據庫用戶名
- -e canal.instance.dbPassword=canal:數據庫密碼
- -e canal.instance.filter.regex=:要監聽的表名稱
⑤查看canal的日志:
docker logs -f canal
docker exec -it canal bash
tail -f canal-server/logs/canal/canal.log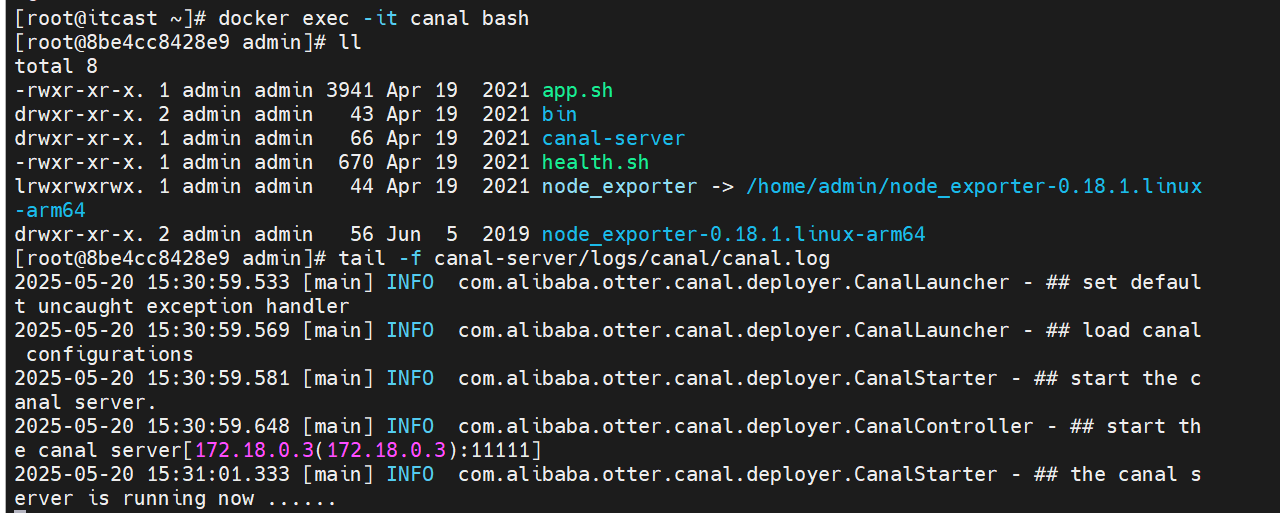
tail -f canal-server/logs/heima/heima.log

6.3 監聽Canal
Canal客戶端
Canal提供了各種語言的客戶端,當Canal監聽到binlog變化時,會通知Canal的客戶端。不過這里我們會使用Github上的第三方開源的canal-starter。
地址:GitHub - NormanGyllenhaal/canal-client: spring boot canal starter 易用的canal 客戶端 canal client
步驟①:引入依賴 pom.xml
<dependency><groupId>top.javatool</groupId><artifactId>canal-spring-boot-starter</artifactId><version>1.2.1-RELEASE</version></dependency>②編寫配置 application.yml
canal:destination: heima # canal實例名稱,要跟canal-server運行時設置的destination一致server: 192.168.200.130:11111 # canal地址③編寫監聽器,監聽Canal消息
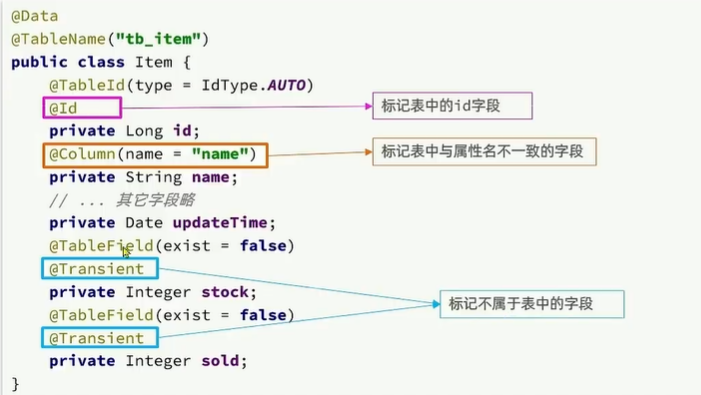
Canal推送給canal-client的是被修改的這一行數據(row),而我們引入的canal-client則會幫我們把行數據封裝到Item實體類中。這個過程中需要知道數據庫與實體的映射關系,要用到JPA的幾個注解:
package com.heima.item.pojo;import com.baomidou.mybatisplus.annotation.IdType;
import com.baomidou.mybatisplus.annotation.TableField;
import com.baomidou.mybatisplus.annotation.TableId;
import com.baomidou.mybatisplus.annotation.TableName;
import lombok.Data;
import org.springframework.data.annotation.Id;
import org.springframework.data.annotation.Transient;import javax.persistence.Column;
import java.util.Date;@Data
@TableName("tb_item")
public class Item {@TableId(type = IdType.AUTO)@Idprivate Long id;//商品id@Column(name = "name")private String name;//商品名稱private String title;//商品標題private Long price;//價格(分)private String image;//商品圖片private String category;//分類名稱private String brand;//品牌名稱private String spec;//規格private Integer status;//商品狀態 1-正常,2-下架private Date createTime;//創建時間private Date updateTime;//更新時間@TableField(exist = false)@Transientprivate Integer stock;@TableField(exist = false)@Transientprivate Integer sold;
}
④在RedisHandler新增兩個方法
package com.heima.item.config;import com.fasterxml.jackson.core.JsonProcessingException;
import com.fasterxml.jackson.databind.ObjectMapper;
import com.heima.item.pojo.Item;
import com.heima.item.pojo.ItemStock;
import com.heima.item.service.IItemService;
import com.heima.item.service.IItemStockService;
import org.springframework.beans.factory.InitializingBean;
import org.springframework.beans.factory.annotation.Autowired;
import org.springframework.data.redis.core.StringRedisTemplate;
import org.springframework.stereotype.Component;import java.util.List;@Component
public class RedisHandler implements InitializingBean {@Autowiredprivate StringRedisTemplate redisTemplate;@Autowiredprivate IItemService itemService;@Autowiredprivate IItemStockService stockService;private static final ObjectMapper MAPPER = new ObjectMapper();@Overridepublic void afterPropertiesSet() throws Exception {// 初始化緩存// 1. 查詢商品信息List<Item> itemList = itemService.list();// 2. 放入緩存for (Item item : itemList) {// 2.1 item序列化為JSONString json = MAPPER.writeValueAsString(item);// 2.2 存入redisredisTemplate.opsForValue().set("item:id:" + item.getId(), json);}// 3. 查詢商品庫存List<ItemStock> itemStockList = stockService.list();// 4. 放入緩存for (ItemStock stock : itemStockList) {// 4.1 stock序列化為JSONString json = MAPPER.writeValueAsString(stock);// 4.2 存入redisredisTemplate.opsForValue().set("item:stock:id:" + stock.getId(), json);}}/*** 新增保存* @param item*/public void saveItem(Item item) {try {// 1. item序列化為JSONString json = MAPPER.writeValueAsString(item);// 2. 存入redisredisTemplate.opsForValue().set("item:id:" + item.getId(), json);} catch (JsonProcessingException e) {throw new RuntimeException(e);}}/*** 刪除* @param id*/public void deleteItemById(Long id) {redisTemplate.delete("item:id:" + id);}
}
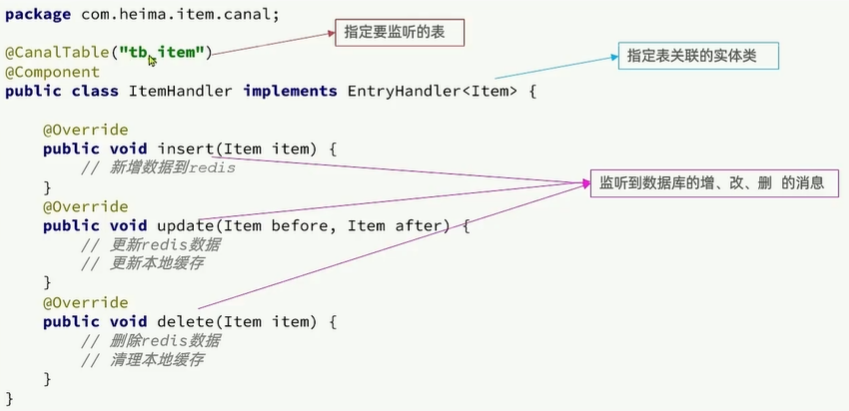
⑤新增ItemHandler
package com.heima.item.canal;import com.github.benmanes.caffeine.cache.Cache;
import com.heima.item.config.RedisHandler;
import com.heima.item.pojo.Item;
import org.springframework.beans.factory.annotation.Autowired;
import org.springframework.stereotype.Component;
import top.javatool.canal.client.annotation.CanalTable;
import top.javatool.canal.client.handler.EntryHandler;@CanalTable("tb_item")
@Component
public class ItemHandler implements EntryHandler<Item> {@Autowiredprivate RedisHandler redisHandler;@Autowiredprivate Cache<Long, Item> itemCache;@Overridepublic void insert(Item item) {// 寫數據到JVM進程緩存itemCache.put(item.getId(), item);// 新增數據到RedisredisHandler.saveItem(item);}@Overridepublic void update(Item before, Item after) {// 更新JVM本地緩存itemCache.put(after.getId(), after);// 更新redis數據redisHandler.saveItem(after);}@Overridepublic void delete(Item item) {// 清理JVM本地緩存itemCache.invalidate(item.getId());// 刪除redis數據redisHandler.deleteItemById(item.getId());}
}
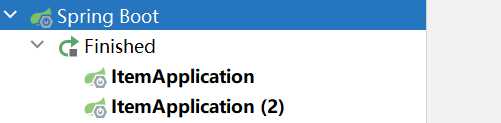
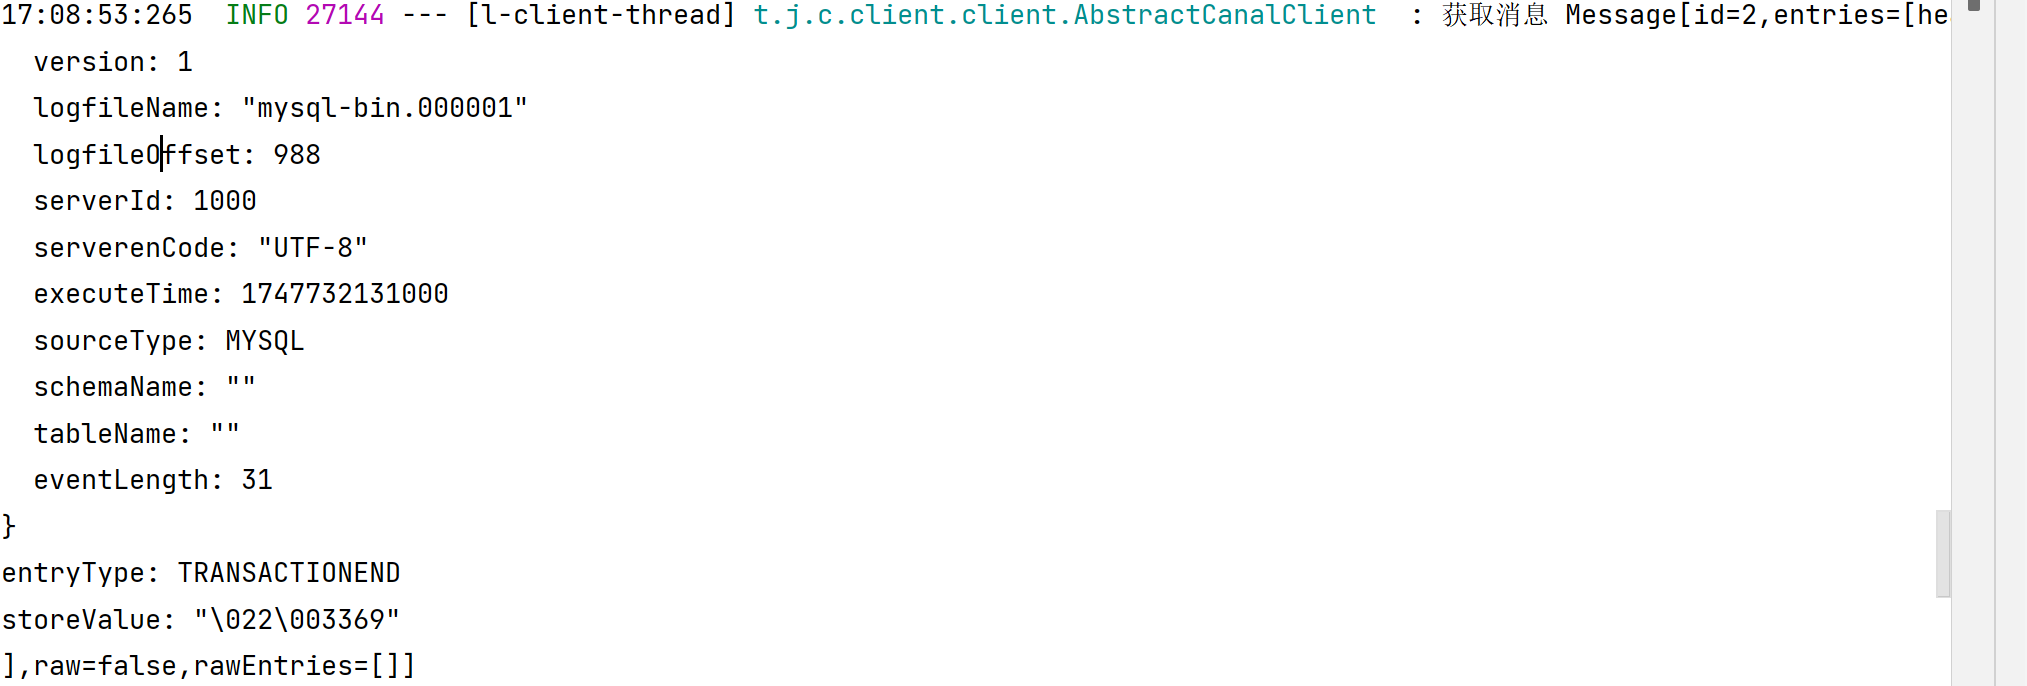
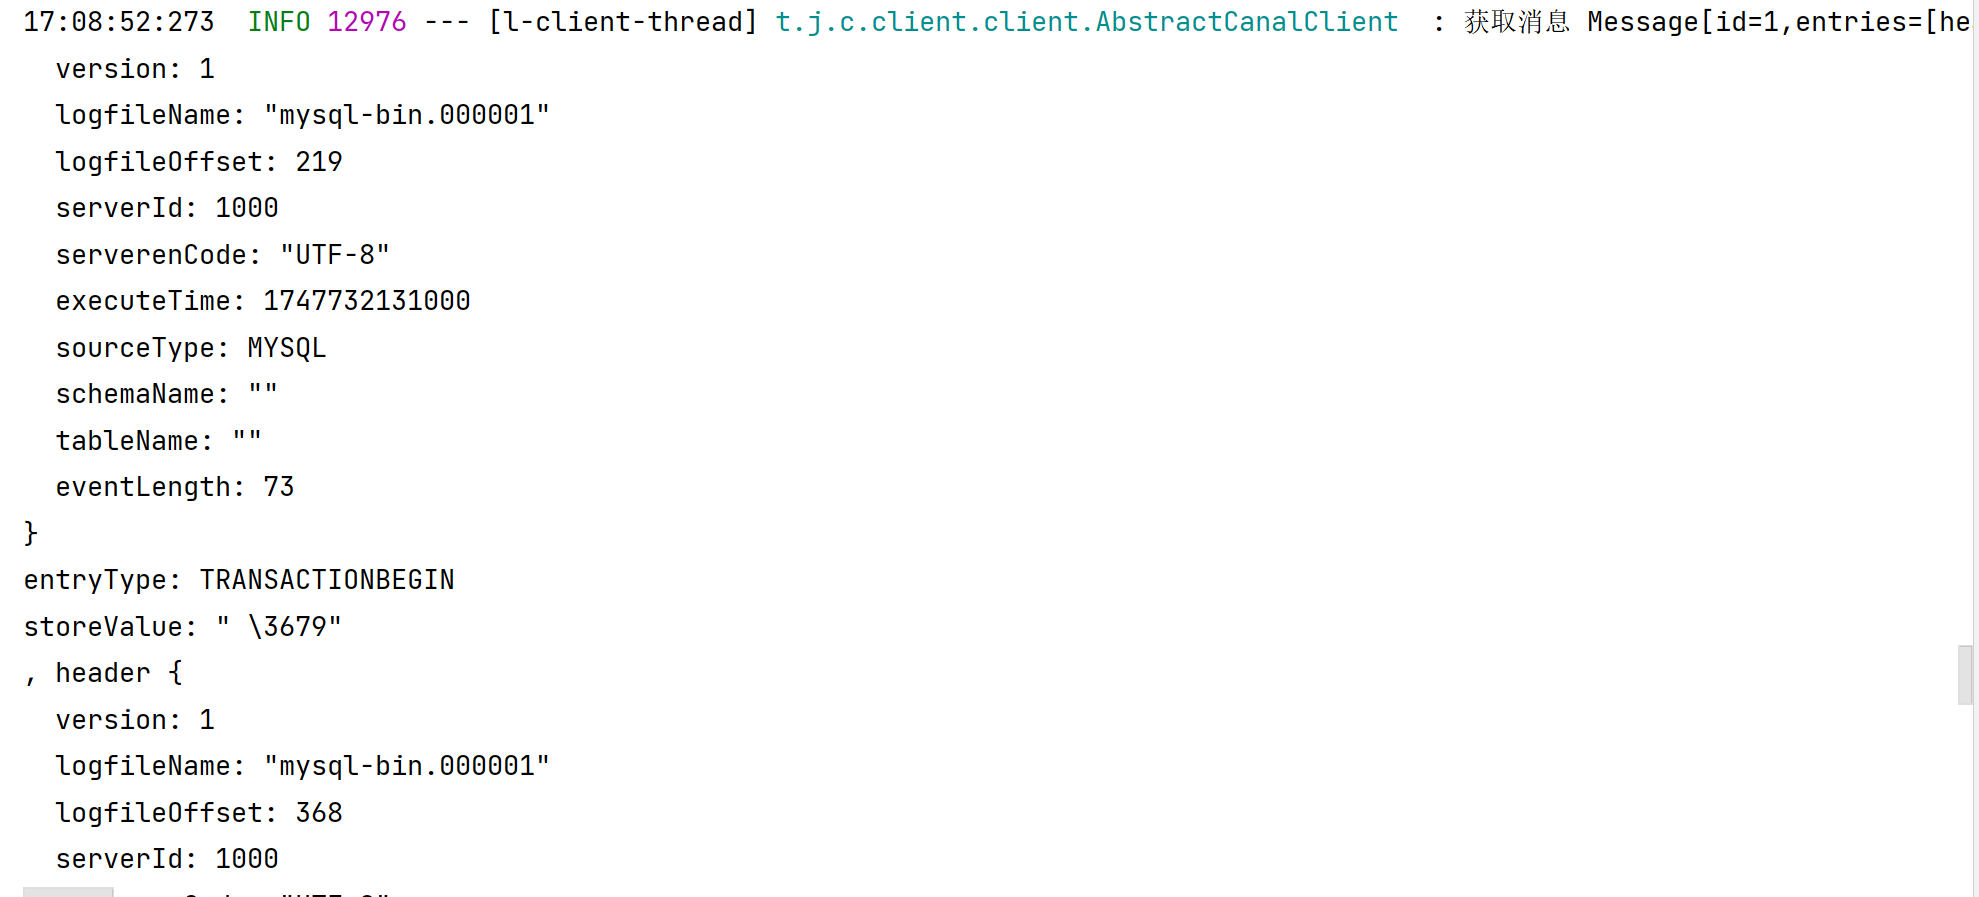
⑥啟動ItemApplication和ItemApplication(2),訪問:http://localhost:8081/
更新商品數據
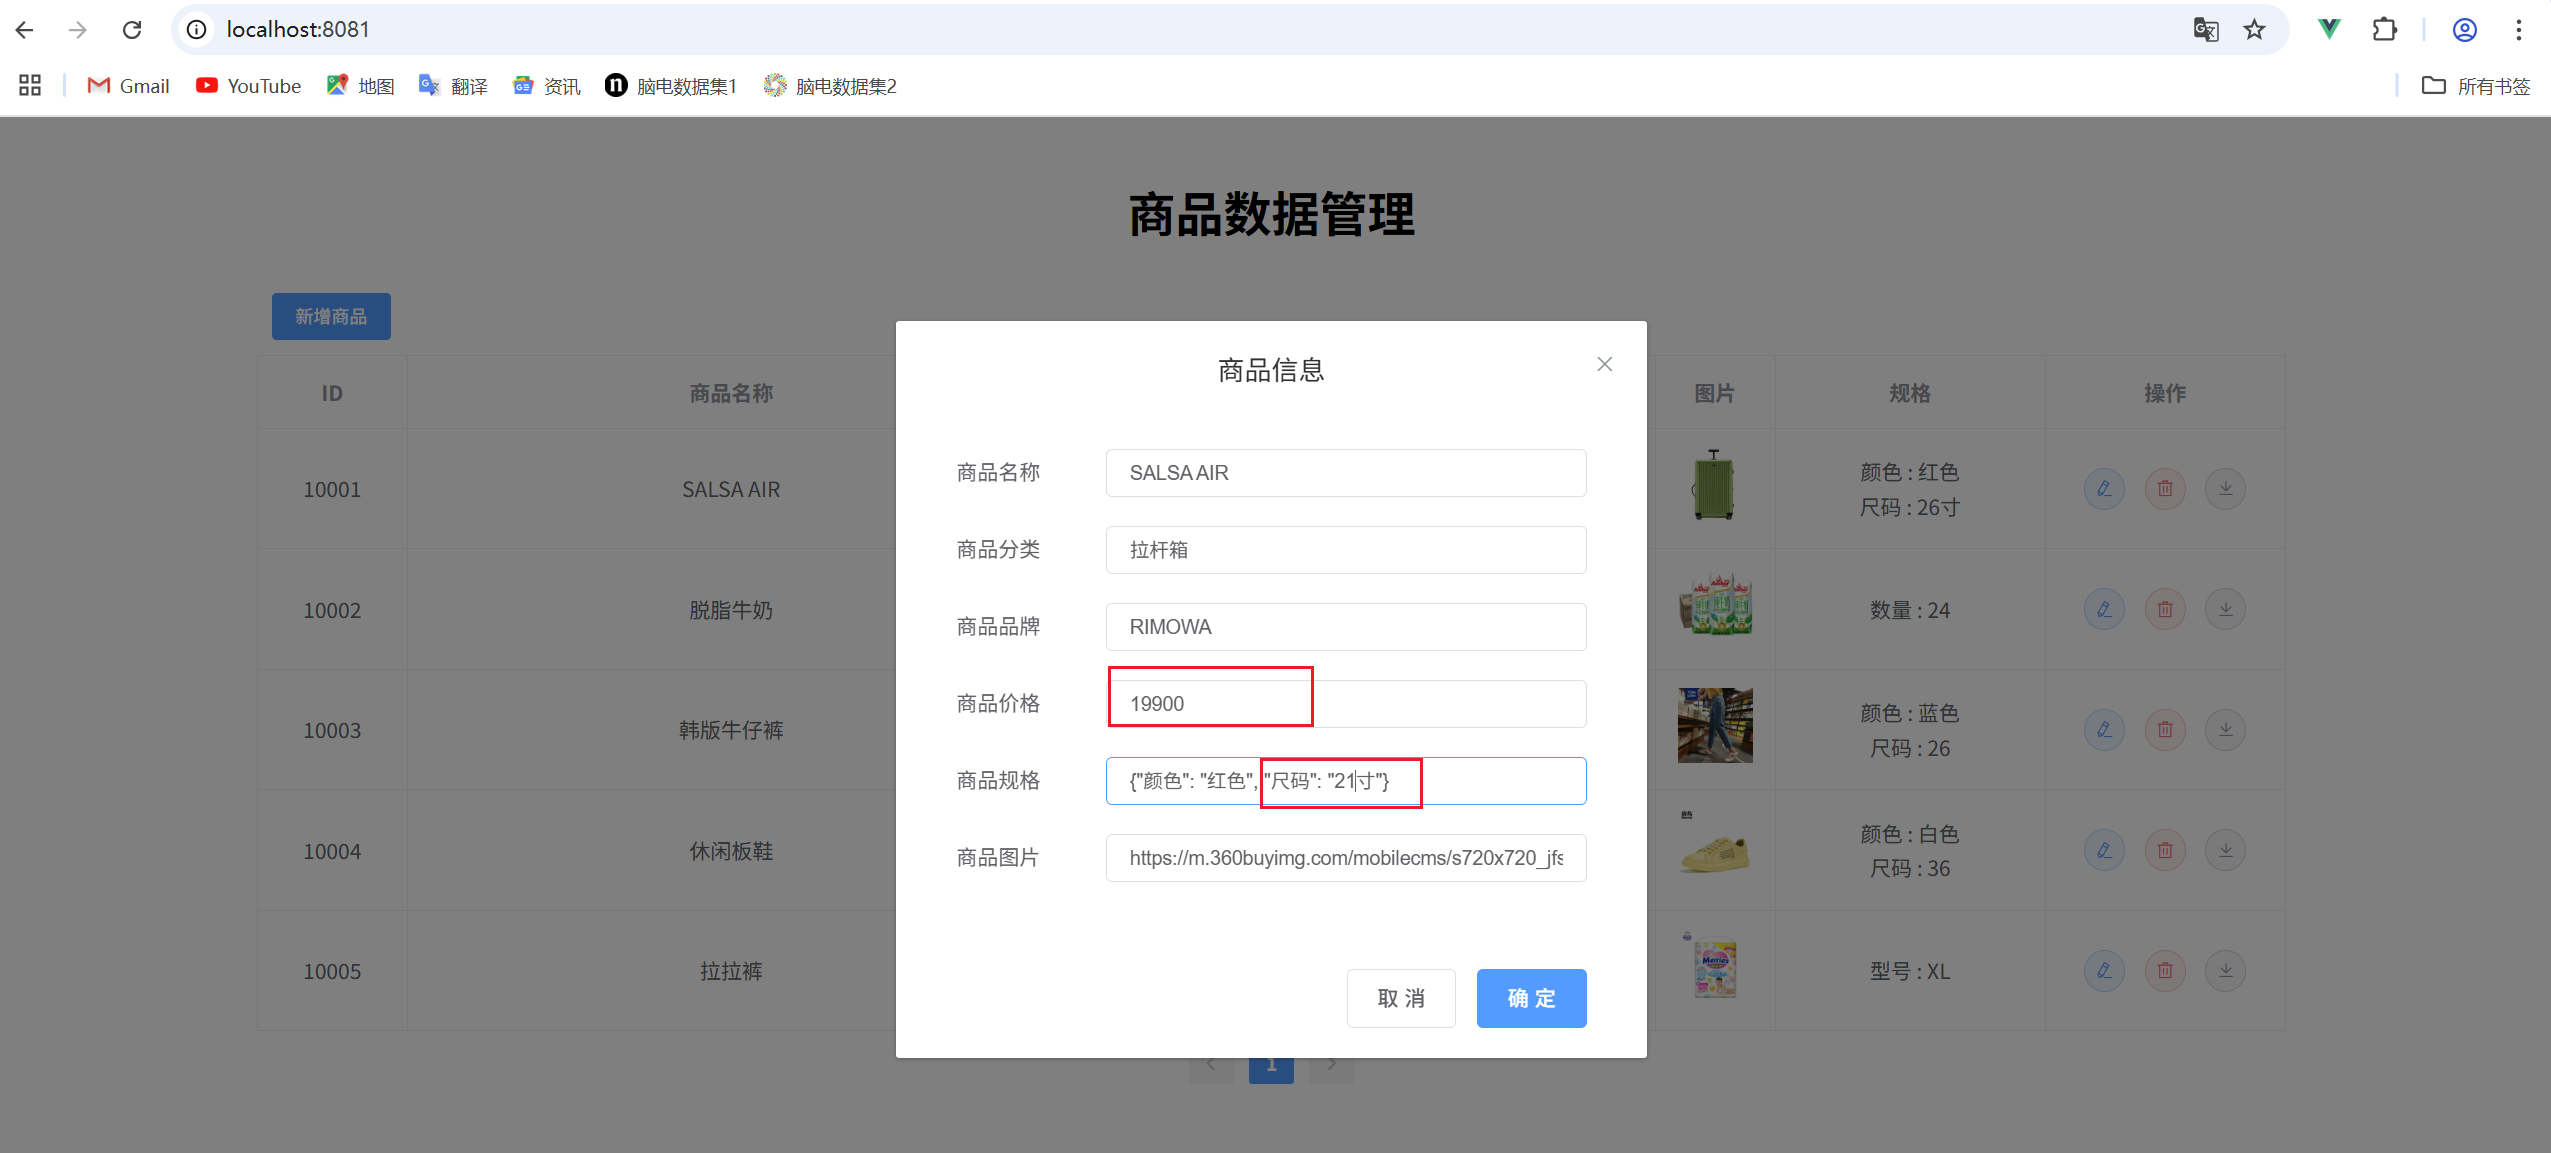
觀察控制臺日志
表名稱監聽支持的語法:
mysql 數據解析關注的表,Perl正則表達式.
多個正則之間以逗號(,)分隔,轉義符需要雙斜杠(\\)
常見例子:
1.  所有表:.*   or  .*\\..*
2.  canal schema下所有表: canal\\..*
3.  canal下的以canal打頭的表:canal\\.canal.*
4.  canal schema下的一張表:canal.test1
5.  多個規則組合使用然后以逗號隔開:canal\\..*,mysql.test1,mysql.test2
多級緩存總結


安裝與部署)


:LangChain Model模型)


:遞歸模式與條件匹配的藝術)


