文章目錄
- 鏈表總結 + 常用技巧
- 兩數相加
- 題解
- 代碼
- 兩兩交換鏈表中的節點
- 題解
- 代碼
- 重排鏈表
- 題解
- 代碼
- 合并k個升序鏈表
- 題解
- 代碼
- K個一組翻轉鏈表
- 題解
- 代碼

鏈表總結 + 常用技巧
- 畫圖 = 直觀 + 形象 + 便于理解
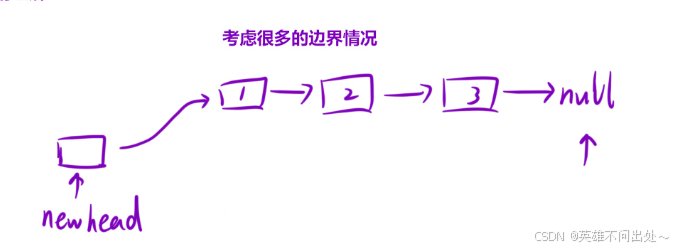
- 引入虛擬頭節點,便于處理邊界情況,方便我們對鏈表進行操作
3. 大膽去定義變量,不要吝嗇空間,可以簡單化鏈表鏈接
- 快慢雙指針,判斷環,找鏈表中環的入口,找鏈表中倒數第n個節點
- 鏈表中的常用操作:
創建一個新節點 new
尾插
頭插,使用虛擬頭節點,例題逆序鏈表,如下圖
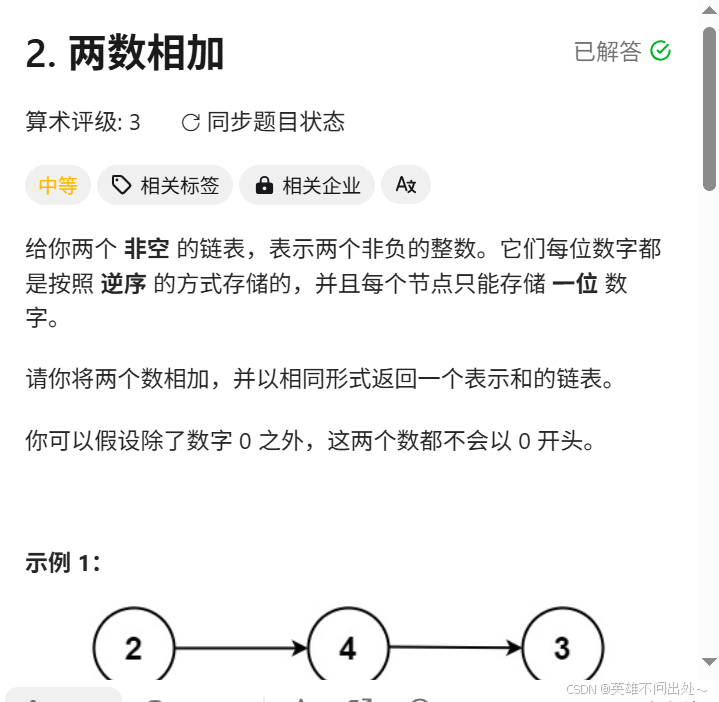
兩數相加
題目鏈接
題解
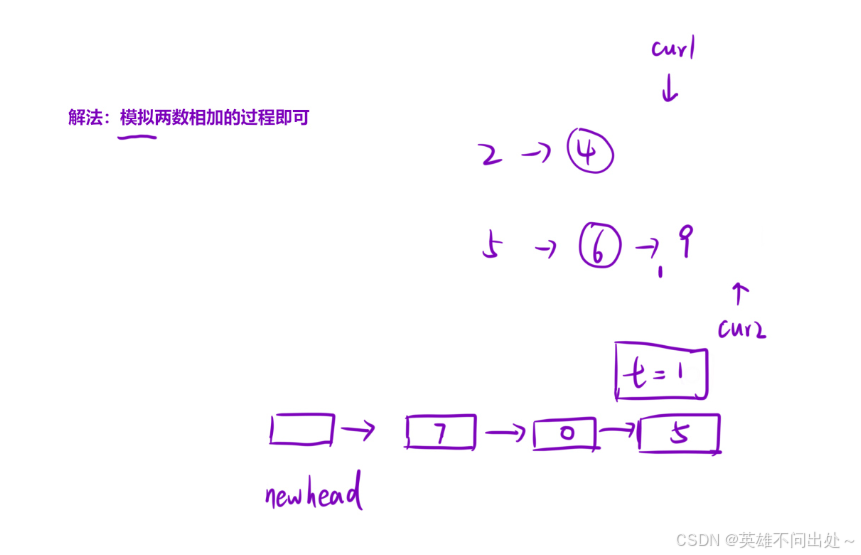
1. 在鏈表中模擬兩數相加的過程
2. 注意t的進位,一個鏈表比另一個鏈表長的情況,開虛擬頭結點,我們模擬相加的時候從低位開始加,這里剛好是從低位開始加的,不需要逆置鏈表
代碼
class Solution
{
public:ListNode* addTwoNumbers(ListNode* l1, ListNode* l2) {// 記錄第一個鏈表和第二個鏈表ListNode* cur1 = l1,*cur2 = l2;ListNode* newhead = new ListNode(0);// 哨兵位節點int t = 0;// 記錄進位ListNode* pcur = newhead;// 尾指針// cur1,cur2,t都不為空while(cur1 || cur2 || t){// 加上第一個鏈表if(cur1){t += cur1->val;cur1 = cur1->next;}// 加上第二個鏈表if(cur2){t += cur2->val;cur2 = cur2->next;}pcur->next = new ListNode(t % 10);pcur = pcur->next;t /= 10;}    // 防止內存泄漏pcur = newhead->next;delete newhead;return pcur;}
};
兩兩交換鏈表中的節點
題目鏈接
題解
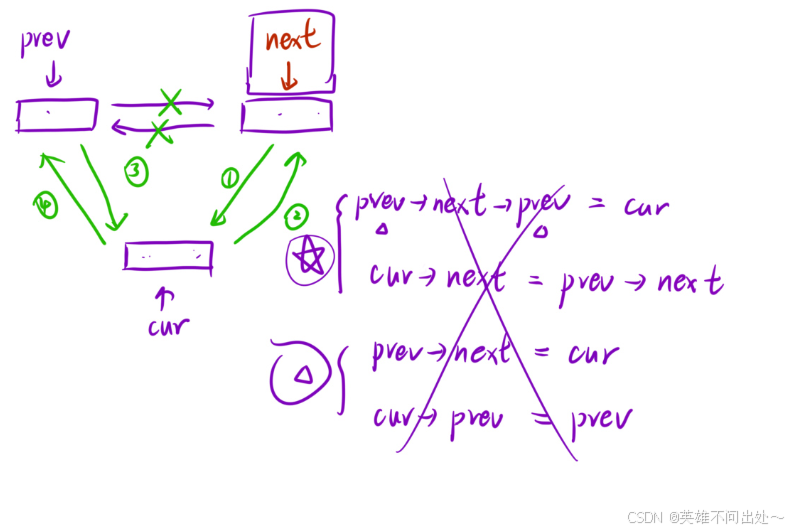
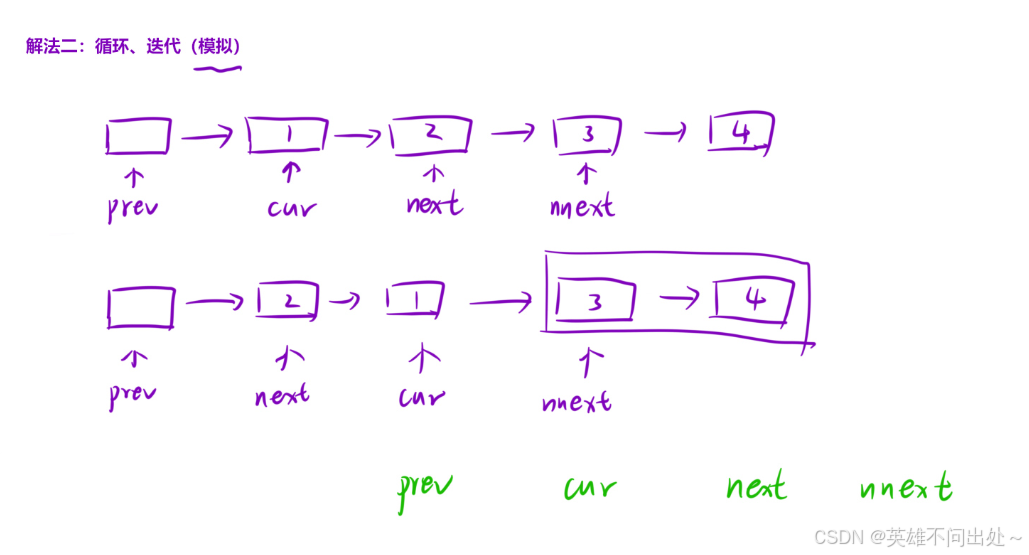
1. 模擬
2. 創建4個變量,一個虛擬節點,最后只需返回虛擬節點的next指針,然后交換兩數的指針,讓指針移動到下一個要交換的位置
3. 注意數為奇數和偶數的情況,為偶數時cur指針為空,為奇數的時候next指針為空
代碼
class Solution
{
public:ListNode* swapPairs(ListNode* head) {if(head == nullptr) return nullptr;if(head->next == nullptr) return head;ListNode* newhead = new ListNode(0);ListNode* prev = newhead;ListNode* cur = head;ListNode* next = cur->next;ListNode* nnext = next->next;while(cur && next){// 交換節點prev->next = next; next->next = cur;cur->next = nnext;// 修改指針并且注意順序prev = cur;cur = nnext;if(cur == nullptr) break;next = nnext->next;if(next == nullptr) break;nnext = next->next;}cur = newhead->next;delete newhead;return cur;}
};
重排鏈表
題目鏈接
題解
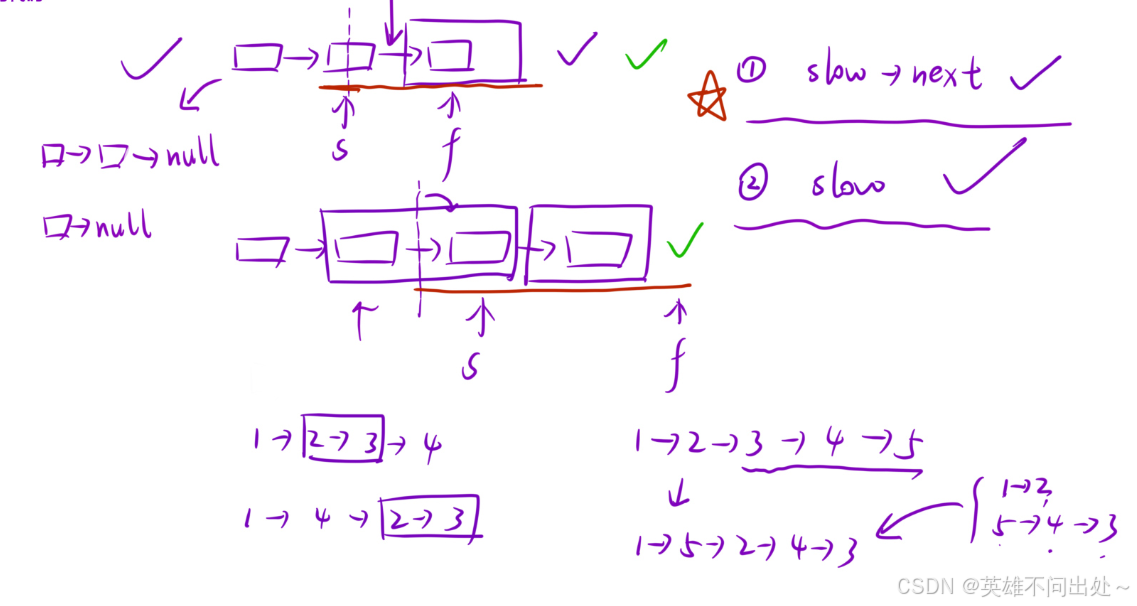
1. 模擬
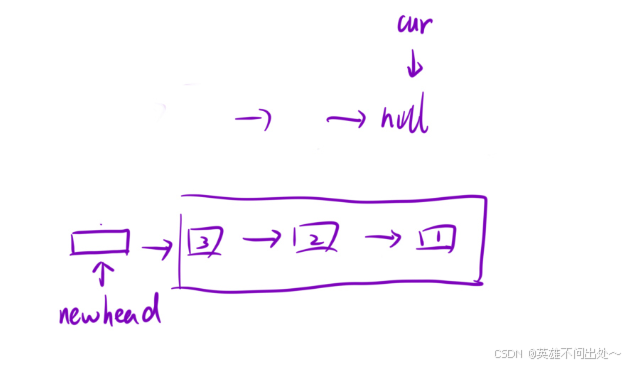
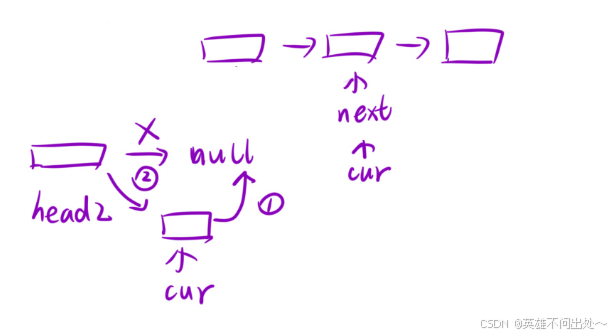
2. 先找到鏈表的中間節點,slow->next為分割點分割兩個鏈表,利用頭插法逆置后面的一個鏈表,最后按順序鏈接兩個鏈表
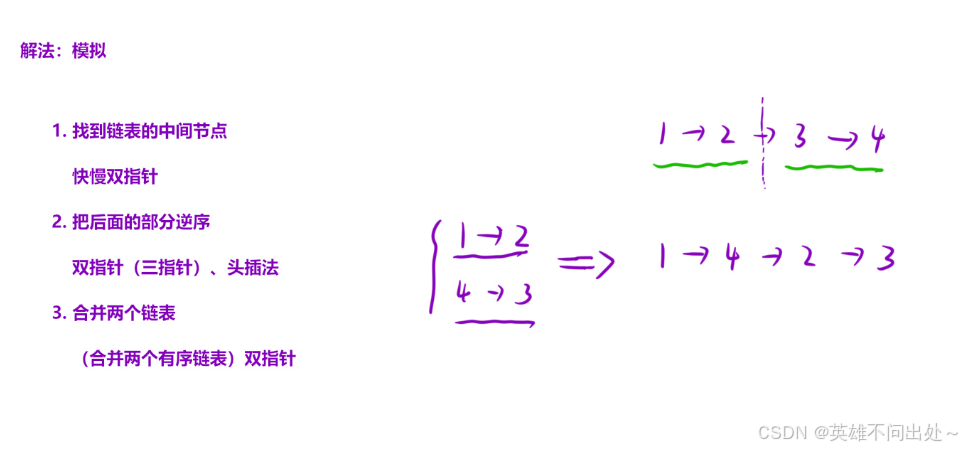
利用快慢雙指針分割鏈表
頭插法
代碼
class Solution
{
public:void reorderList(ListNode* head) {// 快慢雙指針找鏈表的中間節點// 0個1個2個節點不需要重排if(head == nullptr || head->next == nullptr || head->next->next == nullptr) return;ListNode* slow = head;ListNode* fast = head;// 奇數個節點和偶數個節點while(fast && fast->next){slow = slow->next;fast = fast->next->next;}// 把slow->next做為分割鏈表的節點// 方便分割鏈表// 否則slow做為分割節點,還需要加入虛擬節點,也還是是slow->next// 頭插法進行分割鏈表// 逆置第二個鏈表ListNode* head2 = new ListNode(0);ListNode* cur = slow->next;slow->next = nullptr;while(cur){ListNode* next = cur->next;cur->next = head2->next;head2->next = cur;cur = next;}// 尾插法連接兩個鏈表ListNode* newhead = new ListNode(0);ListNode* prev = newhead;ListNode* cur1 = head,*cur2 = head2->next;// 第一個鏈表比第二個鏈表長while(cur1){prev->next = cur1;cur1 = cur1->next;prev = prev->next;if(cur2){prev->next = cur2;cur2 = cur2->next;prev = prev->next;}}delete head2;delete newhead;}
};
合并k個升序鏈表
題目鏈接
題解
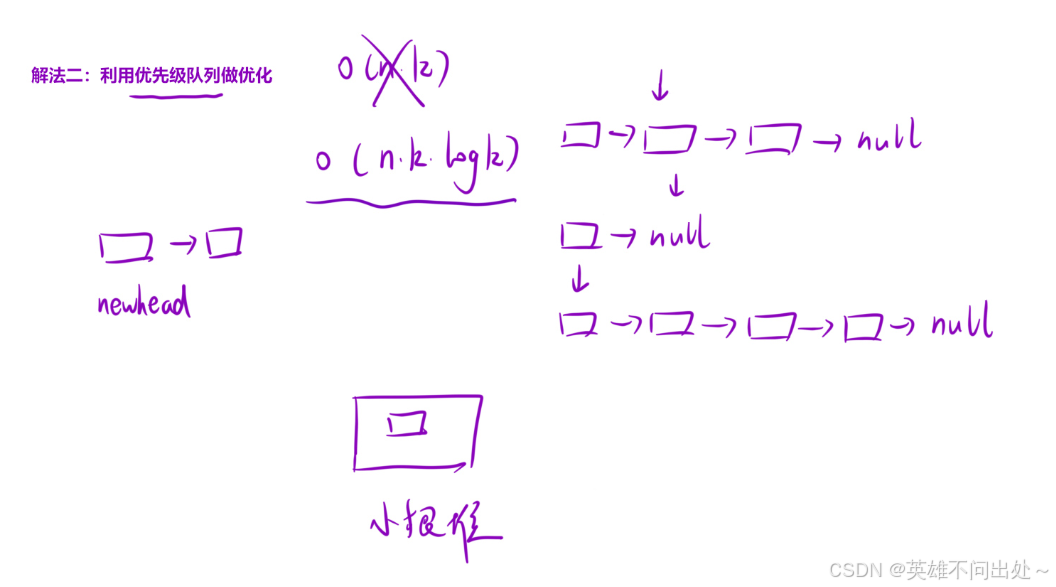
代碼
class Solution
{struct cmp{bool operator()(const ListNode* l1,const ListNode* l2){return l1->val > l2->val;}};
public:ListNode* mergeKLists(vector<ListNode*>& lists) {// 創建一個小根堆priority_queue<ListNode*,vector<ListNode*>,cmp> heap;// 讓所有的頭結點進入小根堆for(auto& x : lists){if(x) heap.push(x);}ListNode* newhead = new ListNode(0);ListNode* cur = newhead;while(!heap.empty()){ListNode* t = heap.top();cur->next = t;heap.pop();cur = cur->next;if(t->next) heap.push(t->next); }cur = newhead->next;delete  newhead;return cur;}
};
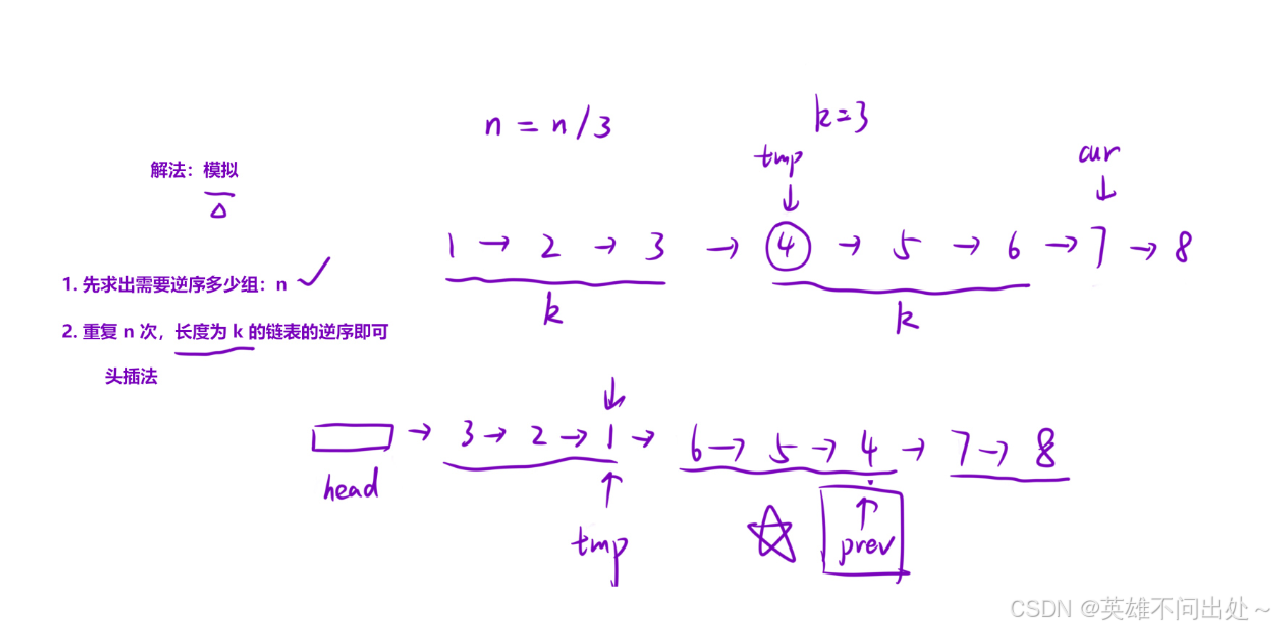
K個一組翻轉鏈表
題目鏈接
題解
1. 注意每次更新一下prev這個指針,prev = tmp
代碼
class Solution
{
public:ListNode* reverseKGroup(ListNode* head, int k) {// 先算出有多少個節點int count = 0;ListNode* cur = head;while(cur){count++;cur = cur->next;}// 頭插法int p = count / k;ListNode* newhead = new ListNode(0);ListNode* prev = newhead;cur = head;for(int i = 0;i < p;i++){ListNode* tmp = cur; for(int j = 0;j < k;j++){ListNode* next = cur->next;cur->next = prev->next;prev->next = cur;cur = next;}prev = tmp;}prev->next = cur;prev = newhead->next;delete newhead;return prev;}
};


)
介紹)


)