2.20日學習打卡
目錄:
- 2.20日學習打卡
- Vue是什么?
- 安裝vue
- 模板語法
- 條件渲染
- 列表渲染
- 事件處理
- 表單輸入綁定
- 組件基礎
- Props組件交互
- 自定義事件組件交互
- 組件生命周期
- Vue引入第三方
- Axios網絡請求
- Axios網絡請求封裝
- 網絡請求跨域解決方案
- 路由配置
- 路由傳遞參數
- 嵌套路由配置
- Vue狀態管理(Vuex)
- Vue狀態管理核心(Vuex)
- vue3新特性
Vue是什么?
Vue是前端優秀框架, 是一套用于構建用戶界面的漸進式框架
安裝vue
安裝Vue工具 Vue CLI
Vue CLI Vue.js 開發的標準工具,Vue CLI 是一個基于 Vue.js 進行快速開發的完整系統
npm install -g @vue/cli
安裝之后,你就可以在命令行中訪問 vue 命令。你可以通過簡單運行 vue,看看是否展示出了一份所有可用命令的幫助信息,來驗證它是否安裝成功。
vue --version
創建一個項目
運行以下命令來創建一個新項目
vue create vue-demo
溫馨提示
在控制臺中,可以用上下按鍵調整選擇項
在控制臺中,可以用空格(spacebar)選擇是否選中和取消選中
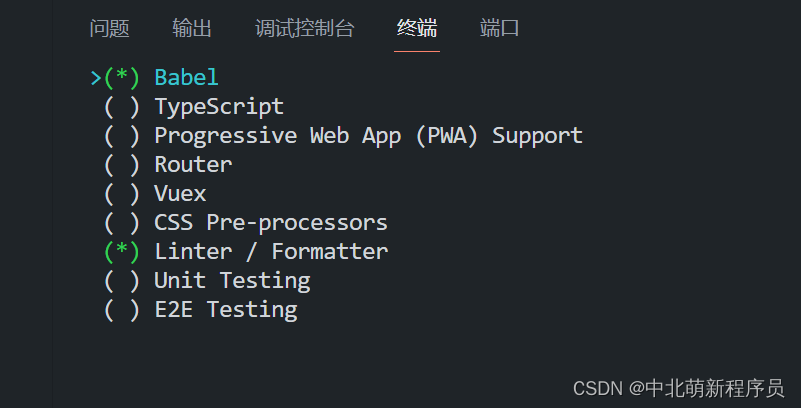
可以選擇默認項目模板,或者選“手動選擇特性”來選取需要的特性。

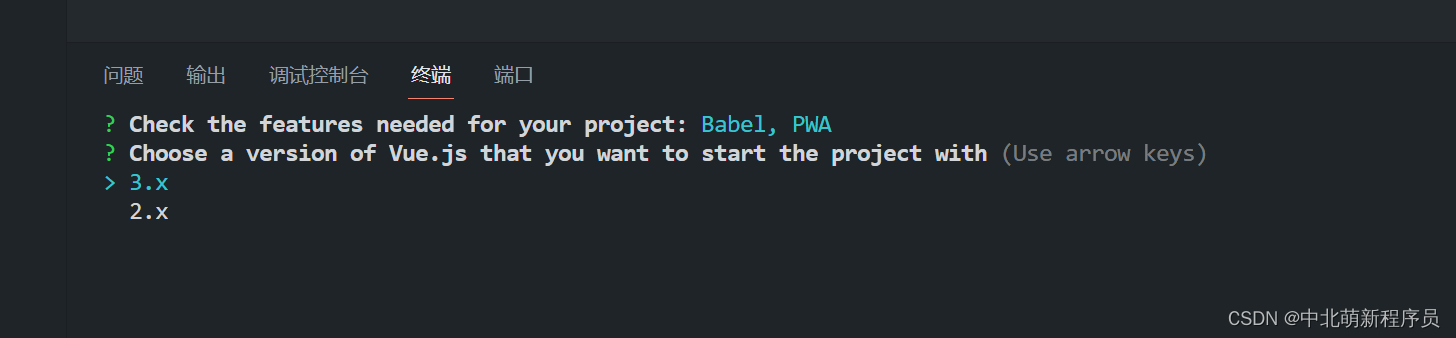
我們選擇Babel和Progressive Web App (PWA) Support 兩個選項即可
不要選中 Linter / Formatter 以避免不必要的錯誤提示
Vue目前有兩個主流大版本vue2和vue3,選擇vue3最新版本
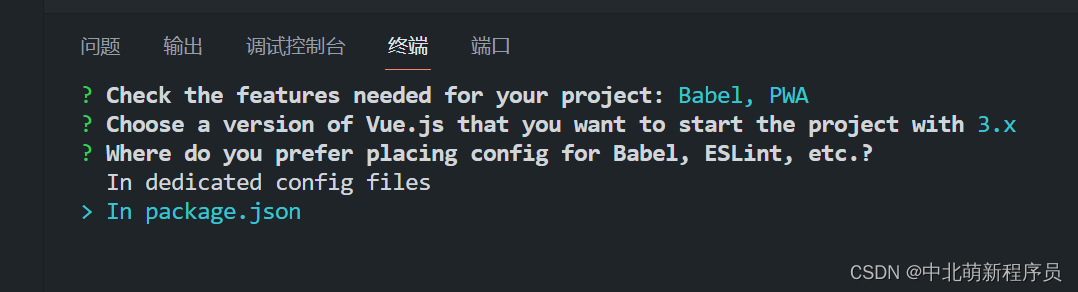
配置放在哪里? In dedicated config files 專用配置文件或者 In package.json在package.json文件
將其保存為未來項目的預置? y代表保存,并添加名字,n不保存

項目創建成功如下提示信息
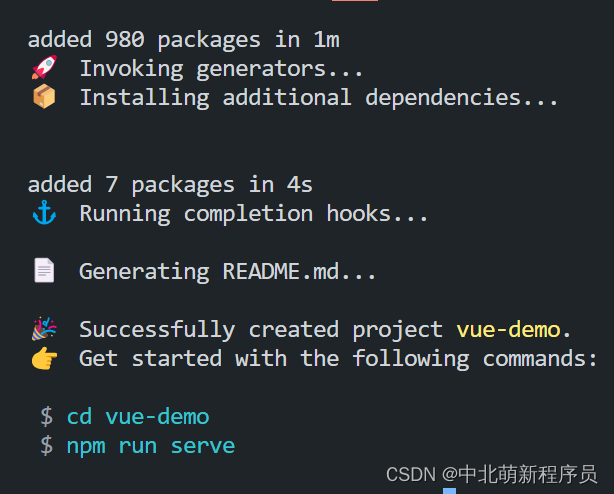
運行項目
第一步:進入項目根目錄cd vue-demo
第二步:運行npm run serve 啟動項目
安裝Vue高亮插件
VSCode中安裝vetur或者volar都可,前者針對Vue2版本,后者針對Vue3版本
模板語法

文本
數據綁定最常見的形式就是使用“Mustache” (雙大括號) 語法的文本插值
<span>Message: {{ msg }}</span>
一般配合js 中的data()設置數據
export default {name: 'HelloWorld',data(){return{msg:"消息提示"}}
}
原始 HTML
雙大括號會將數據解釋為普通文本,而非 HTML 代碼。為了輸出真正的 HTML,你需要使用v-html 指令
<p>Using mustaches: {{ rawHtml }}</p>
<p>Using v-html directive: <span v-html="rawHtml"></span></p>
data(){return{rawHtml:"<a href='https://www.baidu.com'>百度</a>"}
}
屬性 Attribute
Mustache 語法不能在 HTML 屬性中使用,然而,可以使用 v-bind 指令
<div v-bind:id="dynamicId"></div>
data(){return{dynamicId:1001}
}
溫馨提示
v-bind: 可以簡寫成 :
使用 JavaScript 表達式
在我們的模板中,我們一直都只綁定簡單的 property 鍵值,Vue.js 都提供了完全的 JavaScript 表達式支持
{{ number + 1 }}{{ ok ? 'YES' : 'NO' }}{{ message.split('').reverse().join('') }}這些表達式會在當前活動實例的數據作用域下作為 JavaScript 被解析。有個限制就是,每個綁定都只能包含單個表達式,所以下面的例子都不會生效。
<!--  這是語句,不是表達式:-->
{{ var a = 1 }}<!-- 流程控制也不會生效,請使用三元表達式 -->
{{ if (ok) { return message } }}
條件渲染
v-if
v-if 指令用于條件性地渲染一塊內容。這塊內容只會在指令的表達式返回 true 值的時候被渲染。
<p v-if="flag">我是孫猴子</p>
data() {return {flag: true}
}
v-else
你可以使用 v-else 指令來表示 v-if 的“else 塊”
<p v-if="flag">我是孫猴子</p>
<p v-else>你是傻猴子</p>
data() {return {flag: false}
}
v-show
另一個用于條件性展示元素的選項是 v-show 指令
<h1 v-show="ok">Hello!</h1>
v-if vs v-show 的區別
v-if 是“真正”的條件渲染,因為它會確保在切換過程中,條件塊內的事件監聽器和子組件適當地被銷毀和重建。
v-if 也是惰性的:如果在初始渲染時條件為假,則什么也不做——直到條件第一次變為真時,才會開始渲染條件塊。
相比之下,v-show 就簡單得多——不管初始條件是什么,元素總是會被渲染,并且只是簡單地基于 CSS 進行切換。
一般來說,v-if 有更高的切換開銷,而 v-show 有更高的初始渲染開銷。因此,如果需要非常頻繁地切換,則使用 v-show 較好;如果在運行時條件很少改變,則使用 v-if 較好
列表渲染
用 v-for 把一個數組映射為一組元素
我們可以用 v-for 指令基于一個數組來渲染一個列表。v-for 指令需要使用 item in items 形式的特殊語法,其中 items 是源數據數組,而 item 則是被迭代的數組元素的別名。
<ul><li v-for="item in items">{{ item.message }}</li>
</ul>
data() {return {items: [{ message: 'Foo' }, { message: 'Bar' }]}
}
維護狀態
當 Vue 正在更新使用 v-for 渲染的元素列表時,它默認使用“就地更新”的策略。如果數據項的順序被改變,Vue 將不會移動 DOM 元素來匹配數據項的順序,而是就地更新每個元素,并且確保它們在每個索引位置正確渲染。
為了給 Vue 一個提示,以便它能跟蹤每個節點的身份,從而重用和重新排序現有元素,你需要為每項提供一個唯一的 key attribute:
<div v-for="(item,index) in items" :key="item.id|index"><!-- 內容 -->
</div>
事件處理
監聽事件
我們可以使用 v-on 指令 (通常縮寫為 @ 符號) 來監聽 DOM 事件,并在觸發事件時執行一些 JavaScript。用法為 v-on:click="methodName" 或使用快捷方式 @click="methodName"
<button @click="counter += 1">Add 1</button>
data() {return {counter: 0}
}
事件處理方法
然而許多事件處理邏輯會更為復雜,所以直接把 JavaScript 代碼寫在 v-on 指令中是不可行的。因此 v-on 還可以接收一個需要調用的方法名稱。
<button @click="greet">Greet</button>
  greet(event) {// `event` 是原生 DOM eventif (event) {alert(event.target.tagName)}}
}
內聯處理器中的方法
這是官方的翻譯稱呼,其實我們可以直接叫他 “事件傳遞參數”
<button @click="say('hi')">Say hi</button>
<button @click="say('what')">Say what</button>
methods: {say(message) {alert(message)}
}
表單輸入綁定
你可以用 v-model 指令在表單 <input>、<textarea> 及 <select> 元素上創建雙向數據綁定。它會根據控件類型自動選取正確的方法來更新元素。盡管有些神奇,但 v-model 本質上不過是語法糖。它負責監聽用戶的輸入事件來更新數據,并在某種極端場景下進行一些特殊處理。
<input v-model="message" placeholder="edit me" />
<p>Message is: {{ message }}</p>
data() {return {message:""}
}
修飾符
.lazy
在默認情況下,v-model 在每次 input 事件觸發后將輸入框的值與數據進行同步 。你可以添加 lazy 修飾符,從而轉為在 change 事件之后進行同步
<input v-model.lazy="message" />
<p>Message is: {{ message }}</p>
data() {return {message:""}
}
.trim
如果要自動過濾用戶輸入的首尾空白字符,可以給 v-model 添加 trim 修飾符
<input v-model.trim="message" />
data() {return {message:""}
}
組件基礎
單文件組件
Vue 單文件組件(又名 *.vue 文件,縮寫為 SFC)是一種特殊的文件格式,它允許將 Vue 組件的模板、邏輯 與 樣式封裝在單個文件中
<template><h3>單文件組件</h3>
</template><script>
export default {name:"MyComponent"
}
</script><!-- scoped:如果在style中添加此屬性,就代表著,當前樣式,只在當前組件中生效 -->
<style scoped>
h3{color: red;
}
</style>
加載組件
第一步:引入組件 import MyComponentVue from './components/MyComponent.vue'
第二步:掛載組件 components: { MyComponentVue }
第三步:顯示組件 <my-componentVue />
組件的組織
通常一個應用會以一棵嵌套的組件樹的形式來組織

Props組件交互
組件與組件之間是需要存在交互的,否則完全沒關系,組件的意義就很小了
Prop 是你可以在組件上注冊的一些自定義 attribute
<my-componentVue title="標題"/>
<template><h3>單文件組件</h3><p>{{ title }}</p>
</template><script>
export default {name:"MyComponent",props:{title:{type:String,default:""}}
}
</script>
Prop 類型
Prop傳遞參數其實是沒有類型限制的
props: {title: String,likes: Number,isPublished: Boolean,commentIds: Array,author: Object,callback: Function
}
溫馨提示
數據類型為數組或者對象的時候,默認值是需要返回工廠模式(也就是函數)
function(){
return []
}
自定義事件組件交互
自定義事件可以在組件中反向傳遞數據,prop 可以將數據從父組件傳遞到子組件,那么反向如何操作呢,就可以利用自定義事件實現 $emit
<template><h3>單文件組件</h3><button @click="sendHandle">發送數據</button>
</template><script>
export default {name: "MyComponent",methods:{sendHandle(){//參數一字符串 參數二是傳遞的數據this.$emit("onCustom","數據")}}
}
</script><style scoped>
h3 {color: red;
}
</style>
<template><my-componentVue @onCustom="getData" />
</template><script>import MyComponentVue from './components/MyComponent.vue'export default {name: 'App',components: {MyComponentVue},methods: {getData(data) {console.log(data);}}
}
</script>
組件生命周期
每個組件在被創建時都要經過一系列的初始化過程——例如,需要設置數據監聽、編譯模板、將實例掛載到 DOM 并在數據變化時更新 DOM 等。同時在這個過程中也會運行一些叫做生命周期鉤子的函數,這給了用戶在不同階段添加自己的代碼的機會
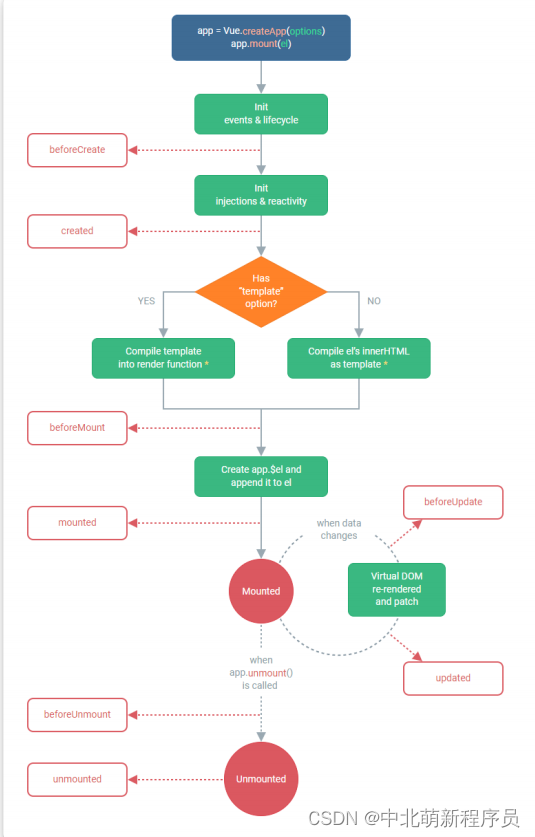
為了方便記憶,我們可以將他們分類:
創建時:beforeCreate、created
渲染時:beforeMount、mounted
更新時:beforeUpdate、updated
卸載時:beforeUnmount、unmounted
Vue引入第三方
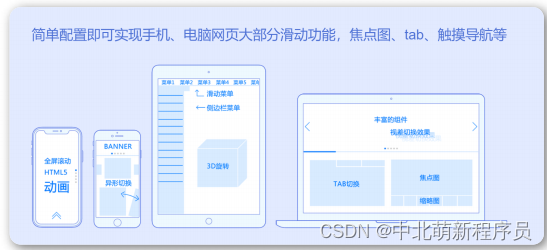
Swiper 開源、免費、強大的觸摸滑動插件
Swiper 是純javascript打造的滑動特效插件,面向手機、平板電腦等移動終端
Swiper 能實現觸屏焦點圖、觸屏Tab切換、觸屏輪播圖切換等常用效果
溫馨提示
官方文檔:https://swiperjs.com/vue
安裝指定版本: npm instal --save swiper@8.1.6
基礎實現
<template><div class="hello"><swiper class="mySwiper"><swiper-slide>Slide 1</swiper-slide><swiper-slide>Slide 2</swiper-slide><swiper-slide>Slide 3</swiper-slide></swiper></div>
</template><script>
import { Swiper, SwiperSlide } from 'swiper/vue';
import 'swiper/css';export default {name: 'HelloWorld',components: {Swiper,SwiperSlide,}
}
</script>
添加指示器
<template><div class="hello"><swiper class="mySwiper" :modules="modules" :pagination="{ clickable: true }"><swiper-slide><img src="../assets/logo.png" alt=""></swiper-slide><swiper-slide><img src="../assets/logo.png" alt=""></swiper-slide><swiper-slide><img src="../assets/logo.png" alt=""></swiper-slide></swiper></div>
</template><script>
import { Pagination } from 'swiper';
import { Swiper, SwiperSlide } from 'swiper/vue';
import 'swiper/css';
import 'swiper/css/pagination';export default {name: 'HelloWorld',data(){return{modules: [ Pagination ]}},components: {Swiper,SwiperSlide,}
}
</script>
Axios網絡請求

Axios 是一個基于 promise 的網絡請求庫
安裝
Axios的應用是需要單獨安裝的 npm install --save axios
引入
組件中引入: import axios from "axios"
全局引用:
import axios from "axios"const app = createApp(App);
app.config.globalProperties.$axios = axios
app.mount('#app')// 在組件中調用
this.$axios
網絡請求基本示例
get請求
axios({method: "get",url: "http://www.baidu.com"
}).then(res => {console.log(res.data);
})
post請求
溫馨提示
post請求參數是需要額外處理的
安裝依賴:npm install --save querystring
轉換參數格式:qs.stringify({})
axios({method:"post",url:"http://www.baidu.com",data:qs.stringify({user_id:"xxx",password:"xxx",verification_code:"crfvw"})
}).then(res =>{console.log(res.data);
})
快捷方案
get請求
axios.get("http://www.baidu.com").then(res =>{console.log(res.data);})
post請求
axios.post("http://www.baidu.com", qs.stringify({user_id: "xxx",password: "xxx",verification_code: "crfvw"})).then(res => {console.log(res.data);})
Axios網絡請求封裝
在日常應用過程中,一個項目中的網絡請求會很多,此時一般采取的方案是將網絡請求封裝起來
在src目錄下創建文件夾utils,并創建文件request,用來存儲網絡請求對象 axios
import axios from "axios"
import qs from "querystring"const errorHandle = (status,info) => {switch(status){case 400:console.log("語義有誤");break;case 401:console.log("服務器認證失敗");break;case 403:console.log("服務器拒絕訪問");break;case 404:console.log("地址錯誤");break;case 500:console.log("服務器遇到意外");break;case 502:console.log("服務器無響應");break;default:console.log(info);break;}
}const instance = axios.create({timeout:5000
})instance.interceptors.request.use(config =>{if(config.method === "post"){config.data = qs.stringify(config.data)}return config;},error => Promise.reject(error)
)instance.interceptors.response.use(response => response.status === 200 ? Promise.resolve(response) : Promise.reject(response),error =>{const { response } = error;errorHandle(response.status,response.info)}
)export default instance;
在src目錄下創建文件夾api,并創建文件index和path分別用來存放網絡請求方法和請求路徑
// path.js
const base = {baseUrl:"xxxxxx",chengpin:"xxxxxxxx"
}export default base
// index.js
import path from "./path"
import axios from "../utils/request"export default {getChengpin(){return axios.get(path.baseUrl + path.chengpin)}
}
組件中直接調用網絡請求
import api from "../api/index"api.getChengpin().then(res =>{console.log(res.data);
})
網絡請求跨域解決方案
JS采取的是同源策略
同源策略是瀏覽器的一項安全策略,瀏覽器只允許js 代碼請求和當前所在服務器域名,端口,協議相同的數據接口上的數據,這就是同源策略.
也就是說,當協議、域名、端口任意一個不相同時,都會產生跨域問題,所以又應
目前主流的跨域解決方案有兩種:
后臺解決:cors
前臺解決:proxy
devServer: {proxy: {'/api': {target: '<url>',changeOrigin: true}}
}
路由配置
在Vue中,我們可以通過vue-router路由管理頁面之間的關系
Vue Router 是 Vue.js 的官方路由。它與 Vue.js 核心深度集成,讓用 Vue.js 構建單頁應用變得輕而易舉
在Vue中引入路由
第一步:安裝路由 npm install --save vue-router
第二步:配置獨立的路由文件
// index.js
import { createRouter, createWebHashHistory } from 'vue-router'
import HomeView from '../views/HomeView.vue'const routes = [{path: '/',name: 'home',component: HomeView},{path: '/about',name: 'about',component: () => import('../views/AboutView.vue')}
]const router = createRouter({history: createWebHashHistory(),routes
})export default router
第三步:引入路由到項目
// main.js
import router from './router'
app.use(router)
第四步:指定路由顯示入口 <router-view/>
第五步:指定路由跳轉
<router-link to="/">Home</router-link> |
<router-link to="/about">About</router-link>
const router =createRouter({/*** createWebHahHistory* home:http://localhost:8080/#/* about:http://localhost:8080/#/about*//*** createWebHistory* home:http://localhost:8080/* about:http://localhost:8080/about* 此種方式,需要后臺配合做重定向,否則會爆404*/
})
路由傳遞參數
頁面跳轉過程中,是可以攜帶參數的,這也是很常見的業務
例如:在一個列表項,點擊進入查看每個列表項的詳情
第一步:在路由配置中指定參數的key
{path:"/list/:name",name:"list",component:() => import("../views/ListView.vue")
}
第二步:在跳轉過程中攜帶參數
<li><router-link to="/list/內蒙">內蒙旅游十大景區</router-link></li>
<li><router-link to="/list/北京">北京旅游十大景區</router-link></li>
<li><router-link to="/list/四川">四川旅游十大景區</router-link></li>
第三步:在詳情頁面讀取路由攜帶的參數
<p>{{ $route.params.name }}城市旅游景區詳情</p>
嵌套路由配置
路由嵌套是非常常見的需求
第一步:創建子路由要加載顯示的頁面
第二步:在路由配置文件中添加子路由配置
{path:"/news",name:"news",redirect:"/news/baidu",component:() => import("../views/NewsView.vue"),children:[{path:"baidu",component:() => import("../views/NewsList/BaiduNews.vue"),},{path:"wangyi",component:() => import("../views/NewsList/WangyiNews.vue"),}]
}
第三步:指定子路由顯示位置<router-view></router-view>
第四步:添加子路由跳轉鏈接
<router-link to="/news/baidu">百度新聞</router-link> |
<router-link to="/news/wangyi">網易新聞</router-link>
第五步:重定向配置 redirect:“/news/baidu”
Vue狀態管理(Vuex)
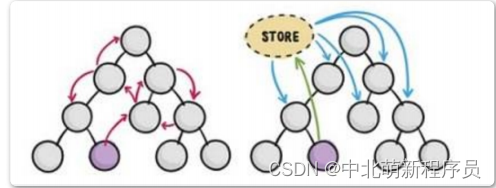
Vuex 是一個專為 Vue.js 應用程序開發的狀態管理模式 + 庫。它采用集中式存儲管理應用的所有組件的狀態,并以相應的規則保證狀態以一種可預測的方式發生變化。
簡單來說,狀態管理可以理解成為了更方便的管理組件之間的數據交互,提供了一個集中式的管理方案,任何組件都可以按照指定的方式進行讀取和改變數據
引入Vuex的步驟
第一步:安裝Vuex npm install --save vuex
第二步:配置Vuex文件
import { createStore } from 'vuex'export default createStore({state: {counter:0}
})
第三步:在主文件中引入Vuex
import store from './store'
app.use(store)
第四步:在組件中讀取狀態
<p>counter:{{ $store.state.counter }}</p>
// 或者
import { mapState } from 'vuex';
computed:{...mapState(["counter"])
}
Vue狀態管理核心(Vuex)
最常用的核心概念包含: State、Getter、Mutation、Action
Getter
對Vuex中的數據進行過濾
import { createStore } from 'vuex'export default createStore({state: {counter: 0},getters: {getCount(state){return state.counter > 0 ? state.counter : "counter小于0,不符合要求"}}
})
import { mapState,mapGetters } from 'vuex';
computed:{...mapGetters(["getCount"])
}
Mutation
更改 Vuex 的 store 中的狀態的唯一方法是提交 mutation。Vuex 中的 mutation 非常類似于事件:每個 mutation 都有一個字符串的事件類型 (type)和一個回調函數 (handler)。這個回調函數就是我們實際進行狀態更改的地方,并且它會接受 state 作為第一個參數
import { createStore } from 'vuex'export default createStore({state: {counter: 0},getters: {},mutations: {setCounter(state, num) {state.counter += num}}
})
import { mapState,mapMutations } from 'vuex';methods:{...mapMutations(["setCounter"]),clickHandler(){// this.$store.commit("setCounter",20)// 或者// this.setCounter(10)}
}
Action
Action 類似于 mutation,不同 在于:
- Action 提交的是 mutation,而不是直接變更狀態
- Action 可以包含任意異步操作
import { createStore } from 'vuex'
import axios from "axios"export default createStore({state: {counter: 0},getters: {getCount(state){return state.counter > 0 ? state.counter : "counter小于0,不符合要求"}},mutations: {setCounter(state, num) {state.counter += num}},actions: {asyncSetCount({ commit }){axios.get("http://iwenwiki.com/api/generator/list.php").then(res =>{commit("setCounter",res.data[0])})}}
})
import { mapState,mapMutations,mapGetters,mapActions } from 'vuex';methods:{...mapActions(["asyncSetCount"]),clickAsyncHandler(){// this.$store.dispatch("asyncSetCount")// 或者// this.asyncSetCount()}
}
vue3新特性
Vue3是目前Vue的最新版本,自然也是新增了很多新特性
六大亮點
ref或者reactive
在2.x中通過組件data的方法來定義一些當前組件的數據
data() {return {name: 'iwen',list: [],}
}
在3.x中通過ref或者reactive創建響應式對象
import { ref,reactive } from "vue"
export default {name: 'HelloWorld',setup(){const name = ref("iwen")const state = reactive({list:[]})return{name,state}}
}
methods中定義的方法寫在setup()
在2.x中methods來定義一些當前組件內部方法
methods:{http(){}
}
在3.x中直接在setup方法中定義并return
setup() {const http = ()=>{// do something}return {http};
}
setup()中使用props和context
在2.x中,組件的方法中可以通過this獲取到當前組件的實例,并執行data變量的修改,方法的調用,組件的通信等等,但是在3.x中,setup()在beforeCreate和created時機就已調用,無法使用和2.x一樣的this,但是可以通過接收setup(props,ctx)的方法,獲取到當前組件的實例和props
export default {props: {name: String,},setup(props,ctx) {console.log(props.name)ctx.emit('event')},
}
在setup中使生命周期函數
你可以通過在生命周期鉤子前面加上 “on” 來訪問組件的生命周期鉤子。
下表包含如何在 setup () 內部調用生命周期鉤子
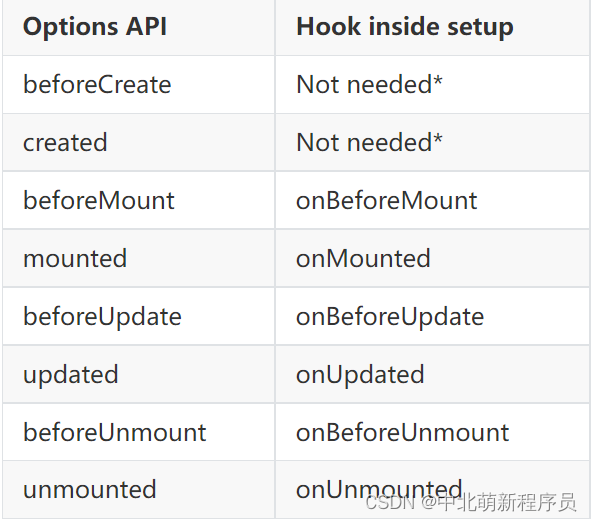
export default {setup() {// mountedonMounted(() => {console.log('Component is mounted!')})}
}
Provide / Inject
- provide() 和 inject() 可以實現嵌套組件之間的數據傳遞。
- 這兩個函數只能在 setup() 函數中使用。
- 父級組件中使用 provide() 函數向下傳遞數據。
- 子級組件中使用 inject() 獲取上層傳遞過來的數據。
- 不限層級
// 父組件
import { provide } from "vue"setup() {provide("customVal", "我是父組件向子組件傳遞的值");
}
// 子組件
import { inject } from "vue"setup() {const customVal = inject("customVal");return {customVal}
}
Fragment
Fragment翻譯為:“碎片”
不再限于模板中的單個根節點
<template><img alt="Vue logo" src="./assets/logo.png"><HelloWorld msg="Welcome to Your Vue.js App" />
</template>
如果我的內容對你有幫助,請點贊,評論,收藏。創作不易,大家的支持就是我堅持下去的動力


——修飾詞靜態(static)的用法詳解)


)


