2019獨角獸企業重金招聘Python工程師標準>>> 
iOS10 UI教程視圖的邊界與視圖的框架
iOS10 UI視圖的邊界
在視圖的幾何形狀中我們提到了視圖屬性中的一部分屬性可以將定義的視圖繪制在屏幕上。其中典型的3個屬性為邊界屬性、框架屬性以及中心位置屬性。
bounds表示的就是邊界屬性,它是一個CGRect屬性。它定義了該視圖本身內部的坐標系統中的位置(origin)和大小(size)。在大多數情況下bounds中的origin屬性為(x: 0, y: 0),size屬性為視圖的大小。在使用bounds時,我們不可以確定視圖是如何繪制在UI層次結構中的。
iOS10 UI視圖的框架
frame表示的就是框架屬性,定義了視圖圖如何放置層次結構中。frame是一個CGRect屬性,它類型與bounds屬性,但是frame的origin屬性決定了視圖如何放置它的父視圖中。
注意:bounds屬性和frame屬性類似,但有所不同,bounds指的是該視圖本身內部的坐標系統中的位置和大小。參照點是本身的坐標系統,即為絕對坐標,而frame指的是該視圖在設計界面坐標系統中的位置和大小。參照點是設計界面,即為相對坐標。
【示例1-4:Frame】以下我們將使用代碼說明frame和bounds的不同。具體的操作步驟如下:
(1)打開ViewController.swift文件,編寫代碼,實現在屏幕上顯示一個紅色的空白視圖,并且分別輸出bounds和frame的位置和大小。代碼如下:
import UIKitclass ViewController: UIViewController {override func viewDidLoad() {super.viewDidLoad()// Do any additional setup after loading the view, typically from a nib.let point=CGPoint(x: 67.0, y: 217.0)let size=CGSize(width: 240.0, height: 128.0)let rect=CGRect(origin: point, size: size)let newView=UIView(frame: rect)self.view.addSubview(newView)newView.backgroundColor=UIColor.red//輸出bounds的位置print("bounds.origin.x:\(newView.bounds.origin.x)")print("bounds.origin.y:\(newView.bounds.origin.y)")//輸出bounds的大小print("bounds.size.width:\(newView.bounds.size.width)")print("bounds.size.height:\(newView.bounds.size.height)")//輸出frame的位置和大小print("frame.origin.x:\(newView.frame.origin.x)")print("frame.origin.y:\(newView.frame.origin.y)")print("frame.size.width:\(newView.frame.size.width)")print("frame.size.height:\(newView.frame.size.height)")}……}此時運行程序,會看到如圖1.9所示的效果
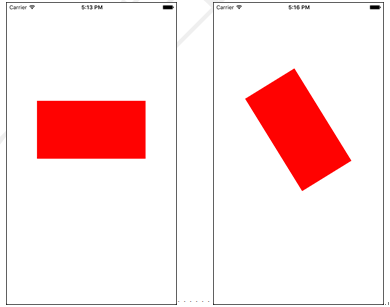
圖1.9 ?運行效果 ? ? 圖1.10 ?運行效果
此時會在應用程序輸出窗口輸出如下內容:
//bounds的位置和大小bounds.origin.x:0.0bounds.origin.y:0.0bounds.size.width:240.0bounds.size.height:128.0//frame的位置和大小frame.origin.x:67.0frame.origin.y:217.0frame.size.width:240.0frame.size.height:128.0注意:在以上這些情況中,frame和bounds的size是相同的,但是origin是不同的。
(2)修改vViewController.swift文件中的viewDidLoad()方法中的代碼,實現空白視圖的旋轉,旋轉后再分別輸出bounds和frame的位置和大小。代碼如下:
override func viewDidLoad() {super.viewDidLoad()// Do any additional setup after loading the view, typically from a nib.let point=CGPoint(x: 67.0, y: 217.0)let size=CGSize(width: 240.0, height: 128.0)let rect=CGRect(origin: point, size: size)let newView=UIView(frame: rect)self.view.addSubview(newView)newView.backgroundColor=UIColor.rednewView.transform=CGAffineTransform(rotationAngle: 45)???????????????????????????????????????//旋轉print("bounds.origin.x:\(newView.bounds.origin.x)")……}此時運行程序,會看到如圖1.10所示的效果。在應用程序輸出窗口輸出以下內容:
//bounds的位置和大小bounds.origin.x:0.0bounds.origin.y:0.0bounds.size.width:240.0bounds.size.height:128.0//frame的位置和大小frame.origin.x:69.5035357716888frame.origin.y:145.270969771571frame.size.width:234.992928456622frame.size.height:271.458060456858注意:在旋轉視圖后,bounds的位置和大小和在沒有旋轉視圖之前是一樣的。frame發生了變化,為了容納旋轉后的視圖,尺寸會自動進行調整。
iOS10 UI教程視圖的邊界與視圖的框架
相關閱讀:iOS10 UI教程視圖的幾何形狀
方法及示例)


方法與示例)


方法與示例)


方法(帶示例))


函數)


![go在方法中修改結構體的值_[Go]結構體及其方法](http://pic.xiahunao.cn/go在方法中修改結構體的值_[Go]結構體及其方法)
函數以及JavaScript中的示例)
