題外話
作為Mysql DBA,我們平時必須要熟練的一個最最基礎的技能,即安裝部署Mysql實例,所以本文分享一個快速安裝部署Mysql實例的方法。
一、環境介質準備
Mysql安裝包準備
服務器準備
我這里使用的是centos 7.x,此方法適用于任何其他linux版本。
配置文件my.cnf準備
一般情況下,用其他安裝方式(YUM,自行編譯等),會自動生成默認配置文件,但不建議那樣做,因為根據服務器各方面的配置不同,Mysql的配置參數也要做相應的調整,才能最優。
下面貼出我的配置文件:(僅供參考,因為測試好多參數是隨意配置的)
#**************MySQL5.7***************
[client]
default-character-set=utf8
# The MySQL server
[mysqld]
port = 3306
user = mysql
socket = /d/mysqldata/mysql3306/sock/mysql.sock
basedir = /d/mysqlbase/mysql3306
datadir = /d/mysqldata/mysql3306/mydata
tmpdir = /d/mysqldata/mysql3306/tmpdir
pid-file= /d/mysqldata/mysql3306/sock/mysql.pid
transaction-isolation=Read-Committed
secure_file_priv=
local-infile=1
skip-symbolic-links
character_set_server=utf8mb4
collation_server=utf8mb4_general_ci
lower_case_table_names=1
explicit_defaults_for_timestamp
#sql_mode='STRICT_TRANS_TABLES,NO_ENGINE_SUBSTITUTION'
sql_mode=''
skip-name-resolve
back_log=1000
max_connections=1000
max_user_connections=7900
thread_cache_size=128
max_connect_errors=99999
wait_timeout=172800
interactive_timeout=172800
net_buffer_length=32K
max_allowed_packet=1G
max_heap_table_size=1G
tmp_table_size=2M
query_cache_type=2
query_cache_size=0
#query_cache_limit=1M
performance_schema=1
event-scheduler=1
#
disabled_storage_engines='BLACKHOLE,FEDERATED'
group_concat_max_len=1048576
lock_wait_timeout=300
max_seeks_for_key=10000
### logs
general_log_file=/d/mysqldata/mysql3306/log/general.log
log-error=/d/mysqldata/mysql3306/log/error.log
log_error_verbosity=3
log_timestamps=SYSTEM
slow_query_log
slow_query_log_file=/d/mysqldata/mysql3306/log/slow-query.log
long_query_time=0.3
log_slow_admin_statements=1
#log_slow_slave_statements=1
##log_queries_not_using_indexes
log-bin-index=/d/mysqldata/mysql3306/binlog/mysql-bin.index
log-bin=/d/mysqldata/mysql3306/binlog/mysql-bin
#
relay-log-index=/d/mysqldata/mysql3306/relaylog/mysql-relay-bin.index
relay-log=/d/mysqldata/mysql3306/relaylog/mysql-relay-bin
#
binlog_cache_size=256K
max_binlog_size=512M
#
binlog-format=ROW
binlog_row_image=minimal #can only use higher than 5.7.14
#binlog_group_commit_sync_delay=5 #can only use higher than 5.7.17
#binlog_group_commit_sync_no_delay_count=64
sync_binlog=1
expire_logs_days=10
### replication
server_id=92
log_slave_updates=1
log_bin_trust_function_creators=1
#auto_increment_increment=1
#auto_increment_offset=1
allow_suspicious_udfs
sysdate-is-now
gtid-mode=ON
enforce-gtid-consistency
#
master_info_repository=TABLE
relay_log_info_repository=TABLE
relay_log_recovery=1
#
plugin_load="rpl_semi_sync_master=semisync_master.so;rpl_semi_sync_slave=semisync_slave.so"
rpl_semi_sync_master_enabled=1
rpl_semi_sync_slave_enabled=1
rpl_semi_sync_master_timeout=10000
rpl_semi_sync_master_wait_no_slave=0
#
slave_parallel_workers=4
slave_parallel_type=LOGICAL_CLOCK
slave_preserve_commit_order=1
slave_pending_jobs_size_max=1G
#buffer
read_buffer_size=466K
read_rnd_buffer_size=466K
sort_buffer_size=932K
join_buffer_size=233K
### innnodb
innodb_buffer_pool_size=1638M
innodb_buffer_pool_instances=8
innodb_max_dirty_pages_pct=85
innodb_sort_buffer_size=16M
large-pages
#
innodb_data_home_dir=/d/mysqldata/mysql3306/innodb_ts
innodb_data_file_path=ibdata1:128M:autoextend
innodb_autoextend_increment=128
innodb_open_files=7168
innodb_file_per_table
##innodb temp
innodb_temp_data_file_path = ibtmp1:12M:autoextend:max:5G
#
innodb_flush_log_at_trx_commit=1
innodb_log_buffer_size=16M
innodb_log_file_size=256M
innodb_log_files_in_group=3
innodb_log_group_home_dir=/d/mysqldata/mysql3306/innodb_log
innodb_adaptive_flushing_lwm=30
#
innodb_read_io_threads=16
innodb_write_io_threads=8
innodb_io_capacity=1000 #for ssd
innodb_flush_neighbors=0 #for ssd
innodb_flush_method=O_DIRECT
innodb_lru_scan_depth=256
innodb_purge_threads=8
#
innodb_thread_concurrency=0
innodb_concurrency_tickets=1024
#
innodb_lock_wait_timeout=300
#
#innodb_rollback_on_timeout=1
#innodb_force_recovery=0
[mysqldump]
quick
max_allowed_packet = 1G
[mysql]
no-auto-rehash
[myisamchk]
key_buffer_size = 256M
sort_buffer_size = 256M
read_buffer = 2M
write_buffer = 2M
[mysqlhotcopy]
interactive-timeout
二、安裝部署
安裝目錄創建
mkdir /d/mysqlbase/ ---程序目錄
mkdir /d/mysqldata/mysql3306/ ---數據目錄
把上面下載的Mysql安裝包解壓到/d/mysqlbase/,并重命名:
tar -zxvf mysql-5.7.30-linux-glibc2.5-x86_64.tar.gz
mv mysql-5.7.30-linux-glibc2.5-x86_64 mysql3306
創建各配置目錄:(對應上面配置文件)
cd /data/mysqldata/mysql3306/
mkdir {binlog,innodb_log,innodb_ts,log,mydata,sock,relaylog,tmpdir}
新增配置文件:(對應上面配置文件)
vim my.cnf
ls /d/mysqldata/mysql3306/ |grep my.cnf
創建mysql用戶并授權:
groupadd mysql
useradd -g mysql mysql
chown -R mysql:mysql /d/mysqldata//*
chown -R mysql:mysql /data/mysqlbase/*
初始化
初始化:
./mysqld --defaults-file=/dad/mysqldata/mysql3306/my.cnf --initialize-insecure --user=mysql ----root密碼為空
查看日志:
[Warning] 'NO_AUTO_CREATE_USER' sql mode was not set.
只有一個Warning信息,沒用異常,說明初始化成功。
三、啟動測試
用配置文件啟動Mysql實例
/d/mysqlbase/mysql3306/bin/mysqld_safe --defaults-file=/d/mysqldata/mysql3306/my.cnf.3306 2>&1 > /dev/null &

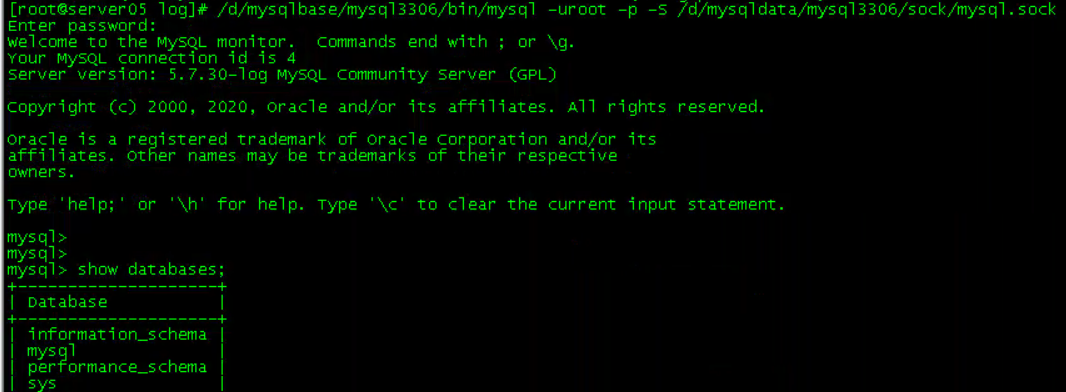
登陸Mysql實例
/d/mysqlbase/mysql3306/bin/mysql -uroot -p -S /d/mysqldata/mysql3306/sock/mysql.sock

PS:由于前面初始化時加了參數–initialize-insecure,root密碼為空,所以這里可以用root直接登陸,然后創建用戶就好。
三、總結
Mysql實例已經安裝部署完成,是不是特別簡單快捷。同樣的方法即可完成多實例的安裝部署(只需修改相應的端口等信息)
當然,Mysql安裝部署是很基礎的技能,還有很多種其他部署方式,大家有興趣可以自行對比研究。
哎喲,不錯噢! - - - - - - 歡迎指出有誤的地方以及補充更好的方法
本文地址:https://blog.csdn.net/Tah_001/article/details/107660943
如您對本文有疑問或者有任何想說的,請點擊進行留言回復,萬千網友為您解惑!

方法與示例)
)

方法與示例)


方法與示例)


方法與示例)

方法與示例)

方法與示例)


