博客同步自:個人博客主頁
輕量級仿網頁風格分頁器,和RecycleView封裝一起配合使用,也可單獨使用,喜歡就star、fork下吧~謝謝
目錄
功能介紹
效果圖
如何引入
簡單使用
依賴
github地址
功能介紹
支持延遲加載分頁
支持單獨分頁器組件使用;同時封裝了RecycleView,可以配合使用
支持加載狀態改變提示
支持自定義數字指示器數量、選中和未選中等樣式
效果圖
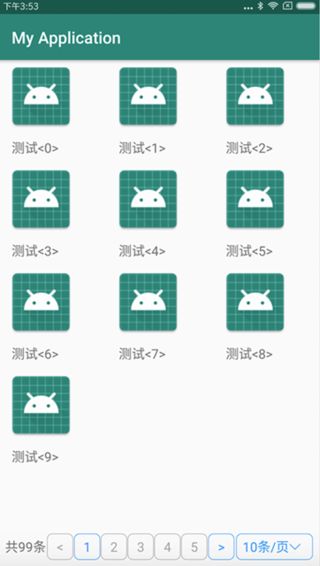
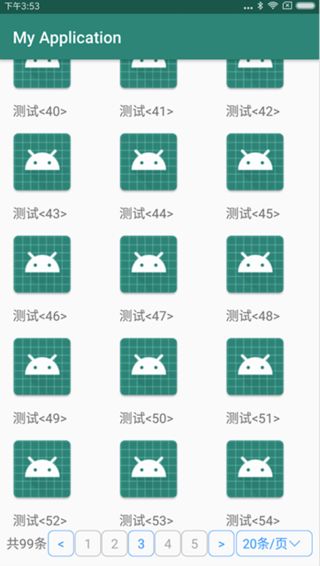
Screenshots
如何引入
Gradle引入
step 1
Add the JitPack repository to your build file
allprojects {
repositories {
...
maven { url 'https://jitpack.io' }
}
}
Step 2
Add the dependency
dependencies {
implementation 'com.github.itlwy:PaginationExample:0.0.20'
}
簡單使用
組合RecycleView使用
此時使用的是PaginationRecycleView類
activity_main.xml ...
android:id="@+id/pagination_rcv"
android:layout_width="match_parent"
android:layout_height="match_parent"
android:layout_marginBottom="8dp"
app:number_tip_count="5"
app:rect_size="30dp"
app:selected_color="@color/indicator_rect_selected"
app:text_size="14sp"
app:unselected_color="@color/indicator_rect_unselected"
/>
...
MainActivity.java ...
@Override
protected void onCreate(Bundle savedInstanceState) {
mPaginationRcv = findViewById(R.id.pagination_rcv);
mAdapter = new CustomAdapter(this, 99);
mPaginationRcv.setAdapter(mAdapter);
// mPaginationRcv.setPerPageCountChoices(perPageCountChoices);
GridLayoutManager layoutManager = new GridLayoutManager(this, 3);
mPaginationRcv.setLayoutManager(layoutManager);
mPaginationRcv.setListener(new PaginationRecycleView.Listener() {
@Override
public void loadMore(int currentPagePosition, int nextPagePosition, int perPageCount, int dataTotalCount) {
// nextPagePosition為將要加載的頁碼,即需要加載數據的頁
// perPageCount 每頁展示的數量
//TODO : 此處進行異步數據加載
//TODO : 完成加載后通知分頁控件(注意此處應該是在主線程運行),如下
mAdapter.setDatas(nextPagePosition, data);
mPaginationRcv.setState(PaginationRecycleView.SUCCESS);
}
@Override
public void onPerPageCountChanged(int perPageCount) {
// "x條/每頁"Spinner選中值改變時觸發
}
});
mAdapter.setOnItemClickListener(this);
}
@Override
public void onItemClick(View view, RecyclerView.ViewHolder holder, int position) {
JSONObject item = mAdapter.getCurrentPageItem(position); // 此處position返回的是recycleview的位置,所以取當前頁顯示列表的項
Toast.makeText(this, item.optString("name"), Toast.LENGTH_LONG).show();
}
...
CustomAdapter class CustomAdapter extends PaginationRecycleView.Adapter {
private Context mContext;
public CustomAdapter(Context context, int dataTotalCount) {
super(dataTotalCount);
mContext = context;
}
@Override
public void bindViewHolder(ViewHolder viewholder, JSONObject data) {
viewholder.setText(R.id.text, data.optString("name"));
}
@Override
public ViewHolder createViewHolder(@NonNull ViewGroup parent, int viewTypea) {
return ViewHolder.createViewHolder(mContext, parent, R.layout.item_list);
}
}
布局文件中的屬性說明: app:number_tip_count="5" // 數字指示器顯示的數量,默認是5
app:rect_size="30dp"// 圓角矩形的大小(正方形)
app:selected_color="@color/indicator_rect_selected" // 選中的顏色(包含框和字體)
app:text_size="14sp" // 字體大小
app:unselected_color="@color/indicator_rect_unselected" 未選中的顏色(包含框和字體)
單獨使用
? 此時使用的是PaginationIndicator類,布局如下:
...
android:id="@+id/indicator"
android:layout_width="match_parent"
app:number_tip_count="5"
app:rect_size="30dp"
app:selected_color="@color/indicator_rect_selected"
app:text_size="14sp"
app:unselected_color="@color/indicator_rect_unselected"
android:layout_height="wrap_content">
...
? 說明如上述
? 代碼如下:
...
private int[] perPageCountChoices = {10, 20, 30, 50};
...
mIndicatorView = (PaginationIndicator) findViewById(R.id.indicator);
mIndicatorView.setTotalCount(99); // 設置數據源總數量即可
mIndicatorView.setPerPageCountChoices(perPageCountChoices); // 選填
mIndicatorView.setListener(new PaginationIndicator.OnChangedListener() {
@Override
public void onPageSelectedChanged(int currentPapePos, int lastPagePos, int totalPageCount, int total) {
Toast.makeText(MainActivity.this, "選中" + currentPapePos + "頁", Toast.LENGTH_LONG).show();
}
@Override
public void onPerPageCountChanged(int perPageCount) {
// x條/頁 選項改變時觸發
}
});
...
? 相關說明已在代碼里注釋,詳細可參考demo,謝謝
依賴
recyclerview : com.android.support:recyclerview-v7:28.0.0
github地址
源碼github
如果覺得對你有所幫助,就喜歡star一下表示下支持唄,謝啦各位看官~


)

