前些天發現了一個巨牛的人工智能學習網站,通俗易懂,風趣幽默,忍不住分享一下給大家。點擊跳轉到教程。
PS:第 3 種最簡單。
一、引入 jar 。
<!-- quartz 定時任務調度 --><dependency><groupId>org.springframework</groupId><artifactId>spring-context-support</artifactId></dependency><dependency><groupId>org.quartz-scheduler</groupId><artifactId>quartz</artifactId><version>2.2.1</version></dependency><dependency><groupId>org.quartz-scheduler</groupId><artifactId>quartz-jobs</artifactId><version>2.2.1</version></dependency>二 、實現方式 一 。
1. 定義好定時任務的業務內容:
package gentle.test;import org.quartz.Job;
import org.quartz.JobExecutionContext;
import org.quartz.JobExecutionException;
import org.slf4j.Logger;
import org.slf4j.LoggerFactory;
import org.springframework.stereotype.Service;import java.util.Date;/*** @author silence* @date 2018/7/17 11:37*/
@Service("show")
public class Show implements Job {private static Logger _log = LoggerFactory.getLogger(Show.class);@Overridepublic void execute(JobExecutionContext arg0) throws JobExecutionException {_log.info("\n\n-------------------------------\n " +"It is running and the time is : " + new Date()+"\n-------------------------------\n");}}
2. 聲明定時任務,并關聯業務實現類 。在?JobDetail jb = JobBuilder.newJob(Show.class) 中關聯業務類 。
package gentle.test;import org.quartz.*;
import org.quartz.impl.StdSchedulerFactory;
import org.slf4j.Logger;
import org.slf4j.LoggerFactory;
import org.springframework.stereotype.Service;import java.util.Date;/*** @author silence* @date 2018/7/17 11:36*/
@Service("schedulerTest")
public class SchedulerTest {private static Logger _log = LoggerFactory.getLogger(Scheduler.class);public static void main(String[] args) {try {//1.創建Scheduler的工廠SchedulerFactory sf = new StdSchedulerFactory();//2.從工廠中獲取調度器實例Scheduler scheduler = sf.getScheduler();//3.創建JobDetailJobDetail jb = JobBuilder.newJob(Show.class) // Show 為一個job,是要執行的一個任務。.withDescription("這是我的測試定時任務。") //job的描述.withIdentity("jy2Job", "jy2Group") //job 的name和group.build();//任務運行的時間,SimpleSchedle類型觸發器有效long time = System.currentTimeMillis() + 3 * 1000L; // 3秒后啟動任務Date statTime = new Date(time);//4.創建Trigger//使用SimpleScheduleBuilder或者CronScheduleBuilderTrigger t = TriggerBuilder.newTrigger().withDescription("").withIdentity("jyTrigger", "jyTriggerGroup")//.withSchedule(SimpleScheduleBuilder.simpleSchedule()).startAt(statTime)  //默認當前時間啟動 ,也可以寫為:.startNow();.withSchedule(CronScheduleBuilder.cronSchedule("0/2 * * * * ?")) //兩秒執行一次.build();//5.注冊任務和定時器scheduler.scheduleJob(jb, t);//6.啟動 調度器scheduler.start();_log.info("啟動時間 : " + new Date());} catch (Exception e) {_log.info("定時任務出現異常 : " + e);}}
}
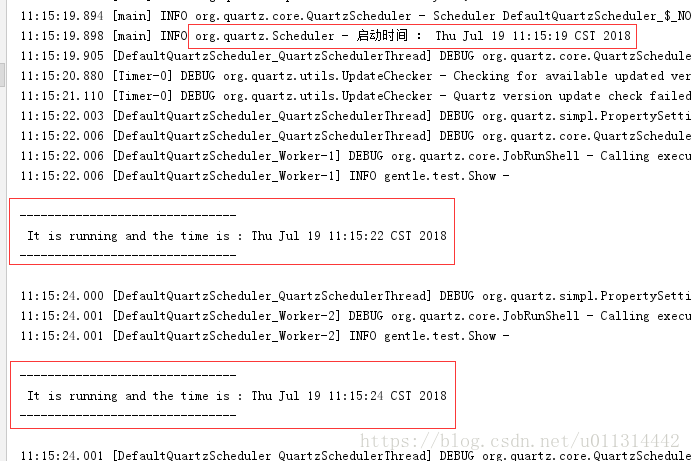
3. 運行成功:
?
實現方式 二 。
1.?定義好定時任務的業務內容:
package gentle.test;import org.quartz.Job;
import org.quartz.JobExecutionContext;
import org.quartz.JobExecutionException;
import org.slf4j.Logger;
import org.slf4j.LoggerFactory;
import org.springframework.stereotype.Service;import java.util.Date;/*** @author silence* @date 2018/7/17 11:37*/
@Service("show")
public class Show implements Job {private static Logger _log = LoggerFactory.getLogger(Show.class);@Overridepublic void execute(JobExecutionContext arg0) throws JobExecutionException {_log.info("\n\n-------------------------------\n " +"It is running and the time is : " + new Date()+"\n-------------------------------\n");}}
2. 定義好定時任務的觸發類,調用業務類中的實現 。
package gentle.test;import org.quartz.JobExecutionException;
import org.slf4j.Logger;
import org.slf4j.LoggerFactory;
import javax.annotation.Resource;
import java.text.SimpleDateFormat;
import java.util.Date;public class UserSyncTask {private final Logger logger = LoggerFactory.getLogger(this.getClass());@ResourceShow show;public void cronDepartmentsAndUsersJob() {logger.info("\n\n 定時--開始,當前時間: " + dateFormat().format(new Date()));try {show.execute(null);} catch (JobExecutionException e) {e.printStackTrace();}logger.info("\n\n 定時--結束,當前時間:" + dateFormat().format(new Date()));}private SimpleDateFormat dateFormat() {return new SimpleDateFormat("HH:mm:ss");}
}
3. 配置文件中 配置觸發類和任務執行頻率 。
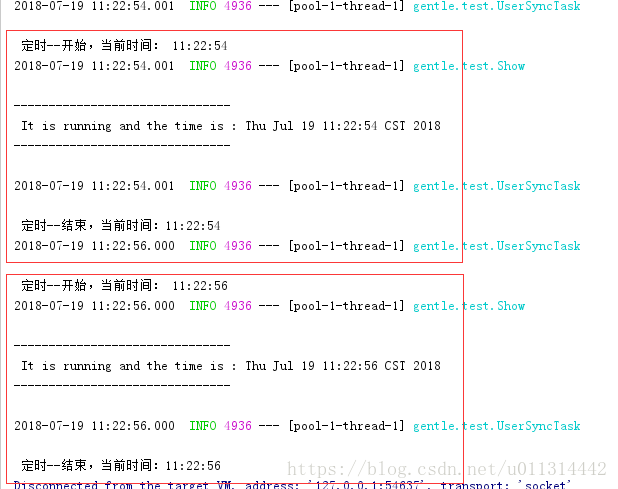
<?xml version="1.0" encoding="UTF-8"?><beans xmlns="http://www.springframework.org/schema/beans"xmlns:xsi="http://www.w3.org/2001/XMLSchema-instance" xmlns:util="http://www.springframework.org/schema/util"xmlns:task="http://www.springframework.org/schema/task"xsi:schemaLocation="http://www.springframework.org/schema/beanshttp://www.springframework.org/schema/beans/spring-beans.xsd http://www.springframework.org/schema/util http://www.springframework.org/schema/util/spring-util.xsd http://www.springframework.org/schema/task http://www.springframework.org/schema/task/spring-task.xsd"><!--定時任務觸發類--><bean id="userSyncTask" class="gentle.test.UserSyncTask"></bean><!--執行頻率--><task:scheduled-tasks><!--每 2 秒執行一次--><task:scheduled ref="userSyncTask" method="cronDepartmentsAndUsersJob" cron="0/2 * * * * ?" /></task:scheduled-tasks></beans>4. 運行成功:
?
實現方式 三?。
1.?引入 jar , 同上。
2. 運行類 代碼中只要給 2 個注解就可以了:
@EnableScheduling? // 開啟定時器、
@Scheduled(fixedDelay = 2000)? 或者 @Scheduled(cron = "* * 2 * * ?")?? // 每 2s 執行 1 次 。
代碼:
package gentle.test;import gentle.util.DateUtil;
import org.slf4j.LoggerFactory;
import org.springframework.scheduling.annotation.EnableScheduling;
import org.springframework.scheduling.annotation.Scheduled;
import org.springframework.stereotype.Component;import java.util.Date;/*** 定時任務 -- 簡版* @author silence* @date 2018/7/31 16:03*/@Component // 注冊為一個bean
@EnableScheduling // 開啟定時器
public class Sender {private final org.slf4j.Logger logger = LoggerFactory.getLogger(this.getClass());@Scheduled(fixedDelay = 2000) // 每 2s 執行1次。public void send() {logger.info(" \n------------------------\n " +"定時任務內容 :" + DateUtil.dateFormat().format(new Date()) +"\n------------------------\n");}
}
3. 運行效果:

?
源碼地址:定時任務demo


)

 - 圖像幾何變換(仿射變換/透視變換))
