highlight: arduino-light
服務端如何處理客戶端新建連接
Netty 服務端完全啟動后,就可以對外工作了。接下來 Netty 服務端是如何處理客戶端新建連接的呢? 主要分為四步:
md Boss NioEventLoop 線程輪詢客戶端新連接 OP_ACCEPT 事件; ? 構造 初始化Netty 客戶端 NioSocketChannel; ? 注冊 Netty 客戶端 NioSocketChannel 到 Worker 工作線程中; ? 從 Worker group 選擇一個 eventLoop 工作線程;注冊到選擇的eventLoop的Selector ? 注冊 OP_READ 事件到 NioSocketChannel 的事件集合。 ?
下面我們對每個步驟逐一進行簡單的介紹。
接收新連接
bossGroup的EventLoop是一個線程是一個線程是一個線程。所以等服務器端啟動起來以后就會執行線程的run方法邏輯。
java protected void run() { ? ?for (;;) { ? ? ? ?try { ? ? ? ? ? ?try { ? ? ? ? ? ?switch (selectStrategy.calculateStrategy ? ? ? ? ? ? ? ? ? (selectNowSupplier, hasTasks())) { ? ? ? ? ? ? ? ?case SelectStrategy.CONTINUE: ? ? ? ? ? ? ? ? ? ?continue; ? ? ? ? ? ? ? ?case SelectStrategy.BUSY_WAIT: ? ? ? ? ? ? ? ?case SelectStrategy.SELECT: ? ? ? ? ? ? ? ? ? ?select(wakenUp.getAndSet(false)); // 輪詢 I/O 事件 ? ? ? ? ? ? ? ? ? ?if (wakenUp.get()) { ? ? ? ? ? ? ? ? ? ? ? ?selector.wakeup(); ? ? ? ? ? ? ? ? ? } ? ? ? ? ? ? ? ?default: ? ? ? ? ? ? ? } ? ? ? ? ? } catch (IOException e) { ? ? ? ? ? ? ? ?rebuildSelector0(); ? ? ? ? ? ? ? ?handleLoopException(e); ? ? ? ? ? ? ? ?continue; ? ? ? ? ? } ? ? ? ? ? ?cancelledKeys = 0; ? ? ? ? ? ?needsToSelectAgain = false; ? ? ? ? ? ?final int ioRatio = this.ioRatio; ? ? ? ? ? ?if (ioRatio == 100) { ? ? ? ? ? ? ? ?try { ? ? ? ? ? ? ? ? ? ?// 處理 I/O 事件 ? ? ? ? ? ? ? ? ? ?processSelectedKeys(); ? ? ? ? ? ? ? } finally { ? ? ? ? ? ? ? ? ? ?runAllTasks(); // 處理所有任務 ? ? ? ? ? ? ? } ? ? ? ? ? } else { ? ? ? ? ? ? ? ?final long ioStartTime = System.nanoTime(); ? ? ? ? ? ? ? ?try { ? ? ? ? ? ? ? ? ? ?processSelectedKeys(); // 處理 I/O 事件 ? ? ? ? ? ? ? } finally { ? ? ? ? ? ? ? ? ? ?final long ioTime = System.nanoTime() - ioStartTime; ? ? ? ? ? ? ? ? ? ?// 處理完 I/O 事件,再處理異步任務隊列 ? ? ? ? ? ? ? ? ? ?runAllTasks(ioTime * (100 - ioRatio) / ioRatio); ? ? ? ? ? ? ? } ? ? ? ? ? } ? ? ? } catch (Throwable t) { ? ? ? ? ? ?handleLoopException(t); ? ? ? } ? ? ? ?try { ? ? ? ? ? ?if (isShuttingDown()) { ? ? ? ? ? ? ? ?closeAll(); ? ? ? ? ? ? ? ?if (confirmShutdown()) { ? ? ? ? ? ? ? ? ? ?return; ? ? ? ? ? ? ? } ? ? ? ? ? } ? ? ? } catch (Throwable t) { ? ? ? ? ? ?handleLoopException(t); ? ? ? } ? } } ?
NioEventLoop#processSelectedKeys
java // processSelectedKeys private void processSelectedKeys() { if (selectedKeys != null) { //不用JDK的selector.selectedKeys(), 性能更好(1%-2%),垃圾回收更少 processSelectedKeysOptimized(); } else { processSelectedKeysPlain(selector.selectedKeys()); } }
服務器端監聽 OP_ACCEPT 事件讀取消息
NioEventLoop#processSelectedKeysOptimized
Netty 中 Boss NioEventLoop 專門負責接收新的連接,關于 NioEventLoop 的核心源碼我們下節課會著重介紹,在這里我們只先了解基本的處理流程。當客戶端有新連接接入服務端時,Boss NioEventLoop 會監聽到 OP_ACCEPT 事件,源碼如下所示:
```java private void processSelectedKeysOptimized() { for (int i = 0; i < selectedKeys.size; ++i) { final SelectionKey k = selectedKeys.keys[i]; // null out entry in the array to allow to have it GC'ed once the Channel close // See https://github.com/netty/netty/issues/2363 selectedKeys.keys[i] = null;
//呼應于channel的register中的this: //selectionKey = javaChannel().register(eventLoop()//                            .unwrappedSelector(), 0, this);final Object a = k.attachment();//因為客戶端和服務器端的都繼承自AbstractNioChannelif (a instanceof AbstractNioChannel) {//會進入判斷processSelectedKey(k, (AbstractNioChannel) a);} else {@SuppressWarnings("unchecked")NioTask<SelectableChannel> task = (NioTask<SelectableChannel>) a;processSelectedKey(k, task);}if (needsToSelectAgain) {// null out entries in the array to allow to have it GC'ed once the Channel close// See https://github.com/netty/netty/issues/2363selectedKeys.reset(i + 1);selectAgain();i = -1;}}
}
```
NioEventLoop#processSelectedKey
```java private void processSelectedKey(SelectionKey k, AbstractNioChannel ch) { final AbstractNioChannel.NioUnsafe unsafe = ch.unsafe(); if (!k.isValid()) { final EventLoop eventLoop; try { eventLoop = ch.eventLoop(); } catch (Throwable ignored) { return; }
if (eventLoop != this || eventLoop == null) {return;}// close the channel if the key is not valid anymoreunsafe.close(unsafe.voidPromise());return;}try {int readyOps = k.readyOps();if ((readyOps & SelectionKey.OP_CONNECT) != 0) {int ops = k.interestOps();ops &= ~SelectionKey.OP_CONNECT;k.interestOps(ops);unsafe.finishConnect();}if ((readyOps & SelectionKey.OP_WRITE) != 0) {ch.unsafe().forceFlush();}//處理讀請求(斷開連接)或接入連接if ((readyOps & (SelectionKey.OP_READ | SelectionKey.OP_ACCEPT))!= 0 || readyOps == 0) {//開始處理請求 服務器端處理的是OP_ACCEPT 接收新連接 unsafe.read();}} catch (CancelledKeyException ignored) {unsafe.close(unsafe.voidPromise());}
}
```
NioMessageUnsafe#read
NioServerSocketChannel 所持有的 unsafe 是 NioMessageUnsafe 類型。
我們看下 NioMessageUnsafe.read() 方法中做了什么事。
```java public void read() { assert eventLoop().inEventLoop(); final ChannelConfig config = config(); final ChannelPipeline pipeline = pipeline(); final RecvByteBufAllocator.Handle allocHandle = unsafe().recvBufAllocHandle(); allocHandle.reset(config); boolean closed = false; Throwable exception = null; try { try {
do {//readBuf一開始是一個空List//while 循環不斷讀取 Buffer 中的數據//創建底層SocketChannel并封裝為NioSocketChannel放到readBuf返回1int localRead = doReadMessages(readBuf); //執行完上面的方法 readBuf放的是新創建的NioSocketChannelif (localRead == 0) {break;}if (localRead < 0) {closed = true;break;}allocHandle.incMessagesRead(localRead);//是否需要繼續讀 因為是建立連接 所以總共讀取的字節數是0 不會繼續進入循環//這里一次最多處理16個連接} while (allocHandle.continueReading());} catch (Throwable t) {exception = t;}int size = readBuf.size();//readBuf放的是新創建的NioSocketChannelfor (int i = 0; i < size; i ++) {readPending = false;// 對于服務器端NioServerSocketChannel來說 // handler有// 1.head // 2.ClientLoggingHandler // 3.ServerBootstrapAcceptor// 4.tail// 接下來就是調用服務器端的每個handler的channelRead方法 傳播讀取事件// 比如ClientLoggingHandler的channelRead用于打印接收到的消息到日志// 比如 serverBootStrapAcceptor的channelRead //用于向客戶端的SocketChannel的pipeline添加handler//就是把服務器端方法中的childHandler都添加到客戶端的NioSocketChannel的pipeline//具體看serverBootStrapAcceptor的channelRead 方法pipeline.fireChannelRead(readBuf.get(i)); }readBuf.clear();allocHandle.readComplete();// 傳播讀取完畢事件pipeline.fireChannelReadComplete(); // 省略其他代碼
} finally {if (!readPending && !config.isAutoRead()) {removeReadOp();}
}
} ```
可以看出 read() 方法的核心邏輯就是通過 while 循環不斷讀取數據,然后放入 List 中,這里的數據其實就是新連接。每次最多處理16個。
需要重點跟進一下 NioServerSocketChannel 的 doReadMessages() 方法。
接前面NioMessageUnsafe#read
繼續接著NioMessageUnsafe#read看
1.NioServerSocketChannel #doReadMessages
接收&&創建&初始化客戶端連接
```java protected int doReadMessages(List
protected AbstractNioChannel(Channel parent, SelectableChannel ch, int readInterestOp) { super(parent); this.ch = ch; //設置讀事件到NioSocketChannel this.readInterestOp = readInterestOp; try { //非阻塞模式 ch.configureBlocking(false); } catch (IOException e) { try { ch.close(); } catch (IOException e2) { logger.warn( "Failed to close a partially initialized socket.", e2); }
throw new ChannelException("Failed to enter non-blocking mode.", e);}
}
public static SocketChannel accept(final ServerSocketChannel serverSocketChannel) throws IOException { try { return AccessController.doPrivileged(new PrivilegedExceptionAction () { @Override public SocketChannel run() throws IOException { // 非阻塞模式下,沒有連接請求時,返回null return serverSocketChannel.accept(); } }); } catch (PrivilegedActionException e) { throw (IOException) e.getCause(); } } ```
這時就開始執行第二個步驟:構造 Netty 客戶端 NioSocketChannel。Netty 先通過 JDK 底層的 accept() 獲取 JDK 原生的 SocketChannel,然后將它封裝成 Netty 自己的 NioSocketChannel。
新建 Netty 的客戶端 Channel 的實現原理與上文中我們講到的創建服務端 Channel 的過程是類似的,只是服務端 Channel 的類型是 NioServerSocketChannel,而客戶端 Channel 的類型是 NioSocketChannel。
NioSocketChannel 的創建同樣會完成幾件事:創建核心成員變量 id、unsafe、pipeline;
注冊 SelectionKey.OP_READ 事件;設置 Channel 的為非阻塞模式;新建客戶端 Channel 的配置。
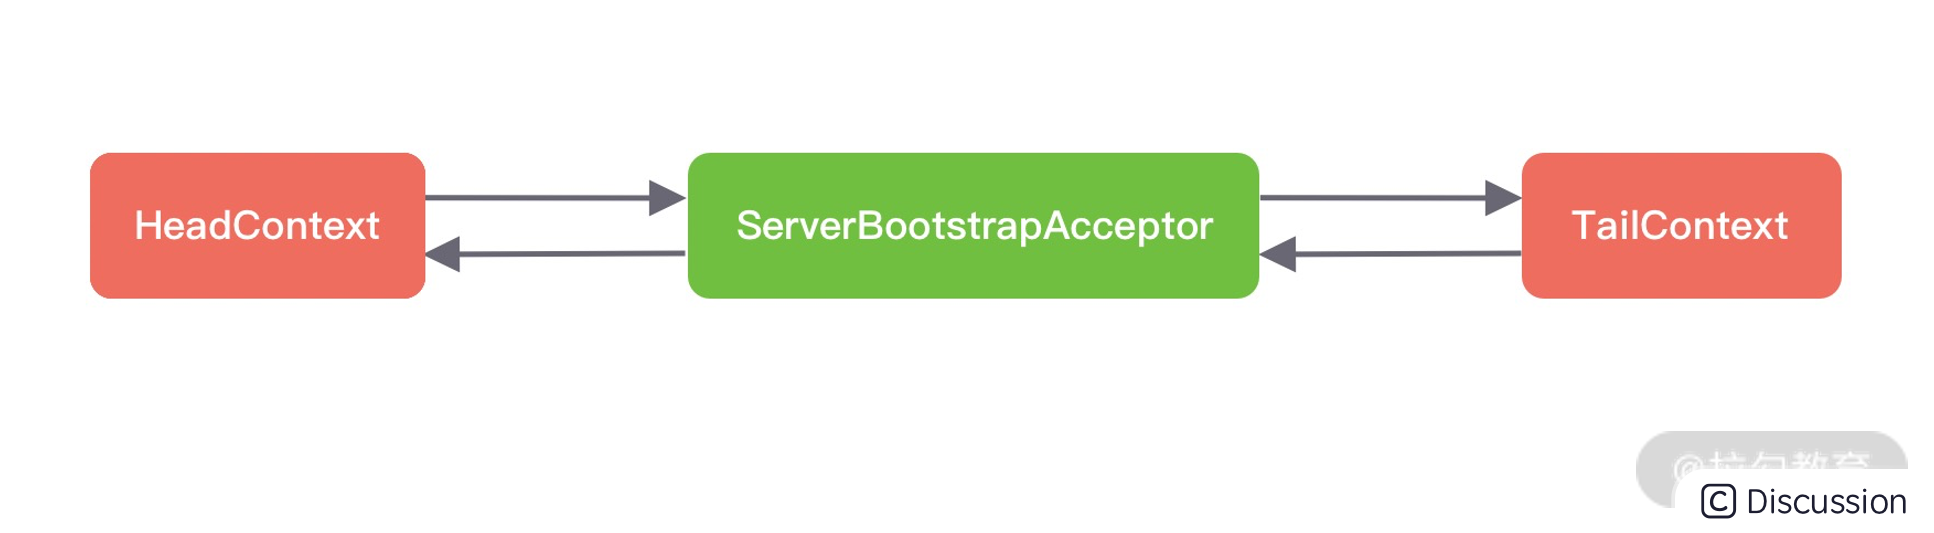
成功構造客戶端 NioSocketChannel 后,接下來會通過 pipeline.fireChannelRead() 觸發 channelRead 事件傳播。對于服務端來說,此時 Pipeline 的內部結構如下圖所示。
2.pipeline.fireChannelRead
上文中我們提到了一種特殊的處理器 ServerBootstrapAcceptor,在下面它就發揮了重要的作用。channelRead 事件會傳播到 ServerBootstrapAcceptor.channelRead() 方法,channelRead() 會將客戶端 Channel 分配到工作線程組中去執行。具體實現如下:
觸發服務器端hanlder#channelRead
ServerBootstrapAcceptor#channelRead
java //ServerBootstrapAcceptor負責接收客戶端連接 創建連接后,對連接的初始化工作。 // ServerBootstrapAcceptor.channelRead() 方法 public void channelRead(ChannelHandlerContext ctx, Object msg) { final Channel child = (Channel) msg; //childHandler是我們自定義的EchoServer的代理類 child.pipeline().addLast(childHandler); setChannelOptions(child, childOptions, logger); setAttributes(child, childAttrs); try { // 注冊客戶端 Channel到工作線程組 //1.MultithreadEventLoopGroup#register childGroup.register(child).addListener(new ChannelFutureListener() { @Override public void operationComplete(ChannelFuture future) throws Exception { if (!future.isSuccess()) { forceClose(child, future.cause()); } } }); } catch (Throwable t) { forceClose(child, t); } }
ServerBootstrapAcceptor 開始就把 msg 強制轉換為 Channel。難道不會有其他類型的數據嗎?
因為 ServerBootstrapAcceptor 是服務端 Channel 中一個特殊的處理器,而服務端 Channel 的 channelRead 事件只會在新連接接入時觸發,所以這里拿到的數據都是客戶端新連接。
register():注冊客戶端 Channel
java //MultithreadEventLoopGroup#register //從workGroup中選擇一個EventLoop注冊到channel @Override public ChannelFuture register(Channel channel) { return next().register(channel); }
```java //io.netty.channel.nio.AbstractChannel#register0 private void register0(ChannelPromise promise) { try { if (!promise.setUncancellable() || !ensureOpen(promise)) { return; } boolean firstRegistration = neverRegistered; //綁定選擇器 doRegister(); neverRegistered = false; registered = true; //給客戶端添加處理器 pipeline.invokeHandlerAddedIfNeeded(); safeSetSuccess(promise); pipeline.fireChannelRegistered();
//NioServerSocketChannel的注冊不會走進下面if(isActive())//NioSocketChannel可以走進去if(isActive())。因為accept后就active了。if (isActive()) {if (firstRegistration) {//第一次注冊需要觸發pipeline上的hanlder的read事件//實際上就是注冊OP_ACCEPT/OP_READ事件:創建連接或者讀事件//首先會進入DefaultChannelPipeLine的read方法pipeline.fireChannelActive();} else if (config().isAutoRead()) {//第二次注冊的時候beginRead();}}} catch (Throwable t) {// Close the channel directly to avoid FD leak.closeForcibly();closeFuture.setClosed();safeSetFailure(promise, t);}}```
客戶端SocketChannel綁定selector
AbstractNioChannel#doRegister
java //io.netty.channel.nio.AbstractNioChannel#doRegister @Override protected void doRegister() throws Exception { boolean selected = false; for (;;) { try { logger.info("initial register: " + 0); //這里的事件類型仍然是0 //attachement是NioSocketChannel selectionKey = javaChannel().register (eventLoop().unwrappedSelector(), 0, this); return; } catch (CancelledKeyException e) { if (!selected) { // Force the Selector to select now as the "canceled" //SelectionKey may still be // cached and not removed because no //Select.select(..) operation was called yet. eventLoop().selectNow(); selected = true; } else { // We forced a select operation on the selector before but the SelectionKey is still cached // for whatever reason. JDK bug ? throw e; } } } }
DefaultChannelPipeline.HeadContext#read
java //io.netty.channel.DefaultChannelPipeline.HeadContext#read @Override public void read(ChannelHandlerContext ctx) { //實際上就是注冊OP_ACCEPT/OP_READ事件:創建連接或者讀事件 unsafe.beginRead(); }
```java @Override public final void beginRead() { assertEventLoop();
if (!isActive()) {return;}try {doBeginRead();} catch (final Exception e) {invokeLater(new Runnable() {@Overridepublic void run() {pipeline.fireExceptionCaught(e);}});close(voidPromise());}}```
```java @Override protected void doBeginRead() throws Exception { // Channel.read() or ChannelHandlerContext.read() was called final SelectionKey selectionKey = this.selectionKey; if (!selectionKey.isValid()) { return; }
readPending = true;final int interestOps = selectionKey.interestOps();//super(parent, ch, SelectionKey.OP_READ);//假設之前沒有監聽readInterestOp,則監聽readInterestOpif ((interestOps & readInterestOp) == 0) {//NioServerSocketChannel: readInterestOp = OP_ACCEPT = 1 << 4 = 16logger.info("interest ops: " + readInterestOp);selectionKey.interestOps(interestOps | readInterestOp);}
}
```
ServerBootstrapAcceptor 通過 childGroup.register() 方法會完成第三和第四兩個步驟.
1.將 NioSocketChannel 注冊到 Worker 工作線程中
2.并注冊 OP_READ 事件到 NioSocketChannel 的事件集合。
在注冊過程中比較有意思的一點是,它會調用 pipeline.fireChannelRegistered() 方法傳播 channelRegistered 事件,然后再調用 pipeline.fireChannelActive() 方法傳播 channelActive 事件。
兜了一圈,這又會回到之前我們介紹的 readIfIsAutoRead() 方法,此時它會將 SelectionKey.OP_READ 事件注冊到 Channel 的事件集合。
添加自定義handler到客戶端SocketChannel
pipeline.invokeHandlerAddedIfNeeded
總結
java ?接受連接本質: ? selector.select()/selectNow()/select(timeoutMillis) 發現 OP_ACCEPT 事件,處理: ? ?SocketChannel socketChannel = serverSocketChannel.accept() ? ?selectionKey = javaChannel().register(eventLoop().unwrappedSelector(), 0, this); ? ?selectionKey.interestOps(OP_READ); ?
關于服務端如何處理客戶端新建連接的具體源碼,我在此就不繼續展開了。這里留一個小任務,建議你親自動手分析下 childGroup.register() 的相關源碼,從而加深對服務端啟動以及新連接處理流程的理解。有了服務端啟動源碼分析的基礎,再去理解客戶端新建連接的過程會相對容易很多。

--堆)


)


)


