滑塊驗證碼
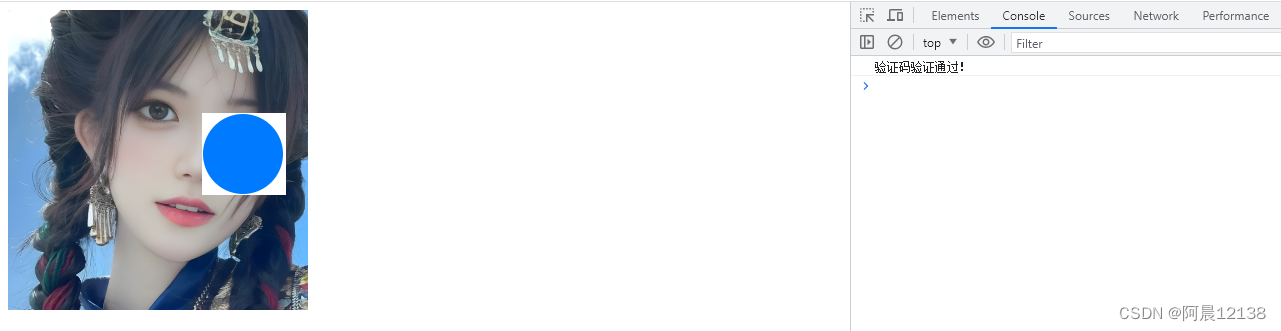
效果圖:
實現思路:
根據滑塊的最左側點跟最右側點,?是否在規定的距離內【頁面最左側為原點】,來判斷是否通過
html代碼:
<!DOCTYPE html>
<html><head><title>滑動圖片驗證碼</title><style>.captcha-container {position: relative;width: 300px;height: 300px;overflow: hidden;}#captcha-image {position: absolute;width: 100%;height: 100%;background-color: #f2f2f2;background-image: url('./img/text.png');background-size: cover;}#slider {position: absolute;top: 48%;left: 0;transform: translateY(-50%);width: 80px;height: 80px;background-color: #007bff;border-radius: 50%;cursor: pointer;z-index: 999;}</style>
</head><body><div class="captcha-container"><div id="captcha-image"></div><div id="slider"></div></div><script src="https://code.jquery.com/jquery-3.6.0.min.js"></script><script src="./js/captcha.js"></script>
</body></html>
js代碼:
$(document).ready(function() {var isDragging = false; // 判斷是否正在拖動滑塊var slider = $("#slider");var captchaContainer = $(".captcha-container");var captchaWidth = captchaContainer.width();var maxOffset = captchaWidth - slider.width(); // 滑塊最大可移動距離// 鼠標按下觸發slider.mousedown(function(e) {isDragging = true;});// 鼠標移動觸發$(document).mousemove(function(e) {// 判斷是否可以拖動if (isDragging) {// e.pageX 是鼠標當前所在位置相對于整個文檔(document)左側的水平位置// captchaContainer.offset().left 是容器左側邊界相對于文檔左側的水平位置。var leftOffset = e.pageX - captchaContainer.offset().left; // console.log(e.pageX,captchaContainer.offset().left)if (leftOffset >= 0 && leftOffset <= maxOffset) {slider.css("left", leftOffset);}}});// 鼠標釋放觸發$(document).mouseup(function(e) {if (isDragging) {var captchaPassed = false; // 是否通過驗證的標志var leftOffset = e.pageX - captchaContainer.offset().left; // 滑塊距離容器左側距離if (leftOffset >= 195 && leftOffset <= 280) { //滑塊要到達的目標位置captchaPassed = true;}if (captchaPassed) {// 驗證通過,執行你的相關操作console.log("驗證碼驗證通過!");} else {// 驗證失敗,重置滑塊位置console.log("驗證碼驗證失敗!");slider.animate({ left: 0 }, 200);}isDragging = false;}});});注解:圖片需要自己放一張,然后滑塊驗證的距離通過下面代碼規定:
if (leftOffset >= 195 && leftOffset <= 280) { //滑塊要到達的目標位置xxxxxxx
}
瀏覽器打印
一開始編寫的代碼如下:
<!DOCTYPE html>
<html><head><title>打印頁面</title><script src="https://code.jquery.com/jquery-3.6.0.min.js"></script>
</head><body><button id="printButton">打印</button><!-- 頁面內容 --><h1>歡迎打印該頁面</h1><p>這是要打印的頁面內容。</p><script>$(document).ready(function () {// 點擊按鈕觸發打印事件$("#printButton").click(function () {window.print(); // 調用window.print()方法打印頁面});});</script>
</body></html>
發現這樣會打印整個頁面的內容,不符合需求:

后來進行改進,打印指定的div下的內容:
新建一個臨時頁面,然后將指定內容賦值到臨時頁面進行打印,打印之后再關閉臨時頁面,這樣就不會打印無關的內容了
<!DOCTYPE html>
<html><head><title>打印頁面</title><script src="https://code.jquery.com/jquery-3.6.0.min.js"></script>
</head><body><button id="printButton">打印</button><!-- 指定內容 --><div id="customDiv"><h1 style="color: red;">歡迎打印該頁面</h1><p style="background-color: aqua; font-size: 88px;">這是要打印的頁面內容。</p></div><script>$(document).ready(function () {// 點擊按鈕觸發打印事件$("#printButton").click(function () {var printContents = $("#customDiv").html(); // 獲取要打印的內容var printWindow = window.open("", "_blank"); // 打開一個新窗口printWindow.document.write('<html><head>');printWindow.document.write('<title>打印</title>');printWindow.document.write('</head><body>');printWindow.document.write(printContents); // 將要打印的內容寫入新窗口printWindow.document.write('</body></html>');printWindow.document.close();printWindow.print(); // 在新窗口中調用 print() 方法打印內容printWindow.close(); // 關閉新窗口});});</script>
</body></html>
但是這樣打印,一些樣式就無法進行打印了

注解:printWindow.document.close() 是用于關閉在新窗口中打開的文檔流
printWindow.document.write() 方法向新窗口的文檔流中寫入了 HTML 內容。然而,在將內容添加到文檔流后,我們需要調用 printWindow.document.close() 來關閉文檔流
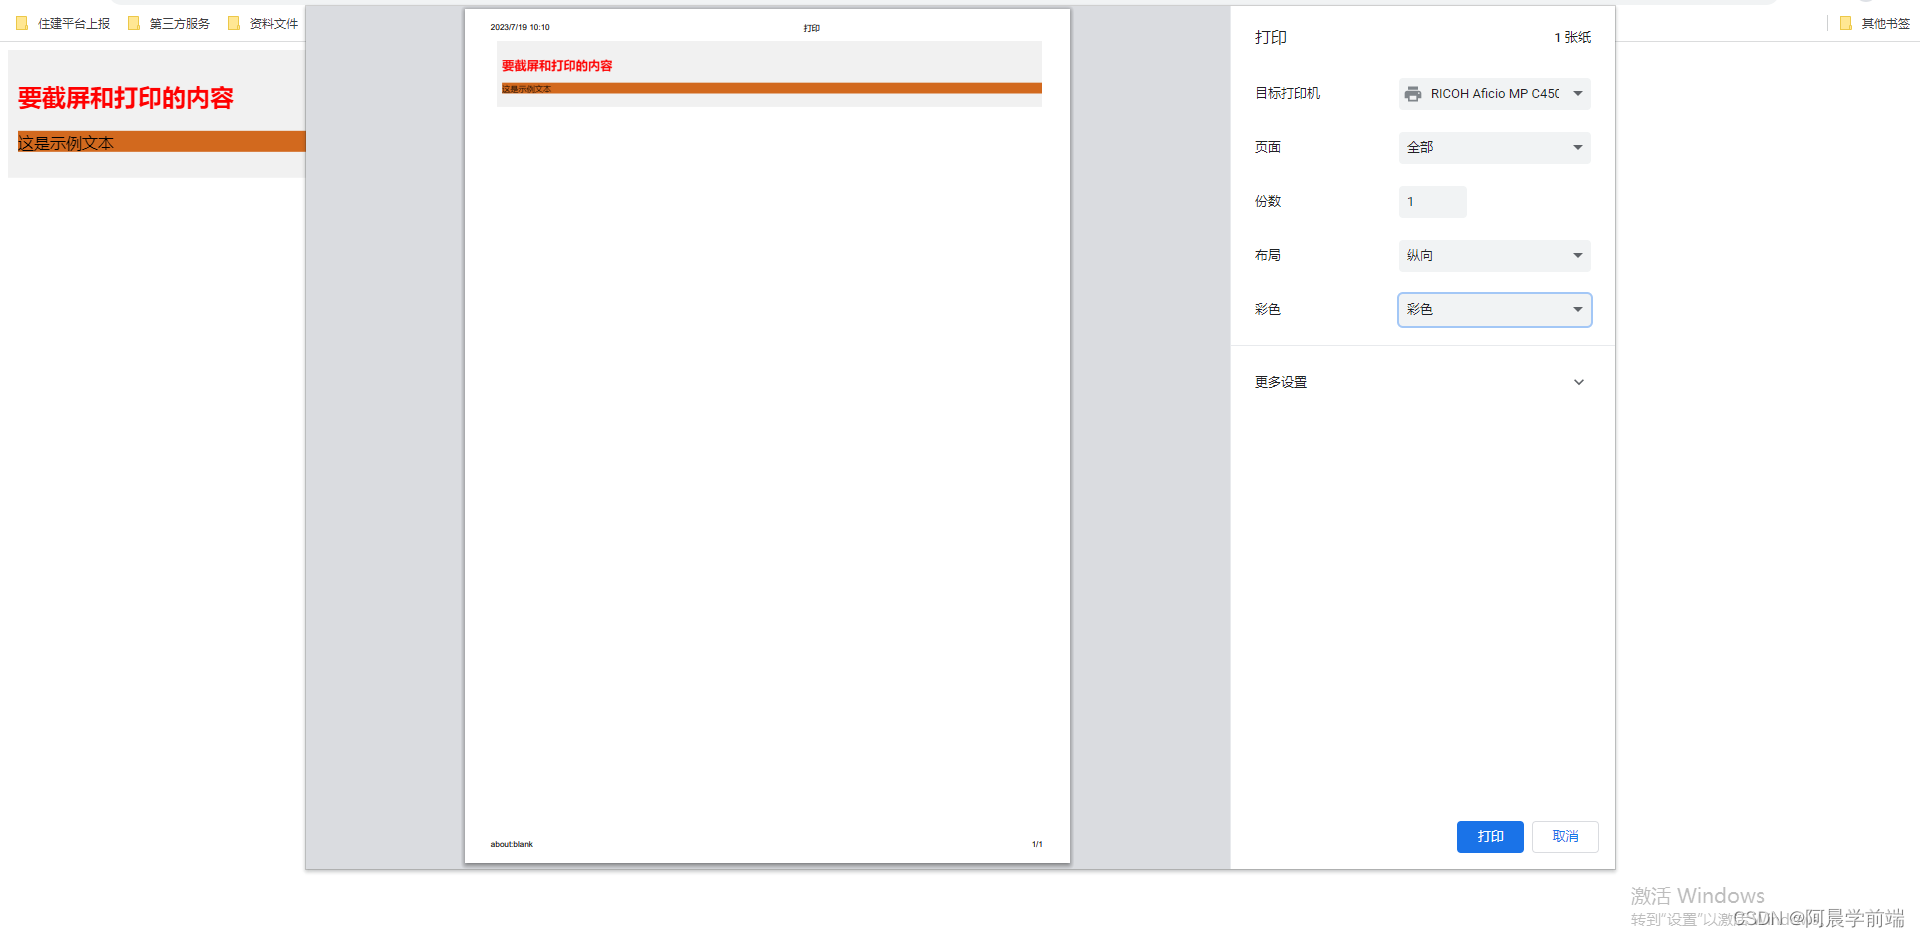
于是又進行修改,想著能不能對指定內容進行一個截屏,然后將截屏的圖片進行打印,這樣就可以保留跟打印內容一樣的樣式了:
<!DOCTYPE html>
<html><head><title>截屏并打印</title><script src="https://cdnjs.cloudflare.com/ajax/libs/html2canvas/1.4.0/html2canvas.min.js"></script><script src="https://code.jquery.com/jquery-3.6.0.min.js"></script>
</head><body><div id="customDiv" style="background-color: #f1f1f1; padding: 10px;"><h2 style="color: red;">要截屏和打印的內容</h2><p style="background-color: chocolate;">這是示例文本</p></div><button id="printButton">截屏并打印</button><script>$(document).ready(function () {// 點擊按鈕觸發截屏和打印事件$("#printButton").click(function () {var targetDiv = document.getElementById("customDiv");var printWindow = window.open("", "_blank"); // 打開一個新窗口html2canvas(targetDiv).then(function (canvas) {var imageData = canvas.toDataURL(); // 獲取截圖數據var imageElement = new Image();imageElement.src = imageData;printWindow.document.write('<html><head>');printWindow.document.write('<title>打印</title>');printWindow.document.write('</head><body>');printWindow.document.write(imageElement.outerHTML); // 將截圖添加到新窗口printWindow.document.write('</body></html>');printWindow.document.close();setTimeout(function () {printWindow.print(); // 在新窗口中調用 print() 方法打印內容printWindow.close(); // 關閉新窗口}, 1000); // 延遲 1 秒等待圖像加載完成(可根據需要調整延遲時間)});});});</script>
</body></html>
效果如下:
注解:
引入了 html2canvas 庫,它可以將指定元素(這里是 <div>)轉換為 <canvas>,從而實現截屏功能
當我們點擊按鈕時,使用 html2canvas 函數將指定 <div>(在代碼中被稱為 targetDiv)轉換為 <canvas>。然后,我們使用 toDataURL() 將 <canvas> 中的圖像數據轉換為 URL 格式


![[測試報告] 愛搜Blog 自動化測試報告](http://pic.xiahunao.cn/[測試報告] 愛搜Blog 自動化測試報告)


)


)
