文章目錄
- 摘要
- 安裝包
- 安裝timm
- 安裝 grad-cam
- 安裝einops
- 數據增強Cutout和Mixup
- EMA
- 項目結構
- 計算mean和std
- 生成數據集
摘要
論文翻譯:https://blog.csdn.net/m0_47867638/article/details/132034098?spm=1001.2014.3001.5501
官方源碼:https://github.com/zhangzjn/EMO
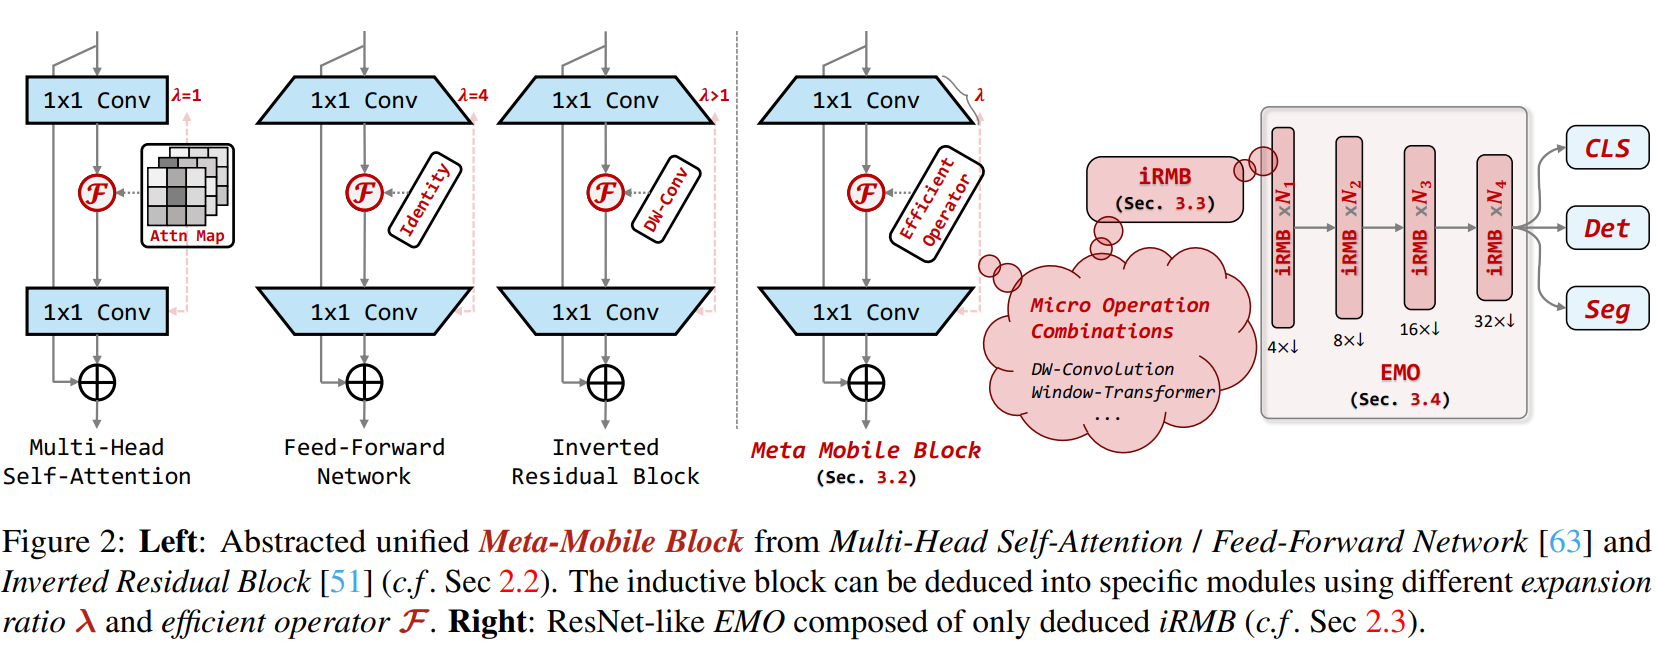
EMO是高效、輕量級的模型,以在參數、FLOPs和性能之間實現平衡,適用于密集預測任務。文章從倒立殘差塊(IRB)和Transformer的有效組件的統一角度出發,將基于CNN的IRB擴展到基于注意力的模型,并抽象出一個用于輕量級模型設計的單殘留元移動塊(MMB)。
作者提出了反向殘差移動塊(iRMB),并根據簡單而有效的設計準則構建了一個只有iRMB的類ResNet高效模型(EMO)用于下游任務。實驗結果表明,EMO在ImageNet-1K、COCO2017和ADE20K基準測試上表現出優異的性能,超過了SOTA的CNN和基于注意力的模型。EMO-1m/2M/5M達到71.5、75.1和78.4 Top-1,同時實現了良好的參數效率與精度權衡,運行速度比iPhone14上的EdgeNeXt快2.8-4.0倍。
EMO為輕量級模型設計提供了一個新的思路,通過將CNN和Transformer的有效組件統一起來,實現了高效的模型性能。大量實驗驗證了所提出的方法的有效性和優越性,為相關領域的研究提供了有益的參考。總的來說,文章提出的方法在參數效率、性能和計算成本之間實現了良好的平衡,具有廣泛的應用前景。
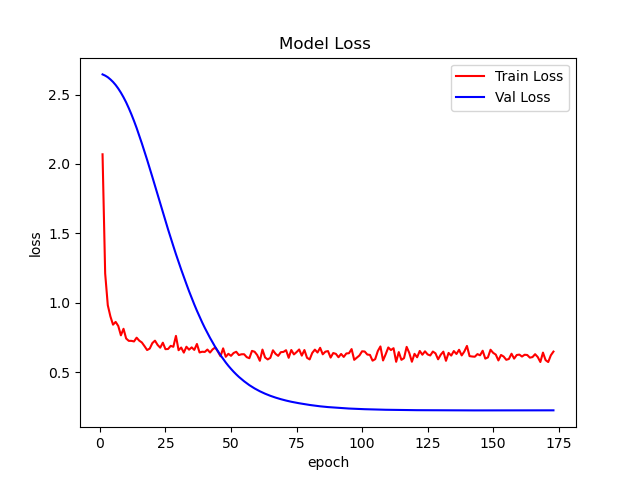
這篇文章使用EMO完成植物分類任務,模型采用EMO_1M向大家展示如何使用EMO。EMO_1M在這個數據集上實現了96+%的ACC,如下圖:

通過這篇文章能讓你學到:
- 如何使用數據增強,包括transforms的增強、CutOut、MixUp、CutMix等增強手段?
- 如何實現EMO模型實現訓練?
- 如何使用pytorch自帶混合精度?
- 如何使用梯度裁剪防止梯度爆炸?
- 如何使用DP多顯卡訓練?
- 如何繪制loss和acc曲線?
- 如何生成val的測評報告?
- 如何編寫測試腳本測試測試集?
- 如何使用余弦退火策略調整學習率?
- 如何使用AverageMeter類統計ACC和loss等自定義變量?
- 如何理解和統計ACC1和ACC5?
- 如何使用EMA?
- 如果使用Grad-CAM 實現熱力圖可視化?
如果基礎薄弱,對上面的這些功能難以理解可以看我的專欄:經典主干網絡精講與實戰
這個專欄,從零開始時,一步一步的講解這些,讓大家更容易接受。
安裝包
安裝timm
使用pip就行,命令:
pip install timm
mixup增強和EMA用到了timm
安裝 grad-cam
pip install grad-cam
安裝einops
pip install einops
數據增強Cutout和Mixup
為了提高成績我在代碼中加入Cutout和Mixup這兩種增強方式。實現這兩種增強需要安裝torchtoolbox。安裝命令:
pip install torchtoolbox
Cutout實現,在transforms中。
from torchtoolbox.transform import Cutout
# 數據預處理
transform = transforms.Compose([transforms.Resize((224, 224)),Cutout(),transforms.ToTensor(),transforms.Normalize([0.5, 0.5, 0.5], [0.5, 0.5, 0.5])])
需要導入包:from timm.data.mixup import Mixup,
定義Mixup,和SoftTargetCrossEntropy
mixup_fn = Mixup(mixup_alpha=0.8, cutmix_alpha=1.0, cutmix_minmax=None,prob=0.1, switch_prob=0.5, mode='batch',label_smoothing=0.1, num_classes=12)criterion_train = SoftTargetCrossEntropy()
參數詳解:
mixup_alpha (float): mixup alpha 值,如果 > 0,則 mixup 處于活動狀態。
cutmix_alpha (float):cutmix alpha 值,如果 > 0,cutmix 處于活動狀態。
cutmix_minmax (List[float]):cutmix 最小/最大圖像比率,cutmix 處于活動狀態,如果不是 None,則使用這個 vs alpha。
如果設置了 cutmix_minmax 則cutmix_alpha 默認為1.0
prob (float): 每批次或元素應用 mixup 或 cutmix 的概率。
switch_prob (float): 當兩者都處于活動狀態時切換cutmix 和mixup 的概率 。
mode (str): 如何應用 mixup/cutmix 參數(每個’batch’,‘pair’(元素對),‘elem’(元素)。
correct_lam (bool): 當 cutmix bbox 被圖像邊框剪裁時應用。 lambda 校正
label_smoothing (float):將標簽平滑應用于混合目標張量。
num_classes (int): 目標的類數。
EMA
EMA(Exponential Moving Average)是指數移動平均值。在深度學習中的做法是保存歷史的一份參數,在一定訓練階段后,拿歷史的參數給目前學習的參數做一次平滑。具體實現如下:
import logging
from collections import OrderedDict
from copy import deepcopy
import torch
import torch.nn as nn_logger = logging.getLogger(__name__)class ModelEma:def __init__(self, model, decay=0.9999, device='', resume=''):# make a copy of the model for accumulating moving average of weightsself.ema = deepcopy(model)self.ema.eval()self.decay = decayself.device = device  # perform ema on different device from model if setif device:self.ema.to(device=device)self.ema_has_module = hasattr(self.ema, 'module')if resume:self._load_checkpoint(resume)for p in self.ema.parameters():p.requires_grad_(False)def _load_checkpoint(self, checkpoint_path):checkpoint = torch.load(checkpoint_path, map_location='cpu')assert isinstance(checkpoint, dict)if 'state_dict_ema' in checkpoint:new_state_dict = OrderedDict()for k, v in checkpoint['state_dict_ema'].items():# ema model may have been wrapped by DataParallel, and need module prefixif self.ema_has_module:name = 'module.' + k if not k.startswith('module') else kelse:name = knew_state_dict[name] = vself.ema.load_state_dict(new_state_dict)_logger.info("Loaded state_dict_ema")else:_logger.warning("Failed to find state_dict_ema, starting from loaded model weights")def update(self, model):# correct a mismatch in state dict keysneeds_module = hasattr(model, 'module') and not self.ema_has_modulewith torch.no_grad():msd = model.state_dict()for k, ema_v in self.ema.state_dict().items():if needs_module:k = 'module.' + kmodel_v = msd[k].detach()if self.device:model_v = model_v.to(device=self.device)ema_v.copy_(ema_v * self.decay + (1. - self.decay) * model_v)
加入到模型中。
#初始化
if use_ema:model_ema = ModelEma(model_ft,decay=model_ema_decay,device='cpu',resume=resume)# 訓練過程中,更新完參數后,同步update shadow weights
def train():optimizer.step()if model_ema is not None:model_ema.update(model)# 將model_ema傳入驗證函數中
val(model_ema.ema, DEVICE, test_loader)
針對沒有預訓練的模型,容易出現EMA不上分的情況,這點大家要注意啊!
項目結構
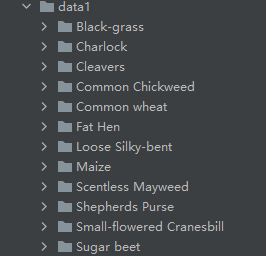
EMO_Demo
├─data1
│  ├─Black-grass
│  ├─Charlock
│  ├─Cleavers
│  ├─Common Chickweed
│  ├─Common wheat
│  ├─Fat Hen
│  ├─Loose Silky-bent
│  ├─Maize
│  ├─Scentless Mayweed
│  ├─Shepherds Purse
│  ├─Small-flowered Cranesbill
│  └─Sugar beet
├─models
│  ├─__init__.py
│  ├─_emo_ios.py
│  ├─basic_modules.py
│  ├─cls_factory.py
│  └─emo.py
├─mean_std.py
├─makedata.py
├─train.py
├─cam_image.py
└─test.py
models:來源官方代碼,對面的代碼做了一些適應性修改。
mean_std.py:計算mean和std的值。
makedata.py:生成數據集。
ema.py:EMA腳本
train.py:訓練InceptionNext模型
cam_image.py:熱力圖可視化
計算mean和std
為了使模型更加快速的收斂,我們需要計算出mean和std的值,新建mean_std.py,插入代碼:
from torchvision.datasets import ImageFolder
import torch
from torchvision import transformsdef get_mean_and_std(train_data):train_loader = torch.utils.data.DataLoader(train_data, batch_size=1, shuffle=False, num_workers=0,pin_memory=True)mean = torch.zeros(3)std = torch.zeros(3)for X, _ in train_loader:for d in range(3):mean[d] += X[:, d, :, :].mean()std[d] += X[:, d, :, :].std()mean.div_(len(train_data))std.div_(len(train_data))return list(mean.numpy()), list(std.numpy())if __name__ == '__main__':train_dataset = ImageFolder(root=r'data1', transform=transforms.ToTensor())print(get_mean_and_std(train_dataset))
數據集結構:
運行結果:
([0.3281186, 0.28937867, 0.20702125], [0.09407319, 0.09732835, 0.106712654])
把這個結果記錄下來,后面要用!
生成數據集
我們整理還的圖像分類的數據集結構是這樣的
data
├─Black-grass
├─Charlock
├─Cleavers
├─Common Chickweed
├─Common wheat
├─Fat Hen
├─Loose Silky-bent
├─Maize
├─Scentless Mayweed
├─Shepherds Purse
├─Small-flowered Cranesbill
└─Sugar beet
pytorch和keras默認加載方式是ImageNet數據集格式,格式是
├─data
│  ├─val
│  │   ├─Black-grass
│  │   ├─Charlock
│  │   ├─Cleavers
│  │   ├─Common Chickweed
│  │   ├─Common wheat
│  │   ├─Fat Hen
│  │   ├─Loose Silky-bent
│  │   ├─Maize
│  │   ├─Scentless Mayweed
│  │   ├─Shepherds Purse
│  │   ├─Small-flowered Cranesbill
│  │   └─Sugar beet
│  └─train
│      ├─Black-grass
│      ├─Charlock
│      ├─Cleavers
│      ├─Common Chickweed
│      ├─Common wheat
│      ├─Fat Hen
│      ├─Loose Silky-bent
│      ├─Maize
│      ├─Scentless Mayweed
│      ├─Shepherds Purse
│      ├─Small-flowered Cranesbill
│      └─Sugar beet
新增格式轉化腳本makedata.py,插入代碼:
import glob
import os
import shutilimage_list=glob.glob('data1/*/*.png')
print(image_list)
file_dir='data'
if os.path.exists(file_dir):print('true')#os.rmdir(file_dir)shutil.rmtree(file_dir)#刪除再建立os.makedirs(file_dir)
else:os.makedirs(file_dir)from sklearn.model_selection import train_test_split
trainval_files, val_files = train_test_split(image_list, test_size=0.3, random_state=42)
train_dir='train'
val_dir='val'
train_root=os.path.join(file_dir,train_dir)
val_root=os.path.join(file_dir,val_dir)
for file in trainval_files:file_class=file.replace("\\","/").split('/')[-2]file_name=file.replace("\\","/").split('/')[-1]file_class=os.path.join(train_root,file_class)if not os.path.isdir(file_class):os.makedirs(file_class)shutil.copy(file, file_class + '/' + file_name)for file in val_files:file_class=file.replace("\\","/").split('/')[-2]file_name=file.replace("\\","/").split('/')[-1]file_class=os.path.join(val_root,file_class)if not os.path.isdir(file_class):os.makedirs(file_class)shutil.copy(file, file_class + '/' + file_name)
完成上面的內容就可以開啟訓練和測試了。
與登錄(login))

)


