2019獨角獸企業重金招聘Python工程師標準>>> 
一、 Linux 下的 Redis 安裝 && 啟動 && 關閉 && 卸載
http://blog.csdn.net/zgf19930504/article/details/51850594
注:設置 redis.conf bind=***.***.*.(127.0.0.1) redis啟動: redis-cli -h * -p *
auth 密碼
二、持久化 轉:
https://my.oschina.net/u/780876/blog/544061
注: 關閉 rdb 配置文件 開啟 save “”注釋
三、redis 主從復制+sentinel(哨兵)
http://www.cnblogs.com/think-in-java/p/5123884.html
注:在做sentinel 配置時,一臺虛擬機做主機master ,另為一臺設置兩個 從機slave,當主機這臺虛擬機 斷開(此處斷開不是手動關閉redis,是指redis 沒關閉情況下,關閉虛擬機。開始大約有1分多鐘一直沒有切換過來,最終切換成功。這里延遲時間較長,可能會丟失數據)
redis一主多從的spring配置
http://blog.csdn.net/xiaobao5214/article/details/52057232
注:sentinel 配置,配置文件只需寫 sentinel 主機 、端口,不必寫 主從機配置。
常出現一下問題
DENIED Redis is running in protected mode because protected mode is enabled, no bind address was
specified, no authentication password is requested to    clients.......
protected-mode no
http://blog.csdn.net/alaska_bibi/article/details/52594639
Redis Sentinel 系統如何實現系統高可用的原理:
http://blog.csdn.net/lihao21/article/details/60359633 (sentinel 實現redis的高可用性,其負載能力還是單機負載能力)
四、集群
集群配置前 依賴安裝
1):安裝redis-cluster依賴:redis-cluster的依賴庫在使用時有兼容問題,在reshard時會遇到各種錯誤,請按指定版本安裝.
(1)確保系統安裝zlib,否則gem install會報(no such file to load -- zlib)
Java代碼 收藏代碼
#download:zlib-1.2.6.tar
./configure
make
make install
(1)安裝ruby:version(1.9.2)
Java代碼 收藏代碼
# ruby1.9.2
cd /path/ruby
./configure -prefix=/usr/local/ruby
make
make install
sudo cp ruby /usr/local/bin
(2)安裝rubygem:version(1.8.16)
Java代碼 收藏代碼
# rubygems-1.8.16.tgz
cd /path/gem
sudo ruby setup.rb
sudo cp bin/gem /usr/local/bin
(3)安裝gem-redis:version(3.0.0)
Java代碼 收藏代碼
gem install redis --version 3.0.0
#由于源的原因,可能下載失敗,就手動下載下來安裝
#download地址:http://rubygems.org/gems/redis/versions/3.0.0
gem install -l /data/soft/redis-3.0.0.gem
2)安裝redis-cluster
參考:http://blog.csdn.net/myrainblues/article/details/25881535/
集群配置:
http://www.cnblogs.com/wuxl360/p/5920330.html
注:針對配置上例中,三主三從情況。當主機掛了,從機上位成為新的主機,實現了高可用性。但當主從都掛了的時候,需要通過復制遷移(備份遷移redis.conf):修改cluster-migration-barrier配置。預先可使一個主機掛多個從機,當某主從都掛了的時候,可以遷移其他主機多余的從機用來代替。
http://lib.csdn.net/article/redis/18568
節點加入到集群,使用 cluster meet ip port,注意是在客戶端執行該命令哦~~
192.168.1.103:7001> cluster meet 192.168.1.103 7006 OK
重新查詢集群信息
192.168.1.103:7001> cluster nodes
Redis 3.0的集群方案有以下兩個問題。
一個Redis實例具備了“數據存儲”和“路由重定向”,完全去中心化的設計。這帶來的好處是部署非常簡單,直接部署Redis就行,不像Codis有那么多的組件和依賴。但帶來的問題是很難對業務進行無痛的升級,如果哪天Redis集群出了什么嚴重的Bug,就只能回滾整個Redis集群。
對協議進行了較大的修改,對應的Redis客戶端也需要升級。升級Redis客戶端后誰能確保沒有Bug?而且對于線上已經大規模運行的業務,升級代碼中的Redis客戶端也是一個很麻煩的事情。
redis 集群的節點是分 槽存儲的, 每次 get key 需要重定向到存放改key 槽的 master上
在第一臺機器上連接集群的7002端口的節點,在另外一臺連接7005節點,連接方式為 redis-cli -h 192.168.31.245 -c -p 7002 ,加參數 -C 可連接到集群,因為上面 redis.conf 將 bind 改為了ip地址,所以 -h 參數不可以省略。
在7005節點執行命令 set hello world ,執行結果如下:

然后在另外一臺7002端口,查看 key 為 hello 的內容, get hello ,執行結果如下:

簡單說一下原理
redis cluster在設計的時候,就考慮到了去中心化,去中間件,也就是說,集群中的每個節點都是平等的關系,都是對等的,每個節點都保存各自的數據和整個集群的狀態。每個節點都和其他所有節點連接,而且這些連接保持活躍,這樣就保證了我們只需要連接集群中的任意一個節點,就可以獲取到其他節點的數據。
Redis 集群沒有并使用傳統的一致性哈希來分配數據,而是采用另外一種叫做哈希槽 (hash slot)的方式來分配的。redis cluster 默認分配了 16384 個slot,當我們set一個key 時,會用CRC16算法來取模得到所屬的slot,然后將這個key 分到哈希槽區間的節點上,具體算法就是:CRC16(key) % 16384。所以我們在測試的時候看到set 和 get 的時候,直接跳轉到了7000端口的節點。
Redis 集群會把數據存在一個 master 節點,然后在這個 master 和其對應的salve 之間進行數據同步。當讀取數據時,也根據一致性哈希算法到對應的 master 節點獲取數據。只有當一個master 掛掉之后,才會啟動一個對應的 salve 節點,充當 master 。
需要注意的是:必須要3個或以上的主節點,否則在創建集群時會失敗,并且當存活的主節點數小于總節點數的一半時,整個集群就無法提供服務了。
spring data redis 操作redis 單機版和集群 xml配置信息;
http://blog.csdn.net/hdf734839030/article/details/52293230
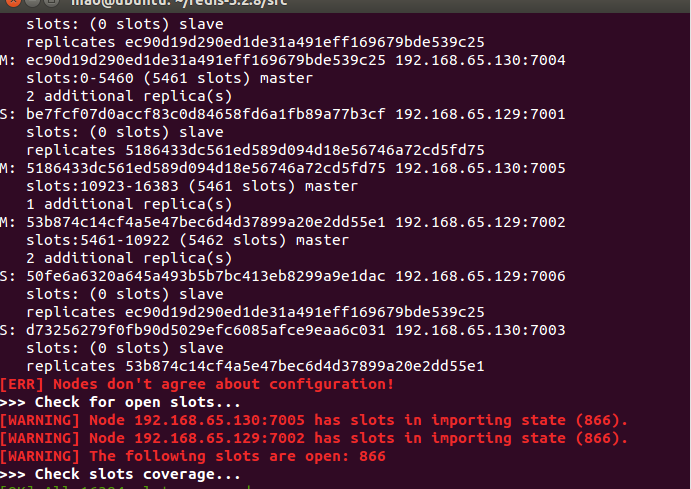
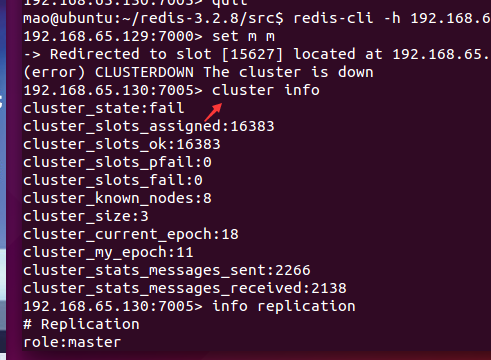
注:redis cluster 出現 CLUSTERDOWN The cluster is down(虛擬機關閉再次重啟所有節點容易出現)
root@ubuntu:~# ./redis-3.0.1/src/redis-trib.rb check 127.0.0.1:7000|more

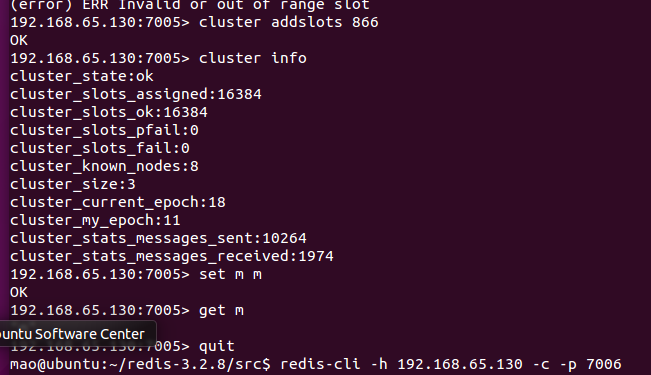
說明 866這個分片沒有費給7005節點或者有誤  添加這個分片
127.0.0.1:7005> cluster addslots 866

cluster-migration-barrier 1 master的slave數量大于該值,slave才能遷移到其他孤立master上,如這個參數若被設為2,那么只有當一個主節點擁有2個可工作的從節點時,它的一個從節點才會嘗試遷移。
SpringMVC application-redis.xml:<?xml version="1.0" encoding="UTF-8"?>
<beans xmlns="http://www.springframework.org/schema/beans"  xmlns:xsi="http://www.w3.org/2001/XMLSchema-instance" xmlns:p="http://www.springframework.org/schema/p"  xmlns:context="http://www.springframework.org/schema/context"  xmlns:jee="http://www.springframework.org/schema/jee" xmlns:tx="http://www.springframework.org/schema/tx"  xmlns:aop="http://www.springframework.org/schema/aop"  xsi:schemaLocation="  http://www.springframework.org/schema/beans http://www.springframework.org/schema/beans/spring-beans.xsd  http://www.springframework.org/schema/context http://www.springframework.org/schema/context/spring-context.xsdhttp://www.springframework.org/schema/aop http://www.springframework.org/schema/aop/spring-aop-3.1.xsd ">  <bean id="propertyConfig1"class="org.springframework.beans.factory.config.PropertyPlaceholderConfigurer"><property name="order" value="1" /><property name="location"><value>/WEB-INF/config/redis.properties</value></property><property name="ignoreUnresolvablePlaceholders" value="true" />  </bean><bean id="poolConfig" class="redis.clients.jedis.JedisPoolConfig">  <property name="maxIdle" value="${redis.maxIdle}" />  <property name="maxTotal" value="${redis.maxActive}" />  <property name="MaxWaitMillis" value="${redis.maxWait}" />  <property name="testOnBorrow" value="${redis.testOnBorrow}" />  </bean>  <!-- 1.redis單例模式 --><!--  <bean id="connectionFactory" class="org.springframework.data.redis.connection.jedis.JedisConnectionFactory"  p:host-name="${redis.host}" p:port="${redis.port}" p:password="${redis.password}" p:pool-config-ref="poolConfig"/>   --><!-- 2.redis主從復制+sentinel --><!-- <bean id="redisSentinelConfiguration" class="org.springframework.data.redis.connection.RedisSentinelConfiguration">  <property name="master">  <bean class="org.springframework.data.redis.connection.RedisNode">  <property name="name" value="mymaster"/>  </bean>  </property>  <property name="sentinels">  <set>  <bean class="org.springframework.data.redis.connection.RedisNode">  <constructor-arg name="host" value="192.168.65.129"></constructor-arg>  <constructor-arg name="port" value="26379"></constructor-arg>  </bean>  <bean class="org.springframework.data.redis.connection.RedisNode">  <constructor-arg name="host" value="192.168.65.130"></constructor-arg>  <constructor-arg name="port" value="26379"></constructor-arg>  </bean>  </set>  </property>  </bean><bean id="connectionFactory"  class="org.springframework.data.redis.connection.jedis.JedisConnectionFactory">  <constructor-arg ref="redisSentinelConfiguration"/>  </bean>  --><!--3.配置RedisClusterConfiguration--><bean id="redisClusterConfiguration" class="org.springframework.data.redis.connection.RedisClusterConfiguration"><property name="maxRedirects" value="${redis.maxRedirects}"></property><property name="clusterNodes"><set><bean class="org.springframework.data.redis.connection.RedisNode"><constructor-arg name="host" value="${redis.host1}"/><constructor-arg name="port" value="${redis.port1}"/></bean><bean class="org.springframework.data.redis.connection.RedisNode"><constructor-arg name="host" value="${redis.host2}"/><constructor-arg name="port" value="${redis.port2}"/></bean><bean class="org.springframework.data.redis.connection.RedisNode"><constructor-arg name="host" value="${redis.host3}"/><constructor-arg name="port" value="${redis.port3}"/></bean><bean class="org.springframework.data.redis.connection.RedisNode"><constructor-arg name="host" value="${redis.host4}"/><constructor-arg name="port" value="${redis.port4}"/></bean><bean class="org.springframework.data.redis.connection.RedisNode"><constructor-arg name="host" value="${redis.host5}"/><constructor-arg name="port" value="${redis.port5}"/></bean><bean class="org.springframework.data.redis.connection.RedisNode"><constructor-arg name="host" value="${redis.host6}"/><constructor-arg name="port" value="${redis.port6}"/></bean><bean class="org.springframework.data.redis.connection.RedisNode"><constructor-arg name="host" value="${redis.host7}"/><constructor-arg name="port" value="${redis.port7}"/></bean><bean class="org.springframework.data.redis.connection.RedisNode"><constructor-arg name="host" value="${redis.host8}"/><constructor-arg name="port" value="${redis.port8}"/></bean></set></property></bean><bean id="connectionFactory" class="org.springframework.data.redis.connection.jedis.JedisConnectionFactory"><constructor-arg name="poolConfig" ref="poolConfig"/><constructor-arg name="clusterConfig" ref="redisClusterConfiguration"/></bean><bean id="redisTemplate" class="org.springframework.data.redis.core.StringRedisTemplate">  <property name="connectionFactory"   ref="connectionFactory" />  <property name="keySerializer">  <bean class="org.springframework.data.redis.serializer.StringRedisSerializer" />  </property>     <property name="valueSerializer">  <bean class="org.springframework.data.redis.serializer.JdkSerializationRedisSerializer" />  </property>  <property name="hashKeySerializer">    <bean class="org.springframework.data.redis.serializer.StringRedisSerializer"/>    </property>  <property name="hashValueSerializer">  <bean class="org.springframework.data.redis.serializer.StringRedisSerializer"/>    </property>  </bean>   <bean id="redisUtil" class="com.general.common.util.RedisUtil"><property name="redisTemplate" ref="redisTemplate"/></bean>   <!-- 啟動對@AspectJ注解的支持 --><!-- proxy-target-class等于true是強制使用cglib代理,proxy-target-class默認是false,如果你的類實現了接口 就走JDK代理,如果沒有,走cglib代理  --><!-- 注:對于單利模式建議使用cglib代理,雖然JDK動態代理比cglib代理速度快,但性能不如cglib --><!--如果不寫proxy-target-class="true"這句話也沒問題--><aop:aspectj-autoproxy proxy-target-class="true"/>
</beans>
redis.properties
#redis 1.單例模式
#redis.host=120.210.153.11
#redis.port=6379
#redis.password=maoguangdong
#redis 2.主從復制 +sentinel
#redis.master_host=192.168.65.130
#redis.master_port=6379
#redis.slave1_host=192.168.65.130
#redis.slave1_port=6380
#redis.slave2_host=192.168.65.129
#redis.slave2_port=6379
#redis 3.集群RedisClusterConfiguration配置
redis.host1=192.168.65.131
redis.port1=7000
redis.host2=192.168.65.131
redis.port2=7001
redis.host3=192.168.65.131
redis.port3=7002
redis.host4=192.168.65.131
redis.port4=7006
redis.host5=192.168.65.130
redis.port5=7003
redis.host6=192.168.65.130
redis.port6=7004
redis.host7=192.168.65.130
redis.port7=7005
redis.host8=192.168.65.130
redis.port8=7006
redis.maxRedirects=3
redis.maxIdle=100
redis.maxActive=300
redis.maxWait=1000
redis.testOnBorrow=true
redis.timeout=100000
com.service.impl.xxxRecordManager= 60
com.service.impl.xxxSetRecordManager= 60
defaultCacheExpireTime=3600fep.local.cache.capacity =10000


1——10題)
)


![多租戶saas 架構_[譯/注] Force.com 多租戶互聯網應用開發平臺的設計](http://pic.xiahunao.cn/多租戶saas 架構_[譯/注] Force.com 多租戶互聯網應用開發平臺的設計)
