樸素貝葉斯 半樸素貝葉斯
In this article, we’ll show you how to classify a tweet into either positive or negative, using two famous machine learning algorithms: Naive Bayes and N-Gram.
在本文中,我們將向您展示如何使用兩種著名的機器學習算法:樸素貝葉斯(Naive Bayes)和N-Gram將推文分類為肯定或否定。
First, what is sentiment analysis?
首先,什么是情感分析?
Sentiment analysis is the automated process of analyzing text data and sorting it into sentiments positive, negative, or neutral. Using sentiment analysis tools to analyze opinions in Twitter data can help companies understand how people are talking about their brand.
情感分析是分析文本數據并將其分類為正面,負面或中性的自動化過程。 使用情緒分析工具分析Twitter數據中的觀點可以幫助公司了解人們如何談論自己的品牌。
Now that you know what sentiment analysis is, let’s start coding.
現在您已經了解了情感分析,讓我們開始編碼。
We have divided the whole program into three parts:
我們將整個程序分為三個部分:
- Importing the datasets 導入數據集
- Preprocessing of datasets 數據集的預處理
- Applying machine learning algorithms 應用機器學習算法
Note: We have used Jupyter Notebook but you can use the editor of your choice.
注意:我們使用了Jupyter Notebook,但您可以使用自己選擇的編輯器。
步驟1:導入數據集 (Step 1: Importing the Datasets)
Displaying the top ten columns of the dataset:
顯示數據集的前十列:
data.head(10)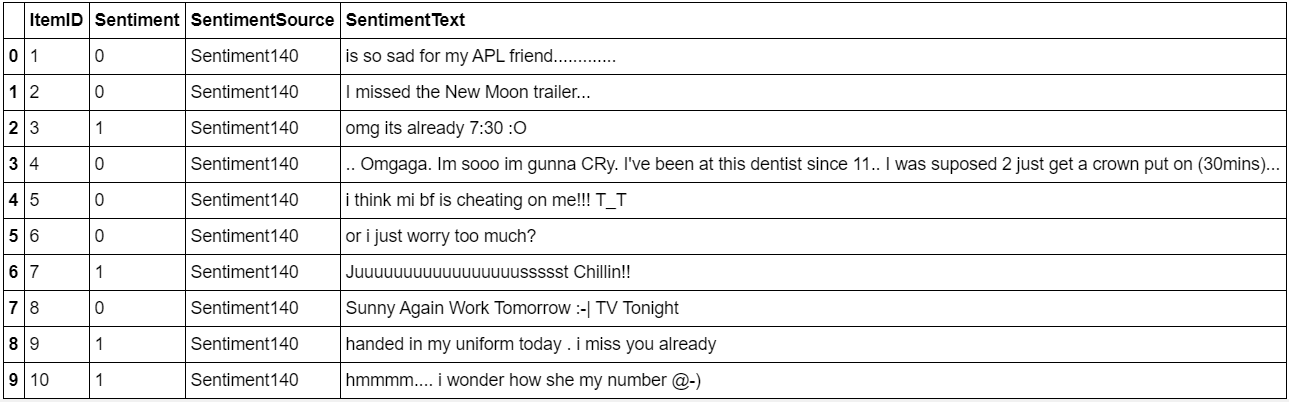
From the dataset above we can clearly see the use of the following (none of which is of any use in determining the sentiment of a tweet):
從上面的數據集中,我們可以清楚地看到以下內容的用途(在確定推文情感時,沒有任何用處):
- Acronyms 縮略語
- Sequences of repeated characters 重復字符序列
- Emoticons 表情符號
- Spelling mistakes 拼寫錯誤
- Nouns 名詞
Let’s see if our dataset is balanced around the label class sentiment:
讓我們看看我們的數據集是否在標簽類情感上保持平衡:
plt.close()
fig, ax = plt.subplots()
counts, bins, patches = ax.hist(data.Sentiment.as_matrix(), edgecolor='gray')ax.set_title("Histogram of Sentiments")ax.set_xlabel("Sentiment")ax.set_ylabel("Frequecy")patches[0].set_facecolor("#5d4037")
patches[0].set_label("negative")patches[-1].set_facecolor("#ff9100")
patches[-1].set_label("positive")plt.legend()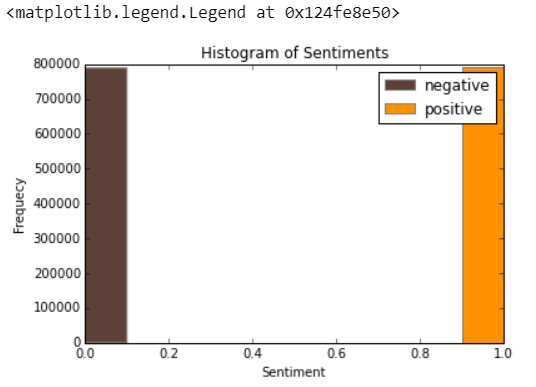
The dataset seems to be very balanced between negative and positive sentiment.
數據集似乎在消極情緒和積極情緒之間非常平衡。
Now, we need to import other datasets which will help us with the preprocessing, such as:
現在,我們需要導入其他可以幫助我們進行預處理的數據集,例如:
- An emoticon dictionary regrouping 132 of the most used emoticons in western with their sentiment, negative or positive: 表情符號字典將132個西方最常用的表情符號及其負面或正面情緒重新組合:
emoticons = pd.read_csv('data/smileys.csv')
positive_emoticons = emoticons[emoticons.Sentiment == 1]
negative_emoticons = emoticons[emoticons.Sentiment == 0]
emoticons.head(5)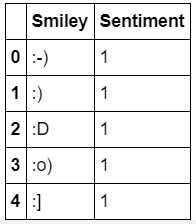
- An acronym dictionary of 5465 acronyms with their translations: 一個縮略詞詞典,包含5465個縮略語及其翻譯:
acronyms = pd.read_csv('data/acronyms.csv')
acronyms.tail(5)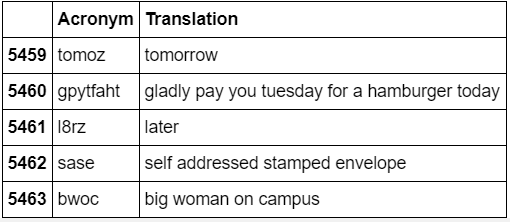
- A stop word dictionary, corresponding to words that are filtered out before or after processing of natural language data because they’re not useful in our case. 停用詞字典,對應于在處理自然語言數據之前或之后過濾掉的詞,因為它們在我們的案例中沒有用。
stops = pd.read_csv('data/stopwords.csv')
stops.columns = ['Word']
stops.head(5)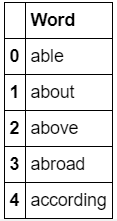
- A positive and negative word dictionary: 正負詞詞典:
positive_words = pd.read_csv('data/positive-words.csv', sep='\t')
positive_words.columns = ['Word', 'Sentiment']
negative_words = pd.read_csv('data/negative-words.csv', sep='\t')
negative_words.columns = ['Word', 'Sentiment']
positive_words.head(5)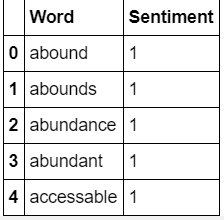
negative_words.head(5)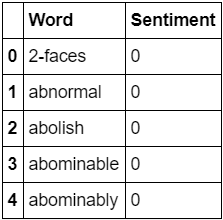
步驟2: 數據集的預處理 (Step 2: Preprocessing of Datasets)
什么是數據預處理? (What is data preprocessing?)
Data Preprocessing is a technique that is used to convert the raw data into a clean data set. In other words, whenever the data is gathered from different sources it is collected in raw format which is not feasible for the analysis.
數據預處理是一種用于將原始數據轉換為干凈數據集的技術。 換句話說,無論何時從不同來源收集數據,數據都以原始格式收集,這對于分析是不可行的。
Now, let's begin with the preprocessing part.
現在,讓我們從預處理部分開始。
To do this we are going to pass our data through various steps:
為此,我們將通過各種步驟傳遞數據:
Replace all emoticons by their sentiment polarity
||pos||/||neg||using the emoticon dictionary:用表情極性替換所有表情
||pos||/||neg||使用表情詞典:
import re
def make_emoticon_pattern(emoticons):pattern = "|".join(map(re.escape, emoticons.Smiley))pattern = "(?<=\s)(" + pattern + ")(?=\s)"return pattern
def find_with_pattern(pattern, replace=False, tag=None):if replace and tag == None:raise Exception("Parameter error", "If replace=True you should add the tag by which the pattern will be replaced")regex = re.compile(pattern)if replace:return data.SentimentText.apply(lambda tweet: re.sub(pattern, tag, " " + tweet + " "))return data.SentimentText.apply(lambda tweet: re.findall(pattern, " " + tweet + " "))
pos_emoticons_found = find_with_pattern(make_emoticon_pattern(positive_emoticons))
neg_emoticons_found = find_with_pattern(make_emoticon_pattern(negative_emoticons))
nb_pos_emoticons = len(pos_emoticons_found[pos_emoticons_found.map(lambda emoticons : len(emoticons) > 0)])
nb_neg_emoticons = len(neg_emoticons_found[neg_emoticons_found.map(lambda emoticons : len(emoticons) > 0)])
print "Number of positive emoticons: " + str(nb_pos_emoticons) + " Number of negative emoticons: " + str(nb_neg_emoticons)
--------------------------------------------------------------------
data.SentimentText = find_with_pattern(make_emoticon_pattern(positive_emoticons), True, '||pos||')
data.SentimentText = find_with_pattern(make_emoticon_pattern(negative_emoticons), True, '||neg||') data.head(10)
Replace all URLs with a tag
||url||:用標簽
||url||替換所有URL。 :
pattern_url = re.compile(ur'(?i)\b((?:https?://|www\d{0,3}[.]|[a-z0-9.\-]+[.][a-z]{2,4}/)(?:[^\s()<>]+|\(([^\s()<>]+|(\([^\s()<>]+\)))*\))+(?:\(([^\s()<>]+|(\([^\s()<>]+\)))*\)|[^\s`!()\[\]{};:\'".,<>?\xab\xbb\u201c\u201d\u2018\u2019]))')
url_found = find_with_pattern(pattern_url)data.SentimentText = find_with_pattern(pattern_url, True, '||url||') data[50:60]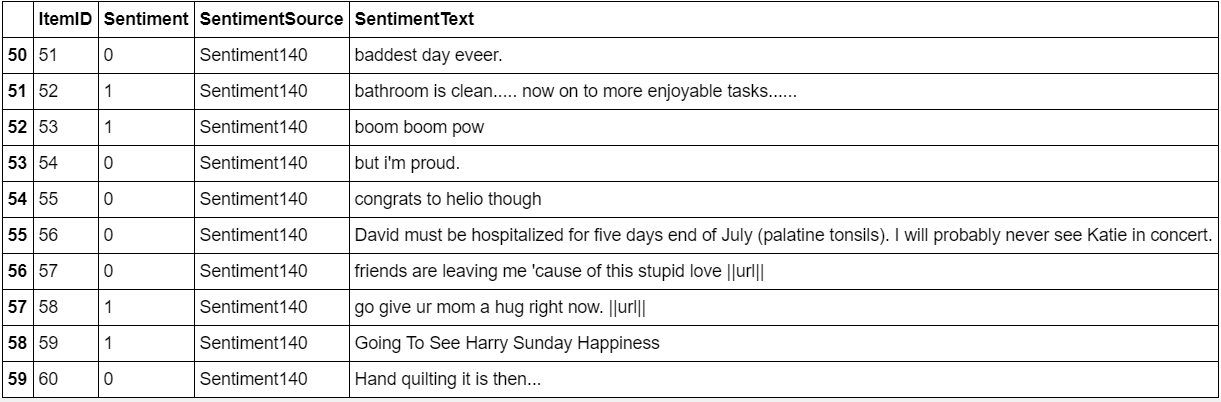
- Remove unicode characters: 刪除unicode字符:
def remove_unicode(string):
    try:
        string = string.decode('unicode_escape').encode('ascii','ignore')
    except UnicodeDecodeError:
        pass
    return string
data.SentimentText = data.SentimentText.apply(lambda tweet: remove_unicode(tweet))data[1578592:1578602]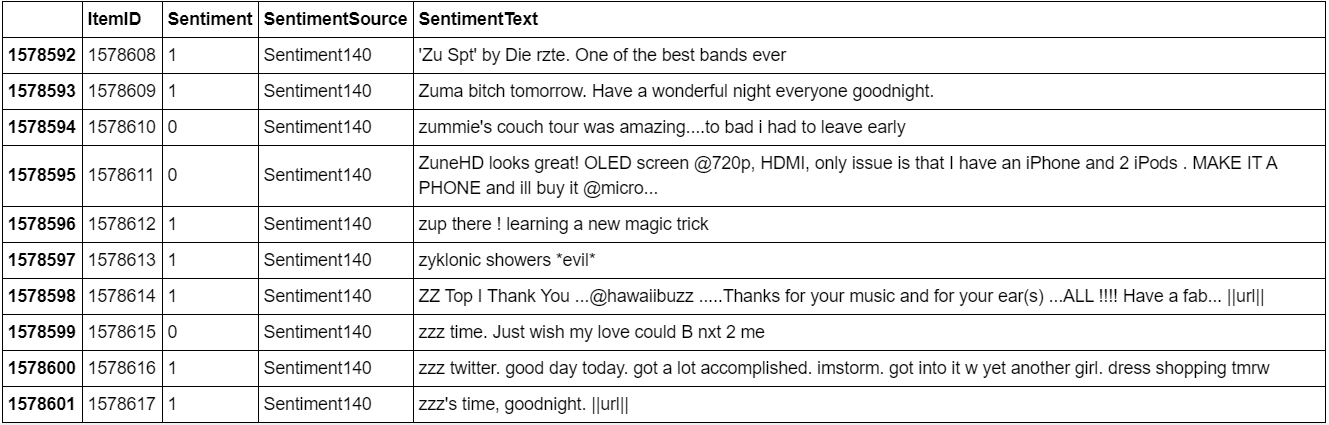
- Decode HTML entities: 解碼HTML實體:
data.SentimentText[599982]import HTMLParser
html_parser = HTMLParser.HTMLParser() data.SentimentText = data.SentimentText.apply(lambda tweet: html_parser.unescape(tweet)) data.SentimentText[599982]- Reduce all letters to lowercase: 將所有字母都減小為小寫:
data.SentimentText = data.SentimentText.str.lower() data.head(10)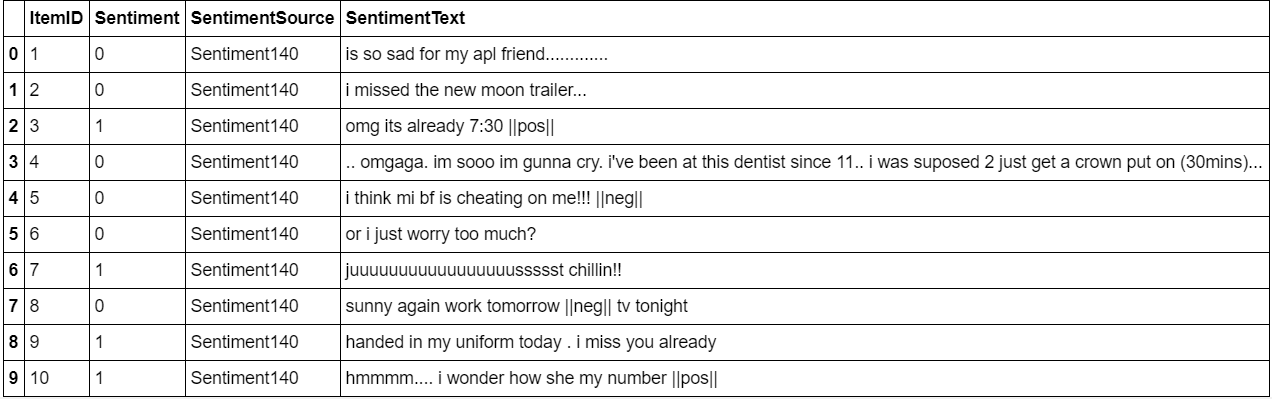
Replace all usernames/targets
@with||target||:將所有用戶名/目標
@替換為||target||:
pattern_usernames = "@\w{1,}"usernames_found = find_with_pattern(pattern_usernames)data.SentimentText = find_with_pattern(pattern_usernames, True, '||target||')data[45:55]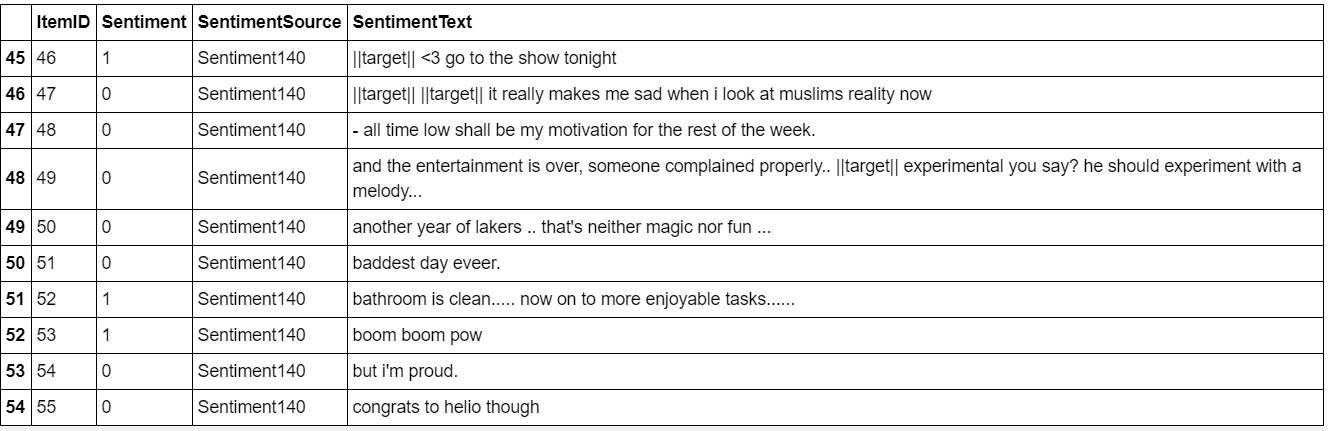
- Replace all acronyms with their translation: 用其翻譯替換所有首字母縮寫詞:
https://gist.github.com/BetterProgramming/fdcccacf21fa02a8a4d697da24a8cd54.js
https://gist.github.com/BetterProgramming/fdcccacf21fa02a8a4d697da24a8cd54.js
for i, (acronym, value) in enumerate(top20acronyms):
    print str(i + 1) + ") " + acronym + " => " + acronym_dictionary[acronym] + " : " + str(value)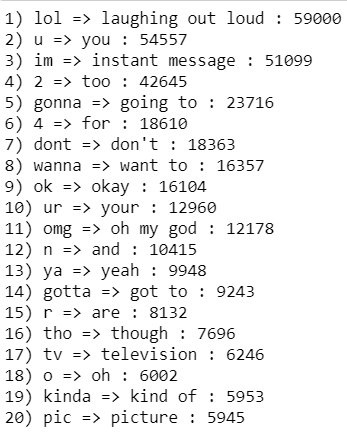
plt.close()
top20acronym_keys = [x[0] for x in top20acronyms]
top20acronym_values = [x[1] for x in top20acronyms]
indexes = np.arange(len(top20acronym_keys))
width = 0.7
plt.bar(indexes, top20acronym_values, width)
plt.xticks(indexes + width * 0.5, top20acronym_keys, rotation="vertical")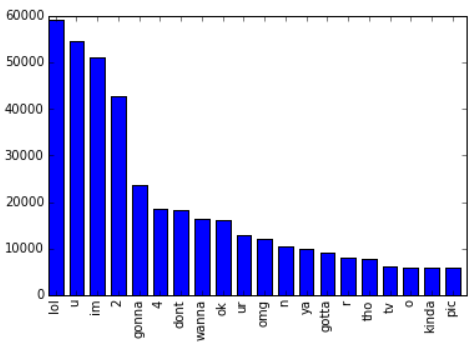
Replace all negations (e.g: not, no, never) by tag
||not||.用標簽
||not||替換所有否定(例如:不,不,從不) 。
negation_dictionary = dict(zip(negation_words.Negation, negation_words.Tag))   def replace_negation(tweet):
return [negation_dictionary[word] if negation_dictionary.has_key(word) else word for word in tweet] data.SentimentText = data.SentimentText.apply(lambda tweet: replace_negation(tweet)) print data.SentimentText[29]- Replace a sequence of repeated characters with two characters (e.g: “helloooo” = “helloo”) to keep the emphasized usage of the word. 用兩個字符代替重復的字符序列(例如:“ helloooo” =“ helloo”),以保持單詞的強調用法。
data[1578604:]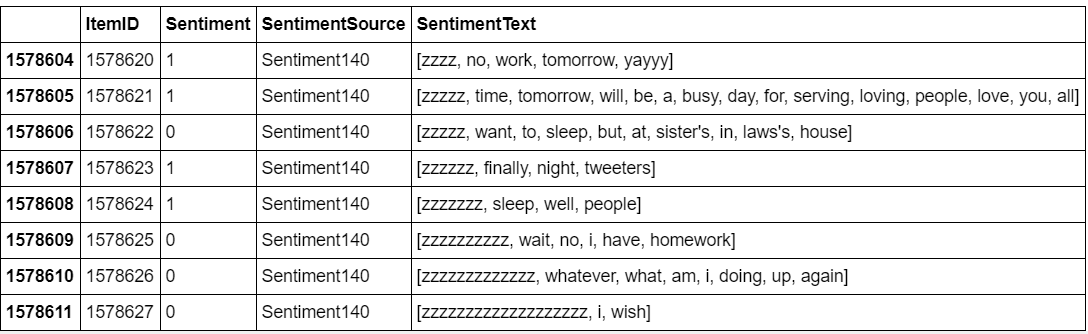
pattern = re.compile(r'(.)\1*')  def reduce_sequence_word(word):
     return ''.join([match.group()[:2] if len(match.group()) > 2 else match.group() for match in pattern.finditer(word)]) def reduce_sequence_tweet(tweet):
     return [reduce_sequence_word(word) for word in tweet]  data.SentimentText = data.SentimentText.apply(lambda tweet: reduce_sequence_tweet(tweet)) data[1578604:]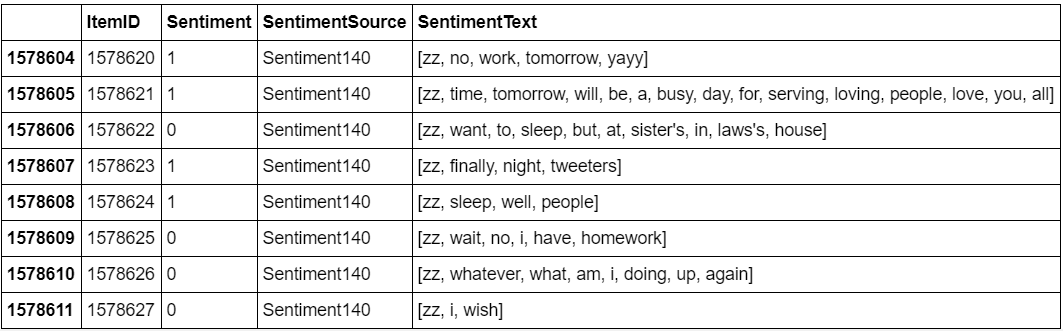
We’ve finished with the most important and tricky part of our Twitter sentiment analysis project, we can now apply our machine learning algorithms to the processed datasets.
我們已經完成了Twitter情緒分析項目中最重要,最棘手的部分,現在我們可以將機器學習算法應用于處理后的數據集。
步驟3: 應用機器學習算法 (Step 3: Applying Machine Learning Algorithms)
什么是機器學習? (What is machine learning?)
Machine learning is an application of artificial intelligence (AI) that provides systems the ability to automatically learn and improve from experience without being explicitly programmed. Machine learning focuses on the development of computer programs that can access data and use it to learn for themselves.
機器學習是人工智能(AI)的一種應用,它使系統能夠自動學習并從經驗中進行改進,而無需進行明確的編程。 機器學習專注于計算機程序的開發,該程序可以訪問數據并使用它自己學習。
There are three major methods used to classify a sentence in a given category, in our case, positive(1) or negative(0): SVM, Naive Bayes, and N-Gram.
在給定類別中,可以使用三種主要方法對句子進行分類,在我們的例子中,這是肯定(1)或否定(0):SVM,樸素貝葉斯和N-Gram。
We have used only Naive Bayes and N-Gram which are the most commonly used in determining the sentiment of tweets.
我們僅使用了樸素貝葉斯(Naive Bayes)和N-Gram,它們是確定推文情感最常用的方法。
Let us start with Naive Bayes.
讓我們從樸素貝葉斯開始。
樸素貝葉斯 (Naive Bayes)
There are different types of Naive Bayes classifiers but we’ll be using the Multinomial Naive Bayes.
樸素貝葉斯分類器有不同類型,但我們將使用多項樸素貝葉斯。
基準線 (Baseline)
We use the Multinomial Naive Bayes as the learning algorithm with Laplace smoothing representing the classic way of doing text classification. Since we need to extract features from our data set of tweets, we use the bag of words model to represent it.
我們使用多項式樸素貝葉斯作為學習算法,拉普拉斯平滑表示經典的文本分類方法。 由于我們需要從推文數據集中提取特征,因此我們使用詞袋模型來表示它。
The bag of words model is a simplifying representation of a document where it’s represented as a bag of its words without taking consideration of the grammar or word order. In-text classification, the frequency of each word is used as a feature for training a classifier.
單詞袋模型是文檔的簡化表示,其中將文檔表示為單詞袋,而無需考慮語法或單詞順序。 在文本分類中,每個單詞的出現頻率用作訓練分類器的功能。
For simplicity, we use the library sci-kit-learn.
為簡單起見,我們使用庫sci-kit-learn。
Let’s first start by dividing our data set into training and test set:
首先,將數據集分為訓練集和測試集:
def make_training_test_sets(data):data_shuffled = data.iloc[np.random.permutation(len(data))]data_shuffled = data_shuffled.reset_index(drop=True)data_shuffled.SentimentText = data_shuffled.SentimentText.apply(lambda tweet: " ".join(tweet))positive_tweets = data_shuffled[data_shuffled.Sentiment == 1]negative_tweets = data_shuffled[data_shuffled.Sentiment == 0]positive_tweets_cutoff = int(len(positive_tweets) * (3./4.))negative_tweets_cutoff = int(len(negative_tweets) * (3./4.))training_tweets = pd.concat([positive_tweets[:positive_tweets_cutoff], negative_tweets[:negative_tweets_cutoff]])test_tweets = pd.concat([positive_tweets[positive_tweets_cutoff:], negative_tweets[negative_tweets_cutoff:]])training_tweets = training_tweets.iloc[np.random.permutation(len(training_tweets))].reset_index(drop=True)test_tweets = test_tweets.iloc[np.random.permutation(len(test_tweets))].reset_index(drop=True)return training_tweets, test_tweetstraining_tweets, test_tweets = make_training_test_sets(data)print "size of training set: " + str(len(training_tweets))
print "size of test set: " + str(len(test_tweets))- Size of training set: 1183958 培訓規模:1183958
- Size of test set: 394654 測試集的大小:394654
Once the training set and the test set are created we need a third set of data called the validation set. This is really useful because it will be used to validate our model against unseen data and tune the possible parameters of the learning algorithm to avoid underfitting and overfitting, for example.
創建訓練集和測試集后,我們需要稱為驗證集的第三組數據。 這真的很有用,因為它將用于針對看不見的數據驗證我們的模型,并調整學習算法的可能參數,例如,避免欠擬合和過擬合。
We need this validation set because our test set should be used only to verify how well the model will generalize. If we use the test set rather than the validation set, our model could be overly optimistic and twist our results.
我們需要此驗證集,因為我們的測試集僅應用于驗證模型的泛化程度。 如果我們使用測試集而不是驗證集,那么我們的模型可能會過于樂觀并扭曲我們的結果。
To make the validation set, there are two main options:
要創建驗證集,有兩個主要選項:
- Split the training set into two parts (60%/20%) with a ratio of 2:8 where each part contains an equal distribution of example types. We train the classifier with the largest part and make predictions with the smaller one to validate the model. This technique works well but has the disadvantage of our classifier not getting trained and validated on all examples in the data set (without counting the test set). 將訓練集按2:8的比例分為兩部分(60%/ 20%),其中每個部分包含示例類型的相等分布。 我們訓練分類器的最大部分,并用較小的部分進行預測以驗證模型。 該技術效果很好,但缺點是我們的分類器沒有針對數據集中的所有示例進行訓練和驗證(不對測試集進行計數)。
- The K-fold cross-validation. We split the data set into k parts, hold out one, combine the others and train on them, then validate against the held-out portion. We repeat that process k times (each fold), holding out a different portion each time. Then we average the score measured for each fold to get a more accurate estimation of our model’s performance. K折交叉驗證。 我們將數據集分為k部分,提供一個部分,合并其他部分并對其進行訓練,然后針對保留部分進行驗證。 我們重復該過程k次(每次折疊),每次都保留不同的部分。 然后,我們對每次折疊的得分進行平均,以更準確地估算模型的性能。
We split the training data into ten folds and cross-validate them using scikit-learn:
我們將訓練數據分為十個部分,并使用scikit-learn對其進行交叉驗證:
from sklearn.cross_validation import KFold
from sklearn.metrics import confusion_matrix, f1_score
from sklearn.feature_extraction.text import CountVectorizer
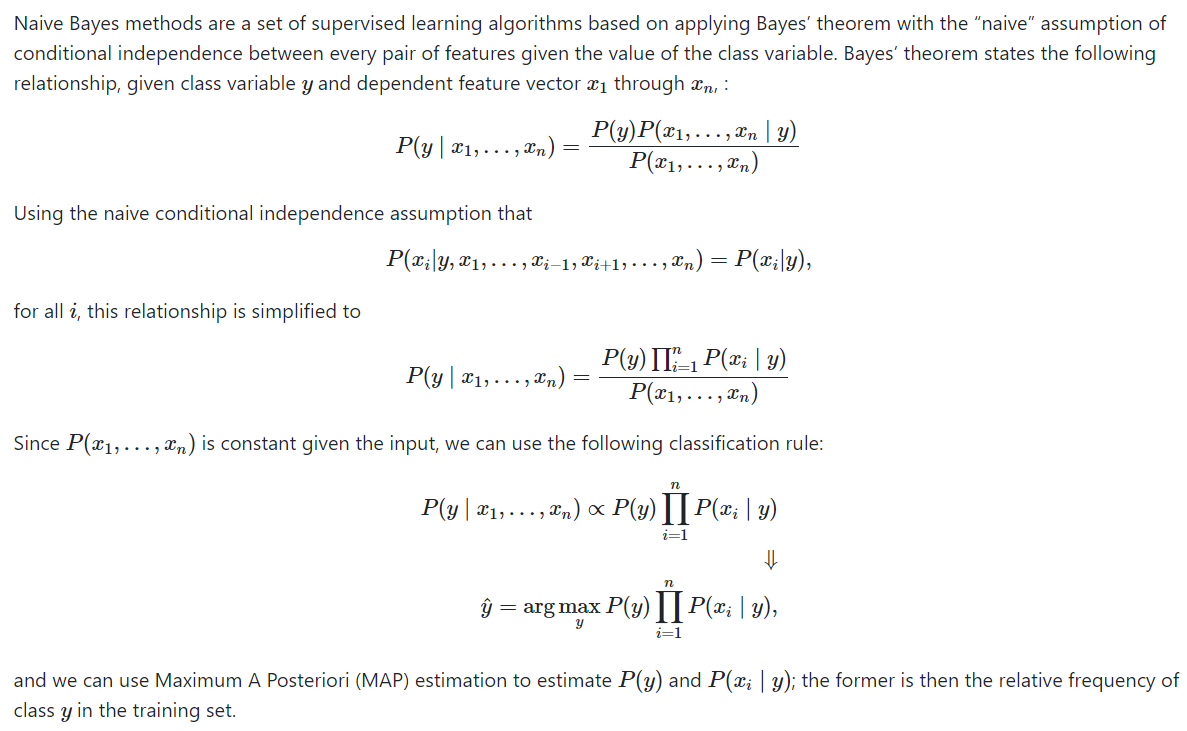
from sklearn.naive_bayes import MultinomialNBdef classify(training_tweets, test_tweets, ngram=(1, 1)):scores = []k_fold = KFold(n=len(training_tweets), n_folds=10)count_vectorizer = CountVectorizer(ngram_range=ngram)confusion = np.array([[0, 0], [0, 0]])for training_indices, validation_indices in k_fold:training_features = count_vectorizer.fit_transform(training_tweets.iloc[training_indices]['SentimentText'].values)training_labels = training_tweets.iloc[training_indices]['Sentiment'].valuesvalidation_features = count_vectorizer.transform(training_tweets.iloc[validation_indices]['SentimentText'].values)validation_labels = training_tweets.iloc[validation_indices]['Sentiment'].valuesclassifier = MultinomialNB()classifier.fit(training_features, training_labels)validation_predictions = classifier.predict(validation_features)confusion += confusion_matrix(validation_labels, validation_predictions)score = f1_score(validation_labels, validation_predictions)scores.append(score)return (sum(scores) / len(scores)), confusionscore, confusion = classify(training_tweets, test_tweets)print 'Total tweets classified: ' + str(len(training_tweets))
print 'Score: ' + str(sum(scores) / len(scores))
print 'Confusion matrix:'
print(confusion)Total tweets classified: 1183958
分類的總推文:1183958
Score: 0.77653600187
得分:0.77653600187
Confusion matrix: [[465021 126305][136321 456311]]
混淆矩陣:[[465021 126305] [136321 456311]]
We get about 0.77 using our baseline.
使用基線,我們得到約0.77。
N-Gram(語言模型) (N-Gram (Language Models ))
Note: An important note is that n-gram classifiers are in fact a generalization of Naive Bayes. A unigram classifier with Laplace smoothing corresponds exactly to the traditional naive Bayes classifier.
注意 :重要的一點是,n-gram分類器實際上是樸素貝葉斯的概括。 具有拉普拉斯平滑的unigram分類器與傳統的樸素貝葉斯分類器完全對應。
Since we use bag of words model, meaning we translate this sentence: “I don’t like chocolate” into “I”, “don’t”, “like”, “chocolate”, we could try to use bigram model to take care of negation with “don’t like” for this example. We are still going to use Laplace smoothing but we use the parameter ngram_range in CountVectorizer to add the bigram features.
由于我們使用詞袋模型,這意味著我們將以下句子翻譯:“我不喜歡巧克力”轉換為“我”,“不喜歡”,“喜歡”,“巧克力”,我們可以嘗試使用bigram模型在這個例子中,用“不喜歡”表示否定。 我們仍將使用拉普拉斯平滑,但我們在CountVectorizer中使用參數ngram_range來添加bigram功能。
score, confusion = classify(training_tweets, test_tweets, (2, 2))print 'Total tweets classified: ' + str(len(training_tweets))
print 'Score: ' +  str(score)
print 'Confusion matrix:' print(confusion)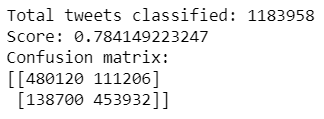
Using only bigram features we have slightly improved our accuracy score of about 0.01. Based on that we could think of adding unigram and bigram should increase the accuracy score more.
僅使用bigram功能,我們的準確性得分略有提高,約為0.01。 基于此,我們可以考慮添加unigram和bigram可以進一步提高準確性得分。
score, confusion = classify(training_tweets, test_tweets, (1, 2))print 'Total tweets classified: ' + str(len(training_tweets))
print 'Score: ' +  str(score)
print 'Confusion matrix:'
print(confusion)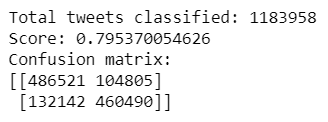
Indeed, the accuracy score of about 0.02 has improved compared to the baseline.
實際上,與基線相比,大約0.02的準確性得分有所提高。
結論 (Conclusion)
In this project, we tried to show a basic way of classifying tweets into positive or negative categories using Naive Bayes as a baseline. We also tried to show how language models are related to the Naive Bayes and can produce better results.
在此項目中,我們試圖展示一種以樸素貝葉斯為基準將推文分為正面或負面類別的基本方法。 我們還試圖說明語言模型與樸素貝葉斯的關系,并可以產生更好的結果。
This was our group’s final year project. We faced a lot of challenges digging into the details and selecting the right algorithm for the task. I hope you guys don’t have to go through the same process!
這是我們小組的最后一個項目。 我們在挖掘細節并為任務選擇正確的算法時面臨許多挑戰。 希望你們不必經歷相同的過程!
Since you have come all this far, I am sharing the code link with you guys (do give a star to the repository if you find it helpful). This is an open initiative to help those in need.
既然您到此為止,我將與大家共享代碼鏈接 (如果發現有幫助,請在資源庫中加注星號)。 這是一項開放的倡議,旨在幫助有需要的人。
Thanks for reading this article. I hope it’s helpful to you all!
感謝您閱讀本文。 希望對您有幫助!
翻譯自: https://medium.com/better-programming/twitter-sentiment-analysis-using-naive-bayes-and-n-gram-5df42ae4bfc6
樸素貝葉斯 半樸素貝葉斯
本文來自互聯網用戶投稿,該文觀點僅代表作者本人,不代表本站立場。本站僅提供信息存儲空間服務,不擁有所有權,不承擔相關法律責任。 如若轉載,請注明出處:http://www.pswp.cn/news/392257.shtml 繁體地址,請注明出處:http://hk.pswp.cn/news/392257.shtml 英文地址,請注明出處:http://en.pswp.cn/news/392257.shtml
如若內容造成侵權/違法違規/事實不符,請聯系多彩編程網進行投訴反饋email:809451989@qq.com,一經查實,立即刪除!相關文章
)
python3:面向對象(多態和繼承、方法重載及模塊)

蠕變斷裂 ansys_如何避免范圍蠕變,以及其他軟件設計課程的辛苦學習方法

leetcode 674. 最長連續遞增序列

深入單例模式 java,深入單例模式四
代理服務)
linux下配置SS5(SOCK5)代理服務

劉備和諸葛亮鬧翻:無意說出蜀國滅亡的根源?

mysql 時間推移_隨著時間的推移可視化COVID-19新案例
)
leetcode 959. 由斜杠劃分區域(并查集)

rcu寬限期_如何處理寬限期錯誤:靜默失敗不是一種選擇

描述符、迭代器、生成器

php模擬表單提交登錄,PHP模擬表單的post請求實現登錄

去除list集合中重復項的幾種方法

Crystal Reports第一張報表

leetcode 1128. 等價多米諾骨牌對的數量

海量數據尋找最頻繁的數據_尋找數據科學家的“原因”

C語言中局部變量和全局變量 變量的存儲類別

營銷 客戶旅程模板_我如何在國外找到開發人員的工作:我從營銷到技術的旅程...

keepalive的作用

scrapy.Spider的屬性和方法
)