目錄
1. 搭建allure環境
2. 生成報告
3. logo定制
4. 企業級報告內容或層級定制
5. allure局域網查看
1. 搭建allure環境
1.1 JDK,使用PyCharm
- 找到pycharm安裝目錄
- 找到java.exe
- 記下jbr目錄的完整路徑,eg: C:\Program Files\JetBrains\PyCharm Community Edition 2022.3\jbr\bin
- 將地址添加進入環境變量
- 重啟

1.2 allure程序
- 下載地址:https://github.com/allure-framework/allure2/releases
- 解壓到指定路徑。eg: D:\study\allure-2.25.0\allure-2.25.0\bin
- 執行allure
- Path 追加allure安裝路徑
- 驗證是否安裝成功:在dos窗口和Pycharm(需要重啟加載環境變量)中都需要驗證:allure --version


2. 生成報告
2.1 生成臨時的json格式的報告
addopts = -vs --alluredir=./temps --clean-alluredir
; --clean-alluredir生成臨時報告并清除
2.2 生成HTML的allure報告
if __name__ == "__main__":pytest.main(['./test_study/test_fixture.py'])os.system("allure generate ./temps -o ./reports --clean") # -o 指定輸出測試報告路徑# --clean 清空歷史數據# ./temps 表示用來生成html的JSON臨時文件目錄# ./reports 表示html文件生成目錄3. logo定制
3.1 在D:\study\allure-2.25.0\allure-2.25.0\config目錄下的allure.yml中配置自定義的logo插件【- custom-logo-plugin】

3.2 重新運行并生成allue報告
3.3 增加一個自己的logo文件并修改D:\study\allure-2.25.0\allure-2.25.0\plugins\custom-logo-plugin\static路徑下的styles.css文件里面的樣式(最好將需要修改的logo也放在custom-logo-plugin目錄下)
.side-nav__brand {background: url('1.png') no-repeat left center !important; //將你需要的logo圖片地址放在這里margin-left: 22px; //調整方位height: 90px; //調整大小background-size: contain !important;
}
//去掉圖片后邊 allure 文本
.side-nav__brand-text{display: none;
}
//配置logo 后面的字體樣式與字體大小
.side-nav__brand:after {content: "測試測試";margin-left: 18px;height: 20px;font-family: Arial;font-size: 13px;
}
?注:logo圖片和文字可以同時存在,也可以只要一個

4. 企業級報告內容或層級定制
左邊:
1. 項目名稱(史詩):@allure.epic("測試報告")
2. 模塊名稱(特性):@allure.feature("測試模塊")
3. 接口名稱(分組):@allure.story("測試接口")
@allure.epic('測試報告')
@allure.feature('測試模塊')
class TestA:@allure.story('測試1')def test_1(self):print('11111')@allure.story('測試2')def test_2(slef):print('22222')
?將多個用例寫到一個組:
@allure.story('測試1')
@allure.title('用例1')
def test_1(self):print('11111')@allure.story('測試1')
def test_2(slef):allure.dynamic.title('用例2')print('22222')
4. 用例標題:@allure.title("用例1") or allure.dynamic.title('用例2') 兩種方法都可以實現
@allure.title('用例1') //方法1
def test_1(self):print('11111')@allure.story('測試2')
def test_2(slef):allure.dynamic.title('用例2') //方法2print('22222')
?右邊:
1. 測試用例嚴重級別:@allure.severity(allure.severity_level.BLOCKER) //BLOCKER(致命),CRITICAL(嚴重),NORMAL(一般),MINOR(提示),TRIVIAL(輕微),一般默認為NORMAL
@allure.severity(allure.severity_level.TRIVIAL)
@allure.story('測試3')
def test_3(slef):print('33333')
?2. 測試用例的描述:@allure.description("測試用例的描述")
@allure.description("測試用例的描述方法1")
@allure.title('測試4')
def test_4(slef):print('44444')@allure.title('測試5')
def test_5(slef):allure.dynamic.description("測試用例的描述方法2")print('55555')
3. 接口訪問鏈接:@allure.link("接口鏈接")
4. BUG鏈接:@allure.issue("bug鏈接")
5. 測試用例鏈接:@allure.testcase("用例鏈接")
@allure.story('測試6')
@allure.link('https://www.baidu.com/0',name='接口鏈接')
@allure.issue('https://www.baidu.com/',name='bug鏈接')
@allure.testcase('https://www.baidu.com/',name='用例鏈接')
def test_6(slef):print('66666')
6. 測試用例的操作步驟:allure.step("第"+str(i)+"步"):
@allure.story('測試1')
def test_7(self):for i in range(0,10):with allure.step("第"+str(i)+"步"):pass
7. 測試附件:allure.attach(body=content,name="錯誤截圖",attachment_type=allure.attachment_type.PNG) //一般用于錯誤截圖(常用于web自動化測試)
@allure.story('測試1')
def test_8(self):# 附件上傳需要使用二進制,可以是圖片,可以是文本,可以是其它文件with open(r'D:\study\allure-2.25.0\allure-2.25.0\plugins\custom-logo-plugin\static\1.png',mode='rb') as f:content = f.read()allure.attach(body=content,name='錯誤截圖',attachment_type=allure.attachment_type.PNG)
8. 文本內容的定制:一般應用于接口自動化
@allure.story('測試1')
def test_9(self):# 請求allure.attach('https://www.baidu.com/0',name='接口地址',attachment_type=allure.attachment_type.TEXT)allure.attach('接口參數,一般從yaml中獲取',name='接口參數',attachment_type=allure.attachment_type.TEXT)allure.attach('請求方式:get/post',name='請求方式',attachment_type=allure.attachment_type.TEXT)allure.attach('請求頭,一般從yaml中獲取',name='請求頭',attachment_type=allure.attachment_type.TEXT)# 響應allure.attach('響應文本,一般從yaml中獲取', name='響應文本', attachment_type=allure.attachment_type.TEXT)allure.attach('執行結果:成功/失敗', name='執行結果', attachment_type=allure.attachment_type.TEXT)
9. 數據驅動:
@allure.story('測試1')
@pytest.mark.parametrize('x', ['這是第1個測試值', "這是第2個測試值"])
def test_a(self,x):print(f'test_a中的X值為{x}')
?由于使用數據驅動,用例標題會展示參數數據化驅動中的所有參數,若不想要顯示則需要修改allure配置
# 修改前
test_result.parameters.extend([Parameter(name=name, value=represent(value)) for name, value in params.items()if name not in current_param_names])# 修改后 (將列表內容去除即可)
test_result.parameters.extend([])

5. allure局域網查看
局域網(內網):allure open ./reports
if __name__ == "__main__":pytest.main(['./test_study/test_allure.py'])os.system("allure generate ./temps -o ./reports --clean")os.system("allure open ./reports")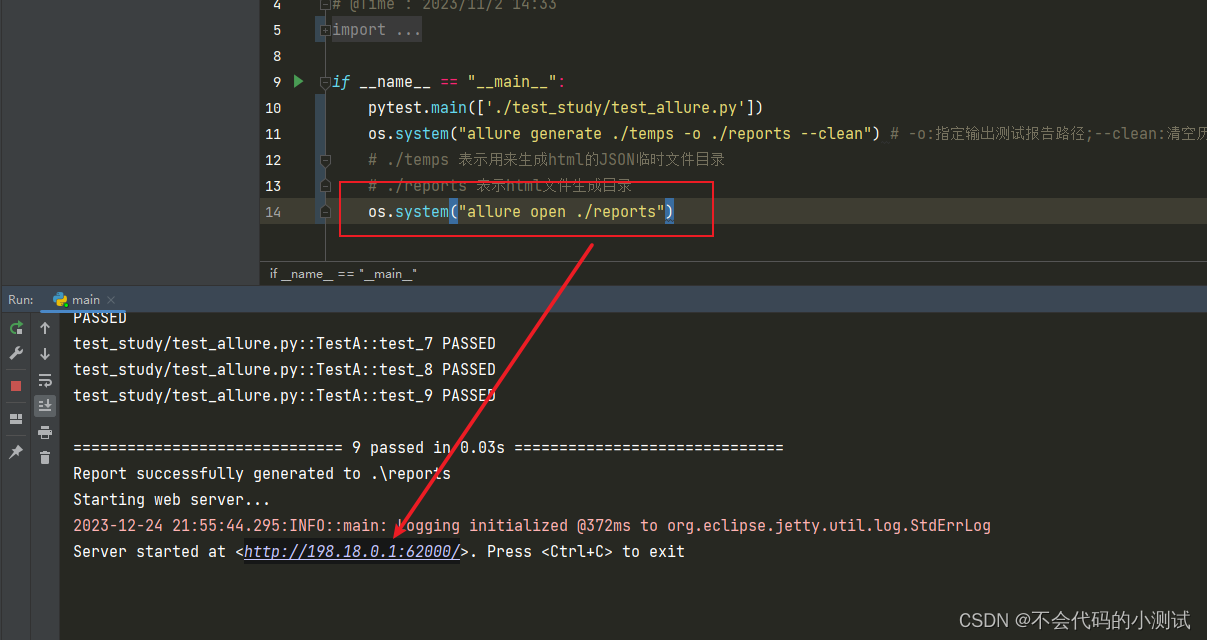


)


)
)
)

)
)

)

)

)