配置文件的修改點沒什么變化,可以參考:http://blog.csdn.net/ouitiken/article/details/8830505
pom.xml的依賴參考:
<dependencies><!-- Commons --><dependency><groupId>commons-dbcp</groupId><artifactId>commons-dbcp</artifactId><version>1.4</version></dependency><!-- Log --><dependency><groupId>log4j</groupId><artifactId>log4j</artifactId><version>1.2.17</version></dependency><!-- Struts2 --><dependency><groupId>org.freemarker</groupId><artifactId>freemarker</artifactId><version>2.3.18</version></dependency><dependency><groupId>org.apache.struts</groupId><artifactId>struts2-core</artifactId><version>2.3.16.3</version></dependency><dependency><groupId>org.apache.struts</groupId><artifactId>struts2-spring-plugin</artifactId><version>2.3.16.3</version></dependency><!-- Spring --><dependency><groupId>org.springframework</groupId><artifactId>spring-core</artifactId><version>3.2.8.RELEASE</version></dependency><dependency><groupId>org.springframework</groupId><artifactId>spring-web</artifactId><version>3.2.8.RELEASE</version></dependency><dependency><groupId>org.springframework</groupId><artifactId>spring-beans</artifactId><version>3.2.8.RELEASE</version></dependency><dependency><groupId>org.springframework</groupId><artifactId>spring-context</artifactId><version>3.2.8.RELEASE</version></dependency><dependency><groupId>org.springframework</groupId><artifactId>spring-context-support</artifactId><version>3.2.8.RELEASE</version></dependency><dependency><groupId>org.springframework</groupId><artifactId>spring-expression</artifactId><version>3.2.8.RELEASE</version></dependency><dependency><groupId>org.springframework</groupId><artifactId>spring-jdbc</artifactId><version>3.2.8.RELEASE</version></dependency><dependency><groupId>org.springframework.security</groupId><artifactId>spring-security-core</artifactId><version>3.2.4.RELEASE</version></dependency><dependency><groupId>org.springframework.security</groupId><artifactId>spring-security-web</artifactId><version>3.2.4.RELEASE</version></dependency><dependency><groupId>org.springframework.security</groupId><artifactId>spring-security-config</artifactId><version>3.2.4.RELEASE</version></dependency><!-- Mybatis --><dependency><groupId>org.mybatis</groupId><artifactId>mybatis</artifactId><version>3.0.6</version></dependency><dependency><groupId>org.mybatis</groupId><artifactId>mybatis-spring</artifactId><version>1.0.2</version></dependency><!-- Database --><dependency><groupId>mysql</groupId><artifactId>mysql-connector-java</artifactId><version>5.1.31</version></dependency></dependencies>
接下去就是spring-security的實現了
1. 修改web.xml
加入spring-security的過濾器,切忌必須加在struts2的過濾器前面。
<?xml version="1.0" encoding="UTF-8"?>
<web-app xmlns:xsi="http://www.w3.org/2001/XMLSchema-instance"xmlns="http://java.sun.com/xml/ns/javaee" xmlns:web="http://java.sun.com/xml/ns/javaee/web-app_2_5.xsd"xsi:schemaLocation="http://java.sun.com/xml/ns/javaee http://java.sun.com/xml/ns/javaee/web-app_2_5.xsd"id="WebApp_ID" version="2.5"><display-name>SpringSecurityPrj</display-name><context-param><param-name>contextConfigLocation</param-name><param-value>classpath:applicationContext*.xml</param-value></context-param><filter><filter-name>springSecurityFilterChain</filter-name><filter-class>org.springframework.web.filter.DelegatingFilterProxy</filter-class></filter><filter-mapping><filter-name>springSecurityFilterChain</filter-name><url-pattern>/*</url-pattern></filter-mapping><listener><listener-class>org.springframework.web.context.ContextLoaderListener</listener-class></listener><welcome-file-list><welcome-file>index.jsp</welcome-file></welcome-file-list>
</web-app>
接下來編寫的是applicationContext-security.xml文件:
<?xml version="1.0" encoding="UTF-8"?>
<beans:beans xmlns="http://www.springframework.org/schema/security"xmlns:beans="http://www.springframework.org/schema/beans" xmlns:xsi="http://www.w3.org/2001/XMLSchema-instance"xsi:schemaLocation="http://www.springframework.org/schema/beans http://www.springframework.org/schema/beans/spring-beans-3.0.xsdhttp://www.springframework.org/schema/securityhttp://www.springframework.org/schema/security/spring-security-3.2.xsd"><!-- 自動配置模式,攔截所有請求,有ROLE_USER才可以通過 --><http auto-config="true"><intercept-url pattern="/**" access="ROLE_USER" /></http><!-- 認證管理器。用戶名密碼都集成在配置文件中 --><authentication-manager><authentication-provider><user-service><user name="sharp" password="sharp" authorities="ROLE_USER" /></user-service></authentication-provider></authentication-manager>
</beans:beans>
另外我新建了一個index.jsp文件,作用是登錄成功后返回到index.jsp頁面:
<%@ page language="java" contentType="text/html; charset=UTF-8"pageEncoding="UTF-8"%>
<!DOCTYPE html PUBLIC "-//W3C//DTD HTML 4.01 Transitional//EN" "http://www.w3.org/TR/html4/loose.dtd">
<html>
<head>
<meta http-equiv="Content-Type" content="text/html; charset=UTF-8">
<title>登錄首頁</title>
</head>
<body><span color="red">登錄成功!</span>
</body>
</html>
當我們在瀏覽器地址欄里輸入下面的url:
http://localhost:8080/SpringSecurityPrj/
我們就可以再瀏覽器里看到用戶登錄界面:

?呵呵,內置的登錄頁面,挺好玩的。沒有使用過springsecurity可能還沒發現我在那里配置用戶名和密碼吧,看下面一段代碼,這里就是用戶名和密碼:
<user name="sharp"?password="sharp"?authorities="ROLE_USER"/> |
測試一:
我們錄入用戶名:admin;密碼:admin,然后點擊提交查詢,最終頁面如下:

登錄失敗了哦!
測試二:我們錄入用戶名:sharp;密碼:sharp;如下圖:
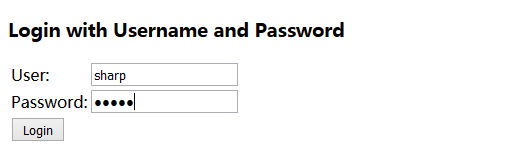
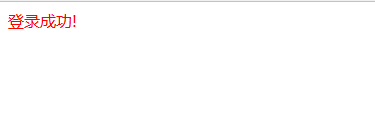
點擊提交查詢后,頁面如下:
?
頁面跳轉到index.jsp頁面,登錄成功了。
——在線播放(播放優酷視頻))

)
)


 攔截器方式配置)

--v$session_longops)


--v$db_object_cache)


