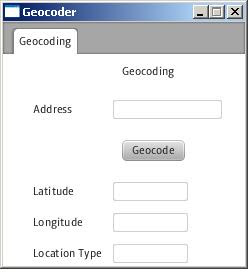
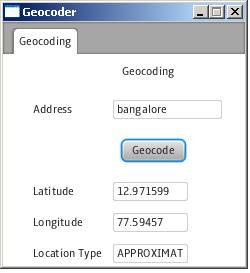
在這里,我開發了一個簡單的地址解析應用程序,該應用程序將使用Google地址編碼API來獲取地址并提供該位置的緯度-經度值。
我使用Groovy進行JSON解析,因為最新版本1.8提供了一個非常整潔的json解析支持。
import groovy.json.*class GeocodingParser {static def GEOCODE_JSON_URL = "http://maps.googleapis.com/maps/api/geocode/json"static def GEOCODE_XML_URL = "http://maps.googleapis.com/maps/api/geocode/xml"static def getGeocodeForAddress(address){def queryBuilder = []queryBuilder << "address=${URLEncoder.encode(address)}"queryBuilder << "sensor=false"def queryString = queryBuilder.join("&")def requestUrl = GEOCODE_JSON_URL+"?${queryString}"def payload = new URL(requestUrl).textdef jsonSlurper = new JsonSlurper()def doc = jsonSlurper.parseText(payload)def geocode = new Geocode()geocode.latitude = doc.results.geometry.location.lat.join("")geocode.longitude = doc.results.geometry.location.lng.join("")geocode.locationType = doc.results.geometry.location_type.join("")return geocode}
}class Geocode {def String latitudedef String longitudedef String locationTypedef String toString(){return "Latitude: ${latitude}, Longitude:${longitude} and Location type: ${locationType}"}
}
您可以看到使用JsonSlurper進行的json解析非常簡潔。 groovy解析器返回Geocode包裝器類中的緯度,經度和位置類型(這些是我們應用程序所關注的值)的值,這也是Grooy Bean。
現在,讓我們看一下實際上是本文重點的JavaFX代碼:
public class NewFXMain extends Application {/*** @param args the command line arguments*/public static void main(String[] args) {Application.launch(NewFXMain.class, args);}@Overridepublic void start(Stage primaryStage) {primaryStage.setTitle("Geocoder");TabPane mainTabPane = new TabPane();Tab geoTab = new Tab("Geocoding");geoTab.setClosable(false);mainTabPane.getTabs().add(geoTab);final GridPane geoGrid = new GridPane();geoGrid.setHgap(10);geoGrid.setVgap(10);geoGrid.setPadding(new Insets(0, 20, 0, 10));Label mainGeoLabel = new Label("Geocoding");final TextBox geoAddressTextBox = new TextBox(15);Button geoCodeButton = new Button("Geocode");final TextBox latitudeValTextBox = new TextBox();latitudeValTextBox.setEditable(false);final TextBox longitudeValTextBox = new TextBox();longitudeValTextBox.setEditable(false);final TextBox locationTypeValTextBox = new TextBox();locationTypeValTextBox.setEditable(false);final StringProperty latitudeProperty = new StringProperty();latitudeProperty.addListener(new ChangeListener<String>() {@Overridepublic void changed(ObservableValue<? extends String> observable, String oldValue, String newValue) {latitudeValTextBox.setText(newValue);}});final StringProperty longitudeProperty = new StringProperty();longitudeProperty.addListener(new ChangeListener<String>() {@Overridepublic void changed(ObservableValue<? extends String> observable, String oldValue, String newValue) {longitudeValTextBox.setText(newValue);}});final StringProperty locationTypeProperty = new StringProperty();locationTypeProperty.addListener(new ChangeListener<String>() {@Overridepublic void changed(ObservableValue<? extends String> observable, String oldValue, String newValue) {locationTypeValTextBox.setText(newValue);}});geoCodeButton.setOnAction(new EventHandler<ActionEvent>(){@Overridepublic void handle(ActionEvent event) {String address = geoAddressTextBox.getText();if(address == null){}else{Geocode parsedCode = (Geocode)GeocodingParser.getGeocodeForAddress(address);latitudeProperty.set(parsedCode.getLatitude());longitudeProperty.set(parsedCode.getLongitude());locationTypeProperty.set(parsedCode.getLocationType());}}});geoGrid.add(mainGeoLabel, 4, 1);geoGrid.add(new Label("Address"), 2, 3);geoGrid.add(geoAddressTextBox, 3, 3,3,1);geoGrid.add(new Label("Latitude"), 2,7);geoGrid.add(new Label("Longitude"),2,8);geoGrid.add(new Label("Location Type"),2,9);geoGrid.add(latitudeValTextBox,3,7,2,1);geoGrid.add(longitudeValTextBox,3,8,2,1);geoGrid.add(locationTypeValTextBox,3,9,2,1);geoGrid.add(geoCodeButton, 4, 5);geoTab.setContent(geoGrid);Scene scene = new Scene(mainTabPane);primaryStage.setScene(scene);primaryStage.setVisible(true);primaryStage.setResizable(false);}
}
我已經使用綁定來綁定顯示緯度,經度和位置類型值的組件以及具有相同值的屬性。 例如,以下代碼顯示了緯度值如何綁定到將顯示該值的控件。 該控件(文本框)保存了通過Geocoding API發送的json響應后獲得的緯度值。
現在,我們創建一個StringProperty來保存緯度的值,并將更改偵聽器附加到此屬性,以使該屬性中的值一旦更新,便會使用新值更新文本框。 那么,到底是什么改變了這個財產的價值? 我們添加一個按鈕,該按鈕調用groovy解析器并在包裝類中獲取緯度,經度和位置類型值。 在上面的動作偵聽器中,我們獲取已解析的值,然后使用相應的值更新屬性。 此更新依次觸發相應的更改偵聽器中的方法。
現在進入控件的布局。 我使用了GridBox布局,這非常靈活,因為它使我能夠以整齊的順序放置組件。
 以下是一些想法:
- JavaFX 2.0已更改,以使Java程序員更加友好
- JavaFX 2.0比JavaFX腳本更為冗長-例如:研究必須完成綁定的方式。
- 缺乏工具支持–創建GUI很困難。
- Java程序員不必一起學習新的語言,他們對JavaFX API感到很賓至如歸
- 與其他JVM語言(如Groovy,Scala)的互操作性。
- JavaFX 2.0中添加了許多新控件,API。
- 缺乏多平臺支持。
源代碼可以在這里找到。
參考: 使用JavaFX 2.0 beta的示例應用程序以及 JCG合作伙伴 Mohamed Sanaulla在Experiences Unlimited Blog上的 想法 。
- Xuggler開發教程
- YouTube Java API入門
- SmartGWT入門,提供出色的GWT界面
翻譯自: https://www.javacodegeeks.com/2011/06/javafx-20-beta-sample-application-and.html


