Python之路【第八篇】:堡壘機實例以及數據庫操作
堡壘機前戲
開發堡壘機之前,先來學習Python的paramiko模塊,該模塊機遇SSH用于連接遠程服務器并執行相關操作
SSHClient
用于連接遠程服務器并執行基本命令
基于用戶名密碼連接:
| 1 2 3 4 5 6 7 8 9 10 11 12 13 14 15 16 | import?paramiko??# 創建SSH對象ssh?=?paramiko.SSHClient()# 允許連接不在know_hosts文件中的主機ssh.set_missing_host_key_policy(paramiko.AutoAddPolicy())# 連接服務器ssh.connect(hostname='c1.salt.com', port=22, username='wupeiqi', password='123')??# 執行命令stdin, stdout, stderr?=?ssh.exec_command('df')# 獲取命令結果result?=?stdout.read()??# 關閉連接ssh.close() |

import paramikotransport = paramiko.Transport(('hostname', 22))
transport.connect(username='wupeiqi', password='123')ssh = paramiko.SSHClient()
ssh._transport = transportstdin, stdout, stderr = ssh.exec_command('df')
print stdout.read()transport.close()
基于公鑰密鑰連接:
| 1 2 3 4 5 6 7 8 9 10 11 12 13 14 15 16 17 18 | import?paramikoprivate_key?=?paramiko.RSAKey.from_private_key_file('/home/auto/.ssh/id_rsa')# 創建SSH對象ssh?=?paramiko.SSHClient()# 允許連接不在know_hosts文件中的主機ssh.set_missing_host_key_policy(paramiko.AutoAddPolicy())# 連接服務器ssh.connect(hostname='c1.salt.com', port=22, username='wupeiqi', key=private_key)# 執行命令stdin, stdout, stderr?=?ssh.exec_command('df')# 獲取命令結果result?=?stdout.read()# 關閉連接ssh.close() |

import paramikoprivate_key = paramiko.RSAKey.from_private_key_file('/home/auto/.ssh/id_rsa')transport = paramiko.Transport(('hostname', 22))
transport.connect(username='wupeiqi', pkey=private_key)ssh = paramiko.SSHClient()
ssh._transport = transportstdin, stdout, stderr = ssh.exec_command('df')transport.close()
SFTPClient
用于連接遠程服務器并執行上傳下載
基于用戶名密碼上傳下載
| 1 2 3 4 5 6 7 8 9 10 11 12 | import?paramikotransport?=?paramiko.Transport(('hostname',22))transport.connect(username='wupeiqi',password='123')sftp?=?paramiko.SFTPClient.from_transport(transport)# 將location.py 上傳至服務器 /tmp/test.pysftp.put('/tmp/location.py',?'/tmp/test.py')# 將remove_path 下載到本地 local_pathsftp.get('remove_path',?'local_path')transport.close() |
基于公鑰密鑰上傳下載
| 1 2 3 4 5 6 7 8 9 10 11 12 13 14 | import?paramikoprivate_key?=?paramiko.RSAKey.from_private_key_file('/home/auto/.ssh/id_rsa')transport?=?paramiko.Transport(('hostname',?22))transport.connect(username='wupeiqi', pkey=private_key )sftp?=?paramiko.SFTPClient.from_transport(transport)# 將location.py 上傳至服務器 /tmp/test.pysftp.put('/tmp/location.py',?'/tmp/test.py')# 將remove_path 下載到本地 local_pathsftp.get('remove_path',?'local_path')transport.close() |

#!/usr/bin/env python
# -*- coding:utf-8 -*-
import paramiko
import uuidclass Haproxy(object):def __init__(self):self.host = '172.16.103.191'self.port = 22self.username = 'wupeiqi'self.pwd = '123'self.__k = Nonedef create_file(self):file_name = str(uuid.uuid4())with open(file_name,'w') as f:f.write('sb')return file_namedef run(self):self.connect()self.upload()self.rename()self.close()def connect(self):transport = paramiko.Transport((self.host,self.port))transport.connect(username=self.username,password=self.pwd)self.__transport = transportdef close(self):self.__transport.close()def upload(self):# 連接,上傳file_name = self.create_file()sftp = paramiko.SFTPClient.from_transport(self.__transport)# 將location.py 上傳至服務器 /tmp/test.pysftp.put(file_name, '/home/wupeiqi/tttttttttttt.py')def rename(self):ssh = paramiko.SSHClient()ssh._transport = self.__transport# 執行命令stdin, stdout, stderr = ssh.exec_command('mv /home/wupeiqi/tttttttttttt.py /home/wupeiqi/ooooooooo.py')# 獲取命令結果result = stdout.read()ha = Haproxy()
ha.run()
堡壘機的實現?
實現思路:

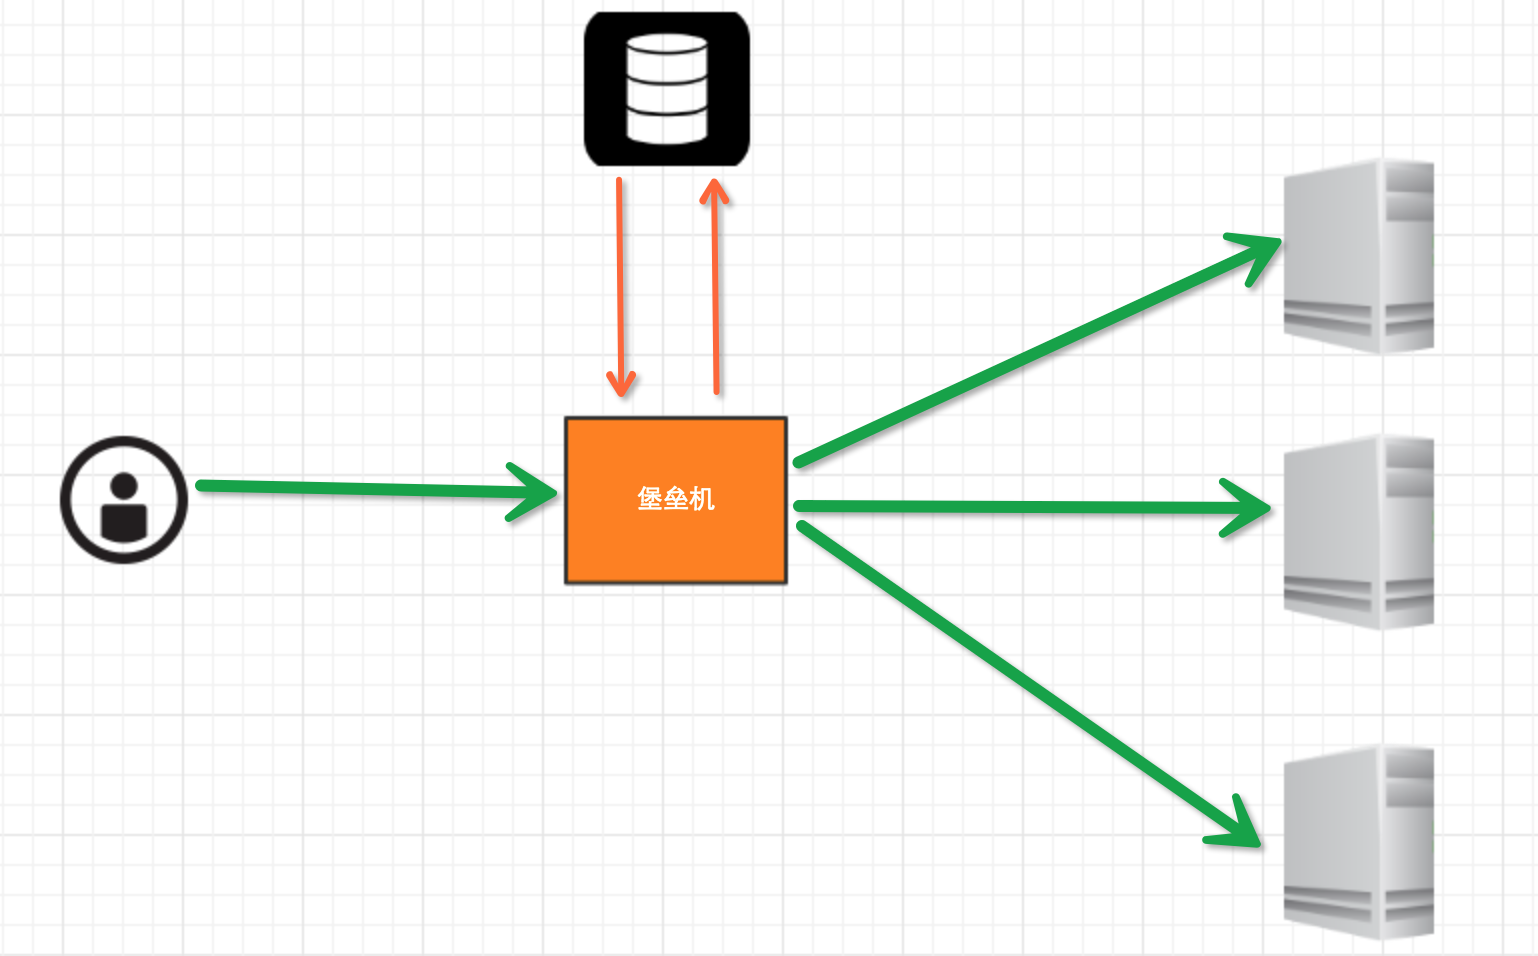
堡壘機執行流程:
- 管理員為用戶在服務器上創建賬號(將公鑰放置服務器,或者使用用戶名密碼)
- 用戶登陸堡壘機,輸入堡壘機用戶名密碼,現實當前用戶管理的服務器列表
- 用戶選擇服務器,并自動登陸
- 執行操作并同時將用戶操作記錄
注:配置.brashrc實現ssh登陸后自動執行腳本,如:/usr/bin/python /home/wupeiqi/menu.py
實現過程
步驟一,實現用戶登陸
| 1 2 3 4 5 6 7 8 | import?getpassuser?=?raw_input('username:')pwd?=?getpass.getpass('password')if?user?==?'alex'?and?pwd?==?'123':????print?'登陸成功'else:????print?'登陸失敗' |
步驟二,根據用戶獲取相關服務器列表
| 1 2 3 4 5 6 7 8 9 10 11 12 13 14 15 16 17 18 19 20 21 | dic?=?{????'alex': [????????'172.16.103.189',????????'c10.puppet.com',????????'c11.puppet.com',????],????'eric': [????????'c100.puppet.com',????]}host_list?=?dic['alex']print?'please select:'for?index, item?in?enumerate(host_list,?1):????print?index, iteminp?=?raw_input('your select (No):')inp?=?int(inp)hostname?=?host_list[inp-1]port?=?22 |
步驟三,根據用戶名、私鑰登陸服務器
| 1 2 3 4 5 6 7 8 9 10 11 12 13 14 15 16 17 18 19 20 21 22 | tran?=?paramiko.Transport((hostname, port,))tran.start_client()default_path?=?os.path.join(os.environ['HOME'],?'.ssh',?'id_rsa')key?=?paramiko.RSAKey.from_private_key_file(default_path)tran.auth_publickey('wupeiqi', key)# 打開一個通道chan?=?tran.open_session()# 獲取一個終端chan.get_pty()# 激活器chan.invoke_shell()########## 利用sys.stdin,肆意妄為執行操作# 用戶在終端輸入內容,并將內容發送至遠程服務器# 遠程服務器執行命令,并將結果返回# 用戶終端顯示內容#########chan.close()tran.close() |

while True:# 監視用戶輸入和服務器返回數據# sys.stdin 處理用戶輸入# chan 是之前創建的通道,用于接收服務器返回信息readable, writeable, error = select.select([chan, sys.stdin, ],[],[],1)if chan in readable:try:x = chan.recv(1024)if len(x) == 0:print '\r\n*** EOF\r\n',breaksys.stdout.write(x)sys.stdout.flush()except socket.timeout:passif sys.stdin in readable:inp = sys.stdin.readline()chan.sendall(inp)

# 獲取原tty屬性
oldtty = termios.tcgetattr(sys.stdin)
try:# 為tty設置新屬性# 默認當前tty設備屬性:#   輸入一行回車,執行#   CTRL+C 進程退出,遇到特殊字符,特殊處理。# 這是為原始模式,不認識所有特殊符號# 放置特殊字符應用在當前終端,如此設置,將所有的用戶輸入均發送到遠程服務器tty.setraw(sys.stdin.fileno())chan.settimeout(0.0)while True:# 監視 用戶輸入 和 遠程服務器返回數據(socket)# 阻塞,直到句柄可讀r, w, e = select.select([chan, sys.stdin], [], [], 1)if chan in r:try:x = chan.recv(1024)if len(x) == 0:print '\r\n*** EOF\r\n',breaksys.stdout.write(x)sys.stdout.flush()except socket.timeout:passif sys.stdin in r:x = sys.stdin.read(1)if len(x) == 0:breakchan.send(x)finally:# 重新設置終端屬性termios.tcsetattr(sys.stdin, termios.TCSADRAIN, oldtty)

def windows_shell(chan):import threadingsys.stdout.write("Line-buffered terminal emulation. Press F6 or ^Z to send EOF.\r\n\r\n")def writeall(sock):while True:data = sock.recv(256)if not data:sys.stdout.write('\r\n*** EOF ***\r\n\r\n')sys.stdout.flush()breaksys.stdout.write(data)sys.stdout.flush()writer = threading.Thread(target=writeall, args=(chan,))writer.start()try:while True:d = sys.stdin.read(1)if not d:breakchan.send(d)except EOFError:# user hit ^Z or F6pass 注:密碼驗證 t.auth_password(username, pw)
詳見:paramiko源碼demo
數據庫操作
Python 操作 Mysql 模塊的安裝
| 1 2 3 4 5 | linux:????yum install MySQL-pythonwindow:????http://files.cnblogs.com/files/wupeiqi/py-mysql-win.zip |
SQL基本使用
1、數據庫操作
| 1 2 3 | show databases;use [databasename];create database? [name]; |
2、數據表操作
| 1 2 3 4 5 6 7 8 9 10 | show tables;create table students????(????????id?int??not?null auto_increment primary key,????????name char(8)?not?null,????????sex char(4)?not?null,????????age tinyint unsigned?not?null,????????tel char(13) null default?"-"????); |

CREATE TABLE `wb_blog` ( `id` smallint(8) unsigned NOT NULL, `catid` smallint(5) unsigned NOT NULL DEFAULT '0', `title` varchar(80) NOT NULL DEFAULT '', `content` text NOT NULL, PRIMARY KEY (`id`), UNIQUE KEY `catename` (`catid`)
) ;
3、數據操作
| 1 2 3 4 5 6 7 | insert into students(name,sex,age,tel) values('alex','man',18,'151515151')delete?from?students where?id?=2;update students?set?name?=?'sb'?where?id?=1;select?*?from?students |
4、其他
| 1 2 3 | 主鍵外鍵左右連接 |
Python MySQL API
一、插入數據
| 1 2 3 4 5 6 7 8 9 10 11 12 13 14 15 | import?MySQLdb??conn?=?MySQLdb.connect(host='127.0.0.1',user='root',passwd='1234',db='mydb')??cur?=?conn.cursor()??reCount?=?cur.execute('insert into UserInfo(Name,Address) values(%s,%s)',('alex','usa'))# reCount = cur.execute('insert into UserInfo(Name,Address) values(%(id)s, %(name)s)',{'id':12345,'name':'wupeiqi'})??conn.commit()??cur.close()conn.close()??print?reCount |

import MySQLdbconn = MySQLdb.connect(host='127.0.0.1',user='root',passwd='1234',db='mydb')cur = conn.cursor()li =[('alex','usa'),('sb','usa'),
]
reCount = cur.executemany('insert into UserInfo(Name,Address) values(%s,%s)',li)conn.commit()
cur.close()
conn.close()print reCount
注意:cur.lastrowid
二、刪除數據
| 1 2 3 4 5 6 7 8 9 10 11 12 13 14 | import?MySQLdbconn?=?MySQLdb.connect(host='127.0.0.1',user='root',passwd='1234',db='mydb')cur?=?conn.cursor()reCount?=?cur.execute('delete from UserInfo')conn.commit()cur.close()conn.close()print?reCount |
三、修改數據
| 1 2 3 4 5 6 7 8 9 10 11 12 13 | import?MySQLdbconn?=?MySQLdb.connect(host='127.0.0.1',user='root',passwd='1234',db='mydb')cur?=?conn.cursor()reCount?=?cur.execute('update UserInfo set Name = %s',('alin',))conn.commit()cur.close()conn.close()print?reCount |
四、查數據
| 1 2 3 4 5 6 7 8 9 10 11 12 13 14 15 16 17 18 19 20 21 22 23 24 25 26 27 28 29 30 31 32 33 34 35 36 37 38 39 40 41 42 43 44 | # ############################## fetchone/fetchmany(num)? ##############################import?MySQLdbconn?=?MySQLdb.connect(host='127.0.0.1',user='root',passwd='1234',db='mydb')cur?=?conn.cursor()reCount?=?cur.execute('select * from UserInfo')print?cur.fetchone()print?cur.fetchone()cur.scroll(-1,mode='relative')print?cur.fetchone()print?cur.fetchone()cur.scroll(0,mode='absolute')print?cur.fetchone()print?cur.fetchone()cur.close()conn.close()print?reCount# ############################## fetchall? ##############################import?MySQLdbconn?=?MySQLdb.connect(host='127.0.0.1',user='root',passwd='1234',db='mydb')#cur = conn.cursor(cursorclass = MySQLdb.cursors.DictCursor)cur?=?conn.cursor()reCount?=?cur.execute('select Name,Address from UserInfo')nRet?=?cur.fetchall()cur.close()conn.close()print?reCountprint?nRetfor?i?in?nRet:????print?i[0],i[1] |
?


(示例代碼)...)


