django實現圖片瀑布流布局
我們在一些圖片網站上經常會看到,滿屏都是圖片,而且圖片都大小不一,卻可以按空間排列。默認一個div是占用一行,當想把div里的圖片并排顯示的時候,只能使用float屬性,但是,如果兩張圖片大小不一,那么第二行圖片會以第一張最大的圖片占用的空間為基準,進行第二行顯示,這樣的圖片布局就非常難看,今天實現的就是瀑布流的形式
實現效果: 

一般我們做圖片布局的時候,都是采用div中加入img,然后將div float起來,這樣圖片就會并排顯示。實現瀑布流的原理就是,我們換一種布局方式,首先定義好需要顯示多少列圖片,多少列就是多少和div,然后在每列的div中去加入div包著的圖片,由于圖片外的div是行標簽,所以默認獨占一行,所以,在本列的div中,圖片就無縫的向下排列了,同理,其他列也是,這樣總體布局就出現了,看下圖 

具體html代碼 不在說明,下面說一下 如何結合模版語言去,動態展示瀑布里圖片
- view代碼
def student(request):img_list = [{'src': '1.jpg', 'title': 'asdfasdfasdf','content': 'asdf'},# 1{'src': '2.jpg', 'title': 'asdfasdfasdf','content': 'asdf'},# 2{'src': '3.jpg', 'title': 'asdfasdfasdf','content': 'asdf'},{'src': '4.jpg', 'title': 'asdfasdfasdf','content': 'asdf'},{'src': '5.jpg', 'title': 'asdfasdfasdf','content': 'asdf'},# 5{'src': '6.jpg', 'title': 'asdfasdfasdf','content': 'asdf'},]return render(request, 'student.html', {"img_list":img_list})
?
首先分析,現在以四列布局 div分別是a、b、c、d, 那么圖片1就在div a中,圖片2就在div b中,圖片3就在div c中,圖片4就在div d中,到圖片5時,就繼續從div a中開始,后面依次。發現,其中的規律就是第多少張圖片 n 除以 4,的余數m 就是第m個div。根據這個規律,我們可以使用模版語言中自定義的方法去進行判斷,如果本圖片 除以4,正好等于所比較的div 號,那么就放進去
代碼:
from django import template
register = template.Library()@register.filter
def detail1(value,arg):"""查看余數是否等于remainder arg="1,2":param counter::param allcount::param remainder::return:"""allcount, remainder = arg.split(',')allcount = int(allcount)remainder = int(remainder)if value%allcount == remainder:return Truereturn False
?
- html 代碼
{% load xx %}
<!DOCTYPE html>
<html lang="en">
<head><meta charset="UTF-8"><title></title><style>.container{width: 980px;margin: 0 auto;}.container .column{float: left;width: 245px;}.container .item img{width: 245px;}</style>
</head>
<body><div class="container"><div class="column">{% for i in img_list %}{% if forloop.counter|detail1:"4,1" %}<div class="item">{{ forloop.counter }}<img src="/static/{{ i.src }}"></div>{% endif %}{% endfor %}</div><div class="column">{% for i in img_list %}{% if forloop.counter|detail1:"4,2" %}<div class="item">{{ forloop.counter }}<img src="/static/{{ i.src }}"></div>{% endif %}{% endfor %}</div><div class="column">{% for i in img_list %}{% if forloop.counter|detail1:"4,3" %}<div class="item">{{ forloop.counter }}<img src="/static/{{ i.src }}"></div>{% endif %}{% endfor %}</div><div class="column">{% for i in img_list %}{% if forloop.counter|detail1:"4,0" %}<div class="item">{{ forloop.counter }}<img src="/static/{{ i.src }}"></div>{% endif %}{% endfor %}</div></div></body>
</html>
?
上面只是簡單的利用模版語言 實現了瀑布流布局,但是會發現圖片列表需要循環四次,這樣效率不好,一般情況下,可以使用ajax,先獲取到圖片列表,然后js去循環列表,然后在循環中,將當前循環的元素索引 去和4相除,拿到余數,最后使用jquery 根據余數進行直接定位到對應的div
django實現組合搜索
案例: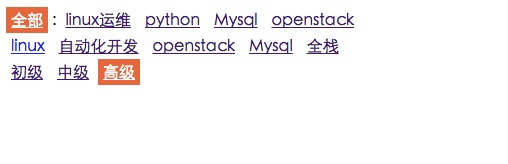 

-
表設計
根據上面的案例,第一行為總的方向,第二行為方向下的分類,第三行為分類下的級別,- 1.總的方向和分類的關系為,一個分類可能屬于多個方向,一個方向下有多個分類,所以屬于多對多的關系
- 2. 分類下應該有多個數據,數據應該只屬于一個分類,所以數據和分類的關系為一對多的關系
- 3. 級別應該是數據的一個字段
根據以上分析,下面是表結構:
from django.db import models# Create your models here.
# 技術方向,
class Direction(models.Model):name = models.CharField(verbose_name='名稱', max_length=32)classification = models.ManyToManyField('Classification')class Meta:db_table = 'Direction'verbose_name_plural = u'方向(視頻方向)'def __str__(self):return self.name# 技術分類、語言
class Classification(models.Model):name = models.CharField(verbose_name='名稱', max_length=32)class Meta:db_table = 'Classification'verbose_name_plural = u'分類(視頻分類)'def __str__(self):return self.name# 技術視頻,
class Video(models.Model):level_choice = ((1, u'初級'),(2, u'中級'),(3, u'高級'),)level = models.IntegerField(verbose_name='級別', choices=level_choice, default=1)classification = models.ForeignKey('Classification', null=True, blank=True)title = models.CharField(verbose_name='標題', max_length=32)summary = models.CharField(verbose_name='簡介', max_length=32)img = models.ImageField(verbose_name='圖片', upload_to='./static/images/Video/')href = models.CharField(verbose_name='視頻地址', max_length=256)create_date = models.DateTimeField(auto_now_add=True)class Meta:db_table = 'Video'verbose_name_plural = u'視頻'def __str__(self):return self.title
?
-
html 設計
案例中的方向、分類、和級別都是直接從數據庫中拿到的數據,所以,這里就應用到了模版語言,下面是html代碼,里面使用了自定義的tag方法
{% load xx %}
<!DOCTYPE html>
<html lang="en">
<head><meta charset="UTF-8"><title></title><style>.condition a{display: inline-block;padding: 5px;}.condition a.active{background-color: coral;color: white;}</style>
</head>
<body><div class="condition"><div>{% all_menu current_url %} :{% for i in dList %}{% ac1 current_url i.id i.name %}{% endfor %}</div><div>{% for i in cList %}{% ac2 current_url i.id i.name %}{% endfor %}</div><div>{% for i in lList %}{% ac3 current_url i.0 i.1 %}{% endfor %}</div></div></body>
</html>
?
- view 設計
from django.shortcuts import render
from app01 import models
# Create your views here.def video(request,**kwargs):print(kwargs)print(request.path_info)current_url = request.path_info         #獲取當前urldirection_id = kwargs.get('direction_id','0')classfication_id = kwargs.get('classfication_id', '0')q = {}# 方向是0if direction_id == '0':cList = models.Classification.objects.values('id', 'name')# 分類是0if classfication_id == '0':# video-0-0passelse:# video-0-1# 選中了某個分類q['classification__id'] = classfication_idelse:obj = models.Direction.objects.get(id=direction_id)temp = obj.classification.all().values('id','name')id_list = list(map(lambda x:x['id'],temp))cList = obj.classification.all().values('id','name')if classfication_id == '0':# video-1-0# 根據風向ID,找到所屬的分類IDprint(id_list)q['classification__id__in'] = id_listelse:# video-1-1if int(classfication_id) in id_list:q['classification__id'] = classfication_idelse:q['classification__id__in'] = id_listurl_list = current_url.split('-')url_list[2] = "0"current_url = '-'.join(url_list)level_id = kwargs.get('level_id',None)if level_id != '0':q['level'] = level_idresult = models.Video.objects.filter(**q)dList = models.Direction.objects.values('id', 'name')lList = models.Video.level_choice# level_choice = (#     (1, u'初級'),#     (2, u'中級'),#     (3, u'高級'),# )return render(request, 'video.html', {"dList":dList,'cList': cList,'lList': lList,'current_url': current_url})
?
- 模版語言自定義方法
from django import template
from django.utils.safestring import mark_saferegister = template.Library()
@register.simple_tag
def action1(current_url, nid):# /video-2-1-3.htmlurl_list = current_url.split('-')url_list[1] = str(nid)return '-'.join(url_list)@register.simple_tag
def action2(current_url, nid):# /video-2-1-3.htmlurl_list = current_url.split('-')url_list[2] = str(nid)return '-'.join(url_list)@register.simple_tag
def action3(current_url, nid):# /video-2-1-3.htmlurl_list = current_url.split('-')url_list[3] = str(nid) + '.html'return '-'.join(url_list)@register.simple_tag
def ac1(current_url, nid, name):# # /video-2-1-3.htmlurl_list = current_url.split('-')old = url_list[1]if old == str(nid):temp = '<a class="active" href="%s">%s</a>'else:temp = '<a href="%s">%s</a>'url_list[1] = str(nid)tag = temp %('-'.join(url_list),name)return mark_safe(tag)@register.simple_tag
def ac2(current_url, nid, name):# # /video-2-1-3.htmlurl_list = current_url.split('-')old = url_list[2]if old == str(nid):temp = '<a class="active" href="%s">%s</a>'else:temp = '<a href="%s">%s</a>'url_list[2] = str(nid)tag = temp %('-'.join(url_list),name)return mark_safe(tag)@register.simple_tag
def ac3(current_url, nid, name):# # /video-2-1-3.htmlurl_list = current_url.split('-')old = url_list[3]if old == str(nid) + '.html':temp = '<a class="active" href="%s">%s</a>'else:temp = '<a href="%s">%s</a>'url_list[3] = str(nid) +  '.html'tag = temp %('-'.join(url_list),name)return mark_safe(tag)@register.simple_tag
def all_menu(current_url):# video-0-10-0.htmlurl_list = current_url.split('-')if url_list[1] == '0':temp = '<a class="active" href="%s">全部</a>'else:temp = '<a  href="%s">全部</a>'url_list[1] = '0'temp = temp %('-'.join(url_list))return mark_safe(temp)
?
- url 設計:
urlpatterns = [url(r'^admin/', admin.site.urls),url(r'^video-(?P<direction_id>\d+)-(?P<classfication_id>\d+)-(?P<level_id>\d+).html', views.video),]
?
django實現階梯評論
data = [(None,'A'),('A','A1'),('A','A1-1'),('A1','A2'),('A1-1','A2-3'),('A2-3','A3-4'),('A1','A2-2'),('A2','A3'),('A2-2','A3-3'),('A3','A4'),(None,'B'),('B','B1'),('B1','B2'),('B1','B2-2'),('B2','B3'),(None,'C'),('C','C1'),]def tree_search(d_dic,parent,son):#一層一層找,先撥第一層,一層一層往下找for k,v in d_dic.items():#舉例來說我先遇到A,我就把A來個深度查詢,A沒有了在找Bif k == parent:#如果等于就找到了parent,就吧son加入到他下面d_dic[k][son] = {} #son下面可能還有兒子#這里找到就直接return了,你找到就直接退出就行了returnelse:#如果沒有找到,有可能還有更深的地方,的需要剝掉一層
            tree_search(d_dic[k],parent,son)data_dic = {}for item in data:# 每一個item代表兩個值一個父親一個兒子parent,son = item#先判斷parent是否為空,如果為空他就是頂級的,直接吧他加到data_dicif parent is None:data_dic[son] = {}  #這里如果為空,那么key就是他自己,他兒子就是一個空字典else:'''如果不為空他是誰的兒子呢?舉例來說A3他是A2的兒子,但是你能直接判斷A3的父親是A2你能直接判斷他是否在A里面嗎?你只能到第一層.key所以咱們就得一層一層的找,我們知道A3他爹肯定在字典里了,所以就得一層一層的找,但是不能循環找,因為你不知道他有多少層,所以通過遞歸去找直到找到位置'''tree_search(data_dic,parent,son) #因為你要一層一層找,你的把data_dic傳進去,還的把parent和son傳進去for k,v in data_dic.items():print(k,v)
?
執行結果:
('A', {'A1': {'A2': {'A3': {'A4': {}}}, 'A2-2': {'A3-3': {}}}, 'A1-1': {'A2-3': {'A3-4': {}}}})
('C', {'C1': {}})
('B', {'B1': {'B2-2': {}, 'B2': {'B3': {}}}})
另一種方法:
def SearchParentNode(comment,CommentTree):'''功能:查找本條評論的父評論'''for i in CommentTree:if comment['reply_id'] == i['cid']:   #如果reply_id和本節點cid一樣,則找到父節點CommentTree[CommentTree.index(i)]['childs'].append(comment)else:SearchParentNode(comment, CommentTree[CommentTree.index(i)]['childs'])comment_lists = models.Comment.objects.filter(news_id=news_id).values('cid','user__username','content','ctime','ups','downs','news_id','reply_id',)comment_lists = list(comment_lists)comment_tree = []       #為每個comment添加一個child字段for comment in comment_lists:comment['childs'] = []if not comment['reply_id']:         #如果reply_id為空,表示為根評論
                comment_tree.append(comment)else:SearchParentNode(comment,comment_tree)  #否則,遞歸查找父節點result = {'TotalCount':len(comment_lists),'CommentTree':comment_tree}print(result)return HttpResponse(json.dumps(result,cls=commons.JsonCustomEncoder))
?
django實現驗證碼
驗證碼需要考慮的問題:
1:系統產生的驗證碼文本內容記錄在哪?
儲存到session,每次比對的驗證碼應該是上次產生的驗證。而不是這次產生的驗證比對。session具有獨立性。因為每個人產生的session的隨機字符串是不一樣,也就意味著每個用戶有單獨的session。所以將驗證碼儲存在session。保證每次比對的是同一個用戶的驗證碼。
2:驗證碼產生的形式?文本還是圖片?
驗證碼的作用:就是為了避免不法用戶ddos攻擊網站,通過網站的驗證碼,可以降低攻擊速率。如果是文本的話,我們可以 用腳本可以抓取相應的標簽內的驗證碼。所以驗證碼不能為文本。由于識別圖片的成本較高,而且速度也不快。所以采用圖片的形式儲存驗證碼。
3:點擊驗證碼圖片要保證更新圖片內容,怎么實現?
保證每次請求的url是不一樣,比如:通過加?問號來保證每次請求的url是不一樣,讓系統產生的不同驗證碼。
需要安裝Pillow模塊:
pip3.5.exe install Pillow- 產生圖片和驗證碼代碼:
#!/usr/bin/env python
#coding:utf-8import random
from PIL import Image, ImageDraw, ImageFont, ImageFilter_letter_cases = "abcdefghjkmnpqrstuvwxy"  # 小寫字母,去除可能干擾的i,l,o,z
_upper_cases = _letter_cases.upper()  # 大寫字母
_numbers = ''.join(map(str, range(3, 10)))  # 數字
init_chars = ''.join((_letter_cases, _upper_cases, _numbers))def create_validate_code(size=(120, 30),chars=init_chars,img_type="GIF",mode="RGB",bg_color=(255, 255, 255),fg_color=(0, 0, 255),font_size=18,font_type="Monaco.ttf",length=4,draw_lines=True,n_line=(1, 2),draw_points=True,point_chance = 2):'''@todo: 生成驗證碼圖片@param size: 圖片的大小,格式(寬,高),默認為(120, 30)@param chars: 允許的字符集合,格式字符串@param img_type: 圖片保存的格式,默認為GIF,可選的為GIF,JPEG,TIFF,PNG@param mode: 圖片模式,默認為RGB@param bg_color: 背景顏色,默認為白色@param fg_color: 前景色,驗證碼字符顏色,默認為藍色#0000FF@param font_size: 驗證碼字體大小@param font_type: 驗證碼字體,默認為 ae_AlArabiya.ttf@param length: 驗證碼字符個數@param draw_lines: 是否劃干擾線@param n_lines: 干擾線的條數范圍,格式元組,默認為(1, 2),只有draw_lines為True時有效@param draw_points: 是否畫干擾點@param point_chance: 干擾點出現的概率,大小范圍[0, 100]@return: [0]: PIL Image實例@return: [1]: 驗證碼圖片中的字符串'''width, height = size # 寬, 高img = Image.new(mode, size, bg_color) # 創建圖形draw = ImageDraw.Draw(img) # 創建畫筆def get_chars():'''生成給定長度的字符串,返回列表格式'''return random.sample(chars, length)def create_lines():'''繪制干擾線'''line_num = random.randint(*n_line) # 干擾線條數for i in range(line_num):# 起始點begin = (random.randint(0, size[0]), random.randint(0, size[1]))#結束點end = (random.randint(0, size[0]), random.randint(0, size[1]))draw.line([begin, end], fill=(0, 0, 0))def create_points():'''繪制干擾點'''chance = min(100, max(0, int(point_chance))) # 大小限制在[0, 100]for w in range(width):for h in range(height):tmp = random.randint(0, 100)if tmp > 100 - chance:draw.point((w, h), fill=(0, 0, 0))def create_strs():'''繪制驗證碼字符'''c_chars = get_chars()strs = ' %s ' % ' '.join(c_chars) # 每個字符前后以空格隔開
font = ImageFont.truetype(font_type, font_size)font_width, font_height = font.getsize(strs)draw.text(((width - font_width) / 3, (height - font_height) / 3),strs, font=font, fill=fg_color)return ''.join(c_chars)if draw_lines:create_lines()if draw_points:create_points()strs = create_strs()# 圖形扭曲參數params = [1 - float(random.randint(1, 2)) / 100,0,0,0,1 - float(random.randint(1, 10)) / 100,float(random.randint(1, 2)) / 500,0.001,float(random.randint(1, 2)) / 500]img = img.transform(size, Image.PERSPECTIVE, params) # 創建扭曲
img = img.filter(ImageFilter.EDGE_ENHANCE_MORE) # 濾鏡,邊界加強(閾值更大)return img, strs
?
如上模塊返回的是圖片對象和驗證碼。
- 后臺驗證碼coder:
def check_code(request):import iofrom backend import check_code as CheckCodestream = io.BytesIO()#在內存中產生# img圖片對象,code在圖像中寫的內容img, code = CheckCode.create_validate_code()img.save(stream, "png")#將驗證碼圖片保存在內存里的文件中
request.session["CheckCode"] = codereturn HttpResponse(stream.getvalue())#從內存中取出圖片返回給前端。# 代碼:生成一張圖片,在圖片中寫文件# request.session['CheckCode'] =  圖片上的內容# 自動生成圖片,并且將圖片中的文字保存在session中# 將圖片內容返回給用戶def login(request):if request.method == 'POST':input_code = request.POST.get('check_code')#驗證碼的比對print(input_code.upper(),request.session['CheckCode'].upper())return render(request, 'login.html')
?
- 前端?
<!DOCTYPE html>
<html lang="en">
<head><meta charset="UTF-8"><title></title>
</head>
<body><form action="/login/" method="POST"><input type="text" name="username" /><input type="text" name="pwd" /><input type="text" name="check_code" /><img src="/check_code/" onclick="ChangeCode(this);"><input type="submit" /></form><script>function ChangeCode(ths){ths.src = ths.src + '?';//保證用戶在點擊驗證碼圖片的時候,進行更新。保證每次請求的url是不同的。
        }</script>
</body>
</html>
?


文檔)


)

windows下安裝PHPCMS V9)


)


