windows獲取本地時間

By default a fresh Windows 8 installation prompts you to create a synchronized cloud-enabled login. While there are distinct perks to Microsoft’s live login system, sometimes you just want to keep things simple and local. Read on as we show you how to banish the cloud-based login for a traditional local login.
默認情況下,全新的Windows 8安裝會提示您創建同步的啟用云的登錄名。 盡管Microsoft的實時登錄系統有明顯的好處,但有時您只是想保持簡單和本地化。 繼續閱讀,我們向您展示如何消除傳統本地登錄的基于云的登錄。
Dear How-To Geek,
親愛的How-To Geek,
While configuring my new computer (which has Windows 8 on it) I seem to have created some sort of synchronized-to-Microsft’s-servers login. I really didn’t want to create it, but it looked like I had no other choice when I set the computer up. On all my old versions of Windows all the way back to the early days of the OS, I always had just a plain old login like John + a password. I don’t like this whole John + somecrazyemail (because all the reasonable @live.com emails were already taken) + a password business.
在配置新計算機(裝有Windows 8)時,我似乎已經創建了某種與Microsft服務器同步的登錄名。 我確實不想創建它,但是在設置計算機時似乎別無選擇。 一直到OS早期,在我所有的Windows舊版本上,我總是只有普通的舊登錄名,例如John +密碼。 我不喜歡這整個John + somecrazyemail(因為所有合理的@ live.com電子郵件都已被接收)+密碼業務。
How do I get a plain jane local login back? I tried searching for a solution and I found your great article explaining the differences between the cloud login and the local login, but I’m not clear how to banish the cloud login and get back to using a regular login again.
如何獲得簡簡的本地登錄名? 我嘗試搜索解決方案,但發現了一篇很棒的文章,解釋了云登錄和本地登錄之間的區別,但是我不清楚如何消除云登錄并重新使用常規登錄。
Sincerely,
真誠的
Local Login 4 Life
本地登錄4生活
We can understand your frustration. The way the setup process is laid out it makes it look like setting up a “Microsoft account” to enable syncing and Windows Store purchases is the only way to do things.
我們可以理解您的無奈。 設置過程的布局方式使其看起來像設置“ Microsoft帳戶”以啟用同步,并且Windows Store購買是唯一的處理方法。
In order to get back to where you’d like to be (no cloud-based login, only a local login) we’ll need to perform a few simple housekeeping steps. Let’s break it down into the individual steps.
為了返回您想要的位置(沒有基于云的登錄,只有本地登錄),我們需要執行一些簡單的內務處理步驟。 讓我們將其分解為各個步驟。
創建本地用戶 (Creating the Local User)
First and foremost, we need to create a new local account. Log into your Windows 8 computer using the Microsoft Account created during the installation/configuration process. Move the cursor up to the upper right corner to reveal the charm bar/search icon and click on the search icon. Search for “users’ to bring up the user account options.
首先,我們需要創建一個新的本地帳戶。 使用在安裝/配置過程中創建的Microsoft帳戶登錄Windows 8計算機。 將光標向上移動到右上角以顯示超級按鈕/搜索圖標,然后單擊搜索圖標。 搜索“用戶”以顯示用戶帳戶選項。
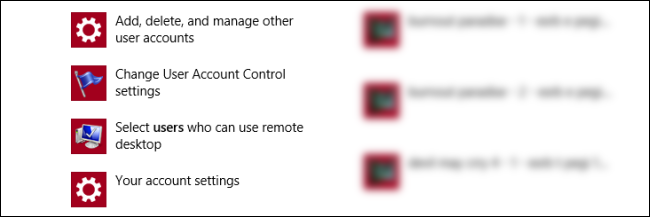
The first search result will be “Add, Delete, and manage other users accounts”. Click on that option. This will take you to the Accounts section like so:
第一個搜索結果將是“添加,刪除和管理其他用戶帳戶”。 單擊該選項。 這樣將帶您進入“帳戶”部分,如下所示:
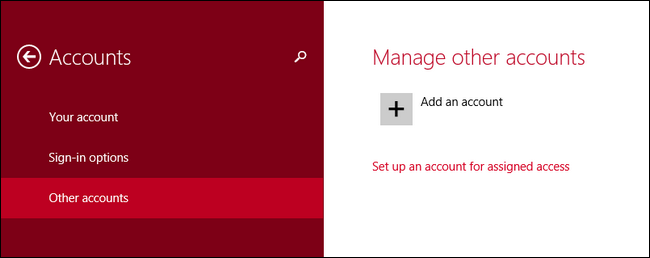
Select, Other Account. Click “Add an account”.
選擇其他帳戶。 點擊“添加帳戶”。
This is the part where things get tricky. At the top of the screen, it makes it seem like you?must provide an email or create a new one:
這是事情變得棘手的部分。 在屏幕頂部,似乎您必須提供電子郵件或創建新電子郵件:

But if you look at the bottom of the screen and read fine print, you can proceed without an email address:
但是,如果您查看屏幕底部并閱讀精美印刷品,則可以在沒有電子郵件地址的情況下繼續進行操作:
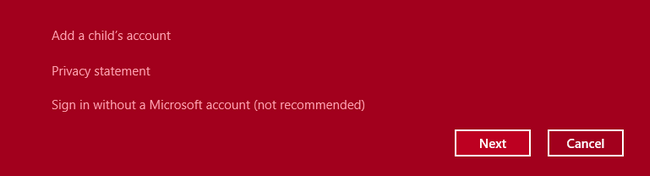
Click on “Sign in without a Microsoft account (not recommended)” and click next. Don’t think you’re done refusing to sign up for an account yet, though:
單擊“不使用Microsoft帳戶登錄(不推薦)”,然后單擊下一步。 不過,不要以為您已經拒絕注冊帳戶了嗎?
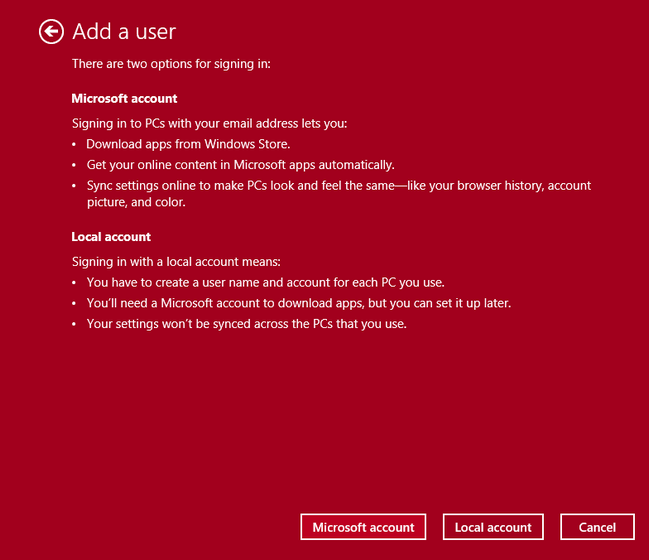
They’ll bug you one more time to sign up for a Microsoft Account. Read the summary if you must, but make sure to click the “Local account” button to start the process of creating a true local account.
他們會讓您有更多時間注冊Microsoft帳戶。 如果需要,請閱讀摘要,但請確保單擊“本地帳戶”按鈕以開始創建真實的本地帳戶的過程。
On the next screen, you’ll see a pretty familiar process, a request for a username, password, password check, and a password hint:
在下一個屏幕上,您將看到一個非常熟悉的過程,要求輸入用戶名,密碼,密碼檢查和密碼提示:
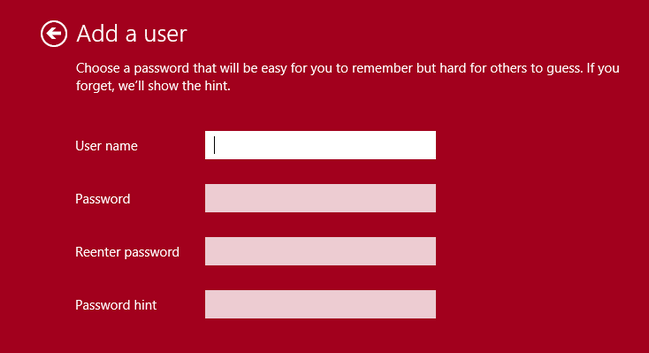
Enter all that information and click Next. In the next step you’ll see a confirmation for the new user. Click Finish and you’re all done. You now have a new local user account with no ties to the Microsoft Account cloud-based system.
輸入所有這些信息,然后單擊下一步。 在下一步中,您將看到對新用戶的確認。 單擊完成,您已完成。 現在,您有了一個新的本地用戶帳戶,該帳戶與基于Microsoft帳戶云的系統沒有關系。
提升本地用戶的特權 (Elevating the Local User’s Privileges)
Before we begin the process of banishing the old Microsoft Account, we need to give our newly minted local account administrative privilege. In the last step, after you clicked Finish, it kicked you back to the Accounts screen. Click on the “Other accounts” option on the sidebar and then double click on the entry for the new local user account you just created. ?Click the “Edit” button that appears when you do so.
在開始清除舊的Microsoft帳戶之前,我們需要賦予我們新創建的本地帳戶管理特權。 在最后一步中,單擊“完成”后,它會將您踢回到“帳戶”屏幕。 單擊側欄上的“其他帳戶”選項,然后雙擊剛創建的新本地用戶帳戶的條目。 單擊這樣做時出現的“編輯”按鈕。
Beneath the user account name is a drop down menu where you can toggle the privileges:
用戶帳戶名下面是一個下拉菜單,您可以在其中切換特權:
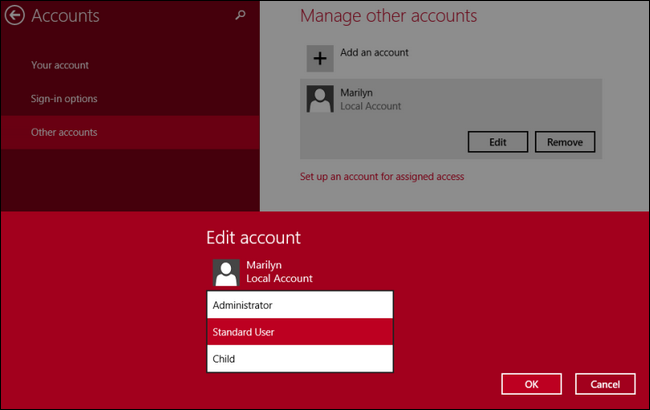
By default the account is set to “Standard User”, change it to “Administrator”. Click OK.
默認情況下,該帳戶設置為“標準用戶”,將其更改為“管理員”。 單擊確定。
Note:?It’s good security practice to have a separate administrative account for administrative tasks and a daily-use account set as a standard user, even if you’re the only one using the computer. To follow that advice, you should create two new local-user accounts, such as Bill and Admin wherein Bill is the standard user and Admin is the elevated user. For the purposes of this tutorial, however, we’re outright replacing the Microsoft Account (which has admin privileges) with an equivalent local user account (which now also has admin privileges).?
注意:最好的安全做法是為管理任務設置一個單獨的管理帳戶,并將一個日常使用的帳戶設置為標準用戶,即使您是唯一使用計算機的人。 要遵循該建議,您應該創建兩個新的本地用戶帳戶,例如Bill和Admin,其中Bill是標準用戶,而Admin是提升的用戶。 但是,出于本教程的目的,我們用等效的本地用戶帳戶(現在也具有管理員特權)直接替換Microsoft帳戶(具有管理員特權)。
After clicking OK, you’ll be back at the Accounts screen. At this point we have a new user account (the local account you want) with administrative privileges.
單擊“確定”后,您將回到“帳戶”屏幕。 至此,我們有了一個具有管理特權的新用戶帳戶(所需的本地帳戶)。
刪除Microsoft帳戶 (Removing the Microsoft Account)
After completing the previous steps of setting up a local user account and elevating that account’s privileges, it’s time to remove the old account.
在完成了設置本地用戶帳戶并提升該帳戶的特權的上述步驟之后,是時候刪除舊帳戶了。
The old Microsoft Account will be removed and?all data associated with it will vanish. This means anything in My Documents, any bookmarks, any data individualized to that account, etc. will be removed. If you just set the computer up and you’re following this tutorial to get rid of the Microsoft Account, there isn’t much data to lose. If you’re following along after having used the Microsoft Account for an extended period of time?you must backup your data first!
舊的Microsoft帳戶將被刪除,與此相關的所有數據都將消失。 這意味著“我的文檔”中的所有內容,書簽,該帳戶的個性化數據等都將被刪除。 如果您只是設置計算機,并且正在按照本教程操作以擺脫Microsoft帳戶,則丟失的數據不會太多。 如果您在長時間使用Microsoft帳戶后仍要繼續操作,則必須先備份數據!
Once you’ve confirmed you have no data to backup (or that your data is already backed up), log out of the Microsoft Account you’re working from. Press WinKey+L to quickly access the login screen and switch to the the new local user.
確認沒有要備份的數據(或者您的數據已經備份)后,請注銷正在使用的Microsoft帳戶。 按WinKey + L快速訪問登錄屏幕并切換到新的本地用戶。
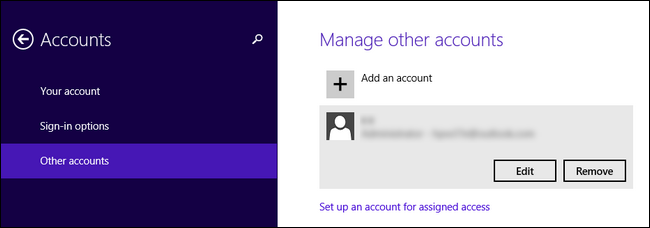
Login to the local user account and repeat the process that we started the tutorial with. Use the search charge to search for “users”, click on “Add, Delete, and manage other users accounts”. Now that you’re logged into the local user account, the Microsoft Account will appear under “Other accounts” click on that category and then double click on the entry for the Microsoft Account:
登錄到本地用戶帳戶,然后重復開始本教程的過程。 使用搜索費用搜索“用戶”,單擊“添加,刪除和管理其他用戶帳戶”。 現在,您已經登錄到本地用戶帳戶,Microsoft帳戶將出現在“其他帳戶”下,單擊該類別,然后雙擊Microsoft帳戶的條目:
Click the Remove button.
單擊刪除按鈕。
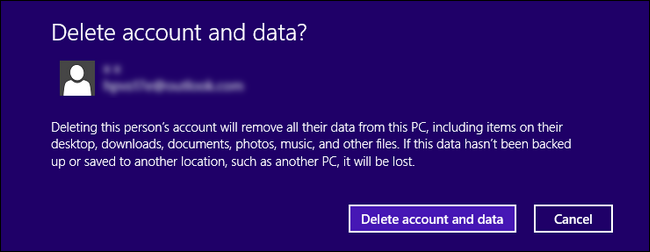
As we warned earlier in this section, all data associated with the account will be removed. ?If you’ve backed everything up (or have nothing to backup), click “Delete account and data”. If you still have data to backup, hit cancel and then repeat the steps in this section when you’re ready.
正如我們在本節前面警告的那樣,與該帳戶關聯的所有數據都將被刪除。 如果您已備份所有內容(或沒有要備份的內容),請單擊“刪除帳戶和數據”。 如果仍有數據要備份,請單擊“取消”,然后在準備好后重復本節中的步驟。
At this point, you’ve finished the process and the Microsoft Account has been removed, leaving only your local user account. The only remains of the old Microsoft Account, if any remain, may be found in the “Network Locations” section of the “This PC” explorer listing on any of your Windows 8 computers (including the one you’re currently working on). A network location is created for each user account, so if you see any vestige of the old account in this section (e.g. a network location named someaddress@live.com (office-pc) instead of the name of your local user account, like John (office-pc) or similar), feel free to right click and delete the phantom entry.
至此,您已經完成了該過程,并且已刪除了Microsoft帳戶,僅保留了本地用戶帳戶。 可以在任何Windows 8計算機(包括當前正在使用的計算機)的“此PC”瀏覽器列表的“網絡位置”部分中找到舊的Microsoft帳戶的唯一殘余(如果有)。 將為每個用戶帳戶創建一個網絡位置,因此,如果在本節中看到舊帳戶的任何痕跡(例如,名為someaddress@live.com(office-pc)的網絡位置,而不是本地用戶帳戶的名稱,例如John(office-pc)或類似的產品,請右鍵單擊并刪除幻像條目。
That’s all there is to it! By creating a brand new account and giving it the proper privileges, we were able to use it to remove the cloud-enabled account and switch the whole computer over to a local user system.
這里的所有都是它的! 通過創建一個全新的帳戶并為其賦予適當的特權,我們能夠使用它來刪除啟用了云的帳戶并將整個計算機切換到本地用戶系統。
翻譯自: https://www.howtogeek.com/181601/ask-htg-how-do-i-get-local-login-back-in-windows-8/
windows獲取本地時間

)


)


)
