
mac設置文件權限

Like all major operating systems, macOS allows you to restrict access to files using a complex set of file permissions. You can set these yourself using the Finder app, or by using the chmod command in your Mac’s terminal. Here’s how.
與所有主要操作系統一樣,macOS允許您使用一組復雜的文件權限來限制對文件的訪問。 您可以使用Finder應用程序或在Mac終端中使用chmod命令自行設置這些設置。 這是如何做。
使用Finder設置Mac文件權限 (Setting Mac File Permissions Using Finder)
If you want to set the permissions for a file on your Mac without using the terminal, you’ll need to use the Finder app.
如果要在不使用終端的情況下為Mac上的文件設置權限,則需要使用Finder應用程序。
You can launch Finder from the Dock at the bottom of your screen. The application is represented by the smiling Happy Mac logo icon.
您可以從屏幕底部的Dock啟動Finder。 該應用程序由微笑的Happy Mac徽標圖標表示。

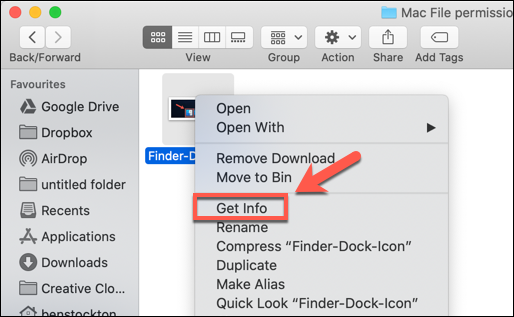
In a Finder window, you can view and set permissions by right clicking a file or folder and selecting the “Get Info” option.
在Finder窗口中,可以通過右鍵單擊文件或文件夾并選擇“獲取信息”選項來查看和設置權限。
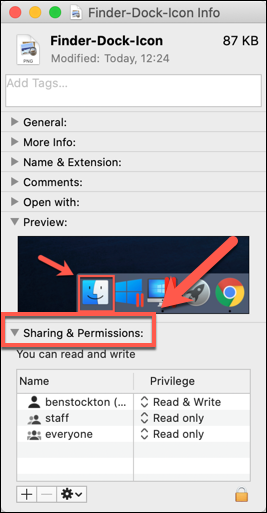
Extensive information about your file or folder can be found in the “Info” window that opens. To set file permissions, however, you’ll need to click on the arrow next to the “Sharing & Permissions” option.
在打開的“信息”窗口中可以找到有關文件或文件夾的大量信息。 但是,要設置文件許可權,您需要單擊“共享和許可權”選項旁邊的箭頭。
This will display a list of accounts or user groups on your Mac, with access levels shown under the “Privilege” category.
這將在Mac上顯示帳戶或用戶組的列表,訪問級別顯示在“權限”類別下。
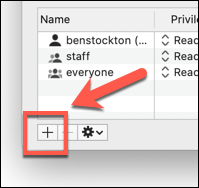
If the account or user group you want to set permissions for isn’t listed, select the Plus (+) icon at the bottom of the window.
如果您要為其設置權限的帳戶或用戶組未列出,請選擇窗口底部的加號(+)圖標。
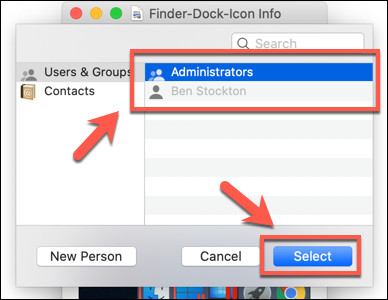
Choose the user or group in the selection window and then click the “Select” button. This will add it to the list.
在選擇窗口中選擇用戶或組,然后單擊“選擇”按鈕。 這會將其添加到列表中。
The access levels are self-explanatory—users with a “Read Only” access level are unable to edit files, but they can access them. If an account is set to the “Read & Write” level, then they can do both.
訪問級別是不言自明的-具有“只讀”訪問級別的用戶無法編輯文件,但可以訪問它們。 如果將帳戶設置為“讀和寫”級別,則它們可以同時執行。
To edit this for a user or group in the list, click on the arrow next to the existing level for that account or group and then select either “Read Only” or “Read & Write” from the list.
要為列表中的用戶或組編輯此內容,請單擊該帳戶或組的現有級別旁邊的箭頭,然后從列表中選擇“只讀”或“讀寫”。

Permissions are immediately set. Close the “Info” window once you’re done.
權限將立即設置。 完成后,關閉“信息”窗口。
使用終端設置Mac文件權限 (Setting Mac File Permissions Using the Terminal)
If you’ve ever used the chmod command on Linux, then you’ll be aware of its power. With one terminal command, you can set the read, write, and executable permissions for files and directories.
如果您曾經在Linux上使用過chmod命令,那么您將意識到它的強大功能。 使用一個終端命令,您可以設置文件和目錄的讀取,寫入和可執行權限。
The chmod command isn’t a Linux-only command, however. Like many other Linux terminal commands, chmod dates back to Unix from the 1970s—Linux and macOS both share this heritage, which is why the chmod command is available in macOS today.
但是, chmod命令不是僅Linux命令。 像許多其他Linux終端命令一樣, chmod可以追溯到1970年代的Unix — Linux和macOS都具有這種傳統,這就是為什么chmod命令在當今的macOS中可用的原因。
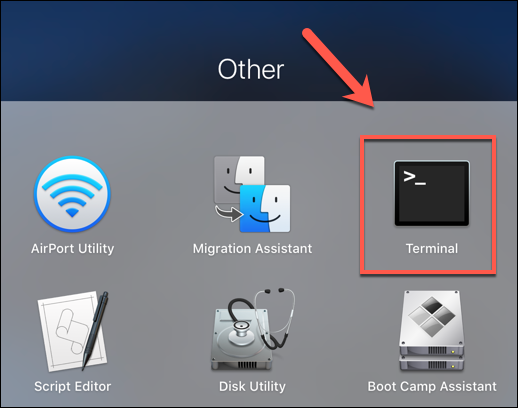
To use chmod, open a terminal window. You can do this by pressing the Launchpad icon on the Dock and clicking the “Terminal” option in the “Other” folder.
要使用chmod ,請打開一個終端窗口。 您可以通過按下Dock上的Launchpad圖標并單擊“ Other”文件夾中的“ Terminal”選項來執行此操作。
Alternatively, you can use Apple’s built-in Spotlight Search feature to open the Terminal.
或者,您可以使用Apple內置的Spotlight搜索功能打開終端。
查看當前文件權限 (Viewing Current File Permissions)
To view current permissions for a file, type:
要查看文件的當前權限,請鍵入:
ls -@l file.txt
Replace “file.txt” with your own file name. This will show all user access levels, as well as any extended attributes relevant to macOS.
用您自己的文件名替換“ file.txt”。 這將顯示所有用戶訪問級別以及與macOS相關的任何擴展屬性。
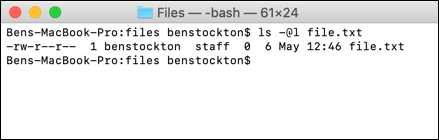
File permissions for the file are shown in the first 11 characters output by the ls command.?The first character, an en dash (-), shows that this is a file. For folders, this is replaced by a letter (d) instead.
ls命令輸出的前11個字符顯示了文件的文件許可權。 第一個字符,破折號( - )表示這是一個文件。 對于文件夾,將其替換為字母( d )。
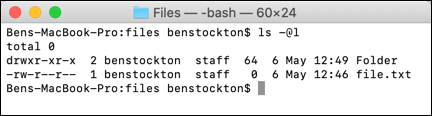
The next nine characters are split into groups of three.
接下來的9個字符分為三個組。
The first group shows the access levels for the file/folder owner (1), the middle group shows group permissions (2), and the final three shows permissions for any other users (3).
第一組顯示文件/文件夾所有者的訪問級別(1),中間組顯示組權限(2),最后三個組顯示任何其他用戶的權限(3)。

You’ll see letters here, too, such as r (read), w (write), and x (execute). These levels are always shown in that order, so for instance:
您還將在這里看到字母,例如r (讀), w (寫)和x (執行)。 這些級別始終按該順序顯示,例如:
---would mean no read or write access, and the file isn’t executable.---表示沒有讀寫訪問權限,并且該文件不可執行。r--would mean the file can be read, but not written to, and the file isn’t executable.r--表示該文件可以讀取,但不能寫入,并且該文件不可執行。rw-would mean the file can be read and written to, but the file isn’t executable.rw-表示可以讀取和寫入文件,但該文件不可執行。r-xmeans the file can be read and executed, but not written to.rx表示該文件可以讀取和執行,但不能寫入。rwxmeans the file can be read, written, and executed.rwx表示可以讀取,寫入和執行文件。
If the final character is an at sign (@), then it signifies that the file or folder has extended file attributes relating to security, giving certain apps (like Finder) persistent file access.
如果最后一個字符是at符號( @ ),則表示文件或文件夾具有與安全性有關的擴展文件屬性,從而使某些應用程序(如Finder)具有持久的文件訪問權限。
This is related in part to?new security features introduced in macOS Catalina, although file access control lists (ACLs) have been a Mac feature since macOS X 10.4 Tiger back in 2005.
這部分與macOS Catalina中引入的新安全功能有關,盡管自2005年macOS X 10.4 Tiger起,文件訪問控制列表(ACL)一直是Mac的功能。
設置文件權限 (Setting File Permissions)
To set file permissions, you’ll use the chmodcommand at the terminal. To remove all existing permissions, set read and write access for the user while allowing read access for all other users, type:
要設置文件許可權,您將在終端上使用chmod命令。 要刪除所有現有權限,請設置用戶的讀寫訪問權限,同時允許所有其他用戶的讀寫訪問權限,鍵入:
chmod u=rw,g=r,o=r file.txt
The u flag sets the permissions for the file owner, g refers to the user group, while o refers to all other users. The use of an equal sign (=) wipes all previous permissions for that category.
u標志設置文件所有者的權限, g表示用戶組,而o表示所有其他用戶。 使用等號( = )會擦除該類別的所有先前權限。
In this instance, the file owner is gaining read and write access, while the user group and other users are gaining read access.
在這種情況下,文件所有者正在獲得讀寫訪問權限,而用戶組和其他用戶正在獲得讀取訪問權限。

You can use a plus sign (+) to add access to a user level. For instance:
您可以使用加號( + )將訪問權限添加到用戶級別。 例如:
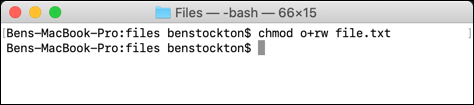
chmod o+rw file.txt
This would grant all other users both read and write access to the file.
這將授予所有其他用戶對該文件的讀寫權限。
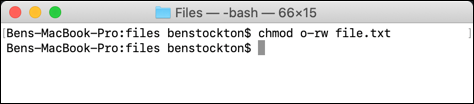
You can use the minus (-) to remove this instead, for example:
您可以使用減號( - )刪除它,例如:
chmod o-rw file.txt
This would remove read and write access for all other users from the file.
這將從文件中刪除所有其他用戶的讀寫訪問權限。
To wipe, add, or remove user permissions for all users, use the a flag instead. For instance:
要擦除,添加或刪除所有用戶的用戶權限,請改用a標志。 例如:
chmod a+rwx file.txt
This would grant all users and user groups with read and write access to your file, as well as allow all users to execute the file.
這將授予所有用戶和用戶組對文件的讀寫權限,并允許所有用戶執行文件。
With great power comes great responsibility, and there’s no denying that the chmod command is an extensive and powerful tool to change file permissions on Mac. You can, for instance, replace the letters ( rwx ) with a combination of three (or four) octal digits, up to 777 (for read, write, and execute).
強大的功能伴隨著巨大的責任,而且不能否認chmod命令是在Mac上更改文件權限的強大工具。 例如,您可以將字母( rwx )替換為三個(或四個)八進制數字的組合,最大為777(用于讀取,寫入和執行)。
If you want to learn more about it, type man chmod at the terminal to read the full list of available flags and settings.
如果要了解更多信息,請在終端上鍵入man chmod以閱讀可用標志和設置的完整列表。
翻譯自: https://www.howtogeek.com/669095/how-to-set-file-permissions-on-mac/
mac設置文件權限


 高效繪圖)


--文件上傳CommonsMultipartFile)

行為)


