
新垣結衣自拍照
The Photos app on your iPhone automatically populates all photos from the front-facing camera in the Selfies album. But what if you don’t want a photo to appear there? Here are a couple of solutions.
iPhone上的“照片”應用程序會自動填充Selfies相冊中前置攝像頭中的所有照片。 但是,如果您不希望照片在那里出現怎么辦? 這里有一些解決方案。
隱藏所有相冊中的自拍照 (Hide the Selfie from All Albums)
The easiest way to hide a photo from the Selfies album is to move it to the Hidden album. The downside is the picture will be hidden from all albums, including the Recents album.
從“自拍”相冊中隱藏照片的最簡單方法是將其移至“隱藏”相冊。 不利的一面是該圖片將對所有相冊(包括“最近”相冊)都隱藏。
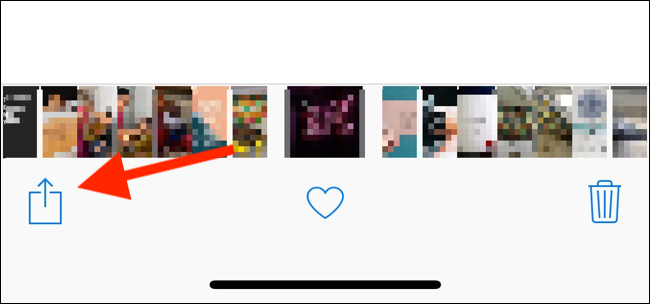
To hide a photo, open the image in the Photos app and then tap on the “Share” button that looks like a box with an arrow coming out of it.
要隱藏照片,請在“照片”應用中打開圖像,然后點擊“共享”按鈕,該按鈕看起來像一個帶有箭頭的框。
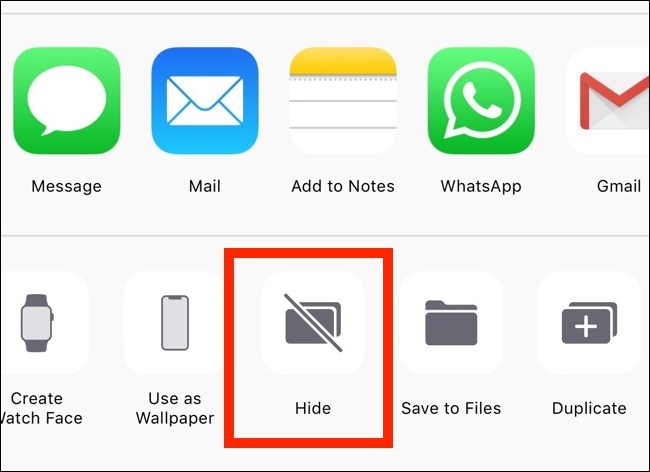
Next, select “Hide” photo. The image will instantly disappear from the Selfies album.
接下來,選擇“隱藏”照片。 該圖像將立即從Selfies相冊中消失。
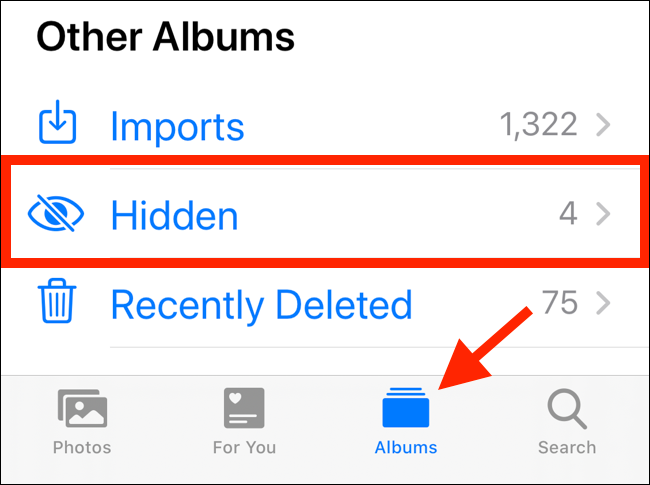
To find the photo, go to the “Albums” tab, scroll down to the “Other Albums” section, and tap on “Hidden.”
要查找照片,請轉到“相冊”選項卡,向下滾動到“其他相冊”部分,然后點擊“隱藏”。
使用快捷方式刪除EXIF數據 (Remove EXIF Data Using Shortcuts)
Apple uses EXIF data?(metadata that’s attached to every photo) to sort pictures into the Selfies album. If the EXIF data says the photo was taken using the iPhone’s front-facing camera, it will automatically end up in the Selfies album. How do you stop this? Simple: Remove the EXIF data.
Apple使用EXIF數據(每張照片附帶的元數據)將照片分類到Selfies相冊中。 如果EXIF數據顯示該照片是使用iPhone的前置攝像頭拍攝的,則它將自動出現在Selfies相冊中。 您如何停止呢? 簡單:刪除EXIF數據。
The Shortcuts app is one of the simplest ways to reliably remove EXIF data from your selfies. The Shortcuts app is built into iOS 13 and iPadOS 13 and above. If you’re using iOS 12, you can download the Shortcuts app from the App Store.
快捷方式應用程序是從自拍照中可靠刪除EXIF數據的最簡單方法之一。 快捷方式應用程序內置于iOS 13和iPadOS 13及更高版本中。 如果您使用的是iOS 12,則可以從App Store下載“快捷方式”應用程序。
You can think of a shortcut as a collection of actions that are executed one after the other, automatically. So you can, for example, create a shortcut that will take a PNG image as a source, resize it to a particular resolution, convert it to JPEG, and save the photo back to your camera roll. All of this would happen with just a tap.
您可以將快捷方式視為一系列自動執行的操作的集合。 因此,例如,您可以創建一個快捷方式,該快捷方式將PNG圖像作為源,將其調整為特定的分辨率,將其轉換為JPEG,然后將照片保存回相機膠卷中。 只需輕按一下,所有這些都會發生。
But you don’t need to write your own automation to use the app. You can import an existing shortcut, add it to your library, and start using the automated shortcut.
但您無需編寫自己的自動化程序即可使用該應用程序。 您可以導入現有的快捷方式,將其添加到庫中,然后開始使用自動快捷方式。
Metadata Remover is one such shortcut. It is made up of actions that strip the metadata from the image you choose. It will even create a duplicate image and delete the original file for you. This means the original image will disappear from the Selfies album.
元數據刪除程序就是這樣一種快捷方式。 它由可從您選擇的圖像中剝離元數據的操作組成。 它甚至會創建一個重復的圖像并為您刪除原始文件。 這意味著原始圖像將從Selfies相冊中消失。
Before we go further, a note for running?iOS 13, iPadOS 13, or newer. Apple has integrated the Shortcuts app directly into the OS. While this is beneficial in many ways, it changes how third-party shortcuts are viewed.
在繼續之前,請先介紹運行iOS 13 ,iPadOS 13或更高版本的注意事項。 Apple已將Shortcuts應用程序直接集成到操作系統中。 盡管這在許多方面都是有益的,但它改變了查看第三方快捷方式的方式。
When you try to install a shortcut downloaded from the internet, the Shortcuts app will tell you the shortcut can’t run because Shortcut’s security settings don’t allow unsecured shortcuts.
當您嘗試安裝從Internet下載的快捷方式時,“快捷方式”應用將告訴您該快捷方式無法運行,因為“快捷方式”的安全設置不允許不安全的快捷方式。
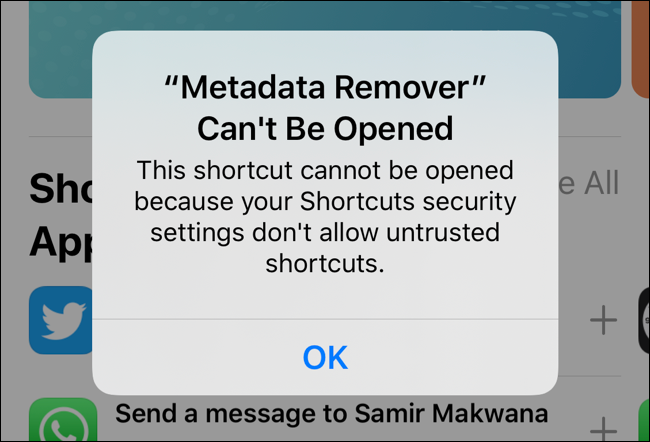
Apple considers every shortcut you downloaded from the internet as inherently untrustworthy because it can put your personal data at risk. If you’re okay with the risk involved, you can allow for untrusted shortcuts.
Apple認為從互聯網上下載的每個快捷方式本質上都是不可信的,因為它可能會使您的個人數據面臨風險。 如果您對所涉及的風險表示滿意,則可以允許使用不受信任的快捷方式。
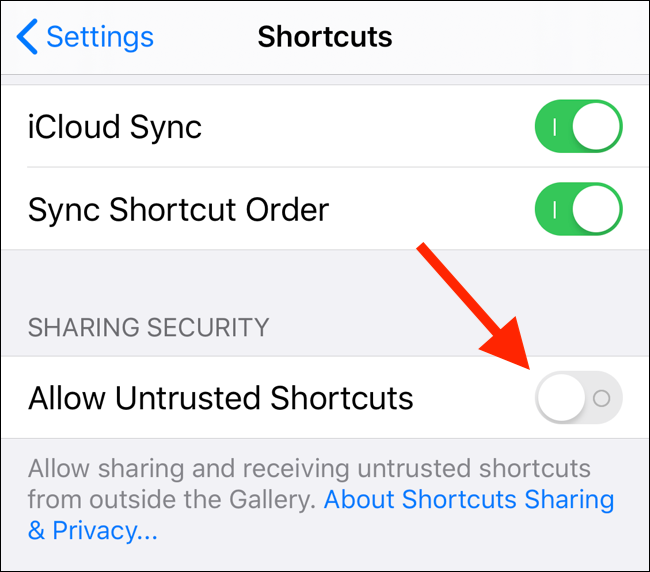
To do this, open the “Settings” app, go to the “Shortcuts” section, and tap on the toggle next to “Allow Untrusted Shortcuts.”
為此,請打開“設置”應用,轉到“快捷方式”部分,然后點擊“允許不受信任的快捷方式”旁邊的開關。
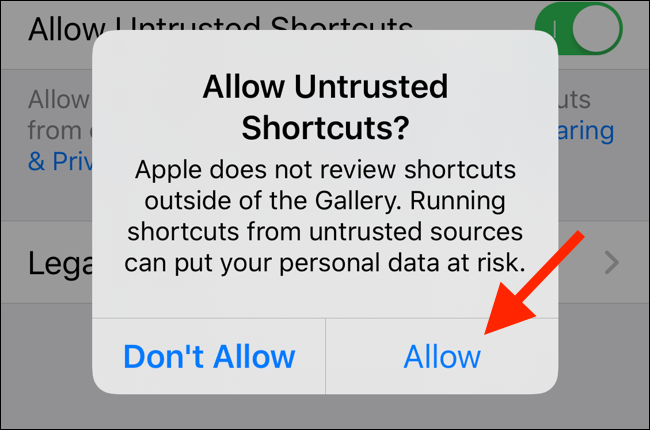
From the popup, tap on “Allow” and enter your device password to confirm.
在彈出窗口中,點擊“允許”,然后輸入設備密碼進行確認。
Now, open the Metadata Remover shortcut on your iPhone or iPad and tap on “Get Shortcut.”
現在,在iPhone或iPad上打開Metadata Remover快捷方式,然后點擊“獲取快捷方式”。
This will open the Shortcuts app. On this screen, swipe down to the bottom of the screen, and tap on “Add Untrusted Shortcut” (if you’re running a newer version of iOS or iPadOS).
這將打開“快捷方式”應用程序。 在此屏幕上,向下滑動到屏幕底部,然后點擊“添加不受信任的快捷方式”(如果您正在運行更新版本的iOS或iPadOS)。
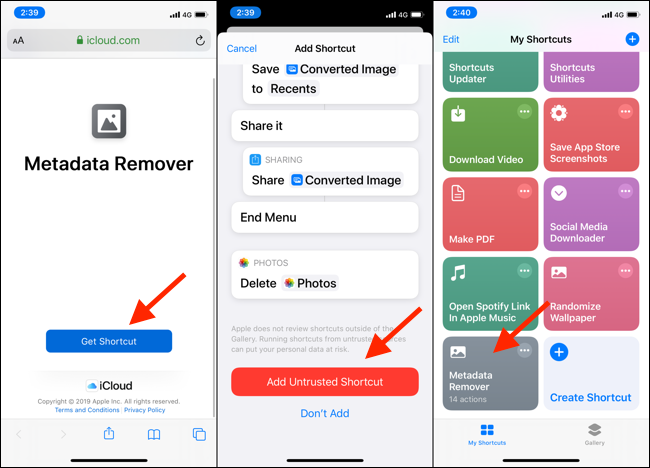
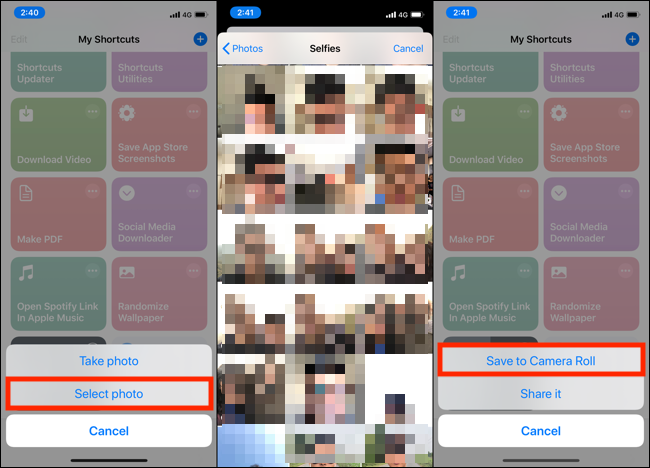
Now go to the “My Shortcuts” page, tap on the “Metadata Remover” shortcut, and choose “Select Photo.”
現在轉到“我的快捷方式”頁面,點擊“元數據卸妝”快捷方式,然后選擇“選擇照片”。
Next, select a photo from the “Selfies” album. Then, tap on “Save to Camera Roll.” From the following popup, delete the older photo.
接下來,從“ Selfies”相冊中選擇一張照片。 然后,點擊“保存到相機膠卷”。 在以下彈出窗口中,刪除舊照片。
The next time you open the Photos app, you’ll see the new photo at the bottom of the Recents album and no longer in the Selfies album.
下次打開“照片”應用時,您會在“最近的相冊”的底部看到新照片,而不再在“自拍”相冊中看到。
使用SafeShare應用刪除EXIF數據 (Remove EXIF Data Using SafeShare App)
SafeShare app?(Free)?is designed to help you share photos online without metadata. It also allows you to save the metadata-less photo back to your camera roll.
SafeShare應用程序(免費)旨在幫助您在沒有元數據的情況下在線共享照片。 它還允許您將無元數據的照片保存回相機膠卷。
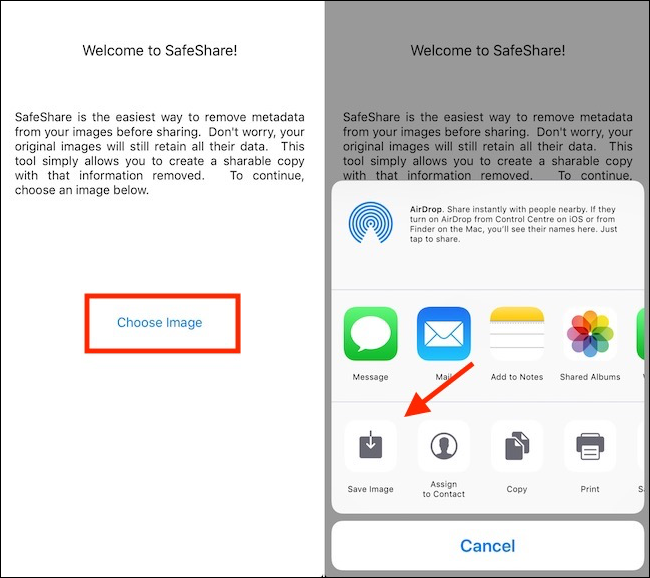
Open the SafeShare app on your iPhone or iPad and tap on “Choose Image.” Select the image from your library and then tap on “Save Image” when the share menu pops up.
在iPhone或iPad上打開SafeShare應用,然后點擊“選擇圖片”。 從庫中選擇圖像,然后在共享菜單彈出時點擊“保存圖像”。
The new image will be stored in your Camera Roll in the Recents album. It will not come up in the Selfies album. SafeShare doesn’t do anything to the original photo, so you’ll have to go in and delete it manually.
新圖像將存儲在“最近”相冊的“相機膠卷”中。 它不會出現在Selfies相冊中。 SafeShare對原始照片不做任何事情,因此您必須手動刪除它。
The App Store has a couple of alternatives for removing metadata from photos, such as the?Viewexif?app if you have issues using SafeShare.
在App Store中,有兩種方法可以從照片中刪除元數據,例如Viewexif應用程序(如果您使用SafeShare時遇到問題)。
使用Mac從Selfies相冊中刪除照片 (Remove Photos from Selfies Album Using Mac)
This process is more straightforward and less destructive for Mac owners. If you use the Mac Photos app and you sync all your photos using iCloud Photos, a Mac app called Photos Exif Editor ($0.99) allows you to selectively remove the EXIF data for the front-facing iPhone camera field. (This data is what Apple uses to sort photos into the Selfies album automatically.)
對于Mac所有者而言,此過程更直接且破壞性較小。 如果您使用Mac Photos應用程序并使用iCloud Photos同步所有照片,則一個名為Photos Exif Editor ($ 0.99)的Mac應用程序允許您有選擇地刪除iPhone前置攝像頭字段的EXIF數據。 (此數據是Apple用于將照片自動分類到Selfies相冊中的數據。)
Open the Photos app on your Mac, select the selfie, and export the photo using the “Command+E” keyboard shortcut. Open the Photos Exif Editor app and drag the photo in from Finder. You can drag multiple images if you want.
在Mac上打開“照片”應用程序,選擇自拍照,然后使用“ Command + E”鍵盤快捷鍵導出照片。 打開“照片Exif編輯器”應用,然后將照片從Finder中拖入。 您可以根據需要拖動多張圖像。
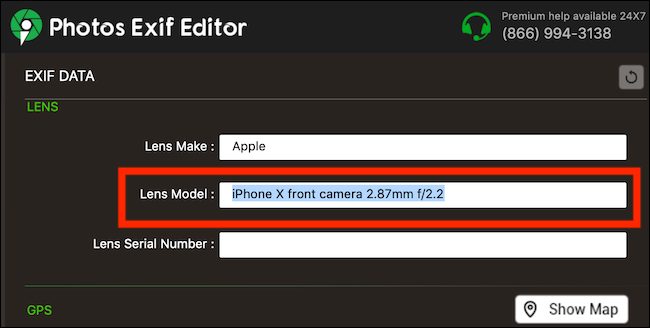
In the EXIF data editor window, find the field that says “Lens Model” and delete the text.
在EXIF數據編輯器窗口中,找到顯示“鏡頭模型”的字段并刪除文本。
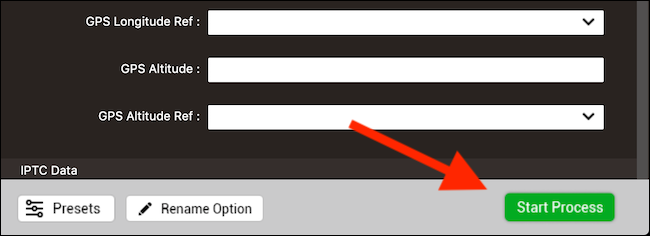
Click on the “Start Process” button to change the EXIF data.
單擊“開始過程”按鈕以更改EXIF數據。
From the next window, choose where you want to save the photo.
在下一個窗口中,選擇要保存照片的位置。
Then, open the Finder app, find the photo you just saved, and drag it into the Photos app to import it to your iCloud Photos library. The photo will now show up across all your devices, but not in the Selfies album.
然后,打開Finder應用程序,找到剛剛保存的照片,然后將其拖到“照片”應用程序中以將其導入到iCloud照片庫中。 現在,照片將顯示在您所有設備上,但不會顯示在Selfies相冊中。
翻譯自: https://www.howtogeek.com/438723/how-to-stop-selfies-from-appearing-in-the-iphones-selfies-album/
新垣結衣自拍照


-依賴)


![[SDOI2015]約數個數和](http://pic.xiahunao.cn/[SDOI2015]約數個數和)

)


