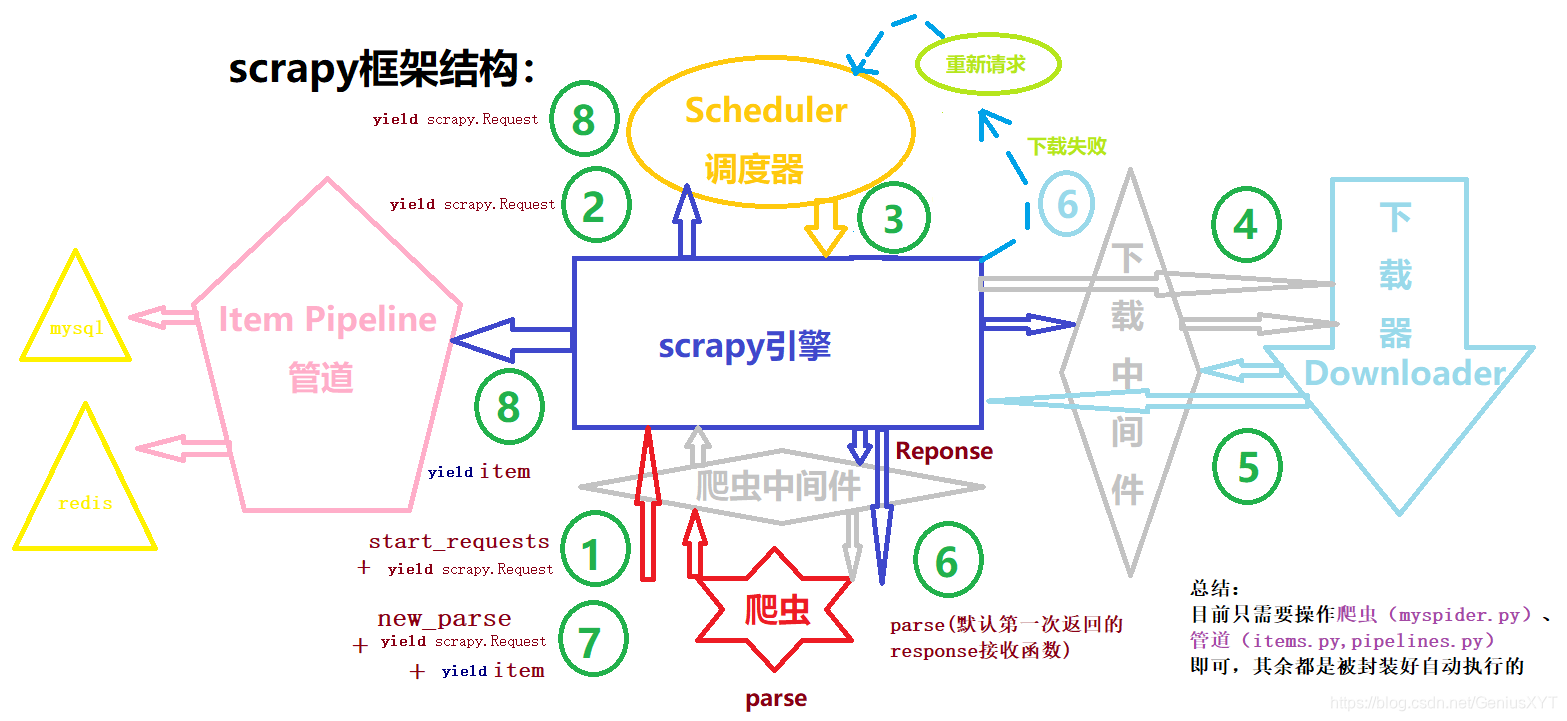
爬蟲可以發送給引擎的兩種請求:
# 1、url:# (爬蟲)yield scrapy.Request -> 引擎 -> 調度器(發送給調度器入隊) -> 引擎(調度器出隊請求于引擎)# -> 下載器(引擎發送于下載器) -> 引擎(下載器成功(失敗)返回引擎):-> 爬蟲(引擎接收成功將給爬蟲response)or -> 調度器(失敗給調度器重新下載)# -> 引擎(爬蟲接收response并做處理,發送跟進url:yield scrapy.Request) -> 調度器(引擎發送給調度器入隊) ->...# 2、weiboitem:# 一般在接收response后便有了數據,然后# (爬蟲) yield weiboitem -> 引擎 -> pipelines(管道)進行存儲,管道中自己寫存儲代碼 -> mysql or redis
一、準備工作
- python、pip、scrapy(pip install Scrapy)
- 測試:scrapy fetch http://www.baidu.com
二、構建crapy框架
- 創建爬蟲項目(cmd或terminal):scrapy startproject mySpiderName
- cd:cd mySpider
- 創建爬蟲:scrapy genspider myspidername www.dytt8.net
( www.dytt8.net 是要爬取網址的根域名,只有在此根域名才能爬取到內容) - 修改settings協議: ROBOTSTXT_OBEY = False
- 切記在settings中ITEM_PIPELINES列表添加語句(打開注釋),否則管道不會被執行:
‘mySpiderName.pipelines.WeiboSpiderPipeline’: 300,
三、填寫代碼三部曲
- 在自動生成的spiders文件夾下的myspider.py文件中編輯:
import scrapy
from hotnewsSpider.items import WeiboSpiderItem     # hotnewsSpider為項目名,WeiboSpiderItem為爬蟲item類,在items.py中可找到# 創建第二個爬蟲時需要手動在items中添加此類from bs4 import BeautifulSoupclass WeiboSpider(scrapy.Spider):# 以微博為例:name = 'weibo'                          # 爬蟲名 -- 自動生成,唯一,不可變allowed_domains = ['s.weibo.com']       # 允許訪問的根域名start_urls = ['http://s.weibo.com/']    # 起始訪問地址searchName = "張鈞甯 感謝抬愛"headers = {}cookies = {}urls = [# 模擬搜索 searchName"https://s.weibo.com/weibo?q=%s&Refer=SWeibo_box"%searchName]# urls.extend(start_urls)# 重寫起始請求,可以給請求加上許多信息def start_requests(self):# 發送初始請求for url in self.urls:yield scrapy.Request(url=url, headers=self.headers, cookies=self.cookies, callback=self.parse)# 默認第一次返回response接收函數,第二次response可以繼續返回這里,也可以返回你定義的人一個函數中,# 這在yield scrapy.Request(url,callback=self.your_parse)中決定def parse(self, response):# 用爬蟲對應的item類聲明一個對象,類型為字典,用來保存數據,通過 yield weiboitem 返回給引擎weiboitem = WeiboSpiderItem()                       # from hotnewsSpider.items import WeiboSpiderItem# BeautifulSoup代碼塊:html = response.textsoup = BeautifulSoup(html, 'lxml')content_id_div = soup.find(id='pl_feedlist_index')card_wraps = content_id_div.find_all(class_='card-wrap')id = 0for card_wrap_item in card_wraps:# 用戶名username = card_wrap_item.find(class_='info').find(class_='name').text# 用戶頭像user_headimg = card_wrap_item.find(class_='avator').find('img')['src']# 內容# 文字 偶爾會搜索出某個人content_text_html = card_wrap_item.find(class_='txt')content_text = ''if content_text_html:content_text = content_text_html.get_text().replace(' ', '').replace('\n', '').replace('展開全文c', '')# 圖片 有的無圖img_items_html = card_wrap_item.find(class_='m3')content_imgs = []if img_items_html:for img_item in img_items_html.find_all('img'):content_imgs.append(img_item['src'])# (收藏)、轉發、評論、點贊數量other_items_html = card_wrap_item.find(class_='card-act')other_items_dic = {}if other_items_html:other_items_lst = other_items_html.find_all('a')for other_item_index in range(len(other_items_lst)):if other_item_index == 0:other_items_dic['收藏'] = ""elif other_item_index == 1:other_items_dic['轉發'] = other_items_lst[other_item_index].text.strip().split()[1]elif other_item_index == 2:other_items_dic['評論'] = other_items_lst[other_item_index].text.strip().split()[1]else:other_items_dic['點贊'] = other_items_lst[other_item_index].text.strip()# print(other_items_dic)id += 1weiboitem['id'] = idweiboitem['username'] = usernameweiboitem['user_headimg'] = user_headimgweiboitem['content_text'] = content_textweiboitem['content_imgs'] = content_imgsweiboitem['other_items_dic'] = other_items_dicyield weiboitem		# 返回數據給引擎,引擎將其傳入管道執行管道中的代碼# yield scrapy.Request(url,callback=self.parse)	# 返回跟進url給引擎# yield scrapy.Request(url,callback=self.parse2)	# 返回跟進url給引擎break       # 用于測試,只拿一次數據def parse2(self,response):pass
- 在items.py中初始化item字典(第二次以上新建的爬蟲需要自己新增對應類)
import scrapy# 第一個爬蟲對應的item類,在創建項目時自動產生
class HotnewsspiderItem(scrapy.Item):# define the fields for your item here like:# name = scrapy.Field()pass# 自己新增的爬蟲類
class WeiboSpiderItem(scrapy.Item):# define the fields for your item here like:# name = scrapy.Field()id = scrapy.Field()username = scrapy.Field()user_headimg = scrapy.Field()content_text = scrapy.Field()content_imgs = scrapy.Field()other_items_dic = scrapy.Field()pass
- 在pipelines.py中保存數據
# 第一個爬蟲對應的Pipeline類,在創建項目時自動產生
class HotnewsspiderPipeline(object):def process_item(self, item, spider):pass# return item# 自己新增的爬蟲類
# 切記在settings中ITEM_PIPELINES列表添加語句,否則不會被執行:
# 'hotnewsSpider.pipelines.WeiboSpiderPipeline': 300,
class WeiboSpiderPipeline(object):def process_item(self, item, spider):# 在這里將數據存入mysql,redisprint(item)
運行:
- scrapy crawl mysipdername(別忘了cd目錄)
- 添加以下任意一個py運行文件命名run或main,要與scrapy.cfg文件同級目錄
更改自己的爬蟲名即可右鍵運行
一、
from scrapy.cmdline import execute
import sys
import os'''
運行scrapy爬蟲的方式是在命令行輸入    scrapy crawl <spider_name>
調試的常用方式是在命令行輸入          scrapy shell <url_name>
'''sys.path.append(os.path.dirname(os.path.abspath(__file__)))execute(['scrapy', 'crawl', 'weibo'])  # 你需要將此處的spider_name替換為你自己的爬蟲名稱
二、
from scrapy.crawler import CrawlerProcess
from scrapy.utils.project import get_project_settings'''
運行scrapy爬蟲的方式是在命令行輸入    scrapy crawl <spider_name>
調試的常用方式是在命令行輸入          scrapy shell <url_name>
'''if __name__ == '__main__':process = CrawlerProcess(get_project_settings())process.crawl('weibo')    #  你需要將此處的spider_name替換為你自己的爬蟲名稱process.start()


store和localstorage中)


之開始centos學習,網絡配置)


![[sol]250OJ 1~10](http://pic.xiahunao.cn/[sol]250OJ 1~10)


